 ##
##
分析HTML代码结构:


<p class="outer">
    <p class="p1">1</p>
    <p class="p2">2</p>
    <p class="p3">3</p>
</p>.outer{border: 1px solid #ccc;background: #fc9;color: #fff; margin: 50px auto;padding: 50px;}
.p1{width: 80px;height: 80px;background: red;float: left;}
.p2{width: 80px;height: 80px;background: blue;float: left;}
.p3{width: 80px;height: 80px;background: sienna;float: left;}Method one: Add new elements and apply clear: both;
HTML:<p class="outer">
<p class="p1">1</p>
<p class="p2">2</p>
<p class="p3">3</p>
<p class="clear"></p>
</p>.clear{clear:both; height: 0; line-height: 0; font-size: 0}
Method 2: The parent p defines overflow: auto (note: it is the parent p, which is p.outer here)
HTML:<p class="outer over-flow"> //这里添加了一个class <p class="p1">1</p>
<p class="p2">2</p>
<p class="p3">3</p>
<!--<p class="clear"></p>--></p>.over-flow{ overflow: auto; zoom: 1; //zoom: 1; 是在处理兼容性问题}Principle: Use the overflow attribute to clear floats. One thing to note is that the overflow attribute has three attribute values: hidden, auto, and visible. We can use hidden and auto values to clear floats, but remember not to use visible values. If you use this value, you will not be able to achieve the effect of clearing floats. The other two values can be used. The difference is that one is more friendly to SEO and the other hidden is It's not very SEO-friendly, and I can't tell the other differences, and it won't be a waste of time.
Method three: It is said to be the highest method: after method: (Note: Acts on the father of floating elements)
Let’s talk about the principle first: This method of clearing floats is the most popular method of clearing floats on the Internet. It uses :after and :before to insert two element blocks inside the element to achieve the effect of clearing floats. The implementation principle is similar to the clear:both method, except that: clear inserts a p.clear tag in html, while outer uses its pseudo-class clear:after to add an effect similar to p.clear inside the element. Let’s take a look at its specific usage:.outer {zoom:1;} /*==for IE6/7 Maxthon2==*/ .outer :after {clear:both;content:'.';display:block;width: 0;height: 0;visibility:hidden;}/*==for FF/chrome/opera/IE8==*/Copy after login
where clear:both; refers to clearing all floats; content: '.';Finally: But it’s not unimportant, and it’s not unknown!display:block; for FF/chrome /opera/IE8 cannot be missing, and content() can have a value or be empty. The function of visibility:hidden; is to allow the browser to render it but not display it, so that clear floating can be achieved.
 下一标签直接清浮动兄弟标签浮动时,在下一标签的属性中直接写入清除clear:both;
 这样就可以清除以上标签的浮动而不用加入空标签来清除浮动。
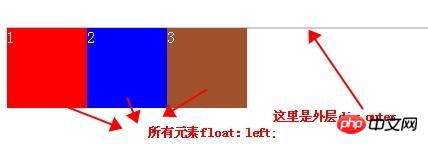
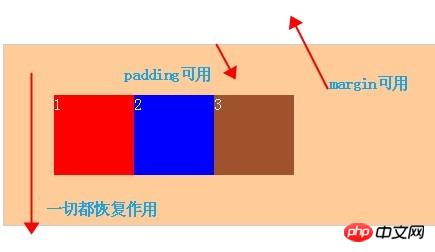
结语:清除浮动的方式虽然是有很多种,但是不是每种都适合你,也不是每种都能很好的兼容所有浏览器,所以参照你觉得最好的方式去做,个人觉得方法三不错,不需多于的标签,而且也能很好的兼容。再次again:当一个内层元素是浮动的时候,如果没有关闭浮动时,其父元素也就不会再包含这个浮动的内层元素,因为此时浮动元素已经脱离了文档流。也就是为什么外层不能被撑开了!
The above is the detailed content of Several methods to clear float in CSS. For more information, please follow other related articles on the PHP Chinese website!


