What is CSS? Introduction to css cascading style (code)
What is css? CSS is CSS Cascading Style Sheet. Because CSS is the acronym for Cascading Style Sheets, which means cascading style sheets. The emergence of CSS has enriched the styles of web page elements and separated the format of web pages from the content of web pages. Next, let us take a look at the specific content in css.
css basic syntax and page reference
css basic syntax
The definition method of css is:
Selector {Attribute: value; Attribute: value; Attribute: value;}
The selector is the name that associates the style with the page element, and the attribute is the style attribute you want to set. Each attribute has one or more values. Code example:
p{ width:100px; height:100px; color:red }css page introduction method:
1. External link: link to the external style sheet into the page through the link tag.
<link rel="stylesheet" type="text/css" href="css/main.css">
2. Embedded: Create an embedded style sheet on the web page through the style tag.
<style type="text/css">
    p{ width:100px; height:100px; color:red }
......</style>3. Inline: Write the style directly on the label through the style attribute of the label.
<p style="width:100px; height:100px; color:red ">......</p>
css text settings
Commonly used css styles for applied text:
color Set the color of the text, such as: color:red;
font-size Set the size of the text, such as: font-size:12px;
font-family Set the font of the text, such as: font- family:'Microsoft Yahei';
font-style Set whether the font is tilted, such as: font-style:'normal'; Set not to tilt, font-style:'italic'; Set the text tilt
font-weight Set whether the text is bold, such as: font-weight:bold; Set bold font-weight:normal Set not bold
font Set several attributes of the text at the same time. There are compatibility issues with the writing order. It is recommended to write in the following order: font: Whether to bold the font size/line height font; such as: font:normal 12px/36px 'Microsoft Ya Black';
line-height sets the line height of the text, such as: line-height:24px;
text-decoration sets the line height of the text Underline, such as: text-decoration:none; Remove the underline of the text
text-indent Set the indentation of the first line of text, such as: text-indent:24px; Set the indentation of the first line of text 24px
text-align sets the horizontal alignment of the text, such as text-align:center sets the text to be horizontally centered
css color representation
There are three main ways to express color values in css:
1. Color name representation, such as: red, gold
2. RGB representation, such as: rgb(255,0 ,0) means red
3. Hexadecimal numerical representation, for example: #ff0000 means red, this can be abbreviated as #f00
css selector
Commonly used There are several types of selectors:
1. Tag selector
Tag selector, this type of selector has a large impact, and it is recommended to be used in hierarchical selectors as much as possible.
Example:
*{margin:0;padding:0}
div{color:red}
<div>....</div>   <!-- 对应以上两条样式 -->
<div class="box">....</div> <!-- 对应以上两条样式 -->2. ID selector
Select elements by id name. The id name of an element cannot be repeated, so a style setting item can only correspond to one element on the page. , cannot be reused. The id name is generally used by programs, so it is not recommended to use id as a selector.
Example:
#box{color:red}
<p id="box">....</p> <!-- 对应以上一条样式,其它元素不允许应用此样式 -->3. Class selector
Select elements by class name. One class can be applied to multiple elements. Multiple classes can also be used on one element. Apply Flexible and reusable, it is the most commonly used selector in CSS.
Example:
.red{color:red}
.big{font-size:20px}
.mt10{margin-top:10px}

<div class="red">....</div>
<h1 class="red big mt10">....</h1>
<p class="red mt10">....</p>4. Hierarchical selector
is mainly used to select child elements under the parent element, or child elements under the child element. It can be used in combination with label elements to reduce Naming can also be done through hierarchy to prevent naming conflicts.
Example:
.box span{color:red}
.box .red{color:pink}
.red{color:red}

<div class="box">
    <span>....</span>
    <a href="#" class="red">....</a>
</div>

<h3 class="red">....</h3>5. Group selector
If you have multiple selectors with the same style setting, you can use a group selector.
Example:
.box1,.box2,.box3{width:100px;height:100px}
.box1{background:red}
.box2{background:pink}
.box2{background:gold}

<div class="box1">....</div>
<div class="box2">....</div>
<div class="box3">....</div>6. Pseudo-class and pseudo-element selectors
Commonly used pseudo-class selectors include hover, which indicates the state when the mouse is hovering over the element, and pseudo-element selector There are before and after, which can insert content into elements through styles.
.box1:hover{color:red}
.box2:before{content:'行首文字';}
.box3:after{content:'行尾文字';}
<div class="box1">....</div>
<div class="box2">....</div>
<div class="box3">....</div>CSS box model
Box model explanation
The element is displayed as a square on the page, similar to a box. The CSS box model uses real boxes as a metaphor to help us set The style corresponding to the element. The schematic diagram of the box model is as follows:
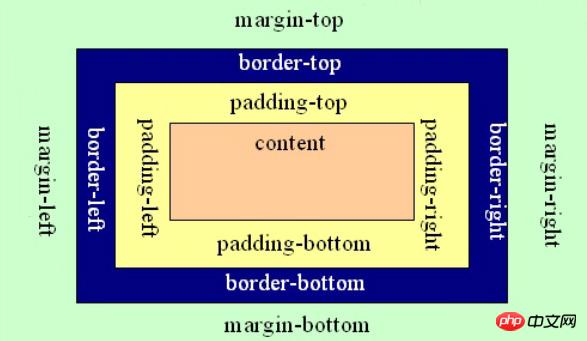
Call the element a box, and set the corresponding styles as follows: the border of the box, the content in the box, and the spacing between the borders ( padding), the spacing between boxes (margin).
Set the border
Set the border on one side, such as the top border, as follows:
border-top-color:red;    /* 设置顶部边框颜色为红色 */
border-top-width:10px;   /* 设置顶部边框粗细为10px */
border-top-style:solid;  /* 设置顶部边框的线性为实线,常用的有:solid(实线)
  dashed(虚线)  dotted(点线); */
The above three sentences can be abbreviated into one sentence:
border-top:10px solid red;
Set the other three The method for each edge is the same as above. Replace 'top' with 'left' to set the left side, replace it with 'right' to set the right side, and replace it with 'bottom' to set the bottom edge.
If the settings of the four sides are the same, you can combine the settings of the four sides into one sentence:
border:10px solid red;
Set the inner spacing padding
Set the inner spacing of the four sides of the box, which can be set As follows:
padding-top:20px;     /* 设置顶部内间距20px */
padding-left:30px;     /* 设置左边内间距30px */
padding-right:40px;    /* 设置右边内间距40px */
padding-bottom:50px;   /* 设置底部内间距50px */
The above settings can be abbreviated as follows:
padding:20px 40px 50px 30px; /* 四个值按照顺时针方向,分别设置的是 上 右 下 左 四个方向的内边距值。 */
padding can also be followed by 3 values, 2 values and 1 value. The items they set respectively are as follows:
padding:20px 40px 50px; /* 设置顶部内边距为20px,左右内边距为40px,底部内边距为50px */
padding:20px 40px; /* 设置上下内边距为20px,左右内边距为40px*/
padding:20px; /* 设置四边内边距为20px */
Set outer spacing margin
外边距的设置方法和padding的设置方法相同,将上面设置项中的'padding'换成'margin'就是外边距设置方法。
盒子模型的尺寸
按照下面代码制作页面:
<!DOCTYPE html>
<html lang="en">
<head>
    <meta charset="UTF-8">
    <title>盒子的真实尺寸</title>
    <style type="text/css">
        .box01{width:50px;height:50px;background-color:gold;}
        .box02{width:50px;height:50px;background-color:gold;border:50px
         solid #000}
        .box03{width:50px;height:50px;background-color:gold;border:50px
         solid #000;padding: 50px;}
    </style>
</head>
<body>
    <p class="box01">1</p>
    <br />
    <p class="box02">2</p>
    <br />
    <p class="box03">3</p>
</body>
</html>页面显示效果如下:
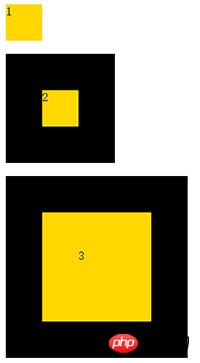
通过上面的页面得出结论:盒子的width和height设置的是盒子内容的宽和高,不是盒子本身的宽和高,盒子的真实尺寸计算公式如下:
盒子宽度 = width + padding左右 + border左右
盒子高度 = height + padding上下 + border上下
思考题:
1.在布局中,如果我想增大内容和边框的距离,又不想改变盒子显示的尺寸,应该怎么做?
课堂练习
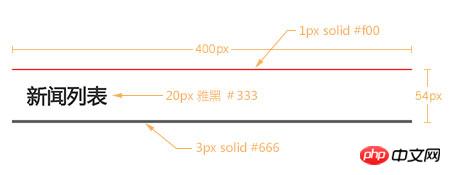
请制作图中所示的标题:
margin相关技巧
1、设置元素水平居中: margin:x auto;
2、margin负值让元素位移及边框合并
外边距合并
外边距合并指的是,当两个垂直外边距相遇时,它们将形成一个外边距。合并后的外边距的高度等于两个发生合并的外边距的高度中的较大者。解决方法如下:
1、使用这种特性
2、设置一边的外边距,一般设置margin-top
3、将元素浮动或者定位
margin-top 塌陷
在两个盒子嵌套时候,内部的盒子设置的margin-top会加到外边的盒子上,导致内部的盒子margin-top设置失败,解决方法如下:
1、外部盒子设置一个边框
2、外部盒子设置 overflow:hidden
3、使用伪元素类:
.clearfix:before{
    content: '';
    display:table;
}css元素溢出
当子元素的尺寸超过父元素的尺寸时,需要设置父元素显示溢出的子元素的方式,设置的方法是通过overflow属性来设置。
overflow的设置项:
1、visible 默认值。内容不会被修剪,会呈现在元素框之外。
2、hidden 内容会被修剪,并且其余内容是不可见的,此属性还有清除浮动、清除margin-top塌陷的功能。
3、scroll 内容会被修剪,但是浏览器会显示滚动条以便查看其余的内容。
4、auto 如果内容被修剪,则浏览器会显示滚动条以便查看其余的内容。
5、inherit 规定应该从父元素继承 overflow 属性的值。
块元素、内联元素、内联块元素
元素就是标签,布局中常用的有三种标签,块元素、内联元素、内联块元素,了解这三种元素的特性,才能熟练的进行页面布局。
块元素
块元素,也可以称为行元素,布局中常用的标签如:p、p、ul、li、h1~h6、dl、dt、dd等等都是块元素,它在布局中的行为:
支持全部的样式
如果没有设置宽度,默认的宽度为父级宽度100%
盒子占据一行、即使设置了宽度
内联元素
内联元素,也可以称为行内元素,布局中常用的标签如:a、span、em、b、strong、i等等都是内联元素,它们在布局中的行为:
支持部分样式(不支持宽、高、margin上下、padding上下)
宽高由内容决定
盒子并在一行
代码换行,盒子之间会产生间距
子元素是内联元素,父元素可以用text-align属性设置子元素水平对齐方式,用line-height属性值设置垂直对齐方式
解决内联元素间隙的方法
1、去掉内联元素之间的换行
2、将内联元素的父级设置font-size为0,内联元素自身再设置font-size
内联块元素
内联块元素,也叫行内块元素,是新增的元素类型,现有元素没有归于此类别的,img和input元素的行为类似这种元素,但是也归类于内联元素,我们可以用display属性将块元素或者内联元素转化成这种元素。它们在布局中表现的行为:
支持全部样式
如果没有设置宽高,宽高由内容决定
盒子并在一行
代码换行,盒子会产生间距
子元素是内联块元素,父元素可以用text-align属性设置子元素水平对齐方式,用line-height属性值设置子元素垂直对齐方式
这三种元素,可以通过display属性来相互转化,不过实际开发中,块元素用得比较多,所以我们经常把内联元素转化为块元素,少量转化为内联块,而要使用内联元素时,直接使用内联元素,而不用块元素转化了。
display属性
display属性是用来设置元素的类型及隐藏的,常用的属性有:
1、none 元素隐藏且不占位置
2、block 元素以块元素显示
3、inline 元素以内联元素显示
4、inline-block 元素以内联块元素显示
请制作图中所示的菜单:

浮动
文档流
文档流,是指盒子按照html标签编写的顺序依次从上到下,从左到右排列,块元素占一行,行内元素在一行之内从左到右排列,先写的先排列,后写的排在后面,每个盒子都占据自己的位置。
浮动特性
1、浮动元素有左浮动(float:left)和右浮动(float:right)两种
2、浮动的元素会向左或向右浮动,碰到父元素边界、浮动元素、未浮动的元素才停下来
3、相邻浮动的块元素可以并在一行,超出父级宽度就换行
4、浮动让行内元素或块元素自动转化为行内块元素
5、浮动元素后面没有浮动的元素会占据浮动元素的位置,没有浮动的元素内的文字会避开浮动的元素,形成文字饶图的效果
6、父元素内整体浮动的元素无法撑开父元素,需要清除浮动
7、浮动元素之间没有垂直margin的合并
清除浮动
父级上增加属性overflow:hidden
在最后一个子元素的后面加一个空的p,给它样式属性 clear:both(不推荐)
使用成熟的清浮动样式类,clearfix
.clearfix:after,.clearfix:before{ content: "";display: table;}
.clearfix:after{ clear:both;}
.clearfix{zoom:1;}
清除浮动的使用方法:
.con2{... overflow:hidden}
或者
<div class="con2 clearfix">定位
关于定位
我们可以使用css的position属性来设置元素的定位类型,postion的设置项如下:
定位元素特性
绝对定位和固定定位的块元素和行内元素会自动转化为行内块元素
定位元素层级
定位元素是浮动的正常的文档流之上的,可以用z-index属性来设置元素的层级
典型定位布局
1、固定在顶部的菜单
2、水平垂直居中的弹框
3、固定的侧边的工具栏
4、固定在底部的按钮
relative 生成相对定位元素,元素所占据的文档流的位置不变,元素本身相对文档流的位置进行偏移
absolute 生成绝对定位元素,元素脱离文档流,不占据文档流的位置,可以理解为漂浮在文档流的上方,相对于上一个设置了相对或者绝对或者固定定位的父级元素来进行定位,如果找不到,则相对于body元素进行定位。
fixed 生成固定定位元素,元素脱离文档流,不占据文档流的位置,可以理解为漂浮在文档流的上方,相对于浏览器窗口进行定位。
static 默认值,没有定位,元素出现在正常的文档流中,相当于取消定位属性或者不设置定位属性
inherit 从父元素继承 position 属性的值
background属性
属性解释
background属性是css中应用比较多,且比较重要的一个属性,它是负责给盒子设置背景图片和背景颜色的,background是一个复合属性,它可以分解成如下几个设置项:
background-color 设置背景颜色
background-image 设置背景图片地址
background-repeat 设置背景图片如何重复平铺
background-position 设置背景图片的位置
background-attachment 设置背景图片是固定还是随着页面滚动条滚动
实际应用中,我们可以用background属性将上面所有的设置项放在一起,而且也建议这么做,这样做性能更高,而且兼容性更好,比如:“background: #00FF00 url(bgimage.gif) no-repeat left center fixed”,这里面的“#00ff00”是设置background-color;“url(bgimage.gif)”是设置background-image;“no-repeat”是设置background-repeat;“left center”是设置background-position;“fixed”是设置background-attachment,各个设置项用空格隔开,有的设置项不写也是可以的,它会使用默认值。
举例:
下面这些例子使用下面这张图片做为背景图:

1、“background:url(bg.jpg)”,默认设置一个图片地址,图片会从盒子的左上角开始将盒子铺满。
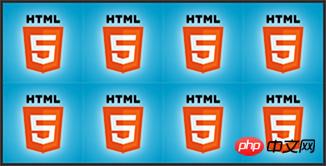
2、“background:cyan url(bg.jpg) repeat-x”,横向平铺盒子,盒子其他部分显示背景颜色“cyan”。
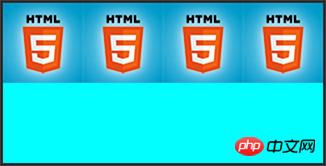
3、“background:cyan url(bg.jpg) repeat-y”,纵向平铺盒子,盒子其他部分显示背景颜色“cyan”。
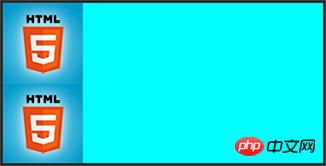
4、“background:cyan url(bg.jpg) no-repeat”,背景不重复,背景和盒子左上角对齐,盒子其他部分显示背景颜色“cyan”。
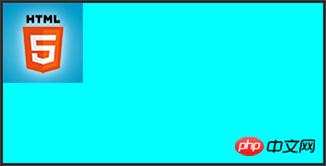
5、“background:cyan url(bg.jpg) no-repeat left center”,背景不重复,背景和盒子左中对齐,盒子其他部分显示背景颜色“cyan”。
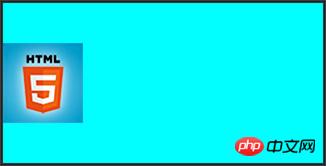
6、“background:cyan url(bg.jpg) no-repeat right center”,背景不重复,背景和盒子右中对齐,也就是背景图片的右边对齐盒子的右边,盒子其他部分显示背景颜色“cyan”。
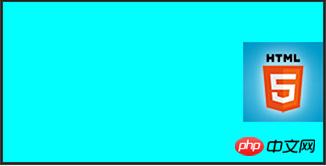
相关代码:
<!DOCTYPE html>
<html lang="en">
<head>
    <meta charset="UTF-8">
    <title>test background</title>
    <style type="text/css">
        .backshow{
            width:320px;
            height:160px;
            border:3px solid #333;
            float:left;
            margin:10px;
        }
        .bg1{background:cyan url(bg.jpg);}
        .bg2{background:cyan url(bg.jpg) repeat-x;}
        .bg3{background:cyan url(bg.jpg) repeat-y;}
        .bg4{background:cyan url(bg.jpg) no-repeat;}
        .bg5{background:cyan url(bg.jpg) no-repeat left center;}
        .bg6{background:cyan url(bg.jpg) no-repeat right center;}
    </style>
</head>
<body>
    <p class="backshow bg1"></p>
    <p class="backshow bg2"></p>
    <p class="backshow bg3"></p>
    <p class="backshow bg4"></p>
    <p class="backshow bg5"></p>
    <p class="backshow bg6"></p>
</body>
</html>例子说明:
代码中使用到的背景图片,可以直接在页面上的背景图片上点右键另存下来,命名为:“bg.jpg”,并且和网页文件存在同一个目录下。
关于背景图片的background-position的设置,设置背景图片水平位置的有“left”、“center”、“right”,设置背景图片垂直位置的有“top”、“center”、“bottom”,水平和垂直的属性值两两组合,就可以把背景图设置到对齐盒子的四个角或者四个边的中心或者盒子的正中心位置。还可以设置具体的像素值来把背景图片精确地定位到盒子的某个位置,特别是对于背景图片尺寸大于盒子尺寸的这种情况,我们可以用数值定位,截取大图片的某一块做为盒子的背景。
比如说,我们想把下边的盒子用右边的图片作为背景,并且让背景显示图片中靠近底部的那朵花:
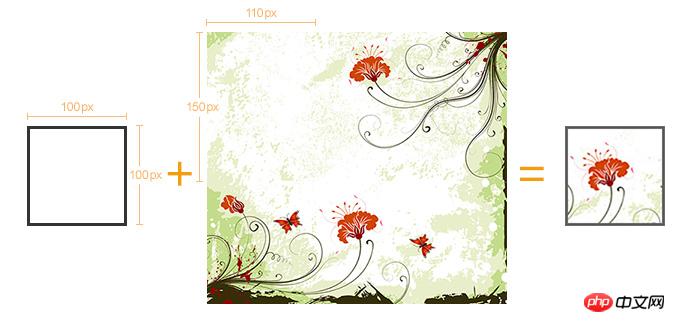
用上面中间那张图片作为左边那个比它尺寸小的盒子的背景,如果不设置background-position,默认背景图的左上角会和盒子的左上角对齐,如果设置,可以用两个数值定位背景图,上面右边的实现效果设置为:“background:url(location_bg.jpg) -110px -150px”,第一个数值表示背景图相对于自己的左上角向左偏移110px,负值向左,正值向右,第二个数值表示背景图相对于自己的左上角向上偏移150px,负值向上,正值向下。
实现原理示意图:
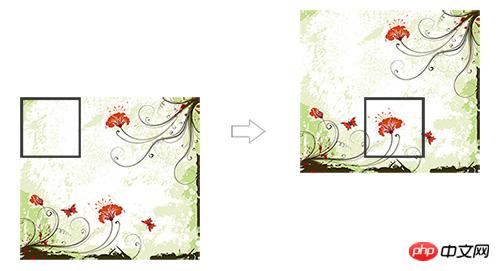
对应代码:
<!DOCTYPE html>
<html lang="en">
<head>
    <meta charset="UTF-8">
    <title>test background</title>
    <style type="text/css">
        .backshow{
            width:320px;
            height:160px;
            border:3px solid #333;
            float:left;
            margin:10px;
        }
        .bg{width:94px;
            height:94px;
            border:3px solid #666;
            background:url(location_bg.jpg) -110px -150px;
        }
    </style>
</head>
<body>
    <p class="bg"></p>
</body>
</html>特征布局实例讲习
经过对前面知识点的巩固和加深,我们可以使用前面学习到的知识来制作实际开发中碰到的一些典型的布局,以此来达到综合应用知识的目的。
1、特征布局:翻页(所需知识点:盒模型、内联元素
2、特征布局:导航条01(所需知识点:盒模型、行内元素布局
3、特征布局:导航条02(所需知识点:盒模型、浮动、定位、字体对齐)

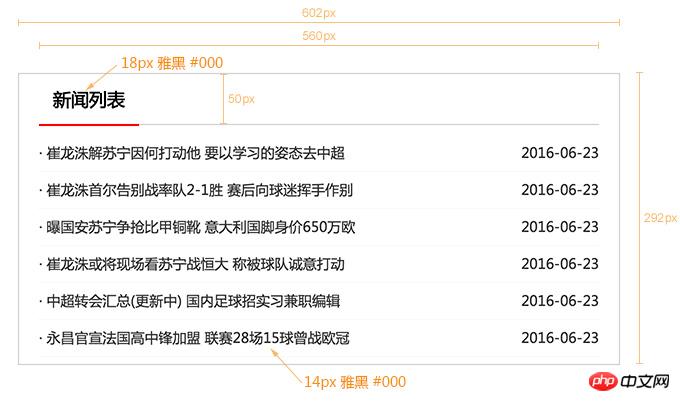
4、特征布局:图片列表(所需知识点:盒模型、浮动)

相关推荐:
CSS(层叠样式表)基础知识_html/css_WEB-ITnos
The above is the detailed content of What is CSS? Introduction to css cascading style (code). For more information, please follow other related articles on the PHP Chinese website!

Hot AI Tools

Undresser.AI Undress
AI-powered app for creating realistic nude photos

AI Clothes Remover
Online AI tool for removing clothes from photos.

Undress AI Tool
Undress images for free

Clothoff.io
AI clothes remover

Video Face Swap
Swap faces in any video effortlessly with our completely free AI face swap tool!

Hot Article

Hot Tools

Notepad++7.3.1
Easy-to-use and free code editor

SublimeText3 Chinese version
Chinese version, very easy to use

Zend Studio 13.0.1
Powerful PHP integrated development environment

Dreamweaver CS6
Visual web development tools

SublimeText3 Mac version
God-level code editing software (SublimeText3)

Hot Topics
 1655
1655
 14
14
 1414
1414
 52
52
 1307
1307
 25
25
 1255
1255
 29
29
 1228
1228
 24
24
 Google Fonts Variable Fonts
Apr 09, 2025 am 10:42 AM
I see Google Fonts rolled out a new design (Tweet). Compared to the last big redesign, this feels much more iterative. I can barely tell the difference
 How to Create an Animated Countdown Timer With HTML, CSS and JavaScript
Apr 11, 2025 am 11:29 AM
Have you ever needed a countdown timer on a project? For something like that, it might be natural to reach for a plugin, but it’s actually a lot more
 HTML Data Attributes Guide
Apr 11, 2025 am 11:50 AM
Everything you ever wanted to know about data attributes in HTML, CSS, and JavaScript.
 How to select a child element with the first class name item through CSS?
Apr 05, 2025 pm 11:24 PM
When the number of elements is not fixed, how to select the first child element of the specified class name through CSS. When processing HTML structure, you often encounter different elements...
 Why are the purple slashed areas in the Flex layout mistakenly considered 'overflow space'?
Apr 05, 2025 pm 05:51 PM
Questions about purple slash areas in Flex layouts When using Flex layouts, you may encounter some confusing phenomena, such as in the developer tools (d...
 A Proof of Concept for Making Sass Faster
Apr 16, 2025 am 10:38 AM
At the start of a new project, Sass compilation happens in the blink of an eye. This feels great, especially when it’s paired with Browsersync, which reloads
 How We Created a Static Site That Generates Tartan Patterns in SVG
Apr 09, 2025 am 11:29 AM
Tartan is a patterned cloth that’s typically associated with Scotland, particularly their fashionable kilts. On tartanify.com, we gathered over 5,000 tartan
 In front-end development, how to use CSS and JavaScript to achieve searchlight effects similar to Windows 10 settings interface?
Apr 05, 2025 pm 10:21 PM
How to implement Windows-like in front-end development...


