

Statement 1: The text here is copied from my own csdn account. It is the crystallization of my own learning and summary, so please respect this work. 2: If you want to reprint this article, you must indicate the source of the text. 3: If there is anything wrong, please point it out.
In the previous article, I mainly talked about some basic tags of http, such as link tags, image tags, html frames, etc. Then the next step will focus on table tags and list tags. , a detailed explanation of form tags
1: Table tags
## <!DOCTYPE html>
<html>
<head>
<!-- 原创作者:蜗牛 -->
<title>table标签</title>
</head>
<body>
<table border="1" width="360" height="240"
cellspacing="1" cellpadding="1"
align="center" bgcolor="red"> <!--这里的center表示该表格在页面的中间位置-->
<!--这里的背景色标签是bgcolor-->
<caption><h2>我的好朋友</caption>
<tr>
<th>姓名</th>
<th>性别</th>
<th>年龄</th>
<th>爱好</th>
</tr>
<tr align="center"> <!--这里的center表示的是表格里面的字体居中-->
<td>小红</td>
<td>女</td>
<td>20</td>
<td>跳舞</td>
</tr>
<tr align="center">
<td>小舵</td>
<td>女</td>
<td>24</td>
<td>唱歌</td>
</tr>
</table>
</body>
</html>Note: ##
border using using through together using using using using out off out out out out off out through out out out through out out out out out out through - t's Set the height of the table, the unit is pixel
cellspacing Set the distance between cells, which refers to the spacing of the table border
cellpadding Set the distance between the text and the cell border
bgcolor Set the background color of the table
align Used to set the alignment, such as center, left, right
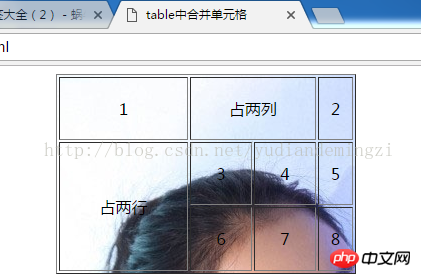
(2) About merging cells
<!DOCTYPE html>
<html>
    <head>
        <title>table中合并单元格</title>
    </head>
    <body>
        <table  border="1" width="300"  height="200"
                align="center" background="first.jpg" >  <!--background代表的是背景图片,bgcolor代表背景色完全不一样-->

                  <tr align="center" width="100" >
                     <td>1</td>
                     <td colspan="2">占两列</td>    <!--当colspan="2"表示在同一行中,两列并一列,那么在它下面少写一个<td></td>标签-->
                     <!-- 删除掉此<td></td> -->
                     <td>2</td>
                 </tr>

                 <tr   align="center" width="100">
                     <td rowspan="2">占两行</td>   <!--当 rowspan="2"表示在同一列中 两行并一行,那么在同一列中删掉一个<td></td>标签-->
                     <td>3</td>
                     <td>4</td>
                     <td>5</td>
                 </tr>

                  <tr   align="center" width="100" >
                    <!-- 删除掉此<td></td> -->
                     <td>6</td>
                     <td>7</td>
                     <td>8</td>
                 </tr>
            </table>
   </body>
</html>
 Note
Note
: When you enter different content in each cell of the table, your content will change with different lengths. If you want each cell to maintain There are two ways to make the same size: 1; For example, when the total height of your table is 400 and you set 4 rows, then add attributes to each
2: List tag
<!DOCTYPE html>
<html>
<head>
<title>列表标签</title>
</head>
<body bgcolor="#FFFF00">
<!-- 无序列表 -->
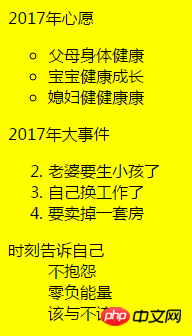
2017年心愿
<ul type="circle"> <!--无序序列<ul> ,无序有circle:圆点,square:小方块-->
<li>父母身体健康</li>
<li>宝宝健康成长</li>
<li>媳妇健健康康</li>
</ul>
<!-- 有序列表 -->
2017年大事件
<ol type="1" start="2"> <!--有序的标签是<ol>,有序有五种:1,A,a ,i,I,start代表从什么时候开始等于2代表从2开始-->
<li>老婆要生小孩了</li>
<li>自己换工作了</li>
<li>要卖掉一套房</li>
</ol>
<!-- 自定义列表 -->
<dl> <!--在自定义列表<dl> </dl>中使用<dt> </dt>表示小标题,使用<dd> </dd>表示列表项-->
<dt>时刻告诉自己</dt>
<dd>不抱怨</dd>
<dd>零负能量</dd>
<dd>该与不该</dd>
</dl>
</body>
</html>
< form> Form tag## <!DOCTYPE html>
<head>
<title>form表单</title>
</head>
<body>
<!--form 指的是表单标签 当前标签的内容在提交的时候都会被自动提交 action=""是指把当前表单提交的位置-->
<form action="Myservlet" method="post" onSubmit="return submitFun();"> <!--onSubmit只有当返回为true是才能提交表单-->
<fieldset> <!--主要会在相关表单元素周围绘制边框-->
<legend>用户注册</legend> <!--在上面绘制的边框绘制的位置写上“用户注册”-->
<!--input 一个输入框里 type 的当前输入框的类型 text 是指当前的类型是文本框name是用来区分不同的文本框-->
<!--的也是在表单提交后用来获取表单的内容 -->
用户名:<input type="text" name="username" /><br/><br/>
密码 :<input type="password" name="password"/><br/><br/> <!--password代表输入的文字显示为黑点-->
<!--value是指当前表单提交后 获取的值 checked设置默认选中的情况-->
性别:男性<input type="radio" name="sex" value="male" checked="checked"> <!--radio代表单选按钮-->
女性<input type="radio" name="sex" value="female"> <br/><br/>
学历: <select name="education"> <!--select代表下来列表-->
<option value="gz">博士</option> <!--option代表每一个值,取名gz为了后台获取-->
<option value="yjs">研究生</option>
<option value="bk" selected="selected">本科</option> <!--select代表默认选中,本科会显示到界面-->
<option value="zk">专科</option>
</select> <br/><br/>
兴趣爱好:<input type="checkbox" name="likes" value="bike" />骑车 <!--checkbox复选框-->
<input type="checkbox" name="likes" value="sleep" checked="checked" />睡觉 <!--checked代表默认选中-->
<input type="checkbox" name="likes" value="eat" />吃饭
<input type="checkbox" name="likes" value="daima" />敲代码 <br/>
备注:<textarea cols="40" rows="5" name="bz"></textarea> <br/><br/> <!--textarea文本域设置行和列-->
个人头像:<input type="file"><br> <!--代表可以在电脑上宣文件-->
<!--disabled代表不可编辑,我在测试中发现不可编辑状态后台是无法取到这个value值的,想要获得就要在提交时改变为可编辑-->
个人网站:<input type="url" value="www.baidu.com" disabled="disabled"> <br>
个人邮箱:<input type="email"><br> <!--邮箱格式-->
身体体重:<input type="number"><br> <!--代表只能输入数字-->
出生日期:<input type="date"><br> <!--可选年月日-->
详细时间:<input type="time"><br> <!--time--代表显示时分-->
隐藏项: <input type="hidden" value="你们看不到我"><br> <!--这个隐藏标签有很大的作用,可以不显示在界面,但后台可以获取值-->
<input type="button" value="填写完毕"> <!--普通的button按钮-->
<input type="reset" value="重置信息"> <!--reset代表一按重置所以信息清空-->
<input type="submit" value="完成注册"> <!--submi代表所以信息提交到后台,如果上面调用了onSubmit方法,那么返回为true才提交-->
<input type="image" src="first.jpg" height="20" width="40"> <!--image也可以进行表单的提交-->
47 </fieldset>
</form>
</body>
</html>
The above is the detailed content of Detailed explanation of table tags in html. For more information, please follow other related articles on the PHP Chinese website!


![[Web front-end] Node.js quick start](https://img.php.cn/upload/course/000/000/067/662b5d34ba7c0227.png)


