canvas The powerful functions make it a very important part of HTML5. As for what it is, I don’t need to introduce it here. . Visual charts are one of the manifestations of the powerful functions of canvas.
Now there are many mature chart plug-ins that are implemented using canvas. Chart.js, ECharts, etc. can create beautiful and cool charts, and cover almost all charts. accomplish.
Sometimes I just want to draw a histogram, but it's troublesome to write it myself, and it's cumbersome to use other people's plug-ins. Finally, I open Baidu, copy a piece of code, and paste it in to modify it. You might as well pick one up yourself.
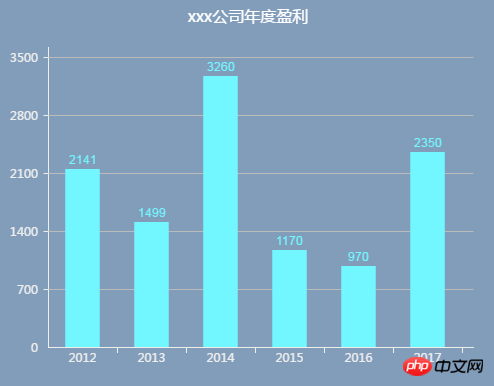
AnimationEffectPicture cannot be displayed, you can go to the bottom to find the demo address

This chart consists of xy axis, data bar and title.
Axis: You can use moveTo() & lineTo() to achieve
Text: You can use fillText() to achieve
Rectangle: You can use fillRect() to achieve
It seems that it is not that difficult.
<canvas id="canvas" width="600" height="500"></canvas>
The canvas tag is just a container, which truly realizes drawing. Or JavaScript.
The coordinate axis is two horizontal lines, which is the most basic knowledge in canvas.
Start a new path by ctx.beginPath()
ctx.lineWidth=1 Set line Width
ctx.strokeStyle='#000000' Set the line color
var canvas = document.getElementById('canvas');var ctx = canvas.getContext('2d');var width = canvas.width;var height = canvas.height;var padding = 50; // 坐标轴到canvas边框的边距,留边距写文字ctx.beginPath();ctx.lineWidth = 1;// y轴线ctx.moveTo(padding + 0.5, height - padding + 0.5);ctx.lineTo(padding + 0.5, padding + 0.5);ctx.stroke();// x轴线ctx.moveTo(padding + 0.5, height - padding + 0.5);ctx.lineTo(width - padding + 0.5, height - padding + 0.5);ctx.stroke();
property of the incoming data.
var yNumber = 5; // y轴的段数var yLength = Math.floor((height - padding * 2) / yNumber); // y轴每段的真实长度var xLength = Math.floor((width - padding * 2) / data.length); // x轴每段的真实长度ctx.beginPath();ctx.textAlign = 'center';ctx.fillStyle = '#000000';ctx.strokeStyle = '#000000';// x轴刻度和值for (var i = 0; i < data.length; i++) {
var xAxis = data[i].xAxis;
var xlen = xLength * (i + 1);
ctx.moveTo(padding + xlen, height - padding);
ctx.lineTo(padding + xlen, height - padding + 5);
ctx.stroke(); // 画轴线上的刻度
ctx.fillText(xAxis, padding + xlen - xLength / 2, height - padding + 15); // 填充文字}// y轴刻度和值for (var i = 0; i < yNumber; i++) {
var y = yFictitious * (i + 1);
var ylen = yLength * (i + 1);
ctx.moveTo(padding, height - padding - ylen);
ctx.lineTo(padding - 5, height - padding - ylen);
ctx.stroke();
ctx.fillText(y, padding - 10, height - padding - ylen + 5);}setInterval, setTimeout and requestAnimationFrame.
requestAnimationFrame does not need to set the timing time yourself, but follows the drawing of the browser. This way there will be no frame drops and it will be smooth naturally.requestAnimationFrame originally only supported IE10 and above, but it can be compatible with IE6 through compatible writing methods.
function looping() {
    looped = requestAnimationFrame(looping);
    if(current < 100){
    // current 用来计算当前柱状的高度占最终高度的百分之几,通过不断循环实现柱状上升的动画
        current = (current + 3) > 100 ? 100 : (current + 3);
        drawAnimation();
    }else{
        window.cancelAnimationFrame(looped);
        looped = null;
    }}function drawAnimation() {
    for(var i = 0; i < data.length; i++) {
        var x = Math.ceil(data[i].value * current / 100 * yRatio);
        var y = height - padding - x;
        ctx.fillRect(padding + xLength * (i + 0.25), y, xLength/2, x);
        // 保存每个柱状的信息
        data[i].left = padding + xLength / 4 + xLength * i;
        data[i].top = y;
        data[i].right = padding + 3 * xLength / 4 + xLength * i;
        data[i].bottom = height - padding;
}}looping();Padding we defined early in the morning is really useful. You can’t cover the title on the histogram. . But some titles are at the top and some are at the bottom, so they cannot be written to death. Set a variable position to determine the position and draw it. This one is simple.
// 标题if(title){                      // 也不一定有标题
    ctx.textAlign = 'center';
    ctx.fillStyle = '#000000';  // 颜色,也可以不用写死,个性化嘛
    ctx.font = '16px Microsoft YaHei'
    if(titlePosition === 'bottom' && padding >= 40){
        ctx.fillText(title,width/2,height-5)    }else{
ctx.fillText(title,width/2,padding/2) }}那我怎么知道在柱状里啊,发现在 drawAnimation() 里会有每个柱状的坐标,那我干脆把坐标给保存到 data 里。那么鼠标在柱状里的条件应该是:
ev.offsetX > data[i].left
ev.offsetX < data[i].right
ev.offsetY > data[i].top
ev.offsetY < data[i].bottom
canvas.addEventListener('mousemove',function(ev){
var ev = ev||window.event;
for (var i=0;i<data.length;i++){
for (var i=0;i<data.length;i++){
if(ev.offsetX > data[i].left &&
ev.offsetX < data[i].right &&
ev.offsetY > data[i].top &&
ev.offsetY < data[i].bottom){
console.log('我在第'+i+'个柱状里。');
}
}})为了更方便的使用,封装成构造函数。通过
var chart = new sBarChart('canvas',data,{
    title: 'xxx公司年度盈利',   // 标题
    titleColor: '#000000',      // 标题颜色
    titlePosition: 'top',       // 标题位置
    bgColor: '#ffffff',         // 背景色
    fillColor: '#1E9FFF',       // 柱状填充色
    axisColor: '#666666',       // 坐标轴颜色
    contentColor: '#a5f0f6'     // 内容横线颜色
});参数可配置,很简单就生成一个个性化的柱状图。代码地址:canvas-demo
最后加上折线图、饼图、环形图,完整封装成sChart.js插件,插件地址:sChart.js
The above is the detailed content of canvas dynamic chart. For more information, please follow other related articles on the PHP Chinese website!
 What are the production methods of html5 animation production?
 How to set up web page automatic refresh
 switch statement usage
 How is the performance of php8?
 Introduction to the difference between javascript and java
 hiberfil file deletion method
 Reasons why phpstudy cannot be opened
 css background code collection


