WeChat development practical sharing function
By understanding the requirements, it can be broken down into:
(1) WeChat mobile phone users can use WeChat’s JSSDK.
(2) Select the image and use "chooseImage" of JSSDK. Since the local address cannot be shared when sharing the image, "uploadImage" of JSSDK is also needed.
(3) Sharing to Moments requires "onMenuShareTimeline" of JSSDK.
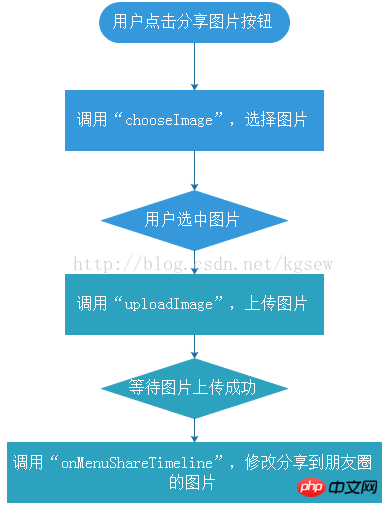
Taken together, the business logic is shown in Figure 4.5.

Figure 4.5 Business logic structure diagram
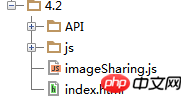
First copy the JSSDK environment to the directory of this section and create an index. html file, imageSharing.js file, the directory structure is shown in Figure 4.6.

Figure 4.6 Section 4.2 Directory Structure
Modify the configuration file of the JSSDK environment, the code is as follows:
01	jsApiList: [ // 必填,需要使用的JS接口列表,所有JS接口列表见附录B
02	    "chooseImage",
03	    "previewImage",
04	    "uploadImage",
05	    "onMenuShareTimeline"
06	]
07	//其他代码略
Build a The click button with "id" equal to "chooseImage", and the container used to display the selected image after clicking the button, add the following code to the index.html file:
01	<!DOCTYPE html>
02	<html lang="en">
03	<head>
04		<meta charset="UTF-8">
05	    <meta name="viewport" content="width=device-width, initial-scale=1.0,
06	minimum-scale=1, maximum-scale=1.0, user-scalable=no">
07	    <title>第4章 4.2节-实例:从手机相册中选照片然后分享</title>
08	    <!--依赖文件:jQuery-->
09	    <script src="./js/jquery-1.11.2.min.js?1.1.10"></script>
10	    <!--依赖文件:微信的JSSDK源文件-->
11	    <script src="http://res.wx.qq.com/open/js/jweixin-1.0.0.js?1.1.10"></script>
12	    <!--依赖文件:coolie-->
13	    <script src="./js/cookie.js?1.1.10"></script>
14	    <!--JSSDK的环境-->
15	    <script src="./js/wxJSSDK.js?1.1.10"></script>
16	    <!--引入检测API的图像服务-->
17	    <script src="imageSharing.js?1.1.10"></script>
18	    <style>
19	        input{
20	            width: 100%;
21	            padding: 0.2em;
22	            background-color: #5eb95e;
23	            font-size: 1.4em;
24	            background-image: linear-gradient(to bottom, #62c462, #57a957);
25	            background-repeat: repeat-x;
26	            color: #ffffff;
27	            text-align: center;
28	            text-shadow: 0 -1px 0 rgba(0, 0, 0, 0.25);
29	            border-radius: 0.3em;
30	        }
31	    </style>
32	</head>
33	<body>
34	    <h1 style="font-size: 8em">:)</h1>
35	    <b style="font-size: 2em">实例:从手机相册中选照片然后分享,支持选择1张图片!
36	</b><br /><br />
37	    <p id="imageContainer" style="text-align: center;width: 100%"></p>
38	    <p id="selectImg" style="color: #5eb95e;text-align: center">没有自定义分享图片</p>
39	    <input type="button" value="请选择分享图片" id="chooseImage" /><br /><br />
40	</body>
41 </html>Add processing business to the imageSharing.js file The code is as follows:
01 /*
02 函数名称:wxJSSDK.shareApi
03 函数功能:为wxJSSDK增加分享模块
04 参数:
05 shareList(Array) 必选项,待分享的API配置表
06 */
07 wxJSSDK.shareApi = function(shareList){
08 if(wxJSSDK.isReady){//wxJSSDK.isReady 查看微信JSSDK是否初始化完毕
09
10 //获取“分享到朋友圈”按钮点击状态及自定义分享内容接口
11 if(shareList.onMenuShareTimeline){
12 var ParametersTimeline = shareList.onMenuShareTimeline;
13 wx.onMenuShareTimeline({
14 title: ParametersTimeline.title, // 分享标题
15 link: ParametersTimeline.link, // 分享链接
16 imgUrl: ParametersTimeline.imgUrl, // 分享图标
17 success: function () {
18 // 用户确认分享后执行的回调函数
19 ParametersTimeline.success && ParametersTimeline.success();
20 },
21 cancel: function () {
22 // 用户取消分享后执行的回调函数
23 ParametersTimeline.cancel && ParametersTimeline.cancel();
24 }
25 });
26 }
27
28 }else{
29 console.log("抱歉,wx没有初始化完毕,请等待wx初始化完毕,再调用分享服务。");
30 }
31 }
32 /*
33 函数名称:wxJSSDK.imageApi
34 函数功能:为wxJSSDK增加图像服务
35 参数:
36 imageApi 图像API Object 配置
37 */
38 wxJSSDK.imageApi = function(imageApi){
39 if(wxJSSDK.isReady){//wxJSSDK.isReady 查看微信JSSDK是否初始化完毕
40 if(imageApi){
41
42 imageApi.chooseImage && wx.chooseImage({//拍照或从手机相册中选图接口
43 success: function (res) {
44 imageApi.chooseImage.success &&
45 imageApi.chooseImage.success(res);
46 }
47 });
48
49 imageApi.previewImage && wx.previewImage({ // 预览图片接口
50 current: imageApi.previewImage.current, // 当前显示的图片链接
51 urls: imageApi.previewImage.urls // 需要预览的图片链接列表
52 });
53
54 imageApi.uploadImage && wx.uploadImage({ // 上传图片接口
55 localId: imageApi.uploadImage.localId, // 需要上传的图片的本地ID,
56 由chooseImage接口获得
57 isShowProgressTips: imageApi.uploadImage.isShowProgressTips || 1, //
58 默认为1,显示进度提示
59 success: function (res) {
60 imageApi.uploadImage.success &&
61 imageApi.uploadImage.success(res);
62 }
63 });
64
65 imageApi.downloadImage && wx.downloadImage({//下载图片接口
66 serverId:imageApi.downloadImage.serverId, // 需要下载的图片的服务器端
67 ID,由uploadImage接口获得
68 isShowProgressTips: imageApi.downloadImage.isShowProgressTips || 1, //
69 默认为1,显示进度提示
70 success: function (res) {
71 imageApi.downloadImage.success &&
72 imageApi.downloadImage.success(res);
73 }
74 });
75 }else{
76 console.log("缺少配置参数");
77 }
78 }else{
79 console.log("抱歉,wx没有初始化完毕,请等待wx初始化完毕,再调用图像接口服
80 务。");
81 }
82
83 }
84
85 window.onload = function(){
86 var chooseImageID, // 拍照或从手机相册中选图接口
87 shareImage,
88 uploadImage = function(back){
89 wxJSSDK.imageApi({ // 上传图片···
90 uploadImage:{
91 localId:chooseImageID.toString(),
92 success:function(res){//临时access_token,上传图片成功之后,执行分
93 享操作
94 shareImage =
95 "http://file.api.weixin.qq.com/cgi-bin/media/get?access_token=
96 eQv3HPwEFxwsw8cyh5O7DjaNOoGd4d-jYtG_c9uW-YbwUYxkMywh_O3LCC
97 ZtmX8ZWr8np0Q5CqAox7lghNkNuiNHU8M618jbRvcaLjQuHq8&media_id="+res.serverId; // 返回图片的服务器端ID
98 back && back();
99 }
100 }
101 });
102 },
103 shareTimeline = function(){
104 uploadImage(function(){
105 wxJSSDK.shareApi({ // 分享图片···
106 onMenuShareTimeline : { // 分享到朋友圈
107 title: "实例:从手机相册中选照片然后分享!", // 分享标题
108 link: 'http://weibo.com/xixinliang', // 分享链接
109 imgUrl: shareImage, // 分享图标
110 success: function () {
111
112 },
113 cancel: function () {
114
115 }
116 }
117 });
118 });
119 };
120 $("#chooseImage").click(function(){
121 wxJSSDK.imageApi({
22 chooseImage:{
23 success:function(res){
24 chooseImageID = res.localIds[0]; // 返回选定照片的本地ID列表,
25 localId可以作为img标签的src属性显示图片
26 $("#imageContainer").html("<img style='width: 30%'
27 src='"+chooseImageID+"'>");
28 $("#selectImg").html("已选择图片,请点击右上角分享到朋友圈按钮");
29 shareTimeline();
30 }
31 }
32 });
33 });
34 }[Code explanation]
In index.html, a button to share a custom image is created, such as As shown in Figure 4.7.
Click the share button and call the JSSDK’s image selection API to allow the user to select the image, as shown in Figure 4.8.

Figure 4.7 Custom Sharing Picture UI

Figure 4.8 After selecting the UI
, call "uploadImage" to upload the image.
After the upload is successful, return the server "serverId" after uploading, then call the multimedia download API, and assign the image to the JSSDK sharing API "onMenuShareTimeline".
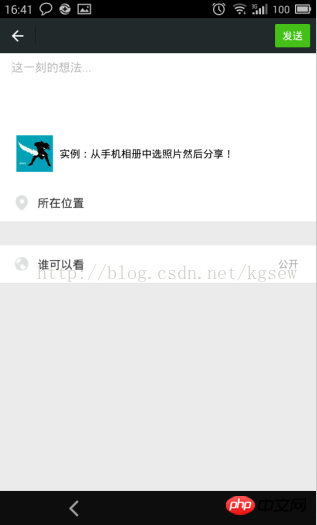
Users can view the sharing effect, as shown in Figure 4.9 and Figure 4.10.

Figure 4.9 Sharing to Moments Editing UI

Figure 4.10 Successfully Sharing Custom Pictures to Moments
The above is the detailed content of WeChat development practical sharing function. For more information, please follow other related articles on the PHP Chinese website!

Hot AI Tools

Undresser.AI Undress
AI-powered app for creating realistic nude photos

AI Clothes Remover
Online AI tool for removing clothes from photos.

Undress AI Tool
Undress images for free

Clothoff.io
AI clothes remover

Video Face Swap
Swap faces in any video effortlessly with our completely free AI face swap tool!

Hot Article

Hot Tools

Notepad++7.3.1
Easy-to-use and free code editor

SublimeText3 Chinese version
Chinese version, very easy to use

Zend Studio 13.0.1
Powerful PHP integrated development environment

Dreamweaver CS6
Visual web development tools

SublimeText3 Mac version
God-level code editing software (SublimeText3)

Hot Topics
 1655
1655
 14
14
 1413
1413
 52
52
 1306
1306
 25
25
 1252
1252
 29
29
 1226
1226
 24
24
 How to send web pages to desktop as shortcut in Edge browser?
Mar 14, 2024 pm 05:22 PM
How to send web pages to the desktop as a shortcut in Edge browser? Many of our users want to display frequently used web pages on the desktop as shortcuts for the convenience of directly opening access pages, but they don’t know how to do it. In response to this problem, the editor of this issue will share the solution with the majority of users. , let’s take a look at the content shared in today’s software tutorial. The shortcut method of sending web pages to the desktop in Edge browser: 1. Open the software and click the "..." button on the page. 2. Select "Install this site as an application" in "Application" from the drop-down menu option. 3. Finally, click it in the pop-up window
 What should I do if the images on the webpage cannot be loaded? 6 solutions
Mar 15, 2024 am 10:30 AM
Some netizens found that when they opened the browser web page, the pictures on the web page could not be loaded for a long time. What happened? I checked that the network is normal, so where is the problem? The editor below will introduce to you six solutions to the problem that web page images cannot be loaded. Web page images cannot be loaded: 1. Internet speed problem The web page cannot display images. It may be because the computer's Internet speed is relatively slow and there are more softwares opened on the computer. And the images we access are relatively large, which may be due to loading timeout. As a result, the picture cannot be displayed. You can turn off the software that consumes more network speed. You can go to the task manager to check. 2. Too many visitors. If the webpage cannot display pictures, it may be because the webpages we visited were visited at the same time.
 Four recommended AI-assisted programming tools
Apr 22, 2024 pm 05:34 PM
This AI-assisted programming tool has unearthed a large number of useful AI-assisted programming tools in this stage of rapid AI development. AI-assisted programming tools can improve development efficiency, improve code quality, and reduce bug rates. They are important assistants in the modern software development process. Today Dayao will share with you 4 AI-assisted programming tools (and all support C# language). I hope it will be helpful to everyone. https://github.com/YSGStudyHards/DotNetGuide1.GitHubCopilotGitHubCopilot is an AI coding assistant that helps you write code faster and with less effort, so you can focus more on problem solving and collaboration. Git
 What are the empty account detection platforms? Empty number detection tool
Mar 07, 2024 pm 01:46 PM
With the advancement of communication technology, telephone contact has become more and more common in our daily lives. However, sometimes we may try to call a number only to find that the number is no longer reachable. In order to save time and energy, many people start looking for empty number verification services to confirm the validity of the number. This service can help users quickly check whether a number is valid and avoid unnecessary trouble. 1. What are the empty account detection platforms? Users can check the status of the number, including whether it is empty, by dialing the corresponding inquiry number or visiting the official website through the official inquiry service provided by the operator. This service is provided by many operators to facilitate users to quickly understand the usage of the number. Online empty number detection platforms are now emerging in an endless stream on the market. These platforms provide quick and convenient
 Which AI programmer is the best? Explore the potential of Devin, Tongyi Lingma and SWE-agent
Apr 07, 2024 am 09:10 AM
On March 3, 2022, less than a month after the birth of the world's first AI programmer Devin, the NLP team of Princeton University developed an open source AI programmer SWE-agent. It leverages the GPT-4 model to automatically resolve issues in GitHub repositories. SWE-agent's performance on the SWE-bench test set is similar to Devin, taking an average of 93 seconds and solving 12.29% of the problems. By interacting with a dedicated terminal, SWE-agent can open and search file contents, use automatic syntax checking, edit specific lines, and write and execute tests. (Note: The above content is a slight adjustment of the original content, but the key information in the original text is retained and does not exceed the specified word limit.) SWE-A
 How to open php on the web page
Mar 22, 2024 pm 03:20 PM
Executing PHP code in a web page requires ensuring that the web server supports PHP and is properly configured. PHP can be opened in three ways: * **Server environment:** Place the PHP file in the server root directory and access it through the browser. * **Integrated Development Environment: **Place PHP files in the specified web root directory and access them through the browser. * **Remote Server:** Access PHP files hosted on a remote server via the URL address provided by the server.
 Learn how to develop mobile applications using Go language
Mar 28, 2024 pm 10:00 PM
Go language development mobile application tutorial As the mobile application market continues to boom, more and more developers are beginning to explore how to use Go language to develop mobile applications. As a simple and efficient programming language, Go language has also shown strong potential in mobile application development. This article will introduce in detail how to use Go language to develop mobile applications, and attach specific code examples to help readers get started quickly and start developing their own mobile applications. 1. Preparation Before starting, we need to prepare the development environment and tools. head
 PHP Practical: Code Example to Quickly Implement Fibonacci Sequence
Mar 20, 2024 pm 02:24 PM
PHP Practice: Code Example to Quickly Implement the Fibonacci Sequence The Fibonacci Sequence is a very interesting and common sequence in mathematics. It is defined as follows: the first and second numbers are 0 and 1, and from the third Starting with numbers, each number is the sum of the previous two numbers. The first few numbers in the Fibonacci sequence are 0,1,1.2,3,5,8,13,21,...and so on. In PHP, we can generate the Fibonacci sequence through recursion and iteration. Below we will show these two


