
1. Overview of HashMap
HashMap is based on the implementation of the Map interface of the hash table. This implementation provides all optional mapping operations and allows null values and null keys. (The HashMap class is much the same as a Hashtable except that it is not synchronized and allows null .) This class does not guarantee the order of the map, and in particular it does not guarantee that the order is immutable.
It is worth noting that HashMap is not thread-safe. If you want a thread-safe HashMap, you can obtain a thread-safe HashMap through the static method synchronizedMap of the Collections class.
Map map = Collections.synchronizedMap(new HashMap());
2. The data structure of HashMap
The bottom layer of HashMap is mainly implemented based on arrays and linked lists. The reason why it is quite fast The query speed is mainly because it determines the storage location by calculating a hash code. In HashMap, the hash value is mainly calculated through the hashCode of the key. As long as the hashCode is the same, the calculated hash value will be the same. If there are too many objects stored, the hash values calculated by different objects may be the same, which results in a so-called hash conflict. Students who have studied data structures know that there are many ways to resolve hash conflicts. The bottom layer of HashMap resolves hash conflicts through linked lists.
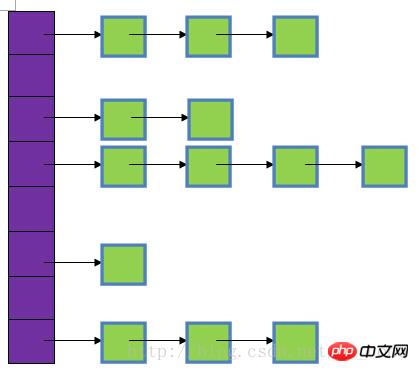
In the picture, the purple part represents the hash table, also known as the hash array. Each element of the array is a singly linked list. The head node and linked list are used to resolve conflicts. If different keys are mapped to the same position in the array, they are put into a singly linked list.
Let’s take a look at the code of the Entry class in HashMap:

##Among them loadFactorThe loading factor indicates the degree of filling of elements in the Hsah table.
If: The larger the loading factor, the more elements are filled. The advantage is that the space utilization rate is high, but: the chance of conflict increases If it is too large, the length of the linked list will become longer and longer, and the search efficiency will decrease.
On the contrary, the smaller the loading factor, the fewer elements are filled. The advantage is: the chance of conflict is reduced, but: more space is wasted. The data in the table will be too sparse (a lot of space is not used yet) , start expanding)
The greater the chance of conflict, the higher the cost of search.
Therefore, we must find a balance between "opportunity of conflict" and "space utilization" A kind of balance and compromise. This balance and compromise is essentially the balance and compromise of the famous "time-space" contradiction in data structures.
If the machine has enough memory and you want to increase the query speed, you can load Set the factor smaller; on the contrary, if the machine memory is tight and there are no requirements for query speed, you can set the load factor larger. But generally we don't need to set it, just let it take the default value of 0.75.
2. Construction method
Let’s take a look at several construction methods of HashMap:

public HashMap(int initialCapacity, float loadFactor) {
 2         //确保数字合法
 3         if (initialCapacity  MAXIMUM_CAPACITY)
 7             initialCapacity = MAXIMUM_CAPACITY;
 8         if (loadFactor = initialCapacity
13         int capacity = 1;   //初始容量
14 while (capacity 
我们可以看到在构造HashMap的时候如果我们指定了加载因子和初始容量的话就调用第一个构造方法,否则的话就是用默认的。默认初始容量为16,默认加载因子为0.75。我们可以看到上面代码中13-15行,这段代码的作用是确保容量为2的n次幂,使capacity为大于initialCapacity的最小的2的n次幂,至于为什么要把容量设置为2的n次幂,我们等下再看。
重点分析下HashMap中用的最多的两个方法put和get
3、存储数据
下面看看HashMap存储数据的过程是怎样的,首先看看HashMap的put方法:

public V put(K key, V value) {
     // 若“key为null”,则将该键值对添加到table[0]中。
         if (key == null)
            return putForNullKey(value);
     // 若“key不为null”,则计算该key的哈希值,然后将其添加到该哈希值对应的链表中。
         int hash = hash(key.hashCode());
     //搜索指定hash值在对应table中的索引
         int i = indexFor(hash, table.length);
     // 循环遍历Entry数组,若“该key”对应的键值对已经存在,则用新的value取代旧的value。然后退出!
         for (Entry<k> e = table[i]; e != null; e = e.next) {
             Object k;
              if (e.hash == hash && ((k = e.key) == key || key.equals(k))) { //如果key相同则覆盖并返回旧值
                  V oldValue = e.value;
                 e.value = value;
                 e.recordAccess(this);
                 return oldValue;
              }
         }
     //修改次数+1
         modCount++;
     //将key-value添加到table[i]处
     addEntry(hash, key, value, i);
     return null;
}</k>
上面程序中用到了一个重要的内部接口:Map.Entry,每个 Map.Entry 其实就是一个 key-value 对。从上面程序中可以看出:当系统决定存储 HashMap 中的 key-value 对时,完全没有考虑 Entry 中的 value,仅仅只是根据 key 来计算并决定每个 Entry 的存储位置。这也说明了前面的结论:我们完全可以把 Map 集合中的 value 当成 key 的附属,当系统决定了 key 的存储位置之后,value 随之保存在那里即可。
我们慢慢的来分析这个函数,第2和3行的作用就是处理key值为null的情况,我们看看putForNullKey(value)方法:

1 private V putForNullKey(V value) {
 2         for (Entry<k> e = table[0]; e != null; e = e.next) {
 3             if (e.key == null) {   //如果有key为null的对象存在,则覆盖掉
 4                 V oldValue = e.value;
 5                 e.value = value;
 6                 e.recordAccess(this);
 7                 return oldValue;
 8            }
 9        }
10         modCount++;
11         addEntry(0, null, value, 0); //如果键为null的话,则hash值为0
12         return null;
13     }</k>
注意:如果key为null的话,hash值为0,对象存储在数组中索引为0的位置。即table[0]
我们再回去看看put方法中第4行,它是通过key的hashCode值计算hash码,下面是计算hash码的函数:

1  //计算hash值的方法 通过键的hashCode来计算
2     static int hash(int h) {
3         // This function ensures that hashCodes that differ only by
4         // constant multiples at each bit position have a bounded
5         // number of collisions (approximately 8 at default load factor).
6         h ^= (h >>> 20) ^ (h >>> 12);
7         return h ^ (h >>> 7) ^ (h >>> 4);
8     }
得到hash码之后就会通过hash码去计算出应该存储在数组中的索引,计算索引的函数如下:
1     static int indexFor(int h, int length) { //根据hash值和数组长度算出索引值
2         return h & (length-1);  //这里不能随便算取,用hash&(length-1)是有原因的,这样可以确保算出来的索引是在数组大小范围内,不会超出
3     }
这个我们要重点说下,我们一般对哈希表的散列很自然地会想到用hash值对length取模(即除法散列法),Hashtable中也是这样实现的,这种方法基本能保证元素在哈希表中散列的比较均匀,但取模会用到除法运算,效率很低,HashMap中则通过h&(length-1)的方法来代替取模,同样实现了均匀的散列,但效率要高很多,这也是HashMap对Hashtable的一个改进。
接下来,我们分析下为什么哈希表的容量一定要是2的整数次幂。首先,length为2的整数次幂的话,h&(length-1)就相当于对length取模,这样便保证了散列的均匀,同时也提升了效率;其次,length为2的整数次幂的话,为偶数,这样length-1为奇数,奇数的最后一位是1,这样便保证了h&(length-1)的最后一位可能为0,也可能为1(这取决于h的值),即与后的结果可能为偶数,也可能为奇数,这样便可以保证散列的均匀性,而如果length为奇数的话,很明显length-1为偶数,它的最后一位是0,这样h&(length-1)的最后一位肯定为0,即只能为偶数,这样任何hash值都只会被散列到数组的偶数下标位置上,这便浪费了近一半的空间,因此,length取2的整数次幂,是为了使不同hash值发生碰撞的概率较小,这样就能使元素在哈希表中均匀地散列。
这看上去很简单,其实比较有玄机的,我们举个例子来说明:
假设数组长度分别为15和16,优化后的hash码分别为8和9,那么&运算后的结果如下:
       h & (table.length-1)                     hash                             table.length-1
       8 & (15-1):                                 0100                   &              1110                   =                0100
       9 & (15-1):                                 0101                   &              1110                   =                0100
       -----------------------------------------------------------------------------------------------------------------------
       8 & (16-1):                                 0100                   &              1111                   =                0100
       9 & (16-1):                                 0101                   &              1111                   =                0101
从上面的例子中可以看出:当它们和15-1(1110)“与”的时候,产生了相同的结果,也就是说它们会定位到数组中的同一个位置上去,这就产生了碰撞,8和9会被放到数组中的同一个位置上形成链表,那么查询的时候就需要遍历这个链 表,得到8或者9,这样就降低了查询的效率。同时,我们也可以发现,当数组长度为15的时候,hash值会与15-1(1110)进行“与”,那么 最后一位永远是0,而0001,0011,0101,1001,1011,0111,1101这几个位置永远都不能存放元素了,空间浪费相当大,更糟的是这种情况中,数组可以使用的位置比数组长度小了很多,这意味着进一步增加了碰撞的几率,减慢了查询的效率!而当数组长度为16时,即为2的n次方时,2n-1得到的二进制数的每个位上的值都为1,这使得在低位上&时,得到的和原hash的低位相同,加之hash(int h)方法对key的hashCode的进一步优化,加入了高位计算,就使得只有相同的hash值的两个值才会被放到数组中的同一个位置上形成链表。
所以说,当数组长度为2的n次幂的时候,不同的key算得得index相同的几率较小,那么数据在数组上分布就比较均匀,也就是说碰撞的几率小,相对的,查询的时候就不用遍历某个位置上的链表,这样查询效率也就较高了。
根据上面 put 方法的源代码可以看出,当程序试图将一个key-value对放入HashMap中时,程序首先根据该 key 的 hashCode() 返回值决定该 Entry 的存储位置:如果两个 Entry 的 key 的 hashCode() 返回值相同,那它们的存储位置相同。如果这两个 Entry 的 key 通过 equals 比较返回 true,新添加 Entry 的 value 将覆盖集合中原有 Entry 的 value,但key不会覆盖。如果这两个 Entry 的 key 通过 equals 比较返回 false,新添加的 Entry 将与集合中原有 Entry 形成 Entry 链,而且新添加的 Entry 位于 Entry 链的头部——具体说明继续看 addEntry() 方法的说明。
1 void addEntry(int hash, K key, V value, int bucketIndex) {
2         Entry<k> e = table[bucketIndex]; //如果要加入的位置有值,将该位置原先的值设置为新entry的next,也就是新entry链表的下一个节点
3         table[bucketIndex] = new Entry(hash, key, value, e);
4         if (size++ >= threshold) //如果大于临界值就扩容
5             resize(2 * table.length); //以2的倍数扩容
6     }</k>
参数bucketIndex就是indexFor函数计算出来的索引值,第2行代码是取得数组中索引为bucketIndex的Entry对象,第3行就是用hash、key、value构建一个新的Entry对象放到索引为bucketIndex的位置,并且将该位置原先的对象设置为新对象的next构成链表。
第4行和第5行就是判断put后size是否达到了临界值threshold,如果达到了临界值就要进行扩容,HashMap扩容是扩为原来的两倍。
4、调整大小
resize()方法如下:
重新调整HashMap的大小,newCapacity是调整后的单位

 1     void resize(int newCapacity) {
 2         Entry[] oldTable = table;
 3         int oldCapacity = oldTable.length;
 4         if (oldCapacity == MAXIMUM_CAPACITY) {
 5             threshold = Integer.MAX_VALUE;
 6             return;
 7        }
 8
 9         Entry[] newTable = new Entry[newCapacity];
10         transfer(newTable);//用来将原先table的元素全部移到newTable里面
11         table = newTable;  //再将newTable赋值给table
12         threshold = (int)(newCapacity * loadFactor);//重新计算临界值
13     }
新建了一个HashMap的底层数组,上面代码中第10行为调用transfer方法,将HashMap的全部元素添加到新的HashMap中,并重新计算元素在新的数组中的索引位置
当HashMap中的元素越来越多的时候,hash冲突的几率也就越来越高,因为数组的长度是固定的。所以为了提高查询的效率,就要对HashMap的数组进行扩容,数组扩容这个操作也会出现在ArrayList中,这是一个常用的操作,而在HashMap数组扩容之后,最消耗性能的点就出现了:原数组中的数据必须重新计算其在新数组中的位置,并放进去,这就是resize。
那么HashMap什么时候进行扩容呢?当HashMap中的元素个数超过数组大小*loadFactor时,就会进行数组扩容,loadFactor的默认值为0.75,这是一个折中的取值。也就是说,默认情况下,数组大小为16,那么当HashMap中元素个数超过16*0.75=12的时候,就把数组的大小扩展为 2*16=32,即扩大一倍,然后重新计算每个元素在数组中的位置,扩容是需要进行数组复制的,复制数组是非常消耗性能的操作,所以如果我们已经预知HashMap中元素的个数,那么预设元素的个数能够有效的提高HashMap的性能。
5、数据读取

1.public V get(Object key) {
2.    if (key == null)
3.        return getForNullKey();
4.    int hash = hash(key.hashCode());
5.    for (Entry<k> e = table[indexFor(hash, table.length)];
6.        e != null;
7.        e = e.next) {
8.        Object k;
9.        if (e.hash == hash && ((k = e.key) == key || key.equals(k)))
10.            return e.value;
11.    }
12.    return null;
13.}</k>
有了上面存储时的hash算法作为基础,理解起来这段代码就很容易了。从上面的源代码中可以看出:从HashMap中get元素时,首先计算key的hashCode,找到数组中对应位置的某一元素,然后通过key的equals方法在对应位置的链表中找到需要的元素。
6、HashMap的性能参数:
HashMap 包含如下几个构造器:
HashMap():构建一个初始容量为 16,负载因子为 0.75 的 HashMap。
HashMap(int initialCapacity):构建一个初始容量为 initialCapacity,负载因子为 0.75 的 HashMap。
HashMap(int initialCapacity, float loadFactor):以指定初始容量、指定的负载因子创建一个 HashMap。
HashMap的基础构造器HashMap(int initialCapacity, float loadFactor)带有两个参数,它们是初始容量initialCapacity和加载因子loadFactor。
initialCapacity:HashMap的最大容量,即为底层数组的长度。
loadFactor:负载因子loadFactor定义为:散列表的实际元素数目(n)/ 散列表的容量(m)。
负载因子衡量的是一个散列表的空间的使用程度,负载因子越大表示散列表的装填程度越高,反之愈小。对于使用链表法的散列表来说,查找一个元素的平均时间是O(1+a),因此如果负载因子越大,对空间的利用更充分,然而后果是查找效率的降低;如果负载因子太小,那么散列表的数据将过于稀疏,对空间造成严重浪费。
HashMap的实现中,通过threshold字段来判断HashMap的最大容量:
threshold = (int)(capacity * loadFactor);
<br/>
结合负载因子的定义公式可知,threshold就是在此loadFactor和capacity对应下允许的最大元素数目,超过这个数目就重新resize,以降低实际的负载因子。默认的的负载因子0.75是对空间和时间效率的一个平衡选择。当容量超出此最大容量时, resize后的HashMap容量是容量的两倍:
The above is the detailed content of HashMap source code analysis. For more information, please follow other related articles on the PHP Chinese website!


![[Web front-end] Node.js quick start](https://img.php.cn/upload/course/000/000/067/662b5d34ba7c0227.png)


