In the past two years, more projects have used annotations for ORM mapping of some relatively stable entity classes, which makes programming more concise and simple. In fact, there are not many changes in the operation process between using annotations for ORM mapping and using xml for mapping. The main steps are: importing packages, writing annotated entity classes, writing core configuration files, and writing test classes.
The project code has been uploaded to GitHub: Project name: HibernateUseAnnotation
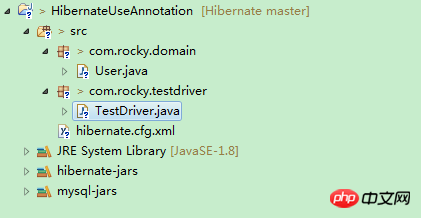
The entire project structure is as follows:

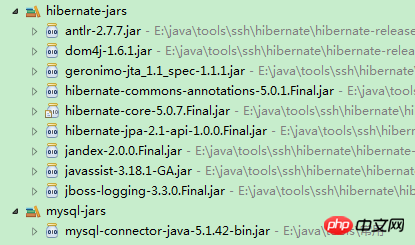
The author is using the MySQL database , so the imported data package is as shown below:

The annotations used for mapping are basically defined in the javax.persistence.* package. The main ones I commonly use are the following four :
1 package com.rocky.domain; 2 3 import javax.persistence.Entity; 4 import javax.persistence.Id; 5 import javax.persistence.Table; 6 7 @Entity 8 @Table(name = "tb_user") 9 public class User10 {11 @Id12 private Integer uId;13 private String uName;14 private Integer uAge;15 public User()16 {17 super();18 }19 @Override20 public String toString()21 {22 return "User [uId=" + uId + ", uName=" + uName + ", uAge=" + uAge + "]";23 }24 public Integer getuId()25 {26 return uId;27 }28 public void setuId(Integer uId)29 {30 this.uId = uId;31 }32 public String getuName()33 {34 return uName;35 }36 public void setuName(String uName)37 {38 this.uName = uName;39 }40 public Integer getuAge()41 {42 return uAge;43 }44 public void setuAge(Integer uAge)45 {46 this.uAge = uAge;47 }48 }The configuration file using annotations is basically the same as the configuration file mapped by xml, but the attribute used when introducing external mapping is class instead of resource attribute.
1 <?xml version='1.0' encoding='UTF-8'?> 2 <!DOCTYPE hibernate-configuration PUBLIC 3 "-//Hibernate/Hibernate Configuration DTD 3.0//EN" 4 "http://hibernate.sourceforge.net/hibernate-configuration-3.0.dtd"> 5 6 <hibernate-configuration> 7 <session-factory> 8 9 <!--指定数据库的参数 -->10 <property name="hibernate.dialect">org.hibernate.dialect.MySQLDialect</property>11 <property name="hibernate.connection.driver_class">com.mysql.jdbc.Driver</property>12 <property name="hibernate.connection.url">jdbc:mysql://192.168.100.100:3306/test</property>13 <property name="hibernate.connection.username">root</property>14 <property name="hibernate.connection.password">1</property>15 16 <!--指定hibernate是否显式SQL语句及其格式化 -->17 <property name="hibernate.show_sql">true</property>18 <property name="hibernate.format_sql">true</property>19 20 <!--指定表的生成方式-即是否由hibernate自动创建表,其取值为:create-drop、21 create、validate、update-->22 <property name="hibernate.hbm2ddl.auto">update</property>23 24 <!--引入 ORM配置文件 -->25 <mapping class="com.rocky.domain.User"/>26 </session-factory>27 28 </hibernate-configuration>
1 package com.rocky.testdriver; 2 3 import org.hibernate.Session; 4 import org.hibernate.SessionFactory; 5 import org.hibernate.Transaction; 6 import org.hibernate.cfg.Configuration; 7 8 import com.rocky.domain.User; 9 10 public class TestDriver11 {12 13 public static void main(String[] args)14 {15 // 加载配置文件16 Configuration cfg = new Configuration();17 cfg.configure();18 // 创建会话工厂19 SessionFactory factory = cfg.buildSessionFactory();20 // 获取非线程绑定会话21 Session session = factory.openSession();22 // 开启事务23 Transaction tx = session.beginTransaction();24 // 创建User对象25 User user = new User();26 user.setuId(1);27 user.setuName("rocky");28 user.setuAge(28);29 30 // 将数据插入数据库31 session.save(user);32 33 // 提交事务34 tx.commit();35 // 关闭会话36 session.close();37 }38 39 }The above is the detailed content of Introduction to ORM mapping using annotations. For more information, please follow other related articles on the PHP Chinese website!


