现在实现圆角普遍用图片来控制,这种方法有其优点(产生的圆角平滑)。 但同时他也要求有吻合的图片,如果要动态的改变div的样式颜色则有些力不从心。还有就是用js来实现。
实现后的调用代码 如下
var objDiv = getRoundDiv.call(document,"solid 1px yellow","#dddddd")
objDiv.Div.style.width="100px";
objDiv.Content.style.margin="6 6 6 6 "
objDiv.Content.innerText="这是一个圆角div测试"
document.body.appendChild(objDiv.Div);
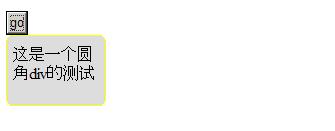 这样就产生了一个圆角div
 实现原理:原理其实很简单,在div的top和bottom 加上三条线,用这三条线的不同长度来产生圆角的效果。
实现过程: 如何实现这三条线呢。 用
这个元素,将其高度 设置为1px 。如果要显示边框则为其添加左边框和右边框。添加好线条以后,将内容div 和这三条线放在一个容器里,这个容器也是一个div。最终返回一个div类,这个类放两个属性,一个是容器div,通过这个容器div可以控制图形出现的位置和大小高度等属性。另一个属性是内容div,通过这个div可以设置这个div的内容,margin,字体颜色,背景颜色,字体大小,等属性。
注意的问题: 调用 getRoundDiv 这个方法需要传递一个方法上下文。我的理解是方法上下文相当与一个指针,指向调用方法的对象。为什么要用这个方法上下文呢? 比如要在ie的 creatPopup 方法 产生出来的popup文档内新建一个圆角div的话,由于popup只能加载他自己创建的控件,所以可以将popup对象传递到方法内部,成为方法上下文指向的对象。 传递上下文的方法有两种function.call(obj,"arg1","arg2") 类似与这样。 另一种是 function.apply(obj,arguments)
详细代码如下:
/**************************************************************************/
/*RoundDiv.js 产生一个圆角div
调用前需设置函数上下文(上下文是指,要创建div的窗口) 例如 var objDiv = getRoundDiv.call(document,"","#dddddd")
函数参数argBorderStyle: 边框样式,字符串 例如 "1px solid black"
函数参数argBgColor: 背景颜色,字符串 例如 "#ffffff"
现在只支持边框为1像素 如果超过1像素产生的图形会比较奇怪
如果不设置边框 则没有边框 可以正常使用
本函数返回的是一个RoundDiv自定义类
如果要设置div的内容请用 obj.Content.innerHtml 或 obj.Content.innerText设置
如果要设置div的高度请用 obj.Div.style.width obj.Div.style.height设置
*/
/**************************************************************************/
/**************************************************************************/
//取得一个圆角div
function getRoundDiv(argBorderStyle,argBgColor){
//创建元素
var divPane =this.createElement("div")
var divContent =this.createElement("div")
var divContentMax =this.createElement("div")
var bTop =this.createElement("b")
var bBottom =this.createElement("b")
var bTop1 =this.createElement("b")
var bTop2 =this.createElement("b")
var bTop3 =this.createElement("b")
var bTop4 =this.createElement("b")
var bBottom1 =this.createElement("b")
var bBottom2 =this.createElement("b")
var bBottom3 =this.createElement("b")
var bBottom4 =this.createElement("b")
//背景设置
divPane.style.backgroundColor=argBgColor;
divContent.style.backgroundColor=argBgColor;
divContentMax.style.backgroundColor=argBgColor;
bTop1.style.backgroundColor=argBgColor;
bTop2.style.backgroundColor=argBgColor;
bTop3.style.backgroundColor=argBgColor;
bTop4.style.backgroundColor=argBgColor;
bBottom1.style.backgroundColor=argBgColor;
bBottom2.style.backgroundColor=argBgColor;
bBottom3.style.backgroundColor=argBgColor;
bBottom4.style.backgroundColor=argBgColor;
bTop.style.backgroundColor="#ffffff";
bBottom.style.backgroundColor="#ffffff";
//样式设置
bTop.style.overflow="hidden";
bBottom.style.overflow="hidden";
bTop1.style.overflow="hidden";
bTop2.style.overflow="hidden";
bTop3.style.overflow="hidden";
bTop4.style.overflow="hidden";
bBottom1.style.overflow="hidden";
bBottom2.style.overflow="hidden";
bBottom3.style.overflow="hidden";
bBottom4.style.overflow="hidden";
bTop.style.display="block";
bBottom.style.display="block";
bTop1.style.display="block";
bTop2.style.display="block";
bTop3.style.display="block";
bTop4.style.display="block";
bBottom1.style.display="block";
bBottom2.style.display="block";
bBottom3.style.display="block";
bBottom4.style.display="block";
//高度设置
divContent.style.height="100%";
divContentMax.style.height="100%";
bTop1.style.height="1px";
bTop2.style.height="1px";
bTop3.style.height="1px";
bTop4.style.height="2px";
bBottom1.style.height="1px";
bBottom2.style.height="1px";
bBottom3.style.height="1px";
bBottom4.style.height="2px";
//边框设置
divContentMax.style.borderLeft=argBorderStyle
divContentMax.style.borderRight=argBorderStyle
bTop1.style.borderLeft=argBorderStyle;
bTop1.style.borderRight=argBorderStyle;
bTop1.style.borderTop=argBorderStyle;
bTop2.style.borderLeft=argBorderStyle;
bTop2.style.borderRight=argBorderStyle;
bTop3.style.borderLeft=argBorderStyle;
bTop3.style.borderRight=argBorderStyle;
bTop4.style.borderRight=argBorderStyle;
bTop4.style.borderLeft=argBorderStyle;
bBottom1.style.borderLeft=argBorderStyle;
bBottom1.style.borderRight=argBorderStyle;
bBottom1.style.borderTop=argBorderStyle;
bBottom2.style.borderLeft=argBorderStyle;
bBottom2.style.borderRight=argBorderStyle;
bBottom3.style.borderLeft=argBorderStyle;
bBottom3.style.borderRight=argBorderStyle;
bBottom4.style.borderLeft=argBorderStyle;
bBottom4.style.borderRight=argBorderStyle;
//空白间距设置
bTop1.style.margin="0 4px 0 4px"
bTop2.style.margin="0 3px 0 3px"
bTop3.style.margin="0 2px 0 2px"
bTop4.style.margin="0 1px 0 1px"
bBottom1.style.margin="0 4px 0 4px"
bBottom2.style.margin="0 3px 0 3px"
bBottom3.style.margin="0 2px 0 2px"
bBottom4.style.margin="0 1px 0 1px"
//控件拼装
bTop.appendChild(bTop1);
bTop.appendChild(bTop1);
bTop.appendChild(bTop2);
bTop.appendChild(bTop3);
bTop.appendChild(bTop4);
bBottom.appendChild(bBottom4);
bBottom.appendChild(bBottom3);
bBottom.appendChild(bBottom2);
bBottom.appendChild(bBottom1);
divContentMax.appendChild(divContent)
divPane.appendChild(bTop)
divPane.appendChild(divContentMax)
divPane.appendChild(bBottom)
var objRoundDiv = new RoundDiv();
objRoundDiv.Div=divPane;
objRoundDiv.Content=divContent;
return objRoundDiv;
}
/**************************************************************************/
/**************************************************************************/
//自定义类(用来装载div对应内容)
function RoundDiv(){
this.content=0;//div内容
this.div=0;//div容器
}
/**************************************************************************/


![[Web front-end] Node.js quick start](https://img.php.cn/upload/course/000/000/067/662b5d34ba7c0227.png)


