
 Web Front-end
JS Tutorial
Detailed explanation of the function of using jQuery+Angular to implement verification code on the login interface
Web Front-end
JS Tutorial
Detailed explanation of the function of using jQuery+Angular to implement verification code on the login interface
Detailed explanation of the function of using jQuery+Angular to implement verification code on the login interface

This article mainly introduces the detailed explanation of the login interface verification code using jQuery and Angular. Friends in need can refer to the following
Written in front:
Previous events , I made a login function using ajax background asynchronous interaction, and added a verification code function on it. The principle behind this function is easy to understand, and it is also very simple to implement. I would like to write a wave to share the process of writing it myself. I've run into a lot of pitfalls, so I'll write it in detail as usual. You can use it as a reference. Friends who like it can give it a like or follow it.
Finally achieved effect:
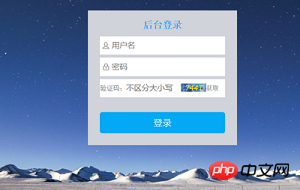
Before clicking to log in, it will first be judged whether the verification code is correct (the verification code does not need to be distinguished) case (can also be case-sensitive), if the verification code is incorrect, the verification code will be refreshed, and no cross-domain login operation will be performed before the verification code is verified.
the whole idea.
1. Take a four-digit random number
2. Assign the value to the input box of the verification code.
3. Before clicking to log in, use if to determine whether the value of the verification code input box is equal to the value of the input box. If they are equal, go to the next step. If they are not equal, an error will be returned directly
4. The ajax part inside can be directly inserted.
Details:
1. The background image of the verification code box here was found online. It seems that the verification code is more formal, otherwise it looks a bit low.
2. Being case-insensitive actually uses the toUpperCase() method of js to convert lowercase to uppercase. Because it is native js, it can also be used in angular!
3. Encapsulate the verification code into a function, and then call this function at the end when you click to log in. You can refresh the function every time.
4. To prevent the verification code from being copied, use: disabled="disabled" in HTML - to prevent the verification code box text from being selected.
The following is a detailed explanation of the implementation process of the code part (the comments are written in more detail):
htmlThe code should not be explained. If you don’t understand, you can leave it in the comment area ask me. There is some content about angular below. If you haven’t learned it yet, you can skip it. It will not affect the implementation effect. (You can copy the code and try it locally.)
First let’s talk about the process of implementation with jq, and then the process of implementation with angular. Anyone who has read a few of my articles knows that I will try my best to All codes and every step are clearly commented. I hope it can help everyone.
Here is the content of html:
<p class="js5-form" id="js5-form" ng-controller="enterCtrl">
    <p id="enter-all" >
      <h3>jnshu后台登录</h3>
      <form action="" name="myForm">
        <p class="js5-input-p">
          <p class="js5-input-img1"></p>
          <input id="js5-userNum" type="text" name="userName" placeholder="用户名" maxlength="12" ng-model="userName" ng-keyup="mykey($event)" required/>
        </p>
      </form>
      <form action="" name="registerForm">
        <p class="js5-input-p">
          <p class="js5-input-img2"></p>
          <input id="js5-password" type="password" name="userPsd" placeholder="密码" maxlength="20" ng-model="userPsd" ng-keyup="mykey($event)" ng-minlength="5" ng-maxlength="16" required/>
        </p>
      </form>
      <!--账号和密码的登录框-->
      <form action="" >
        <p class="js5-input-p">
          <span class="js5-input-pSpan">验证码:</span>
          <input type="text" placeholder="不区分大小写" class="js5-form3-input" id="js5-form3-input" ng-model="writeCode" maxlength="6" ng-keyup="mykey($event)">
          <input type="text" class="js5-authCode" value="" id="js5-authCode" ng-model="showAuthCode" disabled="disabled">
           <!--disabled="disabled"禁止验证码框文字被选中-->
          <span class="spanShift" ng-click="changeVerify()">获取</span>
        </p>
</form>Here is the jq code implementation part:
var authCode;
randomCode=$("#js5-authCode").eq(0);//获取验证码出现的方框dom
console.log(randomCode);
function createCode() {
authCode="";//设置这个为空变量,然后往里面添加随机数
var authCodeLength=4;//随机数的长度
randomArray=[0,1,2,3,4,5,6,7,8,9,'A','B','C','D','E','F','G','H','I','J','K','L','M','N','O','P','Q','R', 'S','T','U','V','W','X','Y','Z'];
//创建一个数组,随机数从里面选择四位数或者更多
for(var i=0;i<authCodeLength;i++){
var index=Math.floor(Math.random()*36);//随机取一位数
authCode +=randomArray[index];//取四位数,并+相连
}
console.log(authCode);//取到四位随机数之后,跳出循环
randomCode.val(authCode);//将四位随机数赋值给验证码出现的方框
console.log(randomCode.val());
}
//以上是封装的获取验证码的函数
$(function () {//当文档加载结束后,运行这个函数
createCode();//一开始先运行一遍取随机数的函数
$("#js5-btn").click(function () {//这里是一个点击事件
console.log(window.randomCode);
//这里写了一个必报,window.randomCode是在文档里面找到这个dom,否则上文的四个随机数传不到这里来
var randomCode=window.randomCode.val();
console.log(randomCode);
var authInput=$("#js5-form3-input").val().toUpperCase(),
user=$("#js5-userNum").val(),
psd=$('#js5-password').val();
//上面三个是分别获取验证码输入框的值,账号的值,密码的值。
//验证码输入框这里,最后toUpperCase()方法是把小写转换成大写
console.log(authInput);
console.log(randomCode);
console.log(user,psd);
if (randomCode===authInput) {
//验证验证码,在验证码输入框与验证码的值不相等之前,是不会进入下面登录的步骤的,验证码是第一步关卡
var firstAjax = new XMLHttpRequest();
//创建ajax对象,这里是ajax跨域的部分
firstAjax.open("POST", "这里是你url跨域的地址", true);
//连接服务器,跨域。
firstAjax.setRequestHeader("Content-type", "application/x-www-form-urlencoded");
//setRequestHeader() 方法指定了一个 HTTP 请求的头部,它应该包含在通过后续 send() 调用而发布的请求中。
//可以理解为,这是http的请求头,固定格式,位置必须要在open之后,send之前。
firstAjax.send("name=" + user + "&pwd=" + psd);
//在使用POST方式时参数代表着向服务器发送的数据,前面两个是账号框和密码框
firstAjax.onreadystatechange = function () {//当参数被传入服务器的时候,引用监听事件。
if (firstAjax.readyState == 4) {//readyState四种状态,当执行四步完成之后
if (firstAjax.status == 200) {//返回的是200,代表成功,404未找到。
var returnValue = JSON.parse(firstAjax.responseText);//取回由服务器返回的数据
console.log(returnValue);
if (returnValue.code == 0) {//这里是后端定义的,当code==0的时候,代表登录正确。
window.location.href = "https://www.baidu.com/index.php?tn=98012088_3_dg&ch=1";
//后端返回的数据验证成功就跳转链接。
}
else {
$("#js5Message").text(returnValue.message);//当code不等于0时,返回出错信息
}
} else {
alert("出错咯,咯咯咯");//返回的不是200的时候,出错。
}
}
};
createCode();//点击登录按钮,验证之后会刷新验证码
}
else {
$("#js5Message").text("验证码错误,请重新输入");
createCode();//验证码错误,刷新验证码。
}
})
});This is the angular code implementation part:
The jq part is written in more detail. It is also quite detailed here. If you don’t understand, you can look back at the jq part. The principles are the same. Copy it locally. Try more.
var enter=angular.module("myApp");
enter.controller('enterCtrl',['$scope','$http','$state',function ($scope,$http,$state) {
  $scope.changeVerify=function () {//定义了一个点击事件,获取验证码
    var authCode="";
    var authCodeLength=4;//取几个随机数字
    var randomArray=[0,1,2,3,4,5,6,7,8,9,'A','B','C','D','E','F','G','H','I','J','K','L','M','N','O','P','Q','R', 'S','T','U','V','W','X','Y','Z'];
    for(var i=0;i<authCodeLength;i++){
      var index=Math.floor(Math.random()*36);//随机取一位数
      authCode +=randomArray[index];//取四位数,并+相连
    }
    $scope.showAuthCode=authCode;//赋值
    console.log($scope.showAuthCode);
  };
  //上面是封装的获取验证码的函数,会在下面进行调用
 (function () {
    $scope.changeVerify();//调用点击事件。
    $scope.enter=function (userName,userPsd) {
      //点击登录按钮事件,将双向绑定的账号密码当做参数传入函数
      if ($scope.writeCode.toUpperCase() ==$scope.showAuthCode){//toUpperCase()将小写转化为大写
        //双向绑定验证码输入框,可以直接使用,这里是验证验证码
        $http({
          method:"POST",
          url:"你的跨域地址",//$http的固定格式
          params:{
            "name":userName,
            "pwd":userPsd
            //双向绑定的参数传到下个页面
          }
        }).then(function (res) {
          //获取服务器返回的参数
          console.log(res);
          if (res.data.code!==0){
            //参数不为0的时候,弹出提示
            alert(res.data.message);
          }else {
            //参数为0的时候,跳转页面
            $state.go("home.studentList");
          }
        })
      }else {
        alert("验证码输入错误咯,咯咯咯");
        $scope.changeVerify();//验证后,刷新验证码
      }
    }
}());Afterword
I have been writing intermittently for two days, and now I am not writing as fast as before. . That’s pretty much it. If you have any questions, please leave them in the comment area. If you have any shortcomings, you are welcome to give me some guidance and advice.
The above is the detailed content of Detailed explanation of the function of using jQuery+Angular to implement verification code on the login interface. For more information, please follow other related articles on the PHP Chinese website!

Hot AI Tools

Undresser.AI Undress
AI-powered app for creating realistic nude photos

AI Clothes Remover
Online AI tool for removing clothes from photos.

Undress AI Tool
Undress images for free

Clothoff.io
AI clothes remover

AI Hentai Generator
Generate AI Hentai for free.

Hot Article
Hot Tools

Notepad++7.3.1
Easy-to-use and free code editor

SublimeText3 Chinese version
Chinese version, very easy to use

Zend Studio 13.0.1
Powerful PHP integrated development environment

Dreamweaver CS6
Visual web development tools

SublimeText3 Mac version
God-level code editing software (SublimeText3)
Hot Topics
 1382
1382
 52
52

 What should I do if Google Chrome does not display the verification code image? Chrome browser does not display the verification code?
Mar 13, 2024 pm 08:55 PM
What should I do if Google Chrome does not display the verification code image? Chrome browser does not display the verification code?
Mar 13, 2024 pm 08:55 PM
What should I do if Google Chrome does not display the verification code image? Sometimes you need a verification code to log in to a web page using Google Chrome. Some users find that Google Chrome cannot display the content of the image properly when using image verification codes. What should be done? The editor below will introduce how to deal with the Google Chrome verification code not being displayed. I hope it will be helpful to everyone! Method introduction: 1. Enter the software, click the "More" button in the upper right corner, and select "Settings" in the option list below to enter. 2. After entering the new interface, click the "Privacy Settings and Security" option on the left. 3. Then click "Website Settings" on the right
 How to install Angular on Ubuntu 24.04
Mar 23, 2024 pm 12:20 PM
How to install Angular on Ubuntu 24.04
Mar 23, 2024 pm 12:20 PM
Angular.js is a freely accessible JavaScript platform for creating dynamic applications. It allows you to express various aspects of your application quickly and clearly by extending the syntax of HTML as a template language. Angular.js provides a range of tools to help you write, update and test your code. Additionally, it provides many features such as routing and form management. This guide will discuss how to install Angular on Ubuntu24. First, you need to install Node.js. Node.js is a JavaScript running environment based on the ChromeV8 engine that allows you to run JavaScript code on the server side. To be in Ub
 Why can't I receive the verification code on my phone?
Aug 17, 2023 pm 02:49 PM
Why can't I receive the verification code on my phone?
Aug 17, 2023 pm 02:49 PM
Failure to receive the verification code on your mobile phone is caused by network problems, mobile phone settings problems, mobile phone operator problems and personal settings problems. Detailed introduction: 1. Network problems. The network environment where the mobile phone is located is unstable or the signal is weak, which may cause the verification code to be unable to be delivered in time; 2. Mobile phone setting problems. The text message or voice function of the mobile phone is accidentally turned off, or the The verification code sending number is added to the blacklist, resulting in the verification code not being received normally; 3. Mobile phone operator issues, the mobile phone operator may have malfunctions or maintenance, resulting in the verification code not being delivered in time, etc.
 An article exploring server-side rendering (SSR) in Angular
Dec 27, 2022 pm 07:24 PM
An article exploring server-side rendering (SSR) in Angular
Dec 27, 2022 pm 07:24 PM
Do you know Angular Universal? It can help the website provide better SEO support!
 Can virtual numbers receive verification codes?
Jan 02, 2024 am 10:22 AM
Can virtual numbers receive verification codes?
Jan 02, 2024 am 10:22 AM
The virtual number can receive the verification code. As long as the mobile phone number filled in during registration complies with the regulations and the mobile phone number can be connected normally, you can receive the SMS verification code. However, you need to be careful when using virtual mobile phone numbers. Some websites do not support virtual mobile phone number registration, so you need to choose a regular virtual mobile phone number service provider.
 How to use PHP and Angular for front-end development
May 11, 2023 pm 04:04 PM
How to use PHP and Angular for front-end development
May 11, 2023 pm 04:04 PM
With the rapid development of the Internet, front-end development technology is also constantly improving and iterating. PHP and Angular are two technologies widely used in front-end development. PHP is a server-side scripting language that can handle tasks such as processing forms, generating dynamic pages, and managing access permissions. Angular is a JavaScript framework that can be used to develop single-page applications and build componentized web applications. This article will introduce how to use PHP and Angular for front-end development, and how to combine them
 PHP image processing case: How to implement the verification code function of images
Aug 17, 2023 pm 12:09 PM
PHP image processing case: How to implement the verification code function of images
Aug 17, 2023 pm 12:09 PM
PHP image processing case: How to implement the verification code function of images. With the rapid development of the Internet, verification codes have become one of the important means to protect website security. Verification code is a verification method that uses image recognition technology to determine whether the user is a real user. This article will introduce how to use PHP to implement the verification code function of images, and come with code examples. Introduction A verification code is a picture containing random characters. The user needs to enter the characters in the picture to pass the verification. The main process of implementing verification code includes generating random characters and drawing characters into pictures.
 PHP Development Guide: Implementing Verification Code Login
Jul 01, 2023 am 09:27 AM
PHP Development Guide: Implementing Verification Code Login
Jul 01, 2023 am 09:27 AM
With the development of the Internet and the popularity of smartphones, the verification code login function is adopted by more and more websites and applications. Verification code login is a login method that verifies the user's identity by entering the correct verification code to improve security and prevent malicious attacks. In PHP development, implementing a simple verification code login function is not complicated and can be completed through the following steps. Create a database table First, we need to create a table in the database to store verification code information. The table structure can contain the following fields: id: auto-incrementing primary key phon
