Vue.js directives start with v-. They are used for HTML elements. The directives provide some special features. When the directive is bound to an element, the directive will add some special features to the bound target element. Special behavior, we can think of directives as special HTML features.
Vue.js provides some built-in instructions. Now let’s introduce the commonly used built-in instructions.
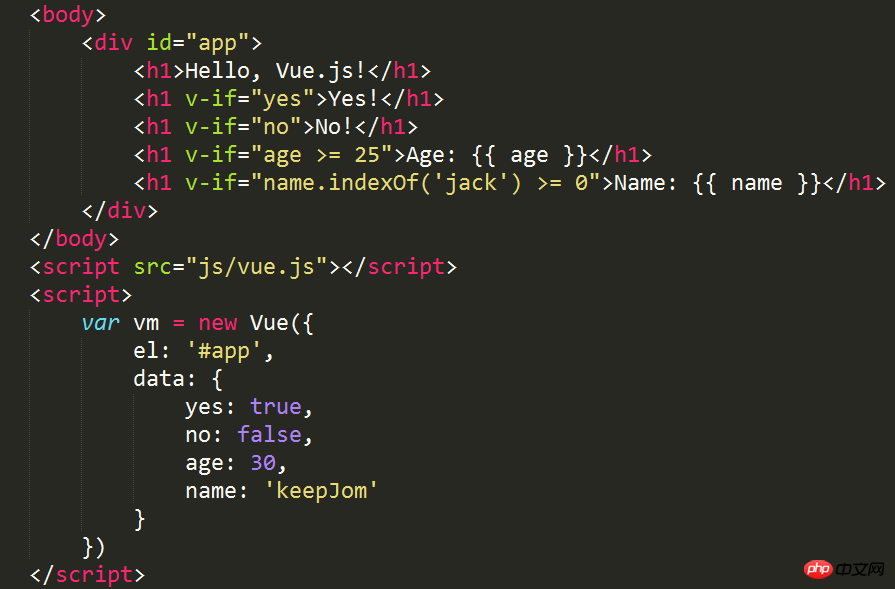
## v-if is a conditional rendering instruction, which adds or deletes elements based on the true or false expression. Its basic syntax: v-if = "expression", expression is a bool value An expression, which can be either a bool attribute or an operator that returns bool, such as the following code:
##

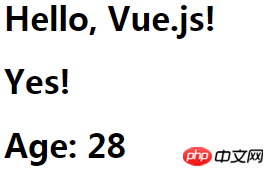
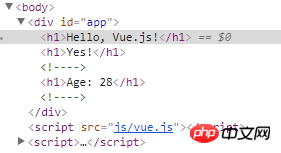
##You can see the rendering through the console The HTML code contains only these three

#You can also modify the value of the data attribute on the console, for example, change the value of yes to false, that is, vm.yes = false, then the value in the page Yes will be deleted. As an instance of vue, vm can directly access the attributes in data because each vue instance will proxy the data attribute in its option object.
Remember: When using the v-if directive, only elements whose expression is true will be rendered. This is the same as the following A difference with the v-show command that will be introduced. 
## v-show command
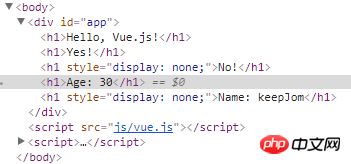
## The v-show instruction is also a conditional rendering instruction. I just mentioned that there is a difference between the v-if instruction and the v-show instruction. This difference is that the elements of the v-show instruction will is rendered, but elements whose expression is false will have the css attribute display:none set to hide them. As shown below:
v-else command

Whether the elements of the v-else directive are rendered into HTML mainly depends on the vue.js version. If it is version 2.x, then it does not matter whether it is preceded by the v-if directive Or the v-show instruction. When the previous instruction is true, the elements of the v-else instruction will not be rendered into HTML. If it is version 1.x, it depends on whether the previous one is the v-if instruction or the v-show instruction; ## When it is preceded by a v-if instruction and the instruction is true, the v-else instruction will not be Rendered into HTML; When the previous one is the v-show command, and the command is true, the v-else command will still When rendered into HTML, the css attribute display:none will be set to hide it; v-for directive ## to code:
##<!DOCTYPE html><html>
<head>
<meta charset="UTF-8">
<title></title>
<link rel="stylesheet" href="styles/demo.css" />
</head>
<body>
<p id="app">
<table>
<thead>
<tr>
<th>Name</th>
<th>Age</th>
<th>Sex</th>
</tr>
</thead>
<tbody>
<tr v-for="person in people">
<td>{{ person.name }}</td>
<td>{{ person.age }}</td>
<td>{{ person.sex }}</td>
</tr>
</tbody>
</table>
</p>
</body>
<script src="js/vue.js"></script>
<script>
var vm = new Vue({
el: '#app',
data: {
people: [{
name: 'Jack',
age: 30,
sex: 'Male'
}, {
name: 'Bill',
age: 26,
sex: 'Male'
}, {
name: 'Tracy',
age: 22,
sex: 'Female'
}, {
name: 'Chris',
age: 36,
sex: 'Male'
}]
}
}) </script></html>
 View Code
v-bind command
The v-bind command can be followed by a parameter, separated by a colon. This parameter is generally an attribute of the HTML element, for example: v-bind:class
Such as the following code:##
<!DOCTYPE html><html>
<head>
<meta charset="UTF-8">
<title></title>
<link rel="stylesheet" href="styles/demo.css" />
</head>
<body>
<p id="app">
<ul class="pagination">
<li v-for="n in pageCount">
<a href="javascripit:void(0)" v-bind:class="activeNumber === n + 1 ? 'active' : ''">{{ n + 1 }}</a>
</li>
</ul>
</p>
</body>
<script src="js/vue.js"></script>
<script>
var vm = new Vue({
el: '#app',
data: {
activeNumber: 1,
pageCount: 10
}
}) </script></html> View Code
Use the v-bind directive to act on the class of the element to set the css style for the current page.
What should be noted here is that when traversing pageCount, different versions of vue and js will cause the start of the traversal to be different;
When the version is 1 .x, the traversal starts from 0 and ends at pageCount-1;
When the version is 2.x, the traversal starts from 1 and ends at pageCount.
Used to monitor DOM events. Its usage is similar to v-bind. For example, to monitor click events: v-on:click="doSomething"
## There are two forms of calling methods: < 1>Bind a method, that is, point the event to a reference to the method
如下代码:Greet按钮就是使用第一种方法,即将事件绑定到greet()方法,而Hi按钮直接调用say()方法 

<!DOCTYPE html><html>
<head>
<meta charset="UTF-8">
<title></title>
</head>
<body>
<p id="app">
<p><input type="text" v-model="message"></p>
<p>
<!--click事件直接绑定一个方法-->
<button v-on:click="greet">Greet</button>
</p>
<p>
<!--click事件使用内联语句-->
<button v-on:click="say('Hi')">Hi</button>
</p>
</p>
</body>
<script src="js/vue.js"></script>
<script>
var vm = new Vue({
el: '#app',
data: {
message: 'Hello, Vue.js!'
}, // 在 `methods` 对象中定义方法 methods: {
greet: function() { // // 方法内 `this` 指向 vm alert(this.message)
},
say: function(msg) {
alert(msg)
}
}
}) </script></html>
View Code
v-bind与v-on的缩写方式
v-bind可以缩写为一个冒号,v-on可以缩写为一个@符号,如下:

The above is the detailed content of Detailed explanation of learning common instructions of Vue.js. For more information, please follow other related articles on the PHP Chinese website!


