

How to write vue plug-in vue.js example tutorial

This article mainly shares with you how to write vue plug-ins. Before learning, ask yourself why you should write vue plug-ins.
In a project, especially a large project, there are many parts that need to be reused, such as loading animations and pop-up boxes. It is a little troublesome to reference one by one, and if there are too many components referenced in a vue file, the code will appear bloated, so there is a need to encapsulate the vue plug-in.
After talking about the requirements, let’s take a look at the specific implementation. At present, I have tried two different plug-in writing methods, and I will introduce them one by one.
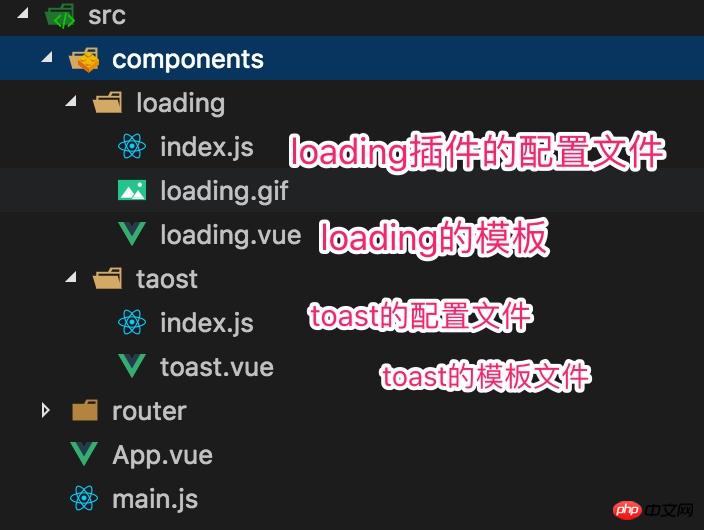
This is my project directory. The general structure is explained like this, as simple as possible and easy to understand.
One is the loading plug-in and the other is the toast plug-in. The difference is that the loading plug-in is introduced as a component, while the toast plug-in is directly added to the mount point and called by changing the status of the method.
Currently used is Jiangzi:
toast plug-in
There are two files under the toast file, the file with the suffix vue is The skeleton of this plug-in, the first js file is to put this skeleton into the Vue global and write the operation logic.
You can take a look at the content of toast.vue:
<template>
 <transition name="fade">
  <p v-show="show">
   {{message}}
  </p>

 </transition>
</template>

<script>
export default {
 data() {
 return {
  show: false,
  message: ""
 };
 }
};
</script>

<style lang="scss" scoped>
.toast {
 position: fixed;
 top: 40%;
 left: 50%;
 margin-left: -15vw;
 padding: 2vw;
 width: 30vw;
 font-size: 4vw;
 color: #fff;
 text-align: center;
 background-color: rgba(0, 0, 0, 0.8);
 border-radius: 5vw;
 z-index: 999;
}

.fade-enter-active,
.fade-leave-active {
 transition: 0.3s ease-out;
}
.fade-enter {
 opacity: 0;
 transform: scale(1.2);
}
.fade-leave-to {
 opacity: 0;
 transform: scale(0.8);
}
</style>
The main thing here There are only two contents, show that determines whether to display and message that determines what content to display.
After a quick look here, do you find any problems?
There is no props attribute in this file, that is, whether it is show or message, there is no way to modify it through parent-child component communication. So how do they handle it correctly? Of. Don't worry, let's take a look at his configuration file.
index.js:
import ToastComponent from './toast.vue'

const Toast = {};

// 注册Toast
Toast.install = function (Vue) {
 // 生成一个Vue的子类
 // 同时这个子类也就是组件
 const ToastConstructor = Vue.extend(ToastComponent)
 // 生成一个该子类的实例
 const instance = new ToastConstructor();

 // 将这个实例挂载在我创建的p上
 // 并将此p加入全局挂载点内部
 instance.$mount(document.createElement('p'))
 document.body.appendChild(instance.$el)

 // 通过Vue的原型注册一个方法
 // 让所有实例共享这个方法
 Vue.prototype.$toast = (msg, duration = 2000) => {
  instance.message = msg;
  instance.show = true;

  setTimeout(() => {

   instance.show = false;
  }, duration);
 }
}

export default ToastVue.extend(). For example, our daily use of vue to write components looks like this:
Vue.component('MyComponent',{
template:'<p>这是组件</p>'
})let component = Vue.extend({
template:'<p>这是组件</p>'
})
Vue.component('MyComponent',component)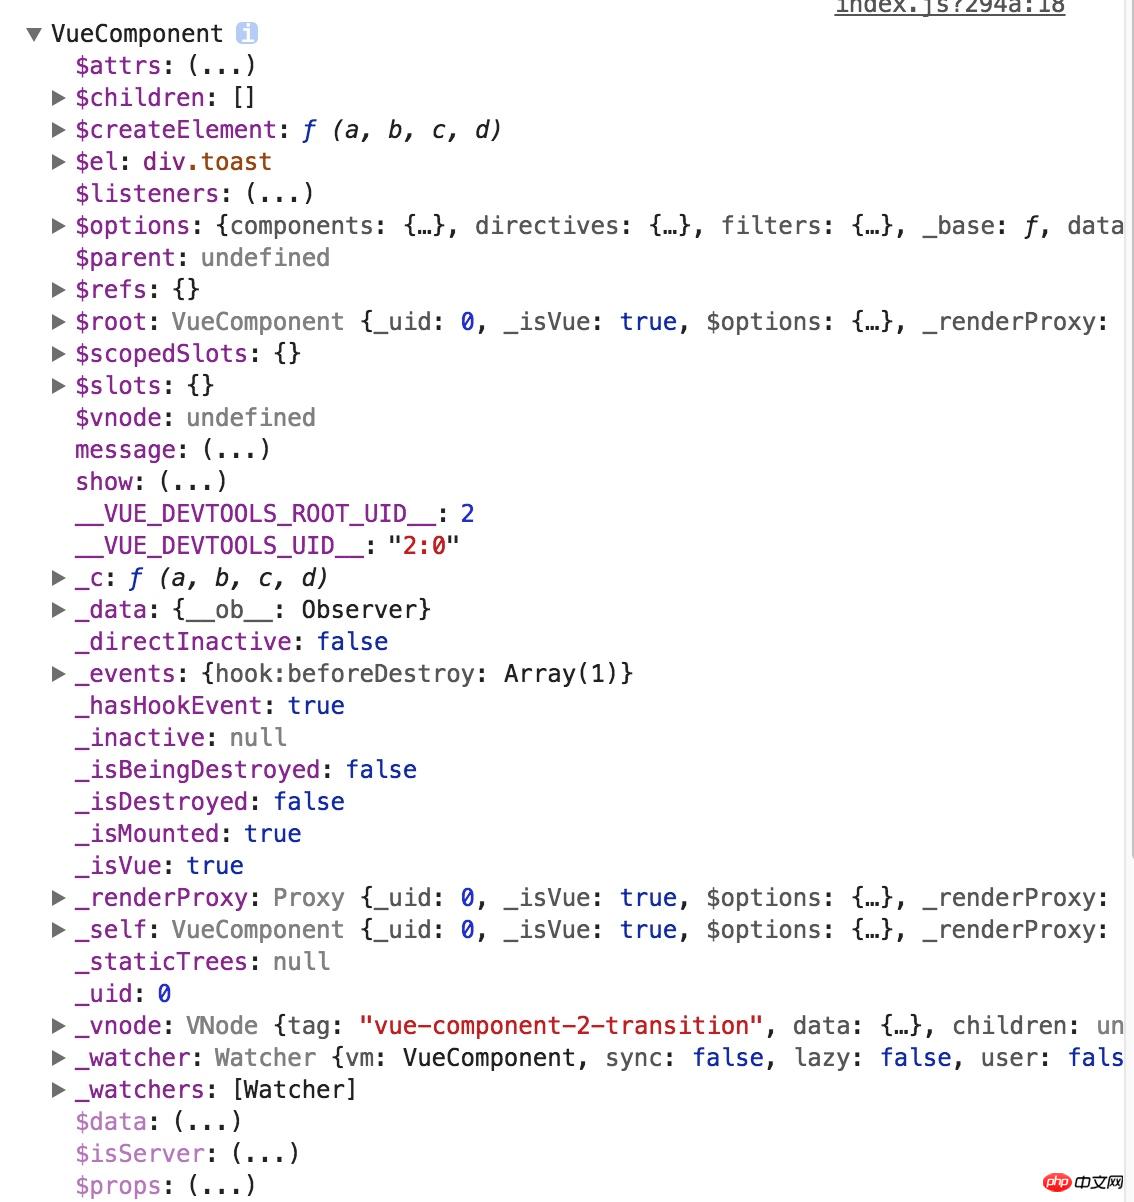
document.body.appendChild(instance.$el)
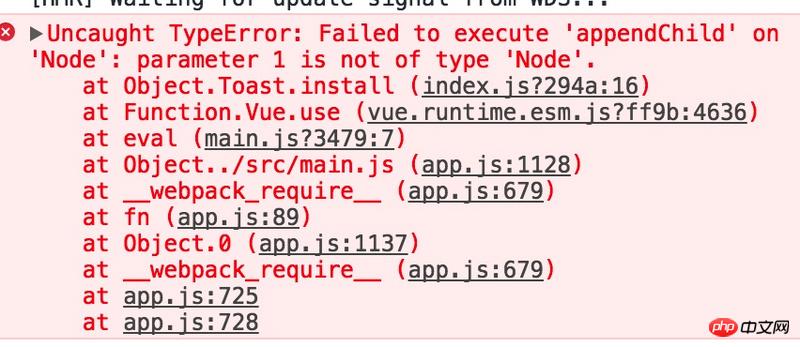
##There is a problem with
instance.$el, okay, let’s check this in the console. WTF! ! ! ! The result turned out to be undefined. Then go on
console.log(instance)
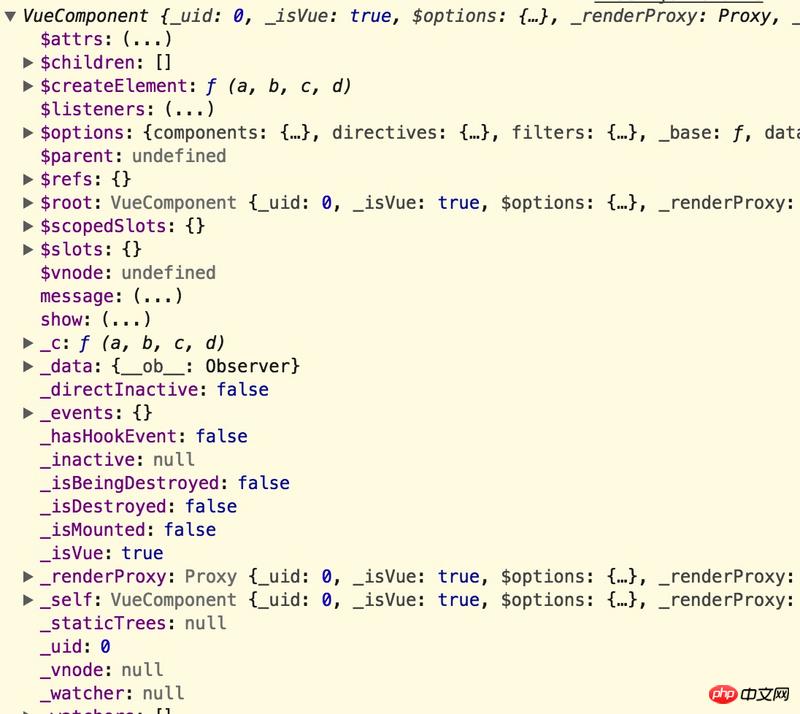 And up Comparing a picture, what did you find? Yes, $el disappeared. In other words, after I commented the sentence
instance.$mount(document.createElement('p'))
, The mount point no longer exists. Then I tried to change this sentence:
instance.$mount(instance.$el)
$el magically came back... …………
No problems have been found with this change for the time being, and it can be run as above. But in any case, this means that the instance must be mounted on a node for subsequent operations. The code after
is simple. It is nothing more than adding a method to change the plug-in state on the Vue prototype. Then export this object.
The next step is how to use it. Let’s take a look at how main.js is written:
import Vue from 'vue'
import App from './App'
// import router from './router'
import Toast from './components/taost'
Vue.use(Toast)

Vue.config.productionTip = false

/* eslint-disable no-new */
new Vue({

 // router,
 render: h => h(App)
}).$mount('#app')// app.vue
<template>
<p id="app">
<loading duration='2s' :isshow='show'></loading>
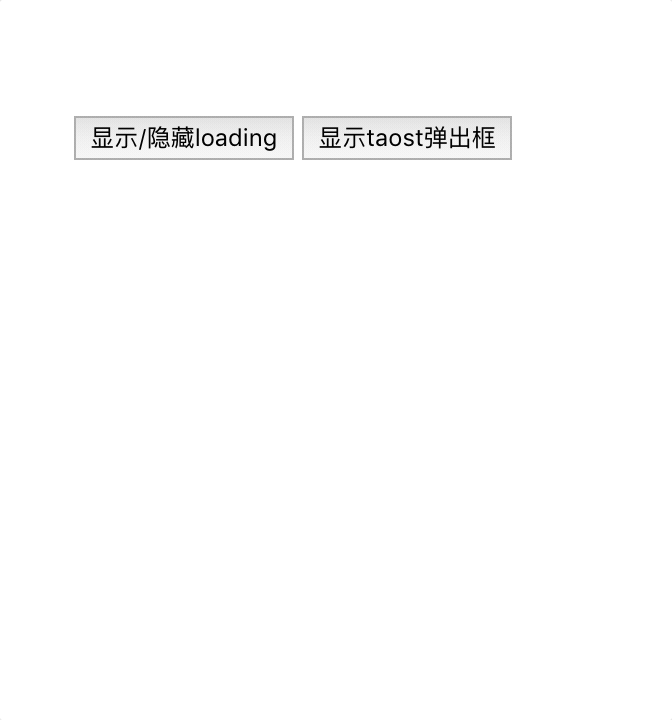
<!-- <button @click="show = !show">显示/隐藏loading</button> -->
<button @click="toast">显示taost弹出框</button>
</p>
</template>
<script>
export default {
name: "app",
data() {
return {
show: false
};
},
methods: {
toast() {
this.$toast("你好");
}
}
};
</script>
<style>
#app {
font-family: "Avenir", Helvetica, Arial, sans-serif;
-webkit-font-smoothing: antialiased;
-moz-osx-font-smoothing: grayscale;
text-align: center;
color: #2c3e50;
margin-top: 60px;
}
</style>通过在methods中增加一个方法控制写在Vue原型上的$toast对toast组件进行操作。
这样toast组件的编写过程就结束了,可以看到一开始gif图里的效果。
loading插件
经过上一个插件的讲解,这一部分就不会那么细致了,毕竟大多数都没有什么不同,我只指出不一样的地方。
<template>
<p class='wrapper' v-if="isshow">
<p class='loading'>
<img src="./loading.gif">
</p>
</p>
</template>
<script>
export default {
props: {
duration: {
type: String,
default: "1s" //默认1s
},
isshow: {
type: Boolean,
default: false
}
},
data: function() {
return {};
}
};
</script>
<style lang="scss" scoped>
</style>这个就只是一个模板,传入两个父组件的数据控制显示效果。
那再来看一下该插件的配置文件:
import LoadingComponent from './loading.vue'

let Loading = {};

Loading.install = (Vue) => {
 Vue.component('loading', LoadingComponent)
}

export default Loading;这个和taoat的插件相比,简单了很多,依然是一个空对象,里面有一个install方法,然后在全局注册了一个组件。
比较
那介绍了这两种不同的插件编写方法,貌似没有什么不一样啊,真的是这样么?
来看一下完整的main.js和app.vue这两个文件:
// main.js
import Vue from 'vue'
import App from './App'
// import router from './router'
import Toast from './components/taost'
import Loading from './components/loading'
Vue.use(Toast)
Vue.use(Loading)
Vue.config.productionTip = false
/* eslint-disable no-new */
new Vue({
// router,
render: h => h(App)
}).$mount('#app')
// app.vue
<template>
<p id="app">
<loading duration='2s' :isshow='show'></loading>
<!-- <button @click="show = !show">显示/隐藏loading</button> -->
<button @click="toast">显示taost弹出框</button>
</p>
</template>
<script>
export default {
name: "app",
data() {
return {
show: false
};
},
methods: {
toast() {
this.$toast("你好");
}
}
};
</script>
<style>
#app {
font-family: "Avenir", Helvetica, Arial, sans-serif;
-webkit-font-smoothing: antialiased;
-moz-osx-font-smoothing: grayscale;
text-align: center;
color: #2c3e50;
margin-top: 60px;
}
</style>可以看出来,loading是显示的写在app.vue模板里的,而toast并没有作为一个组件写入,仅仅是通过一个方法控制显示。
来看一下html结构和vue工具给出的结构:
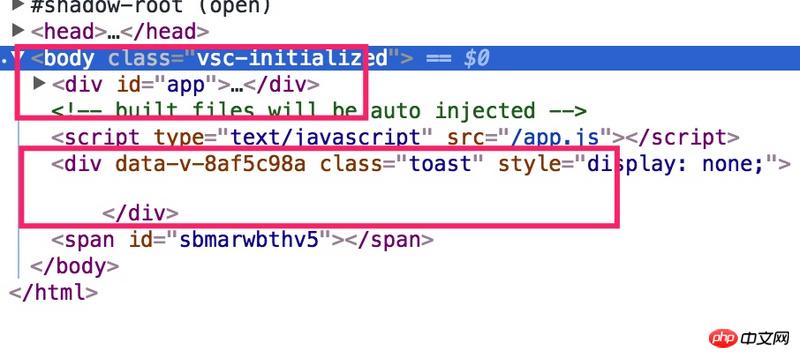

看出来了么,toast插件没有在挂载点里面,而是独立存在的,也就是说当执行
vue.use(toast)
相关推荐:
The above is the detailed content of How to write vue plug-in vue.js example tutorial. For more information, please follow other related articles on the PHP Chinese website!

Hot AI Tools

Undresser.AI Undress
AI-powered app for creating realistic nude photos

AI Clothes Remover
Online AI tool for removing clothes from photos.

Undress AI Tool
Undress images for free

Clothoff.io
AI clothes remover

Video Face Swap
Swap faces in any video effortlessly with our completely free AI face swap tool!

Hot Article
Hot Tools

Notepad++7.3.1
Easy-to-use and free code editor

SublimeText3 Chinese version
Chinese version, very easy to use

Zend Studio 13.0.1
Powerful PHP integrated development environment

Dreamweaver CS6
Visual web development tools

SublimeText3 Mac version
God-level code editing software (SublimeText3)
Hot Topics


 PyCharm Beginner's Guide: Comprehensive understanding of plug-in installation!
Feb 25, 2024 pm 11:57 PM
PyCharm Beginner's Guide: Comprehensive understanding of plug-in installation!
Feb 25, 2024 pm 11:57 PM
PyCharm is a powerful and popular Python integrated development environment (IDE) that provides a wealth of functions and tools so that developers can write code more efficiently. The plug-in mechanism of PyCharm is a powerful tool for extending its functions. By installing different plug-ins, various functions and customized features can be added to PyCharm. Therefore, it is crucial for newbies to PyCharm to understand and be proficient in installing plug-ins. This article will give you a detailed introduction to the complete installation of PyCharm plug-in.
![Error loading plugin in Illustrator [Fixed]](https://img.php.cn/upload/article/000/465/014/170831522770626.jpg?x-oss-process=image/resize,m_fill,h_207,w_330) Error loading plugin in Illustrator [Fixed]
Feb 19, 2024 pm 12:00 PM
Error loading plugin in Illustrator [Fixed]
Feb 19, 2024 pm 12:00 PM
When launching Adobe Illustrator, does a message about an error loading the plug-in pop up? Some Illustrator users have encountered this error when opening the application. The message is followed by a list of problematic plugins. This error message indicates that there is a problem with the installed plug-in, but it may also be caused by other reasons such as a damaged Visual C++ DLL file or a damaged preference file. If you encounter this error, we will guide you in this article to fix the problem, so continue reading below. Error loading plug-in in Illustrator If you receive an "Error loading plug-in" error message when trying to launch Adobe Illustrator, you can use the following: As an administrator
 Share three solutions to why Edge browser does not support this plug-in
Mar 13, 2024 pm 04:34 PM
Share three solutions to why Edge browser does not support this plug-in
Mar 13, 2024 pm 04:34 PM
When users use the Edge browser, they may add some plug-ins to meet more of their needs. But when adding a plug-in, it shows that this plug-in is not supported. How to solve this problem? Today, the editor will share with you three solutions. Come and try it. Method 1: Try using another browser. Method 2: The Flash Player on the browser may be out of date or missing, causing the plug-in to be unsupported. You can download the latest version from the official website. Method 3: Press the "Ctrl+Shift+Delete" keys at the same time. Click "Clear Data" and reopen the browser.
 What is the Chrome plug-in extension installation directory?
Mar 08, 2024 am 08:55 AM
What is the Chrome plug-in extension installation directory?
Mar 08, 2024 am 08:55 AM
What is the Chrome plug-in extension installation directory? Under normal circumstances, the default installation directory of Chrome plug-in extensions is as follows: 1. The default installation directory location of chrome plug-ins in windowsxp: C:\DocumentsandSettings\username\LocalSettings\ApplicationData\Google\Chrome\UserData\Default\Extensions2. chrome in windows7 The default installation directory location of the plug-in: C:\Users\username\AppData\Local\Google\Chrome\User
 Does PyCharm Community Edition support enough plugins?
Feb 20, 2024 pm 04:42 PM
Does PyCharm Community Edition support enough plugins?
Feb 20, 2024 pm 04:42 PM
Does PyCharm Community Edition support enough plugins? Need specific code examples As the Python language becomes more and more widely used in the field of software development, PyCharm, as a professional Python integrated development environment (IDE), is favored by developers. PyCharm is divided into two versions: professional version and community version. The community version is provided for free, but its plug-in support is limited compared to the professional version. So the question is, does PyCharm Community Edition support enough plug-ins? This article will use specific code examples to
 Detailed explanation of how to install and set up the EclipseSVN plug-in
Jan 28, 2024 am 08:42 AM
Detailed explanation of how to install and set up the EclipseSVN plug-in
Jan 28, 2024 am 08:42 AM
Detailed explanation of how to install and set up the EclipseSVN plug-in Eclipse is a widely used integrated development environment (IDE) that supports many different plug-ins to extend its functionality. One of them is the EclipseSVN plugin, which enables developers to interact with the Subversion version control system. This article will detail how to install and set up the EclipseSVN plug-in and provide specific code examples. Step 1: Install the EclipseSVN plug-in and open Eclipse
 PyCharm plug-in installation tips are shared to help you get twice the result with half the effort!
Feb 21, 2024 pm 06:36 PM
PyCharm plug-in installation tips are shared to help you get twice the result with half the effort!
Feb 21, 2024 pm 06:36 PM
PyCharm is a powerful Python integrated development environment. By installing plug-ins, you can further improve development efficiency and facilitate developers' work. This article will share some tips on PyCharm plug-in installation, so that you can get twice the result with half the effort, while also providing specific code examples to demonstrate how to use the plug-in. Step 1: Open PyCharm, click "File" in the menu bar, and then select "Settings". Step 2: In the Settings window, click "
 Simple JavaScript Tutorial: How to Get HTTP Status Code
Jan 05, 2024 pm 06:08 PM
Simple JavaScript Tutorial: How to Get HTTP Status Code
Jan 05, 2024 pm 06:08 PM
JavaScript tutorial: How to get HTTP status code, specific code examples are required. Preface: In web development, data interaction with the server is often involved. When communicating with the server, we often need to obtain the returned HTTP status code to determine whether the operation is successful, and perform corresponding processing based on different status codes. This article will teach you how to use JavaScript to obtain HTTP status codes and provide some practical code examples. Using XMLHttpRequest
