

Using vue-cli can quickly create vue projects. vue-cli is easy to use, but when initially setting up the environment to install vue-cli and related content, it is a headache for some people. I am When building the vue-cli project environment, I also stepped on a lot of pitfalls. This article mainly introduces you to use the vue-cli scaffolding step by step (graphic and text analysis). The editor thinks it is quite good, and now I will share it with you, and give it to everyone. Be a reference. Let’s follow the editor to take a look, I hope it can help everyone.
Advantages of vue-cli scaffolding:
has a mature vue project architecture design that can quickly initialize a Vue project.
vue-cli is an officially supported scaffolding and will be updated iteratively with this version.
vue-cli provides a set of local node test servers. You can start the server using the commands provided by vue-cli itself.
Integrated packaging and online plan.
There are also some advantages, including: modularization, translation, preprocessing, hot loading, static detection and automated testing, etc. You will find the power of vue-cli when you use it in depth. place.
This tutorial is based on windows system.
Now we will officially start building the vue-cli scaffolding.
Command line tools
Command line tools are the basis for us to operate npm. This is a must-have. Many tutorials are not clearly written. Those There were a lot of commands posted at the beginning of the tutorial, and I didn’t know where to use the command line tools at first. . .
git bash command line tool
1. Under windows, I recommend using the git bash command line tool that comes with GitHub’s desktop management tool. Download and install it normally. can.
2. Download address. The picture below shows how to use git bash after the download and installation are completed.
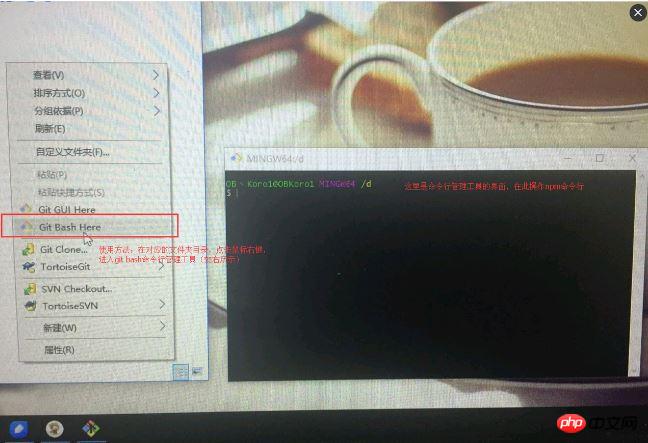
How to use the git bash command line tool
ps: Of course, if you want to use the built-in terminal cmd command line tool, you can, but After all, it is not as easy to use as git bash.
Install node.js
Just download and install node.js normally from the node.js Chinese official website, there is nothing special required Points to note (foolproof installation).
After downloading and installing node.js from the official website, npm (package management tool) already comes with it, and there is no need to install npm separately.
Please note that the downloaded node.js version must be above 4.0 to avoid using it if the version is too low.
Open the command line tool (any folder) and enter the command line node -v, npm -v, as shown below. If the corresponding version number appears, the installation is successful.
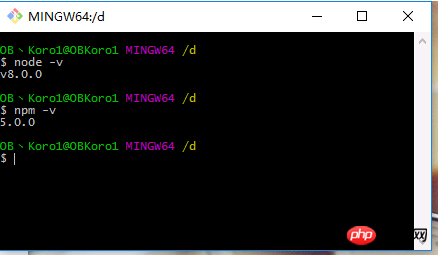
Detect node npm installation situation
Install Taobao mirror
cnpm (Taobao mirror) related:
This is a complete npmjs.org mirror, which is used to synchronize npm. module.
cnpm’s synchronization frequency is 10 minutes (newly released modules have lag, synchronization takes time, if you can’t wait, you can use npm).
The reason for installing cnpm: npm's server is foreign, so sometimes when we install "modules" it will be very, very, very, very, very slow.
The role of cnpm: Taobao mirror synchronizes the modules on npm to the domestic server, improving the time for us to install modules.
After installing the Taobao image, both cnpm and npm command lines can be used. There is no conflict between the two.
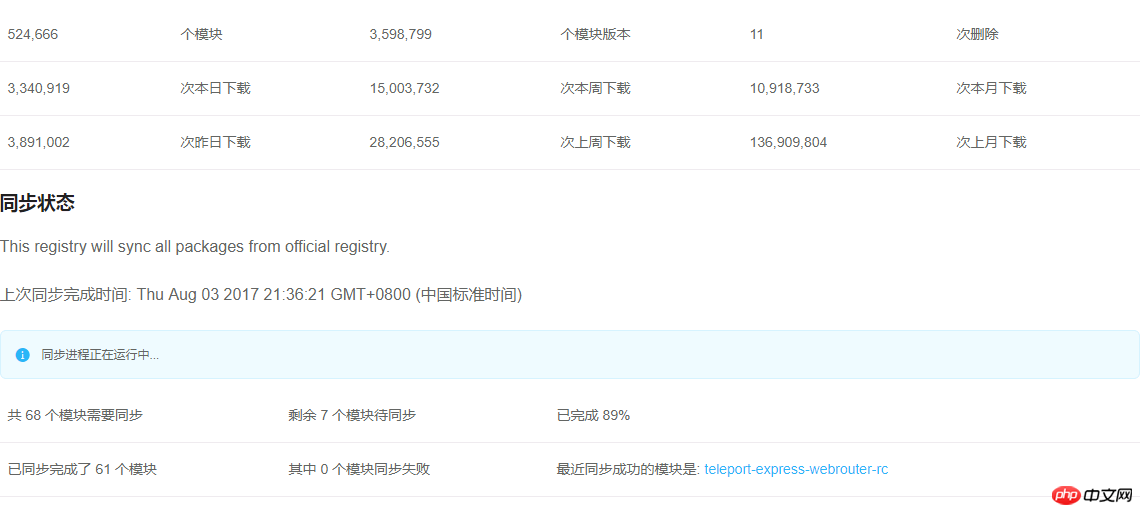
Screenshots from Taobao Mirror official website
Installation method: Open the command line tool and enter the command line:
1 |
|
cnpm usage method:
1 |
|
When installing the module, just replace npm with cnpm. Many domestic coders use cnpm. I personally recommend that everyone install it. Attached: Taobao Mirror URL,
Install webpack
Installation method: Open the command line tool and enter the command line:
1 |
|
After the installation is successful, enter webpack -v. If the corresponding version number appears, the installation is successful.
Install vue-cli scaffolding construction tool
Installation method: global installation, in any folder, enter the command line:
1 |
|
After the installation is completed, enter the command line vue -V to check the version number. If the corresponding version number appears, it is successful:

查看vue-cli是否安装成功
注:这里是大写的V
通过vue-cli,初始化vue项目
通过以上几步,将我们安装脚手架所需要的环境和工具都准备好好了,下面就可以使用vue-cli来初始化项目。
1。新建一个vuetext(项目名)文件夹来放置项目,在新建文件夹的上一级文件夹右键打开命令行工具,输入命令行:
1 |
|
注:项目名不能大写,不能使用中文解释一下这个命令,这个命令的意思是初始化一个vue项目,其中webpack是构建工具,也就是整个项目是基于webpack的。其中vuetext1是整个项目文件夹的名称,这个文件夹会自动生成在你指定的目录中。
2。以下是脚手架安装过程(安装步骤解析在图片下面)
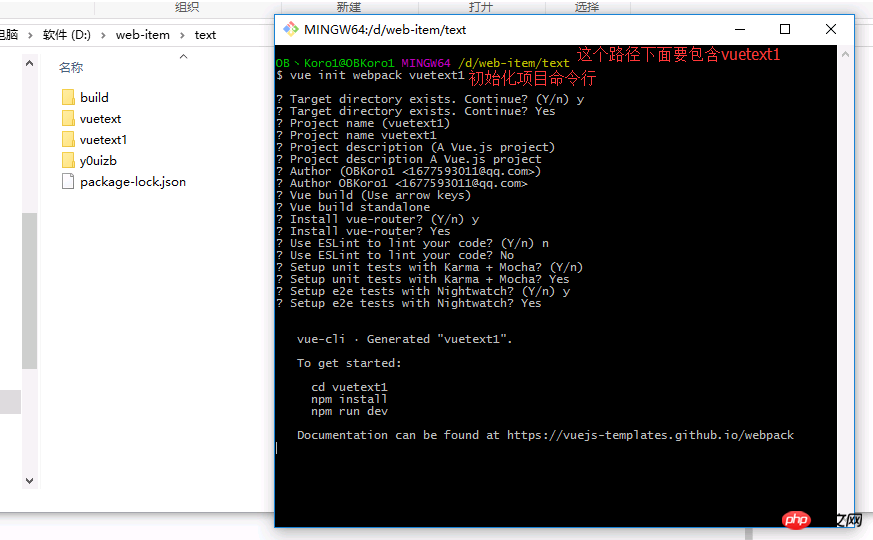
vue-cli初始化项目选项配置详细解析
1 2 3 4 5 6 7 8 9 10 11 12 13 14 15 16 17 18 19 20 21 22 23 24 25 26 |
|
现在vuetext1项目已经初步初始化完成了,里面也有一些文件,但是现在还不能成功运行。
3.如何运行项目
进入你刚才创建在vuetext1项目的文件夹里面,在vuetext1项目的文件夹里面右键运行git bash 命令行工具。
安装项目依赖。命令行: npm install。前面在项目初始化的时候,已经存在了package.json文件,直接使用npm install 安装项目所需要的依赖,否则项目不能正确运行。
创建完成的“vuetext1”目录如下:
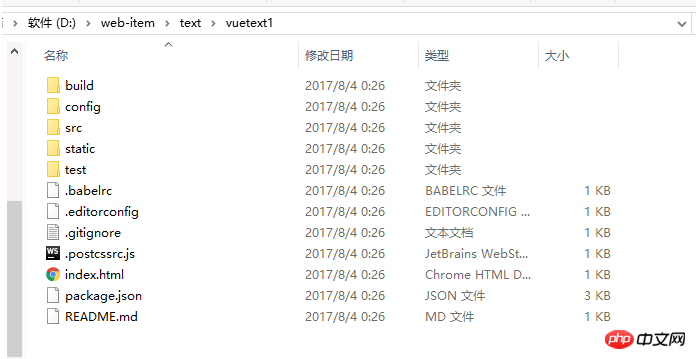
创建完成的项目结构
到这里,我们已经成功使用vue-cli初始化了一个vue项目。
启动项目:
在vuetext1目录运行命令行npm run dev,启动服务,服务启动成功后浏览器会默认打开一个“欢迎页面”,如下图。
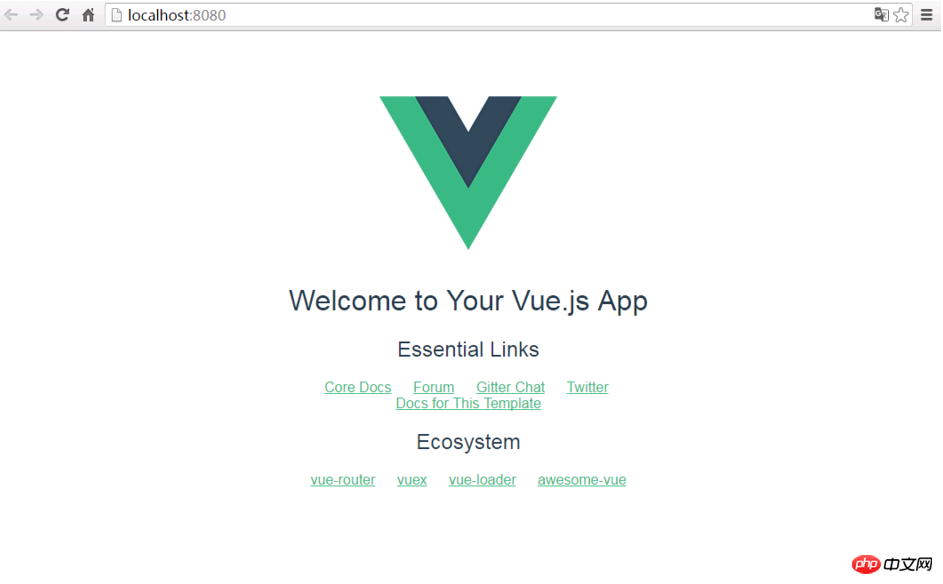
vue-cli项目成功启动
注意:这里是默认服务启动的是本地的8080端口,所以请确保你的8080端口不被别的程序所占用,当有其他vue项目运行的时候,可以使用ctrl+c来中断运行。
结语:
本文关于如何搭建vue-cli脚手架已经尽量详细了,仔细阅读,按步骤来基本上可以成功。如果有哪个地方写的不够清楚的,欢迎指正。本文面向小白,写着玩,大手请轻喷。
相关推荐:
The above is the detailed content of Graphical analysis of how to use vue-cli scaffolding. For more information, please follow other related articles on the PHP Chinese website!
 Main purpose of file system
 How to solve garbled tomcat logs
 How to restore mysql database
 How to use the decode function
 Is there a big difference between c language and Python?
 index.html function
 Win10 does not support the disk layout solution of Uefi firmware
 How to open state file
 No service on mobile data


![[Web front-end] Node.js quick start](https://img.php.cn/upload/course/000/000/067/662b5d34ba7c0227.png)


