
 Web Front-end
JS Tutorial
About date and time range selection plug-in: daterangepicker usage summary
Web Front-end
JS Tutorial
About date and time range selection plug-in: daterangepicker usage summary
About date and time range selection plug-in: daterangepicker usage summary

In the project, date and time range selection must be used to filter data; accurate to year, month, day, hour, minute and second; at first, layui's time and date selection plug-in was used; but the first click on IIE8 reported a setting format error; researched It has not been solved for a long time, but I am sure it is not a problem with layui; because the demo I wrote can run in IE8; it’s just that some codes conflicted in my project environment; so I switched to the bootstrap plug-in daterangepicker; I read a lot of information; combined with the official website I’ve read the document; it’s basically done; I’ll share my summary code with everyone; I hope it will be helpful to beginners using the daterangepicker plug-in.
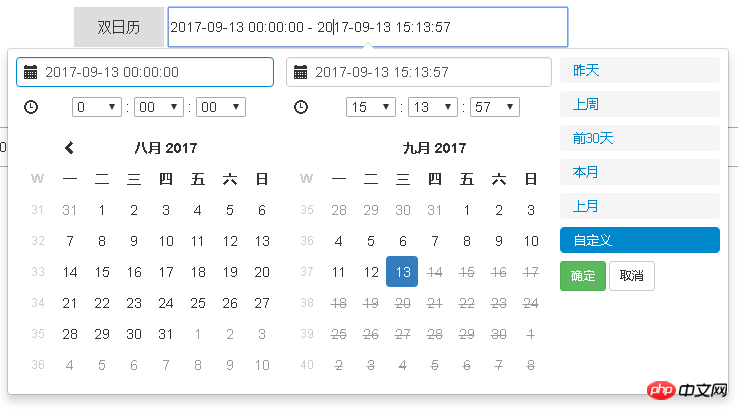
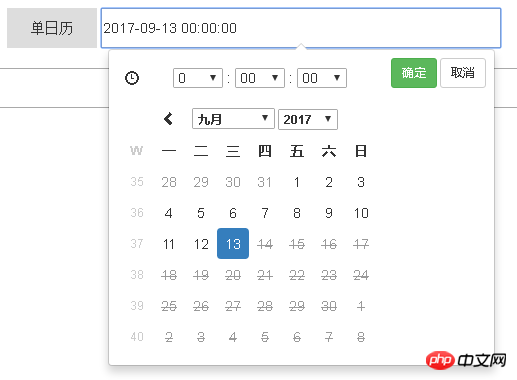
The summary is divided into four parts: date range selection implementation, date time selection, using two single calendars to implement range selection, using p instead of input to implement date time selection; the following is the code
css Code
<style type="text/css">
 body,
 ul,
 p,
 h3,
 img,
 input {
  margin: 0;
  padding: 0;
 }

 .box {
  display: block;
  text-align: center;
  margin: 20px auto;
 }

 input {
  width: 400px;
  height: 40px;
 }

 label {
  display: inline-block;
  width: 90px;
  line-height: 40px;
  height: 40px;
  margin: 0;
  font-weight: normal;
  font-family: "宋体";
  background-color: #ddd;
 }
 .pDateSelect{
  width: 185px;
  height: 50px;
  line-height: 50px;
  margin:10px auto;
  border:2px solid #ddd;
  border-radius: 5px;
 }
</style>html code:
<!-- 日期时间范围选择代码 -->
 <p class="box">
  <label for="datePicker">双日历</label>
  <input type="text" name="datePicker" class="datePicker" id="datePicker">
 </p>
 <!-- 日期时间选择代码 -->
 <p class="box">
  <label for="singledatePicker">单日历</label>
  <input type="text" name="singledatePicker" class="singledatePicker" id="singledatePicker">
 </p>
 <!-- 两个单日历实现日期时间范围选择代码 -->
 <p class="box">
  <label for="from">从</label>
  <input type="text" name="from" class="from" id="from">
  <label for="to">到</label>
  <input type="text" name="to" class="to" id="to">
 </p>
 <!-- 不使用input,用p实现代码 -->
 <p class="pDateSelect" id="pDateSelect">
   <i class="glyphicon glyphicon-calendar fa fa-calendar"></i>
  <span></span> <b class="caret"></b>
 </p>
js code, corresponding to the four parts of html in top and bottom order
$('input[name="datePicker"]').daterangepicker({
  timePicker: true, //显示时间
  timePicker24Hour: true, //时间制
  timePickerSeconds: true, //时间显示到秒
  startDate: moment().hours(0).minutes(0).seconds(0), //设置开始日期
  endDate: moment(new Date()), //设置结束器日期
  maxDate: moment(new Date()), //设置最大日期
  "opens": "center",
  ranges: {
   // '今天': [moment(), moment()],
   '昨天': [moment().subtract(1, 'days'), moment().subtract(1, 'days')],
   '上周': [moment().subtract(6, 'days'), moment()],
   '前30天': [moment().subtract(29, 'days'), moment()],
   '本月': [moment().startOf('month'), moment().endOf('month')],
   '上月': [moment().subtract(1, 'month').startOf('month'), moment().subtract(1, 'month').endOf('month')]
  },
  showWeekNumbers: true,
  locale: {
   format: "YYYY-MM-DD HH:mm:ss", //设置显示格式
   applyLabel: '确定', //确定按钮文本
   cancelLabel: '取消', //取消按钮文本
   customRangeLabel: '自定义',
   daysOfWeek: ['日', '一', '二', '三', '四', '五', '六'],
   monthNames: ['一月', '二月', '三月', '四月', '五月', '六月',
    '七月', '八月', '九月', '十月', '十一月', '十二月'
   ],
   firstDay: 1
  },
 }, function(start, end, label) {
  timeRangeChange = [start.format('YYYY-MM-DD HH:mm:ss'), end.format('YYYY-MM-DD HH:mm:ss')];
  console.log(timeRangeChange);
});$('input[name="singledatePicker"]').daterangepicker({
"autoApply": true, //选择日期后自动提交;只有在不显示时间的时候起作用timePicker:false
singleDatePicker: true, //单日历
showDropdowns: true, //年月份下拉框
timePicker: true, //显示时间
timePicker24Hour: true, //时间制
timePickerSeconds: true, //时间显示到秒
startDate: moment().hours(0).minutes(0).seconds(0), //设置开始日期
maxDate: moment(new Date()), //设置最大日期
"opens": "center",
showWeekNumbers: true,
locale: {
format: "YYYY-MM-DD HH:mm:ss", //设置显示格式
applyLabel: '确定', //确定按钮文本
cancelLabel: '取消', //取消按钮文本
daysOfWeek: ['日', '一', '二', '三', '四', '五', '六'],
monthNames: ['一月', '二月', '三月', '四月', '五月', '六月',
'七月', '八月', '九月', '十月', '十一月', '十二月'
],
firstDay: 1
},
}, function(start) {
console.log(start.format('YYYY-MM-DD HH:mm:ss'));
});var minDate = null;
var max = null;
function fromDate(maxDate) {
if(!maxDate){
max = moment(new Date())
}else{
max = maxDate;
}
$('input[name="from"]').daterangepicker({
"autoApply": true, //选择日期后自动提交;只有在不显示时间的时候起作用timePicker:false
singleDatePicker: true, //单日历
showDropdowns: true, //年月份下拉框
timePicker: true, //显示时间
timePicker24Hour: true, //时间制
timePickerSeconds: true, //时间显示到秒
// startDate: moment().hours(0).minutes(0).seconds(0), //设置开始日期
maxDate: max , //设置最大日期
"opens": "center",
showWeekNumbers: true,
locale: {
format: "YYYY-MM-DD HH:mm:ss", //设置显示格式
applyLabel: '确定', //确定按钮文本
cancelLabel: '取消', //取消按钮文本
daysOfWeek: ['日', '一', '二', '三', '四', '五', '六'],
monthNames: ['一月', '二月', '三月', '四月', '五月', '六月',
'七月', '八月', '九月', '十月', '十一月', '十二月'
],
firstDay: 1
},
}, function(s) {
toDate(s);
});
}
fromDate()
function toDate(minDate) {
$('input[name="to"]').daterangepicker({
"autoApply": true, //选择日期后自动提交;只有在不显示时间的时候起作用timePicker:false
singleDatePicker: true, //单日历
showDropdowns: true, //年月份下拉框
timePicker: true, //显示时间
timePicker24Hour: true, //时间制
timePickerSeconds: true, //时间显示到秒
// startDate: moment().hours(0).minutes(0).seconds(0), //设置开始日期
maxDate: moment(new Date()), //设置最大日期
minDate: minDate,
"opens": "center",
showWeekNumbers: true,
locale: {
format: "YYYY-MM-DD HH:mm:ss", //设置显示格式
applyLabel: '确定', //确定按钮文本
cancelLabel: '取消', //取消按钮文本
daysOfWeek: ['日', '一', '二', '三', '四', '五', '六'],
monthNames: ['一月', '二月', '三月', '四月', '五月', '六月',
'七月', '八月', '九月', '十月', '十一月', '十二月'
],
firstDay: 1
},
}, function(s) {
fromDate(s)
});
}
toDate();var start = moment(new Date());
function cb(start) {
$('#pDateSelect span').html(start.format('YYYY-MM-DD HH:mm:ss'));
}
$('#pDateSelect').daterangepicker({
"autoApply": true, //选择日期后自动提交;只有在不显示时间的时候起作用timePicker:false
singleDatePicker: true, //单日历
showDropdowns: true, //年月份下拉框
// timePicker: true, //显示时间
timePicker24Hour: true, //时间制
timePickerSeconds: true, //时间显示到秒
startDate: moment().hours(0).minutes(0).seconds(0), //设置开始日期
maxDate: moment(new Date()), //设置最大日期
"opens": "center",
showWeekNumbers: true,
locale: {
format: "YYYY-MM-DD HH:mm:ss", //设置显示格式
applyLabel: '确定', //确定按钮文本
cancelLabel: '取消', //取消按钮文本
daysOfWeek: ['日', '一', '二', '三', '四', '五', '六'],
monthNames: ['一月', '二月', '三月', '四月', '五月', '六月',
'七月', '八月', '九月', '十月', '十一月', '十二月'
],
firstDay: 1
},
}, cb);
cb(start);Rendering:
First part:
The second part:
The third part is the two second part groups to achieve the effect of the first part; the principle is After the start date is determined; set the minimum selection date for the end date calendar; after the end date is selected; set the maximum selection date for the start date;
Part 4:
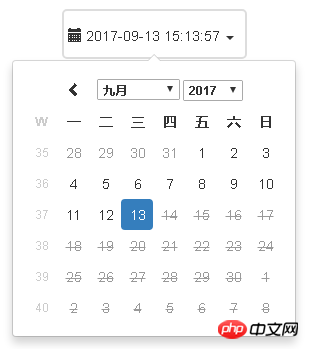
The meaning of the key options has been commented in the code; the imported file css includes bootstrap’s css file; daterangepicker’s css file; js includes jquery’s js; bootstrap’s js; daterangepicker’s js and moment.js;
Remarks:
1 moment.js uses the indexOf() method of the array; but IE8 does not support it; you need to introduce compatible code; the code address is https://developer.mozilla.org/zh-CN /docs/Web/JavaScript/Reference/Global_Objects/Array/indexOf Under polyfill;
2 Under IE8; there is a problem of vertical arrangement of two calendars in the range selection of dual calendars; the solution is to store two The calendar box is set to a fixed width, which is enough to accommodate the p of the two calendars; then set the p of the two calendars to float: left;
3 Official website address; option settings: http://www.daterangepicker .com/#options
Example: http://www.daterangepicker.com/#examples
Related recommendations:
Detailed explanation of picker date and Time picker
vue.js implementation of native ios time selection component development experience
php-datepicker time picker, sql parameter query
The above is the detailed content of About date and time range selection plug-in: daterangepicker usage summary. For more information, please follow other related articles on the PHP Chinese website!

Hot AI Tools

Undresser.AI Undress
AI-powered app for creating realistic nude photos

AI Clothes Remover
Online AI tool for removing clothes from photos.

Undress AI Tool
Undress images for free

Clothoff.io
AI clothes remover

AI Hentai Generator
Generate AI Hentai for free.

Hot Article
Hot Tools

Notepad++7.3.1
Easy-to-use and free code editor

SublimeText3 Chinese version
Chinese version, very easy to use

Zend Studio 13.0.1
Powerful PHP integrated development environment

Dreamweaver CS6
Visual web development tools

SublimeText3 Mac version
God-level code editing software (SublimeText3)
Hot Topics
 1376
1376
 52
52

 Can wallpaper engine be shared among families?
Mar 18, 2024 pm 07:28 PM
Can wallpaper engine be shared among families?
Mar 18, 2024 pm 07:28 PM
Does Wallpaper support family sharing? Unfortunately, it cannot be supported. Still, we have solutions. For example, you can purchase with a small account or download the software and wallpapers from a large account first, and then change to the small account. Simply launching the software is perfectly fine. Can wallpaperengine be family shared? Answer: Wallpaper does not currently support the family sharing function. 1. It is understood that WallpaperEngine does not seem to be suitable for family sharing environments. 2. In order to solve this problem, it is recommended that you consider purchasing a new account; 3. Or download the required software and wallpapers in the main account first, and then switch to other accounts. 4. Just open the software with a light click and it will be fine. 5. You can view the properties on the above web page"
 How to set lock screen wallpaper on wallpaper engine? How to use wallpaper engine
Mar 13, 2024 pm 08:07 PM
How to set lock screen wallpaper on wallpaper engine? How to use wallpaper engine
Mar 13, 2024 pm 08:07 PM
WallpaperEngine is a software commonly used to set desktop wallpapers. Users can search for their favorite pictures in WallpaperEngine to generate desktop wallpapers. It also supports adding pictures from the computer to WallpaperEngine to set them as computer wallpapers. Let’s take a look at how wallpaperengine sets the lock screen wallpaper. Wallpaperengine setting lock screen wallpaper tutorial 1. First enter the software, then select installed, and click "Configure Wallpaper Options". 2. After selecting the wallpaper in separate settings, you need to click OK on the lower right. 3. Then click on the settings and preview above. 4. Next
 How much does a Douyin level 10 light sign cost? How many days does it take to create a level 10 fan sign?
Mar 11, 2024 pm 05:37 PM
How much does a Douyin level 10 light sign cost? How many days does it take to create a level 10 fan sign?
Mar 11, 2024 pm 05:37 PM
On the Douyin platform, many users are eager to obtain level certification, and the level 10 light sign shows the user's influence and recognition on Douyin. This article will delve into the price of Douyin’s level 10 light boards and the time it takes to reach this level to help users better understand the process. 1. How much does a level 10 Douyin light sign cost? The price of Douyin's 10-level light signs will vary depending on market fluctuations and supply and demand. The general price ranges from a few thousand yuan to ten thousand yuan. This price mainly includes the cost of the light sign itself and possible service fees. Users can purchase level 10 light signs through Douyin’s official channels or third-party service agencies, but they should pay attention to legal channels when purchasing to avoid false or fraudulent transactions. 2. How many days does it take to create a level 10 fan sign? Reach level 10 light sign
 Is there any virus when watching wallpaper engine movies?
Mar 18, 2024 pm 07:28 PM
Is there any virus when watching wallpaper engine movies?
Mar 18, 2024 pm 07:28 PM
Users can download various wallpapers when using WallpaperEngine, and can also use dynamic wallpapers. Many users do not know whether there are viruses when watching videos on WallpaperEngine, but video files cannot be used as viruses. Is there any virus when watching movies on wallpaperengine? Answer: No. 1. Just video files cannot be used as viruses. 2. Just make sure to download videos from trusted sources and maintain computer security measures to avoid the risk of virus infection. 3. Application wallpapers are in apk format, and apk may carry Trojan viruses. 4. WallpaperEngine itself does not have viruses, but some application wallpapers in the creative workshop may have viruses.
 In which folder are the wallpapers of wallpaper engine located?
Mar 19, 2024 am 08:16 AM
In which folder are the wallpapers of wallpaper engine located?
Mar 19, 2024 am 08:16 AM
When using wallpaper, users can download various wallpapers they like for use. Many users do not know which folder the wallpapers are in. The wallpapers downloaded by users are stored in the content folder. Which folder is the wallpaper in? Answer: content folder. 1. Open File Explorer. 2. Click "This PC" on the left. 3. Find the "STEAM" folder. 4. Select "steamapps". 5. Click “workshop”. 6. Find the “content” folder.
 Does wallpaper engine consume a lot of power?
Mar 18, 2024 pm 08:30 PM
Does wallpaper engine consume a lot of power?
Mar 18, 2024 pm 08:30 PM
Users can change their computer wallpapers when using WallpaperEngine. Many users don't know that WallpaperEngine consumes a lot of power. Dynamic wallpapers consume a little more power than static wallpapers, but not a lot. Does wallpaperengine consume a lot of power? Answer: Not much. 1. Dynamic wallpapers consume a little more power than static wallpapers, but not a lot. 2. Turning on dynamic wallpaper will increase the computer's power consumption and take away a small amount of memory usage. 3. Users do not need to worry about the serious power consumption of dynamic wallpapers.
 How long does it take to clear the Elden Ring?
Mar 11, 2024 pm 12:50 PM
How long does it take to clear the Elden Ring?
Mar 11, 2024 pm 12:50 PM
Players can experience the main plot of the game and collect game achievements when playing in Elden's Circle. Many players don't know how long it takes to clear Elden's Circle. The player's clearance process is 30 hours. How long does it take to clear the Elden Ring? Answer: 30 hours. 1. Although this 30-hour clearance time does not refer to a master-like speed pass, it also omits a lot of processes. 2. If you want to get a better game experience or experience the complete plot, then you will definitely need to spend more time on the duration. 3. If players collect them all, it will take about 100-120 hours. 4. If you only take the main line to brush BOSS, it will take about 50-60 hours. 5. If you want to experience it all: 150 hours of base time.
 How to change font size in Microsoft Edge browser - How to change font size in Microsoft Edge browser
Mar 04, 2024 pm 05:58 PM
How to change font size in Microsoft Edge browser - How to change font size in Microsoft Edge browser
Mar 04, 2024 pm 05:58 PM
I guess you are not familiar with the Microsoft Edge browser, but do you know how to change the font size in the Microsoft Edge browser? The following article describes how to change the font size in the Microsoft Edge browser. Let's study it together. First, find the Microsoft Edge browser and double-click it to open it. You can find the Microsoft Edge browser in the desktop shortcut, start menu or taskbar, and double-click to open it. Secondly, open the [Settings] interface to enter this browser interface, click the [...] logo in the upper left corner; double-click [Settings] to open the settings interface. Again, find and open the [Appearance] interface and scroll down with the mouse
