 Web Front-end
 JS Tutorial
 Node simply implements the code sharing of changing the avatar function
Node simply implements the code sharing of changing the avatar function
更换头像的功能我们再熟悉不过了,本文主要介绍了node简单实现一个更改头像功能的示例,小编觉得挺不错的,现在分享给大家,也给大家做个参考。一起跟随小编过来看看吧,希望能帮助到大家。
思路
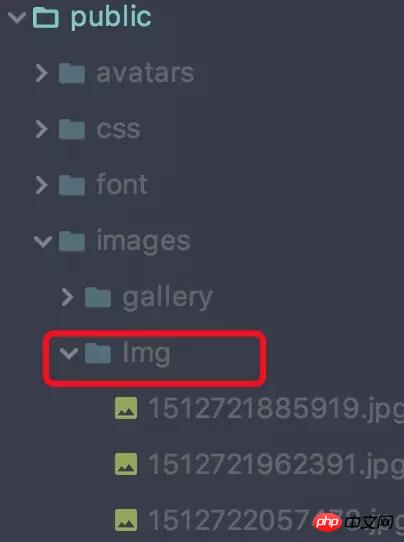
首先,当用户点击上传头像,更新头像的时候,将头像上传到项目的一个文件夹里面(我是存放在项目的public/images/img里面),并且将图像名重命名(可以以时间戳来命名)。

同时图片在项目的路径插入到用户表的当前用户的 userpicturepath 里面
然后更新用户的 session,将图片里面的路径赋值给 session 的里面的picture属性里面
的 src 获取到当前用户的session里面的 picture 的值,最后动态刷新页面头像就换成了用户上传的头像了
实现效果

代码
ejs部分
<img class="nav-user-photo" src="<%= user.picture.replace(/public(\/.*)/, "$1") %>" alt="Photo" style="height: 40px;"/>
<form enctype="multipart/form-data" method="post" name="fileInfo">
  <input type="file" accept="image/png,image/jpg" id="picUpload" name="file">
</form>
<button type="button" class="btn btn-primary" id="modifyPicV">确定</button>
js部分
document.querySelector('#modifyPicV').addEventListener('click', function () {
  let formData = new FormData();
  formData.append("file",$("input[name='file']")[0].files[0]);//把文件对象插到formData对象上
  console.log(formData.get('file'));
  $.ajax({
    url:'/modifyPic',
    type:'post',
    data: formData,
    processData: false, // 不处理数据
    contentType: false,  // 不设置内容类型
    success:function () {
      alert('success');
      location.reload();
    },
  })
});路由部分,使用formidable,这是一个Node.js模块,用于解析表单数据,尤其是文件上传
let express = require('express');
let router = express.Router();
let fs = require('fs');
let {User} = require('../data/db');
let formidable = require('formidable');
let cacheFolder = 'public/images/';//放置路径
router.post('/modifyPic', function (req, res, next) {
  let userDirPath = cacheFolder + "Img";
  if (!fs.existsSync(userDirPath)) {
    fs.mkdirSync(userDirPath);//创建目录
  }
  let form = new formidable.IncomingForm(); //创建上传表单
  form.encoding = 'utf-8'; //设置编码
  form.uploadDir = userDirPath; //设置上传目录
  form.keepExtensions = true; //保留后缀
  form.maxFieldsSize = 2 * 1024 * 1024; //文件大小
  form.type = true;
  form.parse(req, function (err, fields, files) {
    if (err) {
      return res.json(err);
    }
    let extName = ''; //后缀名
    switch (files.file.type) {
      case 'image/pjpeg':
        extName = 'jpg';
        break;
      case 'image/jpeg':
        extName = 'jpg';
        break;
      case 'image/png':
        extName = 'png';
        break;
      case 'image/x-png':
        extName = 'png';
        break;
    }
    if (extName.length === 0) {
      return res.json({
        msg: '只支持png和jpg格式图片'
      });
    } else {
      let avatarName = '/' + Date.now() + '.' + extName;
      let newPath = form.uploadDir + avatarName;
      fs.renameSync(files.file.path, newPath); //重命名
      console.log(newPath)
      //更新表
      User.update({
        picture: newPath
      }, {
        where: {
          username: req.session.user.username
        }
      }).then(function (data) {
        if (data[0] !== undefined) {
          User.findAll({
            where: {
              username: req.session.user.username
            }
          }).then(function (data) {
            if (data[0] !== undefined) {
              req.session.user.picture = data[0].dataValues.picture;
              res.send(true);
            } else {
              res.send(false);
            }
          })
        }
      }).catch(function (err) {
        console.log(err);
      });
    }
  });
});相关头像:
关于js拖拽上传 [一个拖拽上传修改头像的流程]_javascript技巧
The above is the detailed content of Node simply implements the code sharing of changing the avatar function. For more information, please follow other related articles on the PHP Chinese website!

Hot AI Tools

Undresser.AI Undress
AI-powered app for creating realistic nude photos

AI Clothes Remover
Online AI tool for removing clothes from photos.

Undress AI Tool
Undress images for free

Clothoff.io
AI clothes remover

AI Hentai Generator
Generate AI Hentai for free.

Hot Article

Hot Tools

Notepad++7.3.1
Easy-to-use and free code editor

SublimeText3 Chinese version
Chinese version, very easy to use

Zend Studio 13.0.1
Powerful PHP integrated development environment

Dreamweaver CS6
Visual web development tools

SublimeText3 Mac version
God-level code editing software (SublimeText3)

Hot Topics
 1381
1381
 52
52
 4 steps to change user folder names on Windows 11
Jul 07, 2023 pm 02:33 PM
User folder names and account names are set during user account setup. However, sometimes for some reason, you need to change your user folder name on Windows 11. Unlike renaming a standard folder, this process is not that simple. But with the right information, the process can be effortless, and that's what we've got you covered in this guide. Is it safe to rename my user folder name? As mentioned before, changing user folder names on Windows 11 is not as simple as renaming a normal folder. Even if you change the user account name, the user folder name will remain the same. Microsoft recommends not changing your user folder name as this may cause some applications to
 How to change the storage location of wallpaper engine? How to set the save path in wallpaper engine
Mar 13, 2024 pm 12:40 PM
Many users like to download various wallpapers and videos on WallpaperEngine. Over time, they will find that more and more wallpapers are downloaded, resulting in insufficient hard disk space. At this time, the storage location of WallpaperEngine can be changed to reduce the space occupied. So let’s take a look at how to change the save path for wallpaperengine. Step 1: Click Settings under steam in the upper left corner to open the following interface. Step 2: Click Download to find the "Steam Library Folder" under the content library, and click Open above. Step 3: Click Add Library Folder, select the path you want to change to, and after adding it, right-click on the default column.
 How to change the font color of win7 desktop icons
Jan 02, 2024 pm 11:17 PM
The default desktop icon font of win7 is generally white. If we use a white desktop background, the desktop icon text may not be visible. At this time, we can customize the desktop font color through the advanced appearance settings in the personalization settings. The following is Let’s take a look together. Tutorial on changing the font color of win7 desktop icons 1. Right-click a blank space on the desktop and open the "Personalization" settings. 2. Under Theme, we can directly select the desired theme to change the font color of desktop icons. 3. If you are not satisfied with these themes, you can also turn on the "Window Color" as shown in the picture. 4. Click "Advanced Appearance Settings" below 5. Change the "Project" at the icon location to "Desktop" 6. Then you can change various attributes such as font color and size in the red box
 How to adjust the font, style, and size of Notepad in Windows 11
Sep 23, 2023 pm 11:25 PM
Many users want to change the font in Notepad on Windows 11 because the default font is too small or difficult to read for them. Changing fonts is quick and easy, and in this guide, we'll show you how to customize Notepad and change the font to suit your needs. What font does Windows 11 Notepad use by default? As for the default font options, Notepad uses the Consolas font and the default font size is set to 11 pixels. How to change Notepad font size and style in Windows 11? Use the Edit menu in Notepad to click the search button and type notepad. Select Notepad from the list of results. In Notepad, click the Edit menu and select Fonts. You should now see the settings in the left pane
 Tutorial to restore win11 default avatar
Jan 02, 2024 pm 12:43 PM
If we change our system account avatar but don’t want it anymore, we can’t find how to change the default avatar in win11. In fact, we only need to find the folder of the default avatar to restore it. Restore the default avatar in win11 1. First click on the "Windows Logo" on the bottom taskbar 2. Then find and open "Settings" 3. Then enter "Account" on the left column 4. Then click on "Account Information" on the right 5. After opening, click "Browse Files" in the selected photo. 6. Finally, enter the "C:\ProgramData\Microsoft\UserAccountPictures" path to find the system default avatar picture.
 Step-by-step guide to changing background color with Eclipse
Jan 28, 2024 am 08:28 AM
Teach you step by step how to change the background color in Eclipse, specific code examples are required Eclipse is a very popular integrated development environment (IDE) that is often used to write and debug Java projects. By default, the background color of Eclipse is white, but some users may wish to change the background color to suit their preference or to reduce eye strain. This article will teach you step by step how to change the background color in Eclipse and provide specific code examples. Step 1: Open Eclipse First
 How to change region settings on xbox store
Dec 24, 2023 pm 08:53 PM
When the game you want to buy is not available, you can purchase it by changing the region. Do any players know how to change the region settings in the Xbox store? So let’s take a look at the introduction to changing the region settings in the Xbox store! Xbox store region settings: 1. Open windows settings - select time and language. 2. Select the region - the default should be China - select other countries and regions. 3. Select other countries and regions - enter the store - the store prompts you to refresh the content.
 Teach you how to modify the startup sequence of win7
Jan 04, 2024 pm 09:06 PM
Properly setting the startup sequence of win7 can make our computer boot faster, but many friends don’t know how to change the startup sequence. In fact, we can change it in the registry editor. Let’s take a look at it with the editor. A specific method. Tutorial on changing the win7 startup sequence 1. Search for "Run" in the lower left corner. 2. Open the "Run" program. 3. Enter “regedit” and press Enter to confirm. 4. Find the following path "HKEY_LOCAL_MACHINE\SYSTEM\CurrentControlSet\Control\ServiceGroupOrder" and right-click to modify the icon "list" file. 5. The position shown in the picture is from top to bottom.


