

javaScript connects to printer and prints receipt example sharing

This article mainly shares with you an example of javaScript linking to a printer and printing receipts. It has a good reference value and I hope it will be helpful to everyone. Let’s follow the editor to take a look, I hope it can help everyone.
As shown below:
<%@ page contentType="text/html;charset=UTF-8"%>
<%@ include file="/webpage/include/taglib.jsp"%>
<!-- <!DOCTYPE html> -->
<html>
<head>
<meta name="decorator" content="default" />
<script type="text/javascript" src="${ctxStatic}/jquery-ztree/3.5.12/js/jquery-1.4.4.min.js"></script>
<script type="text/javascript" src="${ctxStatic}/newStyle/jsPdf.debug.js"></script>
<script type="text/javascript" src="${ctxStatic}/newStyle/html2canvas.js"></script>
<script type="text/javascript">
function doPrint(){
bdhtml=window.document.body.innerHTML;
sprnstr="<!--startprint-->";
eprnstr="<!--b-->";
prnhtml=bdhtml.substr(bdhtml.indexOf(sprnstr)+17);
prnhtml=prnhtml.substring(0,prnhtml.indexOf(eprnstr));
window.document.body.innerHTML=prnhtml;
window.print();
top.layer.closeAll();
}
function closes (){
top.layer.closeAll();
}
function downPdf(){
document.getElementById("dayin").style.display = "none";
document.getElementById("baocun").style.display = "none";
html2canvas(document.body, {
onrendered:function(canvas) {
var contentWidth = canvas.width;
var contentHeight = canvas.height;
//一页pdf显示html页面生成的canvas高度;
var pageHeight = contentWidth / 592.28 * 841.89;
//未生成pdf的html页面高度
var leftHeight = contentHeight;
//pdf页面偏移
var position = 0;
//a4纸的尺寸[595.28,841.89],html页面生成的canvas在pdf中图片的宽高
var imgWidth = 595.28;
var imgHeight = 592.28/contentWidth * contentHeight;
var pageData = canvas.toDataURL('image/jpeg', 1.0);
var pdf = new jsPDF('', 'pt', 'a4');
//有两个高度需要区分,一个是html页面的实际高度,和生成pdf的页面高度(841.89)
//当内容未超过pdf一页显示的范围,无需分页
if (leftHeight < pageHeight) {
pdf.addImage(pageData, 'JPEG', 0, 0, imgWidth, imgHeight );
} else {
while(leftHeight > 0) {
pdf.addImage(pageData, 'JPEG', 0, position, imgWidth, imgHeight)
leftHeight -= pageHeight;
position -= 841.89;
//避免添加空白页
if(leftHeight > 0) {
pdf.addPage();
}
}
}
pdf.save(document.getElementById("emNo").innerText+"("+document.getElementById("dt").innerText+').pdf');
}
})
document.getElementById("baocun").style.display = "";
document.getElementById("dayin").style.display = "";
}
</script>
</head>
<body >
<p style="width: 800px;height: 35px;">
<button id="dayin" onclick="doPrint()" class="" style="border-bottom:1px solid #0071ce;float: right;background: #0071ce;color:rgb(255, 255, 255);font-size:13px;margin-right: 10px; margin-top: 10px;"><i class="fa fa-print"></i>打印</button>
<button id="baocun" onclick="downPdf()" class="" style="border-bottom:1px solid #0071ce;float: right;background: #0071ce;color:rgb(255, 255, 255);font-size:13px;margin-right: 10px; margin-top: 10px;"><i class="fa fa-print"></i>保存</button>
</p>
<!--startprint-->
<br>
<p id="print" style="padding-left: 15px; padding-right: 15px;">
<table style="width: 100%">
<tr>
<td colspan="8" style="text-align: center;font-size: 20px;">新XXXXX物业服务中心</td>
</tr>
<tr >
<td colspan="8"style="text-align: center;font-size: 14px;padding-top: 10px;">收费单据</td>
</tr>
<tr>
<td colspan="2">收票类型:电费</td>
<td colspan="3"></td>
<td>缴费日期:</td>
<td colspan="2" id="dt">${emfee.dt}</td>
</tr>
<tr>
<td style="text-align: center;font-size: 14px;height: 40px;border:1px solid #000000;border-bottom:0px solid #000000;">户名</td>
<td style="text-align: center ;font-size: 14px;height: 40px;border:1px solid #000000;border-bottom:0px solid #000000;">${emfee.userName}</td>
<td style="text-align: center;font-size: 14px;height: 40px;border:1px solid #000000;border-bottom:0px solid #000000;">表号</td>
<td id="emNo" colspan="2" style="text-align: center;font-size: 14px;height: 40px;border:1px solid #000000;border-bottom:0px solid #000000;">${emfee.emNo}</td>
<td style=" text-align: center;font-size: 14px;height: 40px;border:1px solid #000000;border-bottom:0px solid #000000;">房号</td>
<td colspan="2" style=" text-align: center ;font-size: 14px;height: 40px;border:1px solid #000000;border-bottom:0px solid #000000;">${emfee.num}</td>
</tr>
<tr>
<td style=" text-align: center;font-size: 14px;height: 40px;border:1px solid #000000;border-bottom:0px solid #000000;">起止时间</td>
<td colspan="3" style=" text-align: center ;font-size: 14px;height: 40px;border:1px solid #000000;border-bottom:0px solid #000000;">${emfee.emDt}至${emfee.startDt}</td>
<td style=" text-align: center;font-size: 14px;height: 40px;border:1px solid #000000;border-bottom:0px solid #000000;">缴费金额</td>
<td style=" text-align: center;font-size: 14px;height: 40px;border:1px solid #000000;border-bottom:0px solid #000000;">${emfee.tranMoney}</td>
<td style="text-align: center;font-size: 14px;height: 40px;border:1px solid #000000;border-bottom:0px solid #000000;">倍率</td>
<td style="text-align: center;font-size: 14px;height: 40px;border:1px solid #000000;border-bottom:0px solid #000000;">${emfee.emRate}</td>
</tr>
<tr>
<td rowspan="6" style="width: 12%; text-align: center;font-size: 14px;height: 40px;border:1px solid #000000;">用电量</td>
<td style="width: 12%; text-align: center ;font-size: 14px;height: 40px;border:1px solid #000000;border-bottom:0px solid #000000;">时段</td>
<td colspan="2" style="width: 13%; text-align: center ;font-size: 14px;height: 40px;border:1px solid #000000;border-bottom:0px solid #000000;">起止表码</td>
<td style="width: 12%; text-align: center;font-size: 14px;height: 40px;border:1px solid #000000;border-bottom:0px solid #000000;">倍率前用量</td>
<td style="width: 12%; text-align: center;font-size: 14px;height: 40px;border:1px solid #000000;border-bottom:0px solid #000000;">本次用量</td>
<td style="width: 13%; text-align: center;font-size: 14px;height: 40px;border:1px solid #000000;border-bottom:0px solid #000000;">单价</td>
<td style="width: 13%; text-align: center;font-size: 14px;height: 40px;border:1px solid #000000;border-bottom:0px solid #000000;">本次电费</td>
</tr>
<tr>
<td style="width: 12%; text-align: center ;font-size: 14px;height: 40px;border:1px solid #000000;border-bottom:0px solid #000000;">尖</td>
<td colspan="2" style="width: 13%; text-align: center ;font-size: 14px;height: 40px;border:1px solid #000000;border-bottom:0px solid #000000;">${emfee.mosaicJian}</td>
<td style="width: 12%; text-align: center;font-size: 14px;height: 40px;border:1px solid #000000;border-bottom:0px solid #000000;">${emfee.jianQuantity}</td>
<td style="width: 12%; text-align: center;font-size: 14px;height: 40px;border:1px solid #000000;border-bottom:0px solid #000000;">${emfee.blJian}</td>
<td style="width: 13%; text-align: center;font-size: 14px;height: 40px;border:1px solid #000000;border-bottom:0px solid #000000;">${emfee.jian}</td>
<td style="width: 13%; text-align: center;font-size: 14px;height: 40px;border:1px solid #000000;border-bottom:0px solid #000000;">${emfee.jianFee}</td>
</tr>
<tr>
<td style="width: 12%; text-align: center ;font-size: 14px;height: 40px;border:1px solid #000000;border-bottom:0px solid #000000;">峰</td>
<td colspan="2" style="width: 13%; text-align: center ;font-size: 14px;height: 40px;border:1px solid #000000;border-bottom:0px solid #000000;">${emfee.mosaicFeng}</td>
<td style="width: 12%; text-align: center;font-size: 14px;height: 40px;border:1px solid #000000;border-bottom:0px solid #000000;">${emfee.fengQuantity}</td>
<td style="width: 12%; text-align: center;font-size: 14px;height: 40px;border:1px solid #000000;border-bottom:0px solid #000000;">${emfee.blFeng}</td>
<td style="width: 13%; text-align: center;font-size: 14px;height: 40px;border:1px solid #000000;border-bottom:0px solid #000000;">${emfee.feng}</td>
<td style="width: 13%; text-align: center;font-size: 14px;height: 40px;border:1px solid #000000;border-bottom:0px solid #000000;">${emfee.fengFee}</td>
</tr>
<tr>
<td style="width: 12%; text-align: center ;font-size: 14px;height: 40px;border:1px solid #000000;border-bottom:0px solid #000000;">平</td>
<td colspan="2" style="width: 13%; text-align: center ;font-size: 14px;height: 40px;border:1px solid #000000;border-bottom:0px solid #000000;">${emfee.mosaicPing}</td>
<td style="width: 12%; text-align: center;font-size: 14px;height: 40px;border:1px solid #000000;border-bottom:0px solid #000000;">${emfee.pingQuantity}</td>
<td style="width: 12%; text-align: center;font-size: 14px;height: 40px;border:1px solid #000000;border-bottom:0px solid #000000;">${emfee.blPing}</td>
<td style="width: 13%; text-align: center;font-size: 14px;height: 40px;border:1px solid #000000;border-bottom:0px solid #000000;">${emfee.ping}</td>
<td style="width: 13%; text-align: center;font-size: 14px;height: 40px;border:1px solid #000000;border-bottom:0px solid #000000;">${emfee.pingFee}</td>
</tr>
<tr>
<td style="width: 12%; text-align: center ;font-size: 14px;height: 40px;border:1px solid #000000;border-bottom:0px solid #000000;">谷</td>
<td colspan="2" style="width: 13%; text-align: center ;font-size: 14px;height: 40px;border:1px solid #000000;border-bottom:0px solid #000000;">${emfee.mosaicGu}</td>
<td style="width: 12%; text-align: center;font-size: 14px;height: 40px;border:1px solid #000000;border-bottom:0px solid #000000;">${emfee.guQuantity}</td>
<td style="width: 12%; text-align: center;font-size: 14px;height: 40px;border:1px solid #000000;border-bottom:0px solid #000000;">${emfee.blGu}</td>
<td style="width: 13%; text-align: center;font-size: 14px;height: 40px;border:1px solid #000000;border-bottom:0px solid #000000;">${emfee.gu}</td>
<td style="width: 13%; text-align: center;font-size: 14px;height: 40px;border:1px solid #000000;border-bottom:0px solid #000000;">${emfee.guFee}</td>
</tr>
<tr>
<td style="width: 12%; text-align: center ;font-size: 14px;height: 40px;border:1px solid #000000;border-bottom:0px solid #000000;">总</td>
<td colspan="2" style="width: 13%; text-align: center ;font-size: 14px;height: 40px;border:1px solid #000000;border-bottom:0px solid #000000;">${emfee.mosaicZong}</td>
<td style="width: 12%; text-align: center;font-size: 14px;height: 40px;border:1px solid #000000;border-bottom:0px solid #000000;">${emfee.quantity}</td>
<td style="width: 12%; text-align: center;font-size: 14px;height: 40px;border:1px solid #000000;border-bottom:0px solid #000000;">${emfee.blquantity}</td>
<td style="width: 13%; text-align: center;font-size: 14px;height: 40px;border:1px solid #000000;border-bottom:0px solid #000000;">——</td>
<td style="width: 13%; text-align: center;font-size: 14px;height: 40px;border:1px solid #000000;">${emfee.electFee}</td>
</tr>
<tr>
<td rowspan="2" style="text-align: center;font-size: 14px;height:40px;border:1px solid #000000;">电费</td>
<td style="width: 12%; text-align: center ;font-size: 14px;height: 40px;border:1px solid #000000;border-bottom:0px solid #000000;">上次剩余(元)</td>
<td colspan="2" style="width: 13%; text-align: center ;font-size: 14px;height: 40px;border:1px solid #000000;border-bottom:0px solid #000000;">本期已用(元)</td>
<td colspan="2" style="width: 12%; text-align: center;font-size: 14px;height: 40px;border:1px solid #000000;border-bottom:0px solid #000000;">本次缴费(元)</td>
<td colspan="2" style="width: 13%; text-align: center;font-size: 14px;height: 40px;border:1px solid #000000;border-bottom:0px solid #000000;">本次剩余(元)</td>
</tr>
<tr>
<td style="width: 12%; text-align: center ;font-size: 14px;height: 40px;border:1px solid #000000;">${emfee.lastRemainQ}</td>
<td colspan="2" style="width: 13%; text-align: center ;font-size: 14px;height: 40px;border:1px solid #000000;">${emfee.electFee}</td>
<td colspan="2" style="width: 12%; text-align: center;font-size: 14px;height: 40px;border:1px solid #000000;">${emfee.tranMoney}</td>
<td colspan="2" style="width: 13%; text-align: center;font-size: 14px;height: 40px;border:1px solid #000000;">${emfee.remainQ}</td>
</tr>
<tr>
<td colspan="2" style="text-align: center;font-size: 14px;height: 40px;"></td>
<td style="text-align: center;font-size: 14px;height: 40px;">收款人:</td>
<td colspan="2" style="text-align: center;font-size: 14px;height: 40px;"></td>
<td style="text-align:center ;font-size: 14px;height: 40px;">付款人:</td>
<td colspan="2" style="text-align:center ;font-size: 14px;height: 40px;"></td>
</tr>
</table>
<!--b-->
</p>
</body>
</html>Related recommendations:
javascript print page code_javascript skills
javascript Summary of printing content methods_javascript skills
js client printing html how to remove the header and footer
JavaScript loop practice method of printing triangles, factorials, and multiplication tables
The above is the detailed content of javaScript connects to printer and prints receipt example sharing. For more information, please follow other related articles on the PHP Chinese website!

Hot AI Tools

Undresser.AI Undress
AI-powered app for creating realistic nude photos

AI Clothes Remover
Online AI tool for removing clothes from photos.

Undress AI Tool
Undress images for free

Clothoff.io
AI clothes remover

AI Hentai Generator
Generate AI Hentai for free.

Hot Article
Hot Tools

Notepad++7.3.1
Easy-to-use and free code editor

SublimeText3 Chinese version
Chinese version, very easy to use

Zend Studio 13.0.1
Powerful PHP integrated development environment

Dreamweaver CS6
Visual web development tools

SublimeText3 Mac version
God-level code editing software (SublimeText3)
Hot Topics
 1377
1377
 52
52

 Unable to complete operation (Error 0x0000771) Printer error
Mar 16, 2024 pm 03:50 PM
Unable to complete operation (Error 0x0000771) Printer error
Mar 16, 2024 pm 03:50 PM
If you encounter an error message when using your printer, such as the operation could not be completed (error 0x00000771), it may be because the printer has been disconnected. In this case, you can solve the problem through the following methods. In this article, we will discuss how to fix this issue on Windows 11/10 PC. The entire error message says: The operation could not be completed (error 0x0000771). The specified printer has been deleted. Fix 0x00000771 Printer Error on Windows PC To fix Printer Error the operation could not be completed (Error 0x0000771), the specified printer has been deleted on Windows 11/10 PC, follow this solution: Restart Print Spool
 Printer has insufficient memory and cannot print the page Excel or PowerPoint error
Feb 19, 2024 pm 05:45 PM
Printer has insufficient memory and cannot print the page Excel or PowerPoint error
Feb 19, 2024 pm 05:45 PM
If you encounter the problem of insufficient printer memory when printing Excel worksheets or PowerPoint presentations, this article may be helpful to you. You may receive a similar error message stating that the printer does not have enough memory to print the page. However, there are some suggestions you can follow to resolve this issue. Why is printer memory unavailable when printing? Insufficient printer memory may cause a memory not available error. Sometimes it's because the printer driver settings are too low, but it can also be for other reasons. Large file size Printer driver Outdated or corrupt Interruption from installed add-ons Misconfiguration of printer settings This issue may also occur because of low memory settings on the Microsoft Windows printer driver. Repair printing
 Can't print from snipping tool in Windows 11/10
Feb 19, 2024 am 11:39 AM
Can't print from snipping tool in Windows 11/10
Feb 19, 2024 am 11:39 AM
If you are unable to print using the Snipping Tool in Windows 11/10, it may be caused by corrupted system files or driver issues. This article will provide you with solutions to this problem. Can't print from Snipping Tool in Windows 11/10 If you can't print from Snipping Tool in Windows 11/10, use these fixes: Restart PC Printer Clear print queue Update printer and graphics driver Fix or reset Snipping Tool Run SFC and DISM Scan uses PowerShell commands to uninstall and reinstall Snipping Tool. let us start. 1] Restart your PC and printer Restarting your PC and printer helps eliminate temporary glitches
 What should I do if WPS cannot start the printer job?
Mar 20, 2024 am 08:20 AM
What should I do if WPS cannot start the printer job?
Mar 20, 2024 am 08:20 AM
We can use office software to produce various electronic documents. Electronic documents greatly save the use of paper and are easier to save and read. However, sometimes according to work requirements, superiors require printing out paper documents for everyone to circulate. Document writing It's fine but unable to print. It's very difficult to encounter such a situation. The course we brought today can solve this problem. The following lesson is: What should I do if WPS cannot start the printer job? When trying to print a document using a LAN printer, a problem occurred, saying "WPSOffice cannot start the print job. Please check whether the printer is turned on and online." But in fact, the printer is powered on and online. 2. Click "OK", then click on the upper left corner of the title bar as shown in the picture
 Lenovo Xiaoxin Panda Pro Panda Printer Pro goes on sale on May 6: black and white laser printing, built-in learning resources, 999 yuan
May 01, 2024 am 08:46 AM
Lenovo Xiaoxin Panda Pro Panda Printer Pro goes on sale on May 6: black and white laser printing, built-in learning resources, 999 yuan
May 01, 2024 am 08:46 AM
According to news from this site on April 30, Lenovo Xiaoxin PandaPro Panda Printer Pro is now available on JD.com. This printer will go on sale on May 6. It supports black and white laser printing, has an optional two-color body, and has built-in learning resources. The initial price is 999. Yuan. Lenovo Xiaoxin Panda Printer Pro measures 350x275x141mm and is available in two color options: Xiling White and Qingcheng Gray. This printer supports 2.4GHz/5GHz dual-band Wi-Fi, USB wired and other connection methods. It can print with one click after being configured with the network, and can also achieve NFC one-touch printing. Xiaoxin Panda Printer Pro supports black and white laser printing and can print 22 pages per minute. In addition to printing functions, this model also supports copying and scanning functions, with a color scanning resolution of 4800d.
 Mobile phone directly connected to printer (explore various connection methods of mobile phone connected directly to printer)
Apr 25, 2024 pm 07:31 PM
Mobile phone directly connected to printer (explore various connection methods of mobile phone connected directly to printer)
Apr 25, 2024 pm 07:31 PM
Direct-connection of mobile phone printers has become an increasingly popular printing solution in modern life, as mobile devices become more popular and their functions continue to increase. To quickly print files, we can directly connect to the printer through our mobile phones without the need for a computer. To help you choose the printing solution that best suits your needs, this article will introduce you to the various connection methods for direct connection of your mobile phone to the printer. Wi-Fi direct printing Wi-Fi direct printing is currently one of the most common methods of directly connecting a mobile phone to a printer. By connecting the printer and mobile phone to the same Wi-Fi network, users can easily transfer and print files through the mobile app. Bluetooth direct printing Bluetooth direct printing is a simpler and more convenient way to connect a mobile phone directly to a printer. can realize the file
 Steps on how to connect HP 136w printer to wifi. Must read: HP printer wireless connection tutorial
Feb 26, 2024 am 11:19 AM
Steps on how to connect HP 136w printer to wifi. Must read: HP printer wireless connection tutorial
Feb 26, 2024 am 11:19 AM
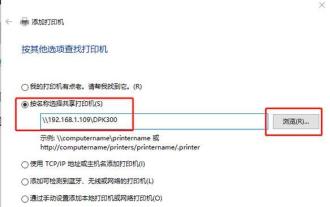
In fact, it is LAN printer sharing. The method is as follows: 1. Set the IP for the printer. First, plug the network from the router or switch to the printer. 2. Then click Printer Settings - Network Configuration - Wireless Menu. It is best to set a fixed IP for the printer there. Next, download and install the printer driver on your computer. When installing the driver, select the network installation option, so that the computer will automatically search for printers connected to the shared network. Once the installation is complete, the driver will show that the printer has been successfully shared wirelessly. How to connect the printer through a wireless network: 1. Right-click the WiFi icon under the desktop and select "Open Network and Sharing Center". 2. Click the name of the WiFi you are connected to, and a pop-up will appear.
 The Print Spooler service automatically shuts down and the printer cannot print normally.
Jun 18, 2024 pm 08:20 PM
The Print Spooler service automatically shuts down and the printer cannot print normally.
Jun 18, 2024 pm 08:20 PM
My friend's printer suddenly stopped printing. When WPS was printing, it prompted "The system print service has been closed" and "The system PrintSpooler service has been detected to be closed. Please enable it and try again." The PrintSpooler service executes print jobs in the background and handles interactions with the printer. . If you turn off the service, you cannot print or view the printer. According to the prompts, generally we only need to find the PrintSpooler service in the service, start it and change it to automatic. After my friend's computer started the PrintSpooler service, the service automatically stopped in about a minute and started again, and the same situation occurred. Saw spoolsv.exe and a dl through event viewer
