
 Web Front-end
JS Tutorial
vue uses better-scroll to implement carousel images and page scrolling
Web Front-end
JS Tutorial
vue uses better-scroll to implement carousel images and page scrolling
vue uses better-scroll to implement carousel images and page scrolling

在我们日常的项目开发中,处理滚动和轮播图是再常见不过的需求了,本文主要和大家介绍了关于vue利用better-scroll实现轮播图与页面滚动的相关资料,文中给出了详细的示例代码供大家参考学习,需要的朋友们下面来一起看看吧。
前言
better-scroll 也很强大,不仅可以做普通的滚动列表,还可以做轮播图、picker 等等...所以本文主要给大家介绍了关于vue用better-scroll实现轮播图与页面滚动的相关内容,分享出来供大家参考学习,下面话不多说了,来一起看看详细的介绍吧。
1.安装better-scroll
在根目录中package.json的dependencies中添加:
"better-scroll": "^0.1.15"
然后 npm i 安装。
2.封装代码
将better-scroll封装成两个基础组件slider和scroll放于src/base文件夹中。
slider.vue 代码
<template>
<p class="slider" ref="slider">
<p class="slider-group" ref="sliderGroup">
<slot>
</slot>
</p>
<p class="dots">
<span class="dot" :class="{active: currentPageIndex === index }" v-for="(item, index) in dots"></span>
</p>
</p>
</template>
<script>
import {addClass} from '../common/js/dom'
import BScroll from 'better-scroll'
export default{
data() {
return {
dots:[],
currentPageIndex: 0
}
},
props:{
loop:{
type:Boolean,
default:true
},
autoPlay:{
type:Boolean,
default:true
},
interval:{
type: Number,
default:4000
}
},
mounted() {
this._setSliderWidth()
setTimeout(() => {
// 在初始化slider前初始化dot
this._initDots()
this._initSlider()
if (this.autoPlay) {
this._play()
}
}, 20)
// 监听窗口大小改变时间
window.addEventListener('resize', () => {
if (!this.slider) {
return
}
this._setSliderWidth(true)
this.slider.refresh()
})
},
methods:{
_setSliderWidth(isResize) {
this.children = this.$refs.sliderGroup.children
let width = 0
// slider 可见宽度
let sliderWidth = this.$refs.slider.clientWidth
for (let i = 0; i < this.children.length; i++) {
let child = this.children[i]
// 设置每个子元素的样式及高度
addClass(child, 'slider-item')
child.style.width = sliderWidth + 'px'
// 计算总宽度
width += sliderWidth
}
// 循环播放首尾各加一个,因此总宽度还要加两倍的宽度
if (this.loop && !isResize) {
width += 2 * sliderWidth
}
this.$refs.sliderGroup.style.width = width + 'px'
},
_initSlider() {
this.slider = new BScroll(this.$refs.slider, {
scrollX: true,
scrollY: false,
momentum: false,
snap: true,
snapLoop: this.loop,
snapThreshold: 0.3,
snapSpeed: 400,
// click:true
})
// 监听滚动结束时间获取pageX
this.slider.on('scrollEnd', () => {
let pageIndex = this.slider.getCurrentPage().pageX
if (this.loop) {
// 由于bscroll循环播放首尾各加一个,因此索引-1
pageIndex -= 1
}
this.currentPageIndex = pageIndex
if (this.autoPlay) {
this._play()
}
})
this.slider.on('beforeScrollStart', () => {
if (this.autoPlay) {
clearTimeout(this.timer)
}
})
},
_initDots() {
// 长度为n的空数组
this.dots = new Array(this.children.length)
},
_play() {
// currentPageIndex为不含首尾副本的索引,因此若有循环要+2
let pageIndex = this.currentPageIndex + 1
if (this.loop) {
pageIndex += 1
}
this.timer = setTimeout(() => {
this.slider.goToPage(pageIndex, 0, 400)
}, this.interval)
}
},
// 生命周期destroyed销毁清除定时器,有利于内存释放
destroyed() {
clearTimeout(this.timer)
},
}
</script>
<style scoped>
.slider{
min-height: 1px;
position: relative;
}
.slider-group{
position: relative;
overflow: hidden;
white-space: nowrap;
}
.slider-item{
float: left;
box-sizing: border-box;
overflow: hidden;
text-align: center;
height: 150px;
overflow: hidden;
}
.slider-item a{
display: block;
width: 100%;
overflow: hidden;
text-decoration: none;
}
.slider-item img{
display: block;
width: 100%;
}
.dots{
position: absolute;
right: 0;
left: 0;
bottom: 12px;
text-align: center;
font-size: 0;
}
.dot{
display: inline-block;
margin: 0 4px;
width: 8px;
height: 8px;
border-radius: 50%;
background: red;
}
.active{
width: 20px;
border-radius: 5px;
}
</style>该代码引用common/js/dom.js中的addClass()方法为每个轮播图添加一个slider-item类,dom.js代码如下:
export function hasClass (el, className) {
 // 开始或空白字符+类名+空白字符或结束
 let reg = new RegExp('(^|\\s)' + className + '(\\s|$)')
 // 测试元素是否有该类名,返回布尔值
 return reg.test(el.className)
}

export function addClass (el, className) {
 if (hasClass(el, className)) {
 return
 }
// 以空白符为切割位置切割生成新数组
 let newClass = el.className.split(' ')
// 数组中加入新类名
 newClass.push(className)
// 将数组元素放入一个字符串,以空白符间隔
 el.className = newClass.join(' ')
}scroll.vue代码
<template>
<p ref="wrapper">
<slot></slot>
</p>
</template>
<script>
import BScroll from 'better-scroll'
export default {
props: {
probeType: {
type: Number,
default: 1
},
click: {
type: Boolean,
default: true
},
listenScroll: {
type: Boolean,
default: false
},
object: {
type: Object,
default: null
},
data: {
type: Array,
default: null
},
string: {
type: String,
default: ''
},
pullup: {
type: Boolean,
default: false
},
beforeScroll: {
type: Boolean,
default: false
},
refreshDelay: {
type: Number,
default: 20
}
},
mounted() {
setTimeout(() => {
this._initScroll()
}, 20)
},
methods: {
_initScroll() {
if (!this.$refs.wrapper) {
return
}
this.scroll = new BScroll(this.$refs.wrapper, {
probeType: this.probeType,
click: this.click
})
if (this.listenScroll) {
let me = this
// pos为位置参数
this.scroll.on('scroll', (pos) => {
me.$emit('scroll', pos)
})
}
if (this.pullup) {
this.scroll.on('scrollEnd', () => {
if (this.scroll.y <= (this.scroll.maxScrollY + 50)) {
this.$emit('scrollToEnd')
}
})
}
if (this.beforeScroll) {
this.scroll.on('beforeScrollStart', () => {
this.$emit('beforeScroll')
})
}
},
disable() {
this.scroll && this.scroll.disable()
},
enable() {
this.scroll && this.scroll.enable()
},
refresh() {
this.scroll && this.scroll.refresh()
},
scrollTo() {
this.scroll && this.scroll.scrollTo.apply(this.scroll, arguments)
},
scrollToElement() {
this.scroll && this.scroll.scrollToElement.apply(this.scroll, arguments)
}
},
watch: {
data() {
setTimeout(() => {
this.refresh()
}, this.refreshDelay)
},
string() {
setTimeout(() => {
this.refresh()
}, this.refreshDelay)
},
object() {
setTimeout(() => {
this.refresh()
}, this.refreshDelay)
}
}
}
</script>
<style>
</style>3.使用封装组件
使用这两个组件的页面组件home.vue 代码如下:
<template>
<p>
<scroll :data="su" class="scroll">
<p>
<p class="slider-wrapper">
<slider>
<p v-for='item in slider'>
<a href="">
<img :src="item.url" alt="">
</a>
</p>
</slider>
</p>
<ul v-for='item in su'>
<li>{{item}}</li>
</ul>
</p>
</scroll>
</p>
</template>
<script>
import Slider from '../base/slider'
import Scroll from '../base/scroll'
export default {
data () {
return {
slider: [
{url: 'http://upload-images.jianshu.io/upload_images/7932253-54c81df0beed405b.jpg?imageMogr2/auto-orient/strip%7CimageView2/2/w/1080/q/50'},
{url: 'https://y.gtimg.cn/music/photo_new/T003R720x288M000004ERTpn1UBu2f.jpg?max_age=2592000&max_age=2592000'},
{url: 'https://y.gtimg.cn/music/photo_new/T003R720x288M00000077s7P0HaZpc.jpg?max_age=2592000&max_age=2592000'},
{url: 'https://y.gtimg.cn/music/photo_new/T003R720x288M000001QL1Si05yMPq.jpg?max_age=2592000&max_age=2592000'},
{url: 'https://y.gtimg.cn/music/photo_new/T003R720x288M000002ke7OC3ooZ5g.jpg?max_age=2592000&max_age=2592000'},
],
su:[1,2,3,4,5,6,7,8,9,10,1,2,3,4,2,3,5,8,7,4,]
}
},
methods: {
},
components: {
Slider,
Scroll
}
}
</script>
<style>
.slider-wrapper{
width: 100%;
position: relative;
overflow: hidden;
}
.scroll{
height: 500px;
}
</style>注意点:
slider组件的父元素必须给他一个100%的宽度且定义overflow:hidden,否则整个页面会被撑开,整个页面都能横向滚动
scroll组件在引用时必须给他一个固定高度。只有拥有固定高度才会发生滚动。
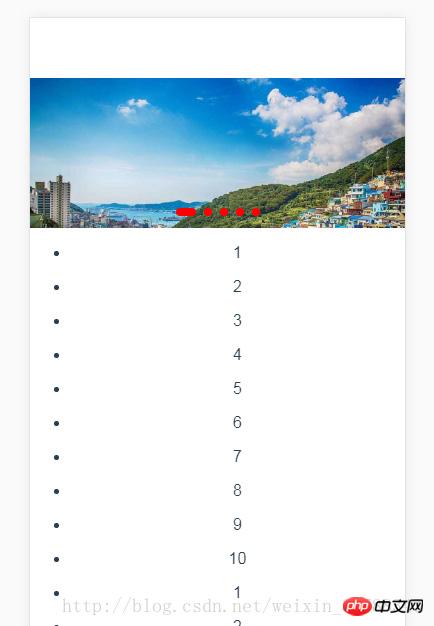
效果图如下:
相关推荐:
关于JQuery和html+css实现带小圆点和左右按钮的轮播图分享
The above is the detailed content of vue uses better-scroll to implement carousel images and page scrolling. For more information, please follow other related articles on the PHP Chinese website!

Hot AI Tools

Undresser.AI Undress
AI-powered app for creating realistic nude photos

AI Clothes Remover
Online AI tool for removing clothes from photos.

Undress AI Tool
Undress images for free

Clothoff.io
AI clothes remover

Video Face Swap
Swap faces in any video effortlessly with our completely free AI face swap tool!

Hot Article
Hot Tools

Notepad++7.3.1
Easy-to-use and free code editor

SublimeText3 Chinese version
Chinese version, very easy to use

Zend Studio 13.0.1
Powerful PHP integrated development environment

Dreamweaver CS6
Visual web development tools

SublimeText3 Mac version
God-level code editing software (SublimeText3)
Hot Topics


 How to copy a page in Word
Feb 20, 2024 am 10:09 AM
How to copy a page in Word
Feb 20, 2024 am 10:09 AM
Want to copy a page in Microsoft Word and keep the formatting intact? This is a smart idea because duplicating pages in Word can be a useful time-saving technique when you want to create multiple copies of a specific document layout or format. This guide will walk you through the step-by-step process of copying pages in Word, whether you are creating a template or copying a specific page in a document. These simple instructions are designed to help you easily recreate your page without having to start from scratch. Why copy pages in Microsoft Word? There are several reasons why copying pages in Word is very beneficial: When you have a document with a specific layout or format that you want to copy. Unlike recreating the entire page from scratch
 How to implement scrolling to a specified element position in JavaScript?
Oct 22, 2023 am 08:12 AM
How to implement scrolling to a specified element position in JavaScript?
Oct 22, 2023 am 08:12 AM
How to implement the function of scrolling to a specified element position in JavaScript? In a web page, when we need to focus the user's line of sight to a specific element position, we can use JavaScript to implement the function of scrolling to the specified element position. This article will introduce how to implement this function through JavaScript and provide corresponding code examples. First, we need to obtain the position information of the target element. You can use Element.getBoundingClient
 How to customize and edit standby mode on iPhone: What's new in iOS 17
Sep 21, 2023 pm 04:01 PM
How to customize and edit standby mode on iPhone: What's new in iOS 17
Sep 21, 2023 pm 04:01 PM
Standby is a new feature in the iOS 17 update that provides a new and enhanced way to access information when your phone is idle quickly. With StandBy, you can conveniently check the time, view upcoming events, browse your calendar, get weather updates for your location, and more. Once activated, the iPhone will intuitively enter standby mode when set to landscape while charging. This feature is perfect for wireless charging points like your bedside table, or when you're away from your iPhone charging during daily tasks. It allows you to swipe through various widgets displayed in standby to access different sets of information from various applications. However, you may want to modify these widgets or even delete some based on your preferences and the information you need frequently. So let's dive into
 How to quickly refresh a web page?
Feb 18, 2024 pm 01:14 PM
How to quickly refresh a web page?
Feb 18, 2024 pm 01:14 PM
Page refresh is very common in our daily network use. When we visit a web page, we sometimes encounter some problems, such as the web page not loading or displaying abnormally, etc. At this time, we usually choose to refresh the page to solve the problem, so how to refresh the page quickly? Let’s discuss the shortcut keys for page refresh. The page refresh shortcut key is a method to quickly refresh the current web page through keyboard operations. In different operating systems and browsers, the shortcut keys for page refresh may be different. Below we use the common W
 How to deal with the problem that Laravel page cannot display CSS correctly
Mar 10, 2024 am 11:33 AM
How to deal with the problem that Laravel page cannot display CSS correctly
Mar 10, 2024 am 11:33 AM
"Methods to handle Laravel pages that cannot display CSS correctly, need specific code examples" When using the Laravel framework to develop web applications, sometimes you will encounter the problem that the page cannot display CSS styles correctly, which may cause the page to render abnormal styles. Affect user experience. This article will introduce some methods to deal with the failure of Laravel pages to display CSS correctly, and provide specific code examples to help developers solve this common problem. 1. Check the file path. First check the path of the CSS file.
 Monitor iframe scrolling behavior
Feb 18, 2024 pm 08:40 PM
Monitor iframe scrolling behavior
Feb 18, 2024 pm 08:40 PM
How to monitor the scrolling of an iframe requires specific code examples. When we use the iframe tag to embed other web pages in a web page, sometimes we need to perform some specific operations on the content in the iframe. One of the common needs is to listen for the scroll event of the iframe so that the corresponding code can be executed when the scroll occurs. The following will introduce how to use JavaScript to monitor the scrolling of an iframe, and provide specific code examples for reference. Get the iframe element First, we need
 How to Rearrange, Disable, and Delete iPhone Home Screen Pages
Nov 29, 2023 am 08:22 AM
How to Rearrange, Disable, and Delete iPhone Home Screen Pages
Nov 29, 2023 am 08:22 AM
In iOS, Apple allows you to disable individual home screen pages on your iPhone. It's also possible to rearrange the order of home screen pages and delete pages directly instead of just disabling them. Here's how it works. How to Rearrange Home Screen Pages Touch and hold Space on the Home screen to enter jitter mode. Tap the row of dots that represent Home screen pages. In the Home screen grid that appears, touch and drag a page to rearrange it relative to other pages. Others move in response to your dragging. When you're happy with your new arrangement, tap "Done" in the upper right corner of the screen, then tap "Done" again to exit dither mode. How to Disable or Remove Home Screen Pages Touch and hold Space on the Home screen to enter dither mode. Tap to represent home screen
 Use ThinkPHP6 to implement a beautiful 404 page
Jun 20, 2023 am 11:06 AM
Use ThinkPHP6 to implement a beautiful 404 page
Jun 20, 2023 am 11:06 AM
As the Internet develops, many websites or applications have gradually become more complex. When users use it, they often encounter error pages, the most common of which is the 404 page. The 404 page means that the page being accessed does not exist and is a common error page. For websites or applications, a beautiful 404 page can greatly improve the user experience. In this article, we will introduce how to use ThinkPHP6 to quickly implement a beautiful 404 page. Create a route First, we need to create an err in the route folder
