
 Web Front-end
JS Tutorial
Angular2 imitates WeChat to implement 9 image upload and preview example sharing
Web Front-end
JS Tutorial
Angular2 imitates WeChat to implement 9 image upload and preview example sharing
Angular2 imitates WeChat to implement 9 image upload and preview example sharing

This article mainly introduces the sample code of Angular2 imitating WeChat UI to implement the uploading and previewing of 9 images. It is of great practical value. Friends who need it can refer to it. I hope it can help everyone.
What I have been working on for the longest time these days is the image upload/display thumbnail/preview/delete function imitating WeChat UI, which requires 1-9 pictures. Let’s record how to implement WeChat’s picture preview/delete function.
Style--weui.css
The style uses the WeChat official ui, weui.min.css (it is recommended to use this compressed version in a production environment).
Download address weui.css/weui.min.css.
Sample--weui.io
WeChat officially comes with a demo: weui.io.
Main steps
Before officially entering the explanation of each small function, first go to the official demo->weui.io to view the style of the image upload component and source code.
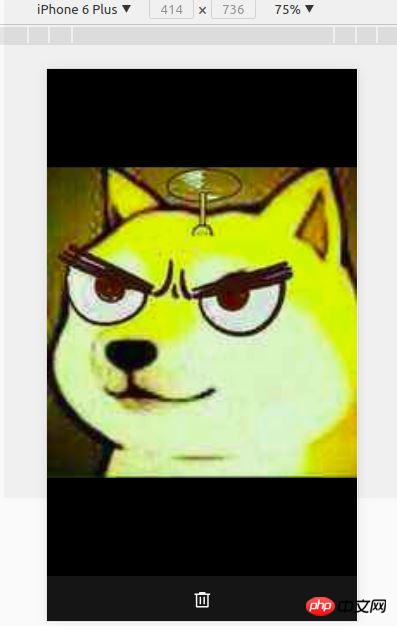
The official UI is shown below, and the UI for image upload is in Uploader.
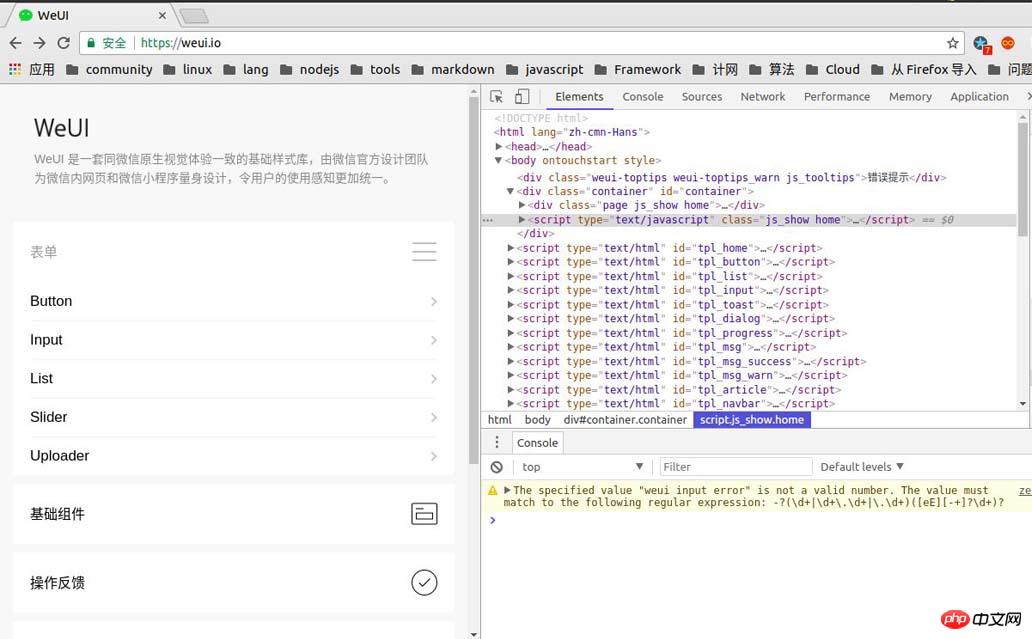
The source code for image upload is available from the review element as follows:
<p class="page uploader js_show">
  <p class="page__hd">
    <h1 class="page__title">Uploader</h1>
    <p class="page__desc">上传组件,一般配合<a class="link" href=" " rel="external nofollow" >组件Gallery</a >来使用。</p >
  </p>
  <p class="page__bd">
    <p class="weui-gallery" id="gallery" style="opacity: 0; display: none;">
      <span class="weui-gallery__img" id="galleryImg" style="background-image:url(./images/pic_160.png)"></span>
      <p class="weui-gallery__opr">
        <a href="javascript:" rel="external nofollow" rel="external nofollow" rel="external nofollow" class="weui-gallery__del">
          <i class="weui-icon-delete weui-icon_gallery-delete"></i>
        </a >
      </p>
    </p>

    <p class="weui-cells weui-cells_form">
      <p class="weui-cell">
        <p class="weui-cell__bd">
          <p class="weui-uploader">
            <p class="weui-uploader__hd">
              <p class="weui-uploader__title">图片上传</p >
              <p class="weui-uploader__info">0/2</p>
            </p>
            <p class="weui-uploader__bd">
              <ul class="weui-uploader__files" id="uploaderFiles">
                <li class="weui-uploader__file" style="background-image:url(./images/pic_160.png)"></li>
                <li class="weui-uploader__file" style="background-image:url(./images/pic_160.png)"></li>
                <li class="weui-uploader__file" style="background-image:url(./images/pic_160.png)"></li>
                <li class="weui-uploader__file weui-uploader__file_status" style="background-image:url(./images/pic_160.png)">
                  <p class="weui-uploader__file-content">
                    <i class="weui-icon-warn"></i>
                  </p>
                </li>
                <li class="weui-uploader__file weui-uploader__file_status" style="background-image:url(./images/pic_160.png)">
                  <p class="weui-uploader__file-content">50%</p>
                </li>
              </ul>
              <p class="weui-uploader__input-box">
                <input id="uploaderInput" class="weui-uploader__input" type="file" accept="image/*" multiple="">
              </p>
            </p>
          </p>
        </p>
      </p>
    </p>
  </p>
  <p class="page__ft j_bottom">
    <a href="javascript:home()" rel="external nofollow" >< img src="./images/icon_footer_link.png"></a >
  </p>
</p>Observation The above code is directly applied to the outer style. The core function blocks are as follows:
Picture preview/delete part:
<p class="weui-gallery" id="gallery">
 <!--显示预览-->
 <span class="weui-gallery__img" id="galleryImg"></span>
 <!--删除按钮-->
 <p class="weui-gallery__opr">
  <a href="javascript:" rel="external nofollow" rel="external nofollow" rel="external nofollow" class="weui-gallery__del">
   <i class="weui-icon-delete weui-icon_gallery-delete"></i></a >
 </p>
</p>
图片缩略图列表部分:
 <ul class="weui-uploader__files" id="uploaderFiles">
  <!--每张图片是一个<li>标签-->
  <li class="weui-uploader__file" style="background-image:url(./images/pic_160.png)"></li>
</ul>
Yes With the above preparations, you can download and implement the function:
1. Picture thumbnail display
Observing the source code, we can see that the thumbnail of each picture The code structure of the sketch is as follows:
<li class="weui-uploader__file" style="background-image:url(./images/pic_160.png)"></li>
He put the URL of the image directly into the background-img:url() attribute, and the style directly used WeChat’s official UI class. Therefore, we can do this: create an array to store picturesUrl to store the URL of the picture, and use the angular2 instruction *ngFor to dynamically generate a thumbnail list based on the content in the array (note that the format of the elements in picturesUrl is: url (URL of the picture)) :, each element in the image url array is stored in the intermediate variable img in turn, and then uses the angular2 instruction [ngStyle] to generate a preview image based on the value of img. The main code is as follows:
<ul class="weui-uploader__files picture-preview" id="uploaderFiles" >
<li *ngFor="let img of picturesUrl"
class="weui-uploader__file"
[ngStyle]="{'background-image':img}">
</li>
</ul>
<!--img实例-->
<!--'url(http://upload-images.jianshu.io/upload_images/7166236-ed8a621900728c39.jpg?imageMogr2/auto-orient/strip%7CimageView2/2/w/1240)'-->Define the image array in the ts file and give certain simulation data:
##
picturesUrl = [
  'url(http://upload-images.jianshu.io/upload_images/7166236-40ed406c30ef20a0.jpg?imageMogr2/auto-orient/strip%7CimageView2/2/w/1240)',
  'url(http://upload-images.jianshu.io/upload_images/7166236-d79762ed654342bf.jpg?imageMogr2/auto-orient/strip%7CimageView2/2/w/1240)',
  'url(http://upload-images.jianshu.io/upload_images/7166236-64e1a458e5e29d59.jpg?imageMogr2/auto-orient/strip%7CimageView2/2/w/1240)',
  'url(http://upload-images.jianshu.io/upload_images/7166236-9a267a540acb8688.jpg?imageMogr2/auto-orient/strip%7CimageView2/2/w/1240)',
  'url(http://upload-images.jianshu.io/upload_images/7166236-283f5687cb73eea8.jpg?imageMogr2/auto-orient/strip%7CimageView2/2/w/1240)',
 ]; //存储图片Url
 title = 'app';
 shown = false;  //是否显示预览,初始化为否
 selectImageUrl: string; //用于存放选中图片的url
2. Image preview display and disappearance
The image preview here uses the native method. WeChat’s approach should be to control the entirestyle through [ngStyle], and I used the same method to generate thumbnails, using The [ngStyle] directive and the *ngIf directive control the display of the preview image, and then bind a click event (click)="touchEvent()" to the range of the preview image to monitor the user's click and implement the function of clicking to exit the preview. The main code is as follows:
<!--预览隐藏的样式-->
<p class="weui-gallery" id="gallery" style="opacity: 0; display: none;">

</p>

<!--预览显示的样式-->
<p class="weui-gallery" id="gallery" style="display: block; opacity: 1;">

</p>
<p class="weui-gallery" id="gallery" style="display: block"
*ngIf="shown">
<span class="weui-gallery__img" (click)="touchEvent()" [ngStyle]="{'background-image':selectImageUrl}"></span>
<p class="weui-gallery__opr">
<a href="javascript:" rel="external nofollow" rel="external nofollow" rel="external nofollow" (click)="onDelete()" class="weui-gallery__del">
<i class="weui-icon-delete weui-icon_gallery-delete"></i>
</a >
</p>
</p>//点击缩略图显示预览
showPicture($event){
console.log("$event.target.backgroundImage:" + $event.target.style.backgroundImage);
this.selectImageUrl = $event.target.style.backgroundImage;
this.shown = true;
}
//点击屏幕退出预览
touchEvent(){
this.shown = false;
}3. Image deletion
Main code for image deletion Nested in the code block of the image preview, just bind a click event ((click)="onDelete()") to the deleted part, delete it and exit the preview when clicked.onDelete(){
if(isUndefined(this.selectImageUrl)){
console.log("查看图片预览,图片url未定义,this.selectImageUrl:" + this.selectImageUrl);
return;
}
//正则去除URL中的双引号
this.selectImageUrl = this.selectImageUrl.replace(/"/g,"");
console.log("(this.picturesUrl.indexOf(this.selectImageUrl):"+this.picturesUrl.indexOf(this.selectImageUrl));
//判断图片URL是否存在
if(this.picturesUrl.indexOf(this.selectImageUrl)!== -1){
this.picturesUrl.splice(this.picturesUrl.indexOf(this.selectImageUrl) , 1);
setTimeout(()=>{
this.shown = false;
},
20);
}else{
console.log("删除图片出错,获取URL或URL格式出错出错:" + this.selectImageUrl )
}
} 
 ##Related recommendations:
The above is the detailed content of Angular2 imitates WeChat to implement 9 image upload and preview example sharing. For more information, please follow other related articles on the PHP Chinese website!

Hot AI Tools

Undresser.AI Undress
AI-powered app for creating realistic nude photos

AI Clothes Remover
Online AI tool for removing clothes from photos.

Undress AI Tool
Undress images for free

Clothoff.io
AI clothes remover

Video Face Swap
Swap faces in any video effortlessly with our completely free AI face swap tool!

Hot Article
Hot Tools

Notepad++7.3.1
Easy-to-use and free code editor

SublimeText3 Chinese version
Chinese version, very easy to use

Zend Studio 13.0.1
Powerful PHP integrated development environment

Dreamweaver CS6
Visual web development tools

SublimeText3 Mac version
God-level code editing software (SublimeText3)
Hot Topics


 How to implement file upload and processing in FastAPI
Jul 28, 2023 pm 03:01 PM
How to implement file upload and processing in FastAPI
Jul 28, 2023 pm 03:01 PM
How to implement file upload and processing in FastAPI FastAPI is a modern, high-performance web framework that is easy to use and powerful. It provides native support for file upload and processing. In this article, we will learn how to implement file upload and processing functions in the FastAPI framework, and provide code examples to illustrate specific implementation steps. First, we need to import the required libraries and modules: fromfastapiimportFastAPI,UploadF
 How to solve the problem of slow upload speed on Win10 computer
Jul 01, 2023 am 11:25 AM
How to solve the problem of slow upload speed on Win10 computer
Jul 01, 2023 am 11:25 AM
How to solve the slow upload speed of Win10 computer? When we use the computer, we may feel that the file upload speed of our computer is very slow. So what is the situation? In fact, this is because the default upload speed of the computer is 20%, so the upload speed is very slow. Many friends do not know how to operate in detail. The editor has compiled the steps to format the C drive in Win11 below. If you are interested, follow Let’s take a look below! Solution to the slow upload speed of Win10 1. Press win+R to call up run, enter gpedit.msc, and press Enter. 2. Select the management template, click Network--Qos Packet Scheduler, and double-click Limit to reserve bandwidth. 3. Select Enabled, which will bring
 How to upload lyrics to QQ Music
Feb 23, 2024 pm 11:45 PM
How to upload lyrics to QQ Music
Feb 23, 2024 pm 11:45 PM
With the advent of the digital age, music platforms have become one of the main ways for people to obtain music. However, sometimes when we listen to songs, we find that there are no lyrics, which is very disturbing. Many people hope that lyrics can be displayed when listening to songs to better understand the content and emotions of the songs. QQ Music, as one of the largest music platforms in China, also provides users with the function of uploading lyrics, so that users can better enjoy music and feel the connotation of the songs. The following will introduce how to upload lyrics on QQ Music. first
 Simple steps to upload your own music on Kugou
Mar 25, 2024 pm 10:56 PM
Simple steps to upload your own music on Kugou
Mar 25, 2024 pm 10:56 PM
1. Open Kugou Music and click on your profile picture. 2. Click the settings icon in the upper right corner. 3. Click [Upload Music Works]. 4. Click [Upload Works]. 5. Select the song and click [Next]. 6. Finally, click [Upload].
 How to improve computer upload speed
Jan 15, 2024 pm 06:51 PM
How to improve computer upload speed
Jan 15, 2024 pm 06:51 PM
Upload speed becomes very slow? I believe this is a problem that many friends will encounter when uploading things on their computers. If the network is unstable when using a computer to transfer files, the upload speed will be very slow. So how can I increase the network upload speed? Below, the editor will tell you how to solve the problem of slow computer upload speed. When it comes to network speed, we all know that the speed of opening web pages, download speed, and upload speed are also very critical. Especially some users often need to upload files to the network disk, so a fast upload speed will undoubtedly save you a lot of money. Less time, what should I do if the upload speed is slow? Below, the editor brings you pictures and texts on how to deal with slow computer upload speeds. How to solve the problem of slow computer upload speed? Click "Start--Run" or "Window key"
 How to take photos and upload them on computer
Jan 16, 2024 am 10:45 AM
How to take photos and upload them on computer
Jan 16, 2024 am 10:45 AM
As long as the computer is equipped with a camera, it can take pictures, but some users still don't know how to take pictures and upload them. Now I will give you a detailed introduction to the method of taking pictures on the computer, so that users can upload the pictures wherever they want. How to take photos and upload them on a computer 1. Mac computer 1. Open Finder and click the application on the left. 2. After opening, click the Camera application. 3. Just click the photo button below. 2. Windows computer 1. Open the search box below and enter camera. 2. Then open the searched application. 3. Click the photo button next to it.
 How to implement video playback and upload functions through the PHP Kuaishou API interface
Jul 21, 2023 pm 04:37 PM
How to implement video playback and upload functions through the PHP Kuaishou API interface
Jul 21, 2023 pm 04:37 PM
How to implement video playback and upload functions through the PHP Kuaishou API interface. Introduction: With the rise of social media, the public’s demand for video content has gradually increased. Kuaishou, as a short video-themed social application, is loved by many users. This article will introduce how to use PHP to write code to implement video playback and upload functions through the Kuaishou API interface. 1. Obtain the access token. Before using the Kuaishou API interface, you first need to obtain the access token. Token is the identity for accessing the API interface
 How to implement avatar upload function in Vue
Nov 07, 2023 am 08:01 AM
How to implement avatar upload function in Vue
Nov 07, 2023 am 08:01 AM
Vue is a popular front-end framework that can be used to build highly interactive applications. During the development process, uploading avatars is one of the common requirements. Therefore, in this article, we will introduce how to implement the avatar upload function in Vue and provide specific code examples. Using a third-party library In order to implement the avatar upload function, we can use a third-party library, such as vue-upload-component. This library provides an upload component that can be easily integrated into Vue applications. Here is a simple example
