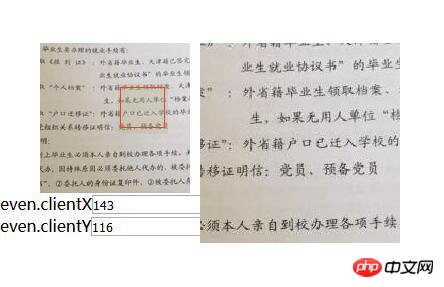
This article mainly introduces the concise code for implementing the magnifying glass in jquery. It is very good and has reference value. Friends who need it can refer to it. I hope it can help everyone.
Introduction
There are many magnifying glass jquery plug-ins on the Internet, but they are not so easy to use. Now one page of code implements a magnifying glass function. If additional functions are needed, they can be modified manually. The principles are all the same. In the comments

<!DOCTYPE html>
<html>
<head>
  <meta charset="UTF-8">
  <title>放大镜效果</title>
  <style type="text/css">
    * {
      margin: 0;
      padding: 0;
    }
    .small {
      margin-left:40px;
      margin-top:50px;
      width: 150px;
      height: 150px;
      /*border: 2px solid yellow;*/
    }
     .small>img {
      width: 150px;
      height: 150px;
    }
    .slider {
      width: 50px;
      height: 50px;
      background: rgba(180,180,135,0.3);
      position: absolute;
      display: none;
    }
    #big {
      //设置为固定大小;
      width: 200px;
      height: 200px;
      position: absolute;
      /* border: 2px solid red;*/
      overflow: hidden;
      display: none;
    }
  </style>
</head>
<body>
<!--缩略图-->
<p class="small">
  <img src="thumb.jpg" />
  <!--放大镜,在原图不上的小块-->
  <p class="slider"></p>
</p>
<!--放大镜区域,大图,设置为none隐藏-->
<p id="big">
  <img id="bigImg" src="big.jpg" />
</p>
even.clientX<input type="text" value="0" id="test" /><br/>
even.clientY<input type="text" value="0" id="test1" />
<script type="text/javascript" src="jquery-1.7.2.min.js"></script>
<script type="text/javascript">
  var small = $(".small")[0];
  var slider = $(".slider")[0];
  var big = document.getElementById("big");//试一试js获取
  var bigImg = document.getElementById("bigImg");
//让slider跟随鼠标移动.给小的方块绑定事件
  $(".small").mousemove(function(e) {
    var even = e || event; //兼容火狐浏览器
    var x = even.clientX - small.offsetLeft - slider.offsetWidth/2;
    var y = even.clientY - small.offsetTop - slider.offsetHeight/2;
//测试even.clientX和even.clientY
    $("#test").val(even.clientX);
    $("#test1").val(even.clientY);
//水平方向的最大值
    var maxX = small.clientWidth - slider.clientWidth;
//竖直方向的最大值
    var maxY = small.clientHeight - slider.clientHeight;
    if(x<0){
//相当于超出左侧,超出左侧时,拉回
      x=0;
    }
//超出右侧时拉回
    if(x>maxX){
      x = maxX;
    }
//顶部超出
    if(y<0){
      y=0;
    }
//底部超出
    if(y>maxY){
      y = maxY;
    }
    slider.style.top = (y+small.offsetTop) + "px";
    slider.style.left = (x+small.offsetLeft) + "px";
//放大的图片的主要实现代码:比例计算, big.scrollLeft是id=big的p中下方滚轴的位置
//由于id=big的p设置成固定大小,而图片又非常大,所以这个p就像个放大镜一样在大图上晃
//比例计算很简单,鼠标在缩略图的位置与缩略图宽高比=鼠标在大图位置与大图宽高比,现在未知数是大图鼠标的位置
    big.scrollLeft = x/maxX * (bigImg.clientWidth - big.clientWidth) ;
    big.scrollTop = y/maxY * (bigImg.clientHeight -big.clientHeight) ;
  });
//鼠标移入事件
  $(".small").mouseenter(function(){
//鼠标移入到缩略图时候实现,上面出现的小的方块
    $(".slider").css("display","block");
    $("#big").css("top",small.offsetTop+"px");
//隐藏的大图=获取左图的左边位置+宽度+10(隔开点缝隙与缩略图)+px
    big.style.left = small.offsetLeft + small.offsetWidth + 10 + "px";
//右侧的大图区域显示出来图片
    $("#big").css("display","block");
  });
//移除事件
//添加鼠标移出事件,鼠标移出缩略图的时候
  $(".small").mouseleave(function(){
    $(".slider").css("display","none");
    $("#big").css("display","none");
  });
</script>
</body>
</html>Related recommendations:
JS imitation Alipay input input display digital magnifying glass
An example of JavaScript imitating Taobao to achieve the magnifying glass effect
How to use jQuery to achieve the magnifying glass effect
The above is the detailed content of Simple method to implement magnifying glass with jquery. For more information, please follow other related articles on the PHP Chinese website!


