Detailed explanation of Node automated deployment method
This article mainly introduces the method of automatic deployment of Node. The editor thinks it is quite good. Now I will share it with you and give it as a reference. Let’s follow the editor to take a look, I hope it can help everyone.
When we update and iterate the Node project, we need to do the following steps:
git push Submit the code to the code repository
Execute git pull on the server to pull the latest code
pm2 start and run your code
This is of course correct , but once the project updates and iterates too quickly, you need to constantly repeat the above steps and switch back and forth among various bash panels, which is very troublesome.
At this time, Webhooks make their debut!
For Webhooks, the explanation given by Github is:
Webhooks allow you to build or set up integrations which subscribe to certain events on GitHub.com.
To put it simply, using Webhooks, we can realize automatic deployment of the website. Now let’s take a look at how to do it
Configuration script
This paragraph The content of the script is what we need the server to automatically execute
# autoBuild.sh

#! /bin/bash
git reset --hard origin/master
git clean -f
git pull
npm start
Note: This script will be automatically executed in the server
Write a js file for execution Script
Since I am using Github as the code repository, here we use the github-Webhooks-handler library to automate the execution of our script
According to the documentation, we write the js file in the following way:
// autoBuild.js
var http = require('http')
var spawn = require('child_process').spawn
var createHandler = require('github-Webhooks-handler')
var handler = createHandler({ path: '/pushCode', secret: '' }) // 在代码仓库的 Webhooks 选项处配置
http.createServer(function (req, res) {
 handler(req, res, function (err) {
  res.statusCode = 404;
  res.end('no such location')
 })
}).listen(7777)

handler.on('error', function (err) {
 console.error('Error:', err.message)
})

// 监听 push 事件
handler.on('push', function (event) {
 console.log('Received a push event for %s to %s',
  event.payload.repository.name,
  event.payload.ref)
 rumCommand('sh', ['./autoBuild.sh'], function( txt ) { // 执行 autoBuild.sh 脚本文件
  console.log(txt)
 })
})

function rumCommand( cmd, args, callback ) {
  var child = spawn( cmd, args )
  var response = ''
  child.stdout.on('data', function( buffer ){ response += buffer.toString(); })
  child.stdout.on('end', function(){ callback( response ) })
}In app.js, we set the port to 3001, and the code will not be released here. You can find all the sample codes of this tutorial in the Github link at the end of the article
Nginx configuration
Since our sample code runs on port 3001, execute The automatically deployed js file runs on port 7777, so we need to configure Nginx to enable these two ports:
# 启用 7777 端口
server {
  listen 7777;
  listen [::]:7777
  server_name huangxizhou.com; #在这里填上你自己的服务器 ip 地址或者域名

  root /var/www/html/auto-build;
}

# 启用 3001 端口
server {
  listen 3001;
  listen [::]:3001
  server_name huangxizhou.com; #在这里填上你自己的服务器 ip 地址或者域名

  root /var/www/html/auto-build;
}In this way, Nginx is configured. Next is the Webhooks configuration of the code warehouse
Webhooks configuration
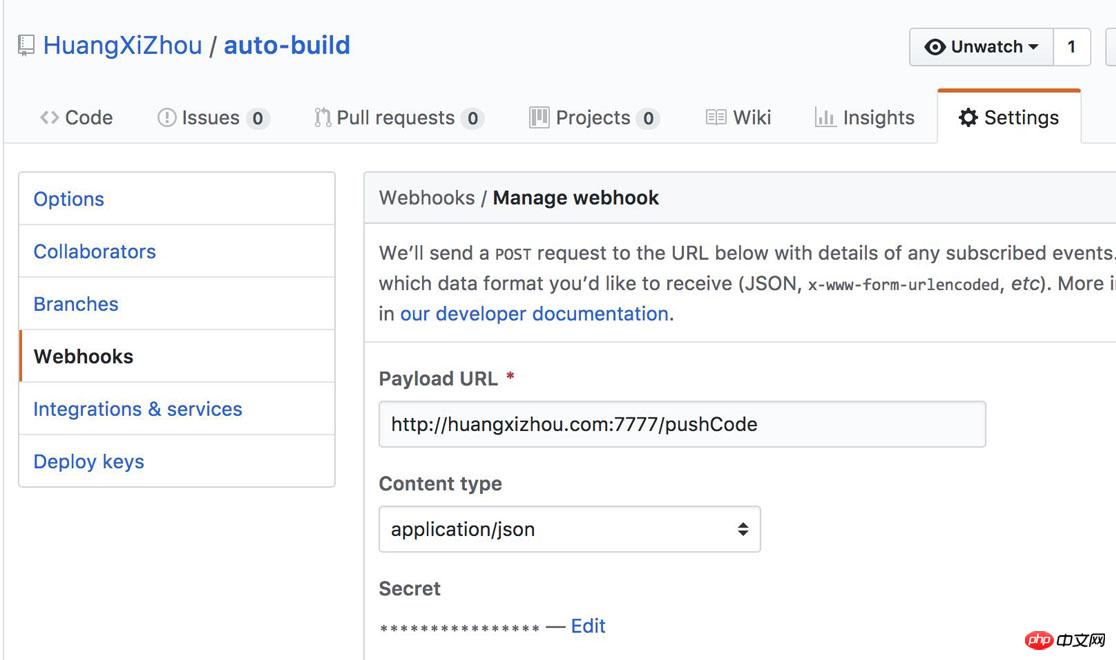
First, we enter the warehouse where you want to implement automated deployment, click settings -> Webhooks to Configuration

On the right, configure your interface address and Secret, corresponding to the Secret in the previous js file, select Content type as application/json
Initializing the project
The first time we deploy the project, we still need to do it manually.
First submit the code to the code repository (here is Github), and then enter the server to execute git pull
In this way, we successfully deployed our Node to implement automatic The deployed code
Let’s modify the code to try out the effect
git push Then go to the server and take a look, it’s perfect and runs successfully

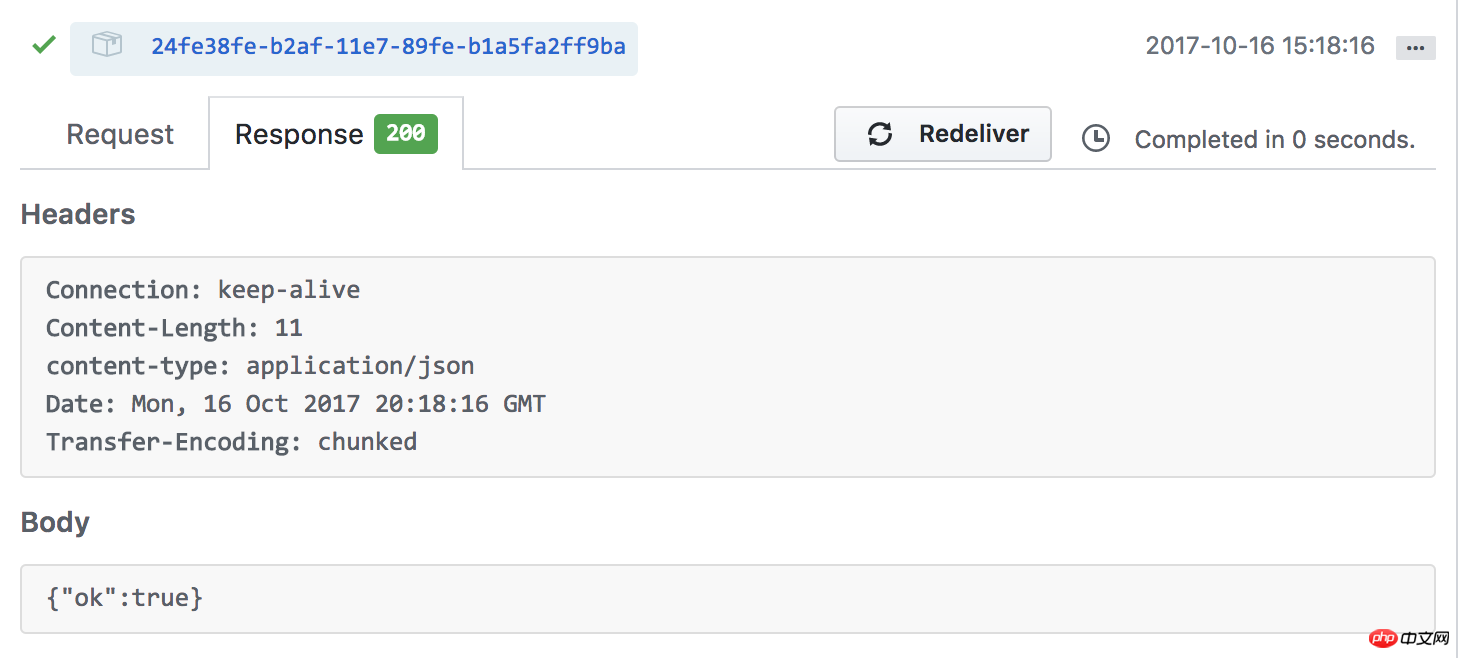
Look at Github again

The interface has been automatically triggered, and the Node automated deployment is successful
Finally
This technology is not limited to Node
There are also limitations. It can only be deployed automatically on a single project and must rely on the code warehouse
Related recommendations:
Use docker to automatically deploy to your own host based on daocloud
Automatically deploy MySQL 5.6 steps
Programmer-Automated deployment tool for PHP websites
The above is the detailed content of Detailed explanation of Node automated deployment method. For more information, please follow other related articles on the PHP Chinese website!

Hot AI Tools

Undresser.AI Undress
AI-powered app for creating realistic nude photos

AI Clothes Remover
Online AI tool for removing clothes from photos.

Undress AI Tool
Undress images for free

Clothoff.io
AI clothes remover

Video Face Swap
Swap faces in any video effortlessly with our completely free AI face swap tool!

Hot Article

Hot Tools

Notepad++7.3.1
Easy-to-use and free code editor

SublimeText3 Chinese version
Chinese version, very easy to use

Zend Studio 13.0.1
Powerful PHP integrated development environment

Dreamweaver CS6
Visual web development tools

SublimeText3 Mac version
God-level code editing software (SublimeText3)

Hot Topics
 1671
1671
 14
14
 1428
1428
 52
52
 1331
1331
 25
25
 1276
1276
 29
29
 1256
1256
 24
24
 Detailed explanation of obtaining administrator rights in Win11
Mar 08, 2024 pm 03:06 PM
Windows operating system is one of the most popular operating systems in the world, and its new version Win11 has attracted much attention. In the Win11 system, obtaining administrator rights is an important operation. Administrator rights allow users to perform more operations and settings on the system. This article will introduce in detail how to obtain administrator permissions in Win11 system and how to effectively manage permissions. In the Win11 system, administrator rights are divided into two types: local administrator and domain administrator. A local administrator has full administrative rights to the local computer
 Detailed explanation of division operation in Oracle SQL
Mar 10, 2024 am 09:51 AM
Detailed explanation of division operation in OracleSQL In OracleSQL, division operation is a common and important mathematical operation, used to calculate the result of dividing two numbers. Division is often used in database queries, so understanding the division operation and its usage in OracleSQL is one of the essential skills for database developers. This article will discuss the relevant knowledge of division operations in OracleSQL in detail and provide specific code examples for readers' reference. 1. Division operation in OracleSQL
 Pi Node Teaching: What is a Pi Node? How to install and set up Pi Node?
Mar 05, 2025 pm 05:57 PM
Detailed explanation and installation guide for PiNetwork nodes This article will introduce the PiNetwork ecosystem in detail - Pi nodes, a key role in the PiNetwork ecosystem, and provide complete steps for installation and configuration. After the launch of the PiNetwork blockchain test network, Pi nodes have become an important part of many pioneers actively participating in the testing, preparing for the upcoming main network release. If you don’t know PiNetwork yet, please refer to what is Picoin? What is the price for listing? Pi usage, mining and security analysis. What is PiNetwork? The PiNetwork project started in 2019 and owns its exclusive cryptocurrency Pi Coin. The project aims to create a one that everyone can participate
 How to delete Apple shortcut command automation
Feb 20, 2024 pm 10:36 PM
How to Delete Apple Shortcut Automation With the launch of Apple's new iOS13 system, users can use shortcuts (Apple Shortcuts) to customize and automate various mobile phone operations, which greatly improves the user's mobile phone experience. However, sometimes we may need to delete some shortcuts that are no longer needed. So, how to delete Apple shortcut command automation? Method 1: Delete through the Shortcuts app. On your iPhone or iPad, open the "Shortcuts" app. Select in the bottom navigation bar
 Detailed explanation of the role and usage of PHP modulo operator
Mar 19, 2024 pm 04:33 PM
The modulo operator (%) in PHP is used to obtain the remainder of the division of two numbers. In this article, we will discuss the role and usage of the modulo operator in detail, and provide specific code examples to help readers better understand. 1. The role of the modulo operator In mathematics, when we divide an integer by another integer, we get a quotient and a remainder. For example, when we divide 10 by 3, the quotient is 3 and the remainder is 1. The modulo operator is used to obtain this remainder. 2. Usage of the modulo operator In PHP, use the % symbol to represent the modulus
 Detailed explanation of the linux system call system() function
Feb 22, 2024 pm 08:21 PM
Detailed explanation of Linux system call system() function System call is a very important part of the Linux operating system. It provides a way to interact with the system kernel. Among them, the system() function is one of the commonly used system call functions. This article will introduce the use of the system() function in detail and provide corresponding code examples. Basic Concepts of System Calls System calls are a way for user programs to interact with the operating system kernel. User programs request the operating system by calling system call functions
 Detailed explanation of Linux curl command
Feb 21, 2024 pm 10:33 PM
Detailed explanation of Linux's curl command Summary: curl is a powerful command line tool used for data communication with the server. This article will introduce the basic usage of the curl command and provide actual code examples to help readers better understand and apply the command. 1. What is curl? curl is a command line tool used to send and receive various network requests. It supports multiple protocols, such as HTTP, FTP, TELNET, etc., and provides rich functions, such as file upload, file download, data transmission, proxy
 Artificial Intelligence will revolutionize hardware design by 2024
Mar 15, 2024 pm 02:34 PM
Here are five ways artificial intelligence will impact hardware design in 2024, from speeding up the brainstorming process to finding design flaws early. Every hardware team’s mission is to drive innovation, design disruptive products, and deliver them on time and on budget. However, this goal is often threatened due to long hardware design and development cycles, inefficient processes, and lack of resources. Although other industries are rapidly adopting AI technology, in the hardware market, the application of AI is still in its infancy. Only recently have hardware teams begun to show serious interest in the potential of artificial intelligence. If applied properly, artificial intelligence is expected to change this situation. The hardware world seems to need more time and resources to adapt to this change. With the continuous development of technology, artificial intelligence is


