Introduction to http module and url module in node.js
This article mainly gives you a brief introduction to the http module and url module in node.js. The article introduces it in detail through sample code. It has certain reference learning value for everyone to learn or use node.js. Friends who need it Let's learn together with the editor, I hope it can help everyone.
Preface
This article mainly introduces to you the relevant content about the http module and url module in node.js, and shares it for your reference and study. I won’t say much more below. Let’s take a look at the detailed introduction.
1. A brief introduction to the http module
The http built-in module in node.js can be used to create http servers and http clients.
1. Introduction package
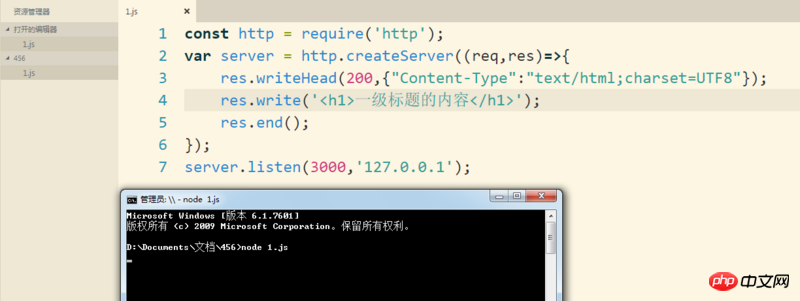
const http = require('http');2. Create http server
var server = http.createServer((req,res)=>{

});Using the .createServer() method of http can be used to return an http server instance, using a custom server variable to receive. When the server receives a request from a client, it triggers a call to its internal callback function. Every time the client accesses it, it triggers a call. The callback function has two parameters, req and res, the order cannot be reversed, req represents the request, and res represents the response.
The internal statement of the callback function must contain res.end();, because if not, the browser will think that it has not received a response from the server, and the browser will always be suspended. status, at this time there is a timeout mechanism inside the browser. Once it times out, an error will be reported.
Commonly used code statements in this callback function are:
Set the response header, res.writeHead(status code, {}); among them, the commonly used HTTP status codes are 200 (return successfully), 404 (the page cannot be found, error returned), etc. The second parameter is passed in an object, which is used to set the rendering parsing type of the response text. For example, the commonly used setting for html code is, res.writeHead(200,{"Content-Type":"text/html;charset=UTF8"});. The setting for css files is res.writeHead(200,{"Content-Type":"text/css"});. The setting for pictures is res.writeHead(200,{"Content-Type":"image/jpg"});. For plain text, the setting is res.writeHead(200,{"Content-Type":"text/plain"}); set the returned content, res.write('');
3. Let the The server listens to a specific port number
Use the custom variable server to represent the created server to listen to a specified port number. server.listen(3000,'192.168.155.1'); External clients can access this server through this IP address and port number.

At this time, it means that the server is in a suspended state. At this time, enter the corresponding IP address and port number in the browser to get the content of the server response.

2. A brief introduction to the url module
const http = require('http');
var server = http.createServer((req,res)=>{
 console.log(req.url);
 res.end();
});
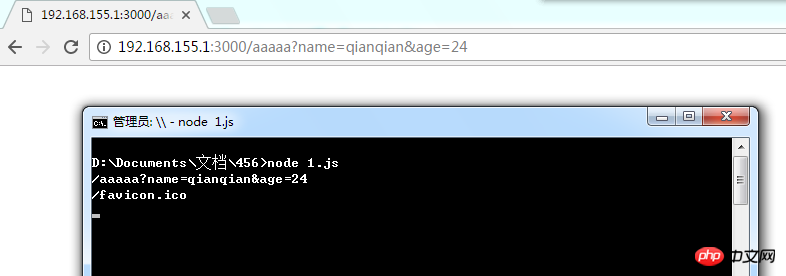
server.listen(3000,'192.168.155.1');When you use the node command to open this server, you can print out the URL address of the accessed client in real time on the console. information.

Since when accessing through the chrome browser, each access will be accompanied by a request for /favicon.ico by default. When parsing the client, the browser actually When accessing the address, you can do the following processing:
const http = require('http');
var server = http.createServer((req,res)=>{
 if(req.url == '/favicon.ico'){
  return;
 };
 console.log(req.url);
 res.end();
});
server.listen(3000,'192.168.155.1');
As shown in the figure above, we can get the user's complete request address through req.url. We can use The built-in url module parses the user's request address.
1. Introduction package
const url = require('url');2. The commonly used method is url.parse(req.url)
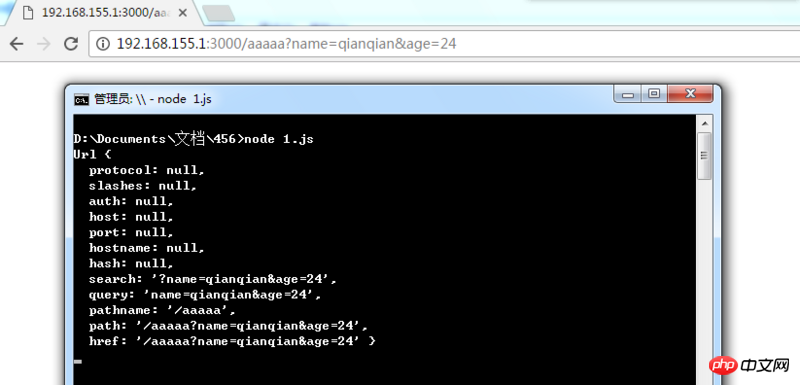
This method is commonly used to decompose a complete url address into a object.
const http = require('http');
const url = require('url');
var server = http.createServer((req,res)=>{
 if(req.url == '/favicon.ico'){
  return;
 };
 console.log(url.parse(req.url));
 res.end();
});
server.listen(3000,'192.168.155.1');
The most commonly used one is url.parse(req.url).pathname to get a string of file path, starting with /, and not including the query part of the content. Use url.parse(req.url).query to get a query part of the string. The second parameter of the url.parse() method is true, which can convert all queries into object form.
console.log(url.parse(req.url,true).query);

In this way, the data submitted by the client to the server through GET can be quickly obtained.
Related recommendations:
Detailed explanation of HTTP module and event module in Node.js
NodeJS study notes Http module_node.js
golang uses http module to build redis read-write query api
The above is the detailed content of Introduction to http module and url module in node.js. For more information, please follow other related articles on the PHP Chinese website!

Hot AI Tools

Undresser.AI Undress
AI-powered app for creating realistic nude photos

AI Clothes Remover
Online AI tool for removing clothes from photos.

Undress AI Tool
Undress images for free

Clothoff.io
AI clothes remover

Video Face Swap
Swap faces in any video effortlessly with our completely free AI face swap tool!

Hot Article

Hot Tools

Notepad++7.3.1
Easy-to-use and free code editor

SublimeText3 Chinese version
Chinese version, very easy to use

Zend Studio 13.0.1
Powerful PHP integrated development environment

Dreamweaver CS6
Visual web development tools

SublimeText3 Mac version
God-level code editing software (SublimeText3)

Hot Topics
 1653
1653
 14
14
 1413
1413
 52
52
 1304
1304
 25
25
 1251
1251
 29
29
 1224
1224
 24
24
 Understand common application scenarios of web page redirection and understand the HTTP 301 status code
Feb 18, 2024 pm 08:41 PM
Understand the meaning of HTTP 301 status code: common application scenarios of web page redirection. With the rapid development of the Internet, people's requirements for web page interaction are becoming higher and higher. In the field of web design, web page redirection is a common and important technology, implemented through the HTTP 301 status code. This article will explore the meaning of HTTP 301 status code and common application scenarios in web page redirection. HTTP301 status code refers to permanent redirect (PermanentRedirect). When the server receives the client's
 HTTP 200 OK: Understand the meaning and purpose of a successful response
Dec 26, 2023 am 10:25 AM
HTTP Status Code 200: Explore the Meaning and Purpose of Successful Responses HTTP status codes are numeric codes used to indicate the status of a server's response. Among them, status code 200 indicates that the request has been successfully processed by the server. This article will explore the specific meaning and use of HTTP status code 200. First, let us understand the classification of HTTP status codes. Status codes are divided into five categories, namely 1xx, 2xx, 3xx, 4xx and 5xx. Among them, 2xx indicates a successful response. And 200 is the most common status code in 2xx
 Simple JavaScript Tutorial: How to Get HTTP Status Code
Jan 05, 2024 pm 06:08 PM
JavaScript tutorial: How to get HTTP status code, specific code examples are required. Preface: In web development, data interaction with the server is often involved. When communicating with the server, we often need to obtain the returned HTTP status code to determine whether the operation is successful, and perform corresponding processing based on different status codes. This article will teach you how to use JavaScript to obtain HTTP status codes and provide some practical code examples. Using XMLHttpRequest
 How to implement HTTP streaming using C++?
May 31, 2024 am 11:06 AM
How to implement HTTP streaming in C++? Create an SSL stream socket using Boost.Asio and the asiohttps client library. Connect to the server and send an HTTP request. Receive HTTP response headers and print them. Receives the HTTP response body and prints it.
 How to get HTTP status code in JavaScript the easy way
Jan 05, 2024 pm 01:37 PM
Introduction to the method of obtaining HTTP status code in JavaScript: In front-end development, we often need to deal with the interaction with the back-end interface, and HTTP status code is a very important part of it. Understanding and obtaining HTTP status codes helps us better handle the data returned by the interface. This article will introduce how to use JavaScript to obtain HTTP status codes and provide specific code examples. 1. What is HTTP status code? HTTP status code means that when the browser initiates a request to the server, the service
 What status code is returned for an HTTP request timeout?
Feb 18, 2024 pm 01:58 PM
The HTTP request times out, and the server often returns the 504GatewayTimeout status code. This status code indicates that when the server executes a request, it still fails to obtain the resources required for the request or complete the processing of the request after a period of time. It is a status code of the 5xx series, which indicates that the server has encountered a temporary problem or overload, resulting in the inability to correctly handle the client's request. In the HTTP protocol, various status codes have specific meanings and uses, and the 504 status code is used to indicate request timeout issues. in customer
 How to solve HTTP 503 error
Mar 12, 2024 pm 03:25 PM
Solution: 1. Retry: You can wait for a period of time and try again, or refresh the page; 2. Check the server load: Check the server's CPU, memory and disk usage. If the capacity limit is exceeded, you can try to optimize the server configuration or increase the capacity. Server resources; 3. Check server maintenance and upgrades: You can only wait until the server returns to normal; 4. Check network connection: Make sure the network connection is stable, check whether the network device, firewall or proxy settings are correct; 5. Ensure cache or CDN configuration Correct; 6. Contact the server administrator, etc.
 How to implement HTTP file upload security using Golang?
Jun 01, 2024 pm 02:45 PM
Implementing HTTP file upload security in Golang requires following these steps: Verify file type. Limit file size. Detect viruses and malware. Store files securely.


