

Vue header component development example code

This article mainly introduces you to the detailed explanation of Vue header component development and gives you a reference. I hope you will have a deeper understanding of Vue component development.
1. Data transmission in header component development
1. App.vue introduces components
##
import header from './components/header/header'
 export default {
   components:{
     v-header:header
   }
}<v-header :sell="sellerObj"></v-header>
export default {
 props:{ // 子组件获取 父组件 数据
 sell:{
  type:Object // 传递的类型
 }
 }
}- The child component creates a property in props to receive the value passed by the parent component
- Parent Register the subcomponent in the component
- Add the attribute created in the subcomponent props to the subcomponent tag
- Pass the value that needs to be passed to the subcomponent Assign this attribute
<p class="logo">
<img :src="sell.avatar" alt="" width='64' height='64'/>
</p>
<span class="name">{{sell.name}}</span>
<p class="description">
{{sell.description + '/' + sell.deliveryTime + '分钟送达'}}
</p>2. Header component pop-up layer (details)
1. Pop-up mask layer
(1) Set one State, determine the state to control display and hidedata (){
return {
detailShow:false
}
}<p v-if="detailShow" class="detail"></p>
<p class="bulletin-wrapper" @click="showDetails()" ></p>
<p class="detail-close" v-if="sell.supports">
  <i class="icon-close" @click="hideDetail()"></i>
</p>
methods:{
 showDetails () {
  this.detailShow=true
 },
 hideDetail () {
 this.detailShow=false
 }
}2. Star rating
(1) Binding class The type that controls the star size// 利用 computed 属性 <p class="star" :class="starSizeType"></p>
computed: {
 starSizeType() { // 返回 星级的大小类型 48/36/24
  return 'star-' + this.size;
 }
}
Copy Code The code is as follows:
// 类名用变量存起来
const LENGTH = 5 // 星星长度
const CLS_ON = 'on' // 全星
const CLS_HALF = 'half' // 半星
const CLS_OFF = 'off'// 空星
itemClasses () { // 返回一个数组为每个span 的类名 (遍历)
  let spanClassList=[];
  // 利用 实参评分来判断 有几颗全星,半星,空星
 let scores=( Math.floor(this.score * 2) ) / 2
 let intNum= Math.floor(scores); // 全星个数
 let HashalfNum= scores % 1 !== 0  // 半星
 for(var i=0;i<intNum;i++){ // 遍历全星的span
 spanClassList.push(CLS_ON)
 }
 if(HashalfNum){ // 如果有半星 加类名
 spanClassList.push(CLS_HALF)
 }
 while(spanClassList.length<LENGTH){// 判断 是否有空星 及个数
 spanClassList.push(CLS_OFF)
 }
  return spanClassList;
 }
}<p class="star" :class="starSizeType"> <span v-for="itemClass in itemClasses" :class="itemClass" class="star-item" track-by="$index"></span> </p>
Detailed explanation of jQuery setting request information instance in header
Detailed explanation of php sending custom data through header
Summary of usage of php header
The above is the detailed content of Vue header component development example code. For more information, please follow other related articles on the PHP Chinese website!

Hot AI Tools

Undresser.AI Undress
AI-powered app for creating realistic nude photos

AI Clothes Remover
Online AI tool for removing clothes from photos.

Undress AI Tool
Undress images for free

Clothoff.io
AI clothes remover

Video Face Swap
Swap faces in any video effortlessly with our completely free AI face swap tool!

Hot Article
Hot Tools

Notepad++7.3.1
Easy-to-use and free code editor

SublimeText3 Chinese version
Chinese version, very easy to use

Zend Studio 13.0.1
Powerful PHP integrated development environment

Dreamweaver CS6
Visual web development tools

SublimeText3 Mac version
God-level code editing software (SublimeText3)
Hot Topics


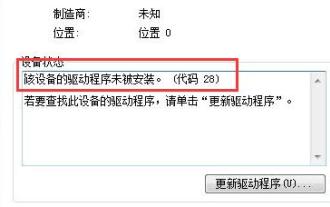 How to solve win7 driver code 28
Dec 30, 2023 pm 11:55 PM
How to solve win7 driver code 28
Dec 30, 2023 pm 11:55 PM
Some users encountered errors when installing the device, prompting error code 28. In fact, this is mainly due to the driver. We only need to solve the problem of win7 driver code 28. Let’s take a look at what should be done. Do it. What to do with win7 driver code 28: First, we need to click on the start menu in the lower left corner of the screen. Then, find and click the "Control Panel" option in the pop-up menu. This option is usually located at or near the bottom of the menu. After clicking, the system will automatically open the control panel interface. In the control panel, we can perform various system settings and management operations. This is the first step in the nostalgia cleaning level, I hope it helps. Then we need to proceed and enter the system and
 What to do if the blue screen code 0x0000001 occurs
Feb 23, 2024 am 08:09 AM
What to do if the blue screen code 0x0000001 occurs
Feb 23, 2024 am 08:09 AM
What to do with blue screen code 0x0000001? The blue screen error is a warning mechanism when there is a problem with the computer system or hardware. Code 0x0000001 usually indicates a hardware or driver failure. When users suddenly encounter a blue screen error while using their computer, they may feel panicked and at a loss. Fortunately, most blue screen errors can be troubleshooted and dealt with with a few simple steps. This article will introduce readers to some methods to solve the blue screen error code 0x0000001. First, when encountering a blue screen error, we can try to restart
 Solve the 'error: expected initializer before 'datatype'' problem in C++ code
Aug 25, 2023 pm 01:24 PM
Solve the 'error: expected initializer before 'datatype'' problem in C++ code
Aug 25, 2023 pm 01:24 PM
Solve the "error:expectedinitializerbefore'datatype'" problem in C++ code. In C++ programming, sometimes we encounter some compilation errors when writing code. One of the common errors is "error:expectedinitializerbefore'datatype'". This error usually occurs in a variable declaration or function definition and may cause the program to fail to compile correctly or
 The computer frequently blue screens and the code is different every time
Jan 06, 2024 pm 10:53 PM
The computer frequently blue screens and the code is different every time
Jan 06, 2024 pm 10:53 PM
The win10 system is a very excellent high-intelligence system. Its powerful intelligence can bring the best user experience to users. Under normal circumstances, users’ win10 system computers will not have any problems! However, it is inevitable that various faults will occur in excellent computers. Recently, friends have been reporting that their win10 systems have encountered frequent blue screens! Today, the editor will bring you solutions to different codes that cause frequent blue screens in Windows 10 computers. Let’s take a look. Solutions to frequent computer blue screens with different codes each time: causes of various fault codes and solution suggestions 1. Cause of 0×000000116 fault: It should be that the graphics card driver is incompatible. Solution: It is recommended to replace the original manufacturer's driver. 2,
 GE universal remote codes program on any device
Mar 02, 2024 pm 01:58 PM
GE universal remote codes program on any device
Mar 02, 2024 pm 01:58 PM
If you need to program any device remotely, this article will help you. We will share the top GE universal remote codes for programming any device. What is a GE remote control? GEUniversalRemote is a remote control that can be used to control multiple devices such as smart TVs, LG, Vizio, Sony, Blu-ray, DVD, DVR, Roku, AppleTV, streaming media players and more. GEUniversal remote controls come in various models with different features and functions. GEUniversalRemote can control up to four devices. Top Universal Remote Codes to Program on Any Device GE remotes come with a set of codes that allow them to work with different devices. you may
 Resolve code 0xc000007b error
Feb 18, 2024 pm 07:34 PM
Resolve code 0xc000007b error
Feb 18, 2024 pm 07:34 PM
Termination Code 0xc000007b While using your computer, you sometimes encounter various problems and error codes. Among them, the termination code is the most disturbing, especially the termination code 0xc000007b. This code indicates that an application cannot start properly, causing inconvenience to the user. First, let’s understand the meaning of termination code 0xc000007b. This code is a Windows operating system error code that usually occurs when a 32-bit application tries to run on a 64-bit operating system. It means it should
 Detailed explanation of the causes and solutions of 0x0000007f blue screen code
Dec 25, 2023 pm 02:19 PM
Detailed explanation of the causes and solutions of 0x0000007f blue screen code
Dec 25, 2023 pm 02:19 PM
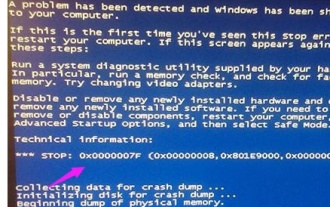
Blue screen is a problem we often encounter when using the system. Depending on the error code, there will be many different reasons and solutions. For example, when we encounter the problem of stop: 0x0000007f, it may be a hardware or software error. Let’s follow the editor to find out the solution. 0x000000c5 blue screen code reason: Answer: The memory, CPU, and graphics card are suddenly overclocked, or the software is running incorrectly. Solution 1: 1. Keep pressing F8 to enter when booting, select safe mode, and press Enter to enter. 2. After entering safe mode, press win+r to open the run window, enter cmd, and press Enter. 3. In the command prompt window, enter "chkdsk /f /r", press Enter, and then press the y key. 4.
 A quick guide to learning Python drawing: code example for drawing ice cubes
Jan 13, 2024 pm 02:00 PM
A quick guide to learning Python drawing: code example for drawing ice cubes
Jan 13, 2024 pm 02:00 PM
Quickly get started with Python drawing: code example for drawing Bingdundun Python is an easy-to-learn and powerful programming language. By using Python's drawing library, we can easily realize various drawing needs. In this article, we will use Python's drawing library matplotlib to draw a simple graph of ice. Bingdundun is a cute panda who is very popular among children. First, we need to install the matplotlib library. You can do this by running in the terminal
