This article mainly introduces relevant information to you about the detailed examples of WeChat applet authorization to obtain user details openid. I hope this article can help you. Friends in need can refer to it. I hope it can help you.
The applet gets the user’s avatar, nickname, openid, etc.

The first way is to use wx.getUserInfo Directly obtain the WeChat avatar, nickname
wx.getUserInfo({
   success: function (res) {
   that.setData({
     nickName: res.userInfo.nickName,
     avatarUrl: res.userInfo.avatarUrl,
   })
   },
})The second type
When we use the wx.login API of the mini program to log in, we use it directly wx.getUserInfo cannot obtain more information, such as the openid of the WeChat user.
Official tip, you need to send the obtained code to request WeChat's back-end API, and perform user decryption and other operations before you can obtain it.
According to the document, you only need to make a get request Just go to the following address:
https://api.weixin.qq.com/sns/jscode2session?appid=APPID&secret=SECRET&js_code=JSCODE&grant_type=authorization_code

appid和secret在微信小程序后台可以看到,js_code为使用wx.login登录时获取到的code参数数据,grant_type这个不用改动。
js file
var openId = (wx.getStorageSync('openId'))
    if (openId) {
     wx.getUserInfo({
      success: function (res) {
       that.setData({
        nickName: res.userInfo.nickName,
        avatarUrl: res.userInfo.avatarUrl,
       })
      },
      fail: function () {
       // fail
       console.log("获取失败!")
      },
      complete: function () {
       // complete
       console.log("获取用户信息完成!")
      }
     })
    } else {
     wx.login({
      success: function (res) {
       console.log(res.code)
       if (res.code) {
        wx.getUserInfo({
         withCredentials: true,
         success: function (res_user) {
          wx.request({
           //后台接口地址
           url: 'https://....com/wx/login',
           data: {
            code: res.code,
            encryptedData: res_user.encryptedData,
            iv: res_user.iv
           },
           method: 'GET',
           header: {
            'content-type': 'application/json'
           },
           success: function (res) {
            // this.globalData.userInfo = JSON.parse(res.data);
            that.setData({
             nickName: res.data.nickName,
             avatarUrl: res.data.avatarUrl,
            })
            wx.setStorageSync('openId', res.data.openId);

           }
          })
         }, fail: function () {
          wx.showModal({
           title: '警告通知',
           content: '您点击了拒绝授权,将无法正常显示个人信息,点击确定重新获取授权。',
           success: function (res) {
            if (res.confirm) {
             wx.openSetting({
              success: (res) => {
               if (res.authSetting["scope.userInfo"]) {////如果用户重新同意了授权登录
                wx.login({
                 success: function (res_login) {
                  if (res_login.code) {
                   wx.getUserInfo({
                    withCredentials: true,
                    success: function (res_user) {
                     wx.request({
                      url: 'https://....com/wx/login',
                      data: {
                       code: res_login.code,
                       encryptedData: res_user.encryptedData,
                       iv: res_user.iv
                      },
                      method: 'GET',
                      header: {
                       'content-type': 'application/json'
                      },
                      success: function (res) {
                       that.setData({
                        nickName: res.data.nickName,
                        avatarUrl: res.data.avatarUrl,

                       })
                       wx.setStorageSync('openId', res.data.openId);
                      }
                     })
                    }
                   })
                  }
                 }
                });
               }
              }, fail: function (res) {

              }
             })

            }
           }
          })
         }, complete: function (res) {


         }
        })
       }
      }
     })

    }


 },
 globalData: {
  userInfo: null
}The background is php and the framework is laravel5.4 version
Official document:
https://mp.weixin.qq.com/debug/wxadoc/dev/api/signature.html
WeChat official provides sample codes in multiple programming languages (click to download). The interface names are consistent for each language type. The calling method can refer to the example.
After downloading, introduce it into the php file:
<?php
namespace App\Http\Controllers\Admin;
use Illuminate\Http\Request;
use App\Http\Controllers\Controller;
use App\Models\User;
use App\Models\Wechatuser;
include_once app_path('/Http/Controllers/Admin/PHP/wxBizDataCrypt.php');
// 获取微信用户信息
public function getWxLogin(Request $request)
{
// require_once ROOTPATH . "./PHP/wxBizDataCrypt.php";
$code = $request->get('code');
$encryptedData = $request->get('encryptedData');
$iv = $request->get('iv');
$appid = "***" ;
$secret = "***";
$URL = "https://api.weixin.qq.com/sns/jscode2session?appid=$appid&secret=$secret&js_code=$code&grant_type=authorization_code";
$apiData=file_get_contents($URL);
// var_dump($code,'wwwwwwww',$apiData['errscode']);
// $ch = curl_init();
// curl_setopt($ch, CURLOPT_URL, $URL);
// curl_setopt($ch, CURLOPT_RETURNTRANSFER, 1);
// curl_setopt($ch, CURLOPT_HEADER, 0);
// $output = curl_exec($ch);
// curl_close($ch)
if(!isset($apiData['errcode'])){
$sessionKey = json_decode($apiData)->session_key;
$userifo = new \WXBizDataCrypt($appid, $sessionKey);
$errCode = $userifo->decryptData($encryptedData, $iv, $data );
if ($errCode == 0) {
return ($data . "\n");
} else {
return false;
}
}
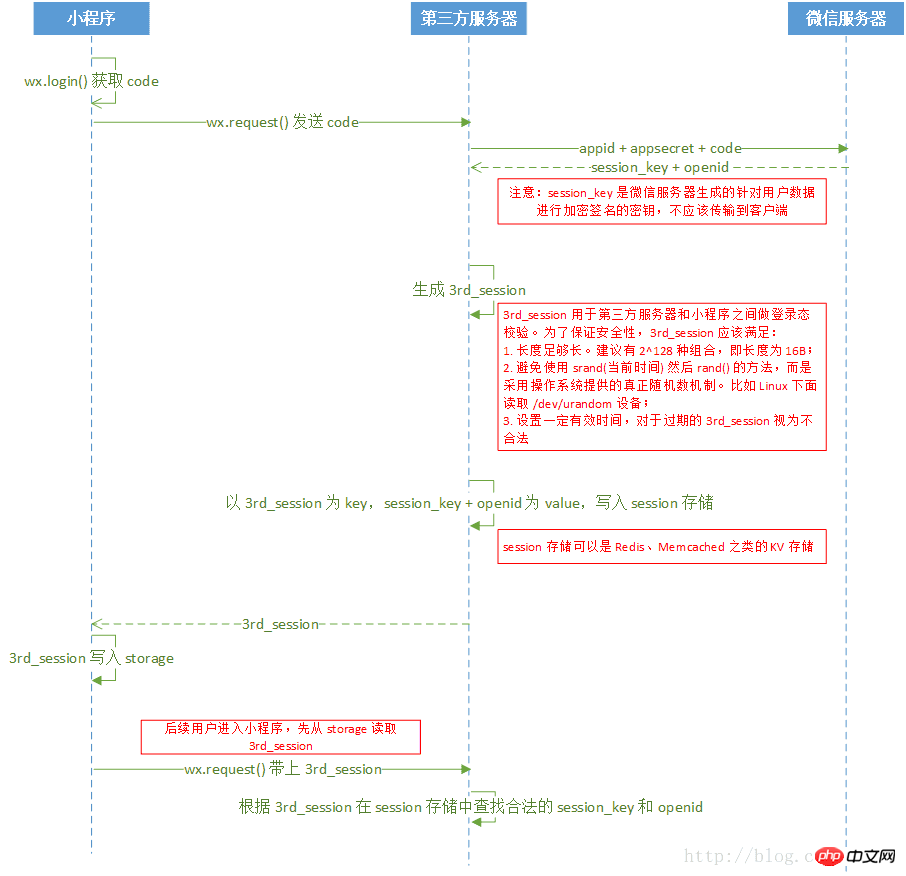
}The login flow chart of the official document. The entire login process is basically as shown below:

Related recommendations:
Thinkphp5 WeChat applet how to obtain user information interface
Instance method of WeChat applet to obtain user information
How to obtain user information through WeChat applet
The above is the detailed content of Example of WeChat applet authorization to obtain user details. For more information, please follow other related articles on the PHP Chinese website!
 What is user stickiness
 Mini program path acquisition
 Common Linux download and installation tools
 net use command usage
 The function of intermediate relay
 Introduction to shortcut keys for minimizing windows windows
 c language else if statement usage
 The difference between i5 and i7
 How to use the axis function in Matlab


