JS imitation classic legendary game
This time I will bring you a JS imitation of the Legend of Blood game. What are the precautions for the JS imitation of the Legend of Blood game? The following is a practical case, let’s take a look.
Preface
The first version of the game was developed in 2014. The browser uses html+css+js and the server uses asp +php, communication uses ajax, and data storage uses access+mySql. However, due to some problems (I didn’t know how to use node at that time, writing complex logic in asp was really difficult to write; there was little writing on canvas at that time, and dom rendering could easily reach performance bottlenecks), it has been abandoned. Later, a version was remade using canvas. This article was written in 2018. 
##1. Preparation before development
Why useJavascriptTo implement a relatively complex PC-side game1.js is feasible to implement PC-side online games. With the upgrade of PC and mobile phone hardware configurations, the updating of browsers, and the development of various H5 libraries, it is becoming increasingly difficult to implement an online game in js. The difficulty here mainly lies in two aspects: the performance of the browser; whether the js code is easy enough to expand to satisfy the iteration of a game with extremely complex logic.
2. Among the js games at this stage, there are few large-scale ones for reference. Most (almost all) games involving multiplayer connections, server-side data storage, and complex interactions are developed using Flash. But flash is declining after all, while js is developing rapidly and can run as long as there is a browser.
Why did you choose a 2001 legendary game?The first reason is the feeling for the old game; of course, the other more important reason is that... Either I can't play the game, or I can play it but don't have the materials (pictures, sound effects, etc.). I think it is a waste of time to spend a lot of effort to collect a game's map, character and monster models, items and equipment diagrams, and then process and parse them before using them for js development.
Since I have collected some legendary game materials before, and luckily found a way to extract the Legend of Blood client resource files (github address), I can start writing code directly, saving some preparation time.
Possible difficulties1. Browser performance: This should be the most difficult point. If the game wants to maintain 40 frames, then each frame only has 25ms left for js to calculate. And since rendering usually consumes more performance than calculation, the actual time left for js is only about 10 milliseconds.
2. Anti-cheating: How to prevent users from directly calling interfaces or tampering with network request data? Since the goal is to use js to implement more complex games, and any online game needs to consider this, there must be a relatively mature solution. This is not the focus of this article.
2. Overall design
Browser sideScreen rendering uses canvas.
Compared with dom(p)+css, canvas can handle more complex scene rendering and event management. For example, the following scene involves four pictures: players, animals, items on the ground, and the lowest map picture. (There are actually shadows on the ground, the corresponding names that appear when the mouse points to characters, animals, and objects, as well as shadows on the ground. For the convenience of reading, we will not consider so much content.)
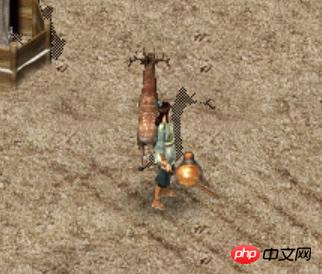 At this time, if you want to achieve the effect of "click on the animal, attack the animal; click on the item, pick up the item", then you need to monitor the events for animals and items. If you use the dom method, there will be several problems that are difficult to deal with:
a. The order of rendering is different from the order of
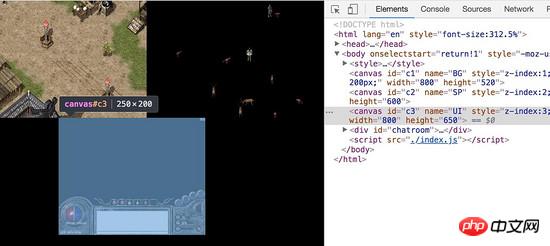
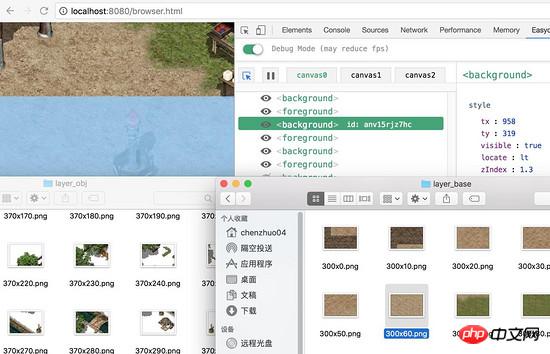
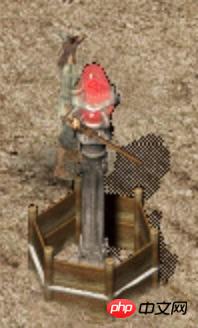
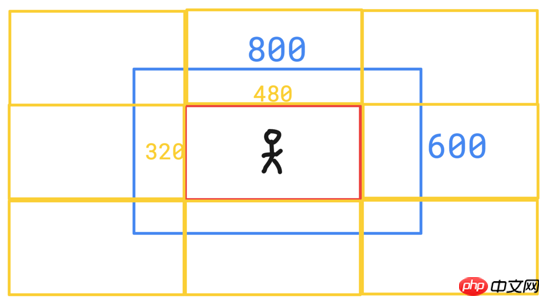
event processing (sometimes the small z-index needs to be processed first event), requiring additional processing. For example, in the above example: when you click on monsters or items, it is easy to click on characters, so you need to perform "click event penetration" processing for the characters. Moreover, the order of event processing is not fixed: if I have a skill (such as treatment in the game) that requires a character to be released, then the character needs to have event monitoring at this time. Therefore, whether an element needs to handle events and the order in which events are handled vary with the game state, and DOM's event binding can no longer meet the needs. b. It is difficult to put related elements in the same dom node: such as the player's model, the player's name and the player's skill effects. Ideally, they should be placed in a c. Performance issues. Even if the effect is sacrificed, using DOM for rendering will inevitably lead to many nested relationships, and the styles of all elements will change frequently, continuously triggering the browser's repaint or even reflow. Separation of canvas rendering logic and project logic If the various rendering operations of canvas (such as drawImage, fillText, etc.) are put together with the project code, it will inevitably lead to the inability to maintain the project later. After looking through several existing canvas libraries, combined with vue's data binding+ debugging tools, I created a new canvas library Easycanvas (github address), and like vue, it supports a plug-in to debug elements in the canvas. In this way, the rendering part of the entire game is much easier. You only need to manage the current state of the game and update the data based on the data returned from the socket by the server. Easycanvas is responsible for the link "changes in data cause changes in the view". For example, in the implementation of the player wrapping items in the picture below, we only need to give the location of the wrapping container and the arrangement rules of each element in the backpack, and then bind each wrapped item to an array, and then manage this array. Yes (Easycanvas is responsible for the process of mapping data to the screen). For example, the styles of a total of 40 items in 5 rows and 8 columns can be passed to Easycanvas in the following form (index is the item index, the distance between items in the x direction is 36, and the distance in the y direction 32). And this logic is immutable. No matter how the array of items changes or where the package is dragged, the relative position of each item is fixed. As for rendering on canvas, there is no need to consider the project itself, so maintainability is better. canvas layered rendering Assumption: The game needs to maintain 40 frames, the browser is 800 wide and 600 high, with an area of 480,000 (hereinafter referred to as 480,000 as one screen) area). If the same canvas is used to render, then the frame number of this canvas is 40, and at least 40 screen areas need to be drawn per second. However, it is likely that multiple elements overlap at the same coordinate point. For example, the UI, health bar, and buttons at the bottom are overlapped, and they jointly block the scene map. So adding these together, the browser's drawing amount per second can easily reach more than 100 screen areas. This drawing is difficult to optimize, because the view is being updated anywhere on the entire canvas: it may be the movement of players and animals, it may be the special effects of buttons, it may be the effect of a certain skill Variety. In this case, even if the player does not move, the entire canvas will be redrawn due to the effect of the clothes "fluttering in the wind" (actually the sprite animation plays to the next picture), or a bottle of potion appearing on the ground. Because it is almost impossible for a certain frame of the game to be indistinguishable from the previous frame, even a part of the game screen is difficult to remain unchanged. The entire game screen is always updated. Because it is almost impossible for a certain frame of the game to be indistinguishable from the previous frame, and the screen is always updated. Therefore, this time I adopted the overlapping arrangement of three canvases. Since Easycanvas' event processing supports delivery, even if the top canvas is clicked, if no element ends a click, the subsequent canvas can also receive the event. The three canvases are responsible for the UI, the ground (map), and the elves (characters, animals, skill special effects, etc.): The advantage of this layering is that the maximum number of frames per layer Can be adjusted as needed: For example, the UI layer, because many UIs usually do not move, and even if they move, they do not require too precise drawing, so the number of frames can be appropriately reduced, for example, to 20. In this way, if the player's physical strength decreases from 100 to 20, the view can be updated within 50ms, and the 50ms switch cannot be felt by the player. Because changes in UI layer data such as physical strength are difficult to change multiple times in a short period of time, and the 50ms delay is difficult for humans to perceive, so frequent drawing is not required. If we save 20 frames per second, we can probably save 10 screen areas of drawing. Like the ground again, the map will only change when the player moves. In this way, if the player is not moving, 1 screen area can be saved per frame. Since it is necessary to ensure smoothness when players move, the maximum frame rate on the ground should not be too low. If the ground frame is 30 frames, then when the player is not moving, 30 screen areas can be saved per second (in this project, the map is almost drawn to fill the screen). Moreover, the movement of other players and animals will not change the ground, and there is no need to redraw the ground layer. The maximum number of frames of the sprite layer cannot be reduced. This layer will display the core parts of the game such as character movements, so the maximum number of frames is set to 40. In this way, the area drawn per second, player movement It may be 80 to 100 screen areas when the player is not moving, but it may only be 50 screen areas when the player is not moving. In the game, players stop to fight monsters, type, organize items, and release skills while standing still. Therefore, the drawing of the ground will not be triggered for a large amount of time, which saves performance greatly. Server side Since the goal is to implement a multiplayer online game with js, the server uses Node and uses socket to communicate with the browser. Another advantage of this is that some common logic can be reused at both ends, such as determining whether there is an obstacle at a certain coordinate point on the map. Game-related data such as players and scenes on the Node side are all stored in memory and synchronized to files regularly. Every time the Node service starts, data is read from the file to memory. In this way, when there are more players, the frequency of file reading and writing increases exponentially, causing performance problems. (Later, in order to improve stability, a buffer was added for file reading and writing, using the "memory-file-backup" method to avoid file damage caused by server restarting during the reading and writing process). The Node side is divided into multiple layers such as interface, data, and instance. The "interface" is responsible for interacting with the browser. "Data" is some static data, such as the name and effect of a certain medicine, the speed and physical strength of a certain monster, and is part of the game rules. "Instance" is the current state in the game. For example, a medicine on a certain player is an instance of "drug data". For another example, "deer instance" has the attribute "current blood volume". Deer A may be 10, deer B may be 14, and "deer" itself only has "initial blood volume". 3. Implementation of scene map Map scene Let’s start with the map scene part, which still relies on Easycanvas for rendering. Thinking Since the player is always fixed at the center of the screen, the movement of the player is actually the movement of the map. For example, if the player runs to the left, the map will move to the right. As mentioned just now, the player is in the middle layer of the three canvases, and the map belongs to the bottom layer, so the player must block the map. This seems reasonable, but if there is a tree in the map, then "the player's level is always higher than the tree" is wrong. At this time, there are two big solutions: Map layering, "ground" and "above ground" are separated. Place the player between two layers. For example, in the picture below, the left side is on the ground and the right side is on the ground. Then overlap and draw to sandwich the character in the middle: It looks like this Solved the problem, but actually introduced 2 new problems: The first is that players may sometimes be blocked by things "on the ground" (such as a tree), and sometimes they need to be able to block things "on the ground" (such as standing on Below the tree, the head will obscure the tree). Another problem is that the performance cost of rendering will increase. Since players are changing all the time, the "ground" layer needs to be redrawn frequently. This also breaks the original design - to save the rendering of the large ground map as much as possible, which makes the layering of the canvas more complicated. The map is not layered, "ground" and "above ground" are drawn together. When the player is behind a tree, set the player's transparency to 0.5, such as the following picture: There is only one disadvantage to doing this: the player's body is either opaque or translucent (monsters walking on the map will also have this effect), which will not be completely realistic. Because the ideal effect is to have a scene where part of the player's body is obscured. But this is performance-friendly and the code is easy to maintain. I currently use this solution. So how to determine which parts of the "map" picture are trees? Games usually have a large map description file (actually an Array), which uses numbers such as 0, 1, and 2 to identify which places can be passed, where there are obstacles, which places are transfer points, etc. The "description file" in Legend of Hot Blood is described in 48x32 as the smallest unit, so the player's actions in Legend will have a "chessboard" feel. The smaller the unit, the smoother it is, but the larger the volume it occupies, and the more time-consuming the process of generating this description is. Now let’s get to the point. Implementation I asked a friend to help me export the map of "Beach Province" in the Legend of Blood client, with a width of 33600 and a height of 33600. 22400, hundreds of times the size of my computer. To prevent the computer from exploding, it needs to be split into multiple chunks to load. Since the smallest unit of a legend is 48x32, we split the map into 4900 (70x70) image files at 480x320. We set the size of the canvas to 800x600, so that players only need to load 3x3, a total of 9 pictures, to cover the entire canvas. 800/480=1.67, so why not 2x2? Because it is possible that the player's current position happens to cause only part of some pictures to be displayed. As shown below:
I believe you have mastered the method after reading the case in this article. For more exciting information, please pay attention to other php Chinese websites related articles! Recommended reading: 
style: {
 tw: 30, th: 30,
 tx: function () {
 return 40 + index % 8 * 36;
 },
 ty: function () {
 return 31 + Math.floor(index / 8) * 32;
 }
}
The above is the detailed content of JS imitation classic legendary game. For more information, please follow other related articles on the PHP Chinese website!

Hot AI Tools

Undresser.AI Undress
AI-powered app for creating realistic nude photos

AI Clothes Remover
Online AI tool for removing clothes from photos.

Undress AI Tool
Undress images for free

Clothoff.io
AI clothes remover

Video Face Swap
Swap faces in any video effortlessly with our completely free AI face swap tool!

Hot Article

Hot Tools

Notepad++7.3.1
Easy-to-use and free code editor

SublimeText3 Chinese version
Chinese version, very easy to use

Zend Studio 13.0.1
Powerful PHP integrated development environment

Dreamweaver CS6
Visual web development tools

SublimeText3 Mac version
God-level code editing software (SublimeText3)

Hot Topics
 1672
1672
 14
14
 1428
1428
 52
52
 1332
1332
 25
25
 1276
1276
 29
29
 1256
1256
 24
24
 How to implement an online speech recognition system using WebSocket and JavaScript
Dec 17, 2023 pm 02:54 PM
How to use WebSocket and JavaScript to implement an online speech recognition system Introduction: With the continuous development of technology, speech recognition technology has become an important part of the field of artificial intelligence. The online speech recognition system based on WebSocket and JavaScript has the characteristics of low latency, real-time and cross-platform, and has become a widely used solution. This article will introduce how to use WebSocket and JavaScript to implement an online speech recognition system.
 WebSocket and JavaScript: key technologies for implementing real-time monitoring systems
Dec 17, 2023 pm 05:30 PM
WebSocket and JavaScript: Key technologies for realizing real-time monitoring systems Introduction: With the rapid development of Internet technology, real-time monitoring systems have been widely used in various fields. One of the key technologies to achieve real-time monitoring is the combination of WebSocket and JavaScript. This article will introduce the application of WebSocket and JavaScript in real-time monitoring systems, give code examples, and explain their implementation principles in detail. 1. WebSocket technology
 How to use JavaScript and WebSocket to implement a real-time online ordering system
Dec 17, 2023 pm 12:09 PM
Introduction to how to use JavaScript and WebSocket to implement a real-time online ordering system: With the popularity of the Internet and the advancement of technology, more and more restaurants have begun to provide online ordering services. In order to implement a real-time online ordering system, we can use JavaScript and WebSocket technology. WebSocket is a full-duplex communication protocol based on the TCP protocol, which can realize real-time two-way communication between the client and the server. In the real-time online ordering system, when the user selects dishes and places an order
 How to implement an online reservation system using WebSocket and JavaScript
Dec 17, 2023 am 09:39 AM
How to use WebSocket and JavaScript to implement an online reservation system. In today's digital era, more and more businesses and services need to provide online reservation functions. It is crucial to implement an efficient and real-time online reservation system. This article will introduce how to use WebSocket and JavaScript to implement an online reservation system, and provide specific code examples. 1. What is WebSocket? WebSocket is a full-duplex method on a single TCP connection.
 JavaScript and WebSocket: Building an efficient real-time weather forecasting system
Dec 17, 2023 pm 05:13 PM
JavaScript and WebSocket: Building an efficient real-time weather forecast system Introduction: Today, the accuracy of weather forecasts is of great significance to daily life and decision-making. As technology develops, we can provide more accurate and reliable weather forecasts by obtaining weather data in real time. In this article, we will learn how to use JavaScript and WebSocket technology to build an efficient real-time weather forecast system. This article will demonstrate the implementation process through specific code examples. We
 Simple JavaScript Tutorial: How to Get HTTP Status Code
Jan 05, 2024 pm 06:08 PM
JavaScript tutorial: How to get HTTP status code, specific code examples are required. Preface: In web development, data interaction with the server is often involved. When communicating with the server, we often need to obtain the returned HTTP status code to determine whether the operation is successful, and perform corresponding processing based on different status codes. This article will teach you how to use JavaScript to obtain HTTP status codes and provide some practical code examples. Using XMLHttpRequest
 How to use insertBefore in javascript
Nov 24, 2023 am 11:56 AM
Usage: In JavaScript, the insertBefore() method is used to insert a new node in the DOM tree. This method requires two parameters: the new node to be inserted and the reference node (that is, the node where the new node will be inserted).
 How to get HTTP status code in JavaScript the easy way
Jan 05, 2024 pm 01:37 PM
Introduction to the method of obtaining HTTP status code in JavaScript: In front-end development, we often need to deal with the interaction with the back-end interface, and HTTP status code is a very important part of it. Understanding and obtaining HTTP status codes helps us better handle the data returned by the interface. This article will introduce how to use JavaScript to obtain HTTP status codes and provide specific code examples. 1. What is HTTP status code? HTTP status code means that when the browser initiates a request to the server, the service


