
This time I will bring you node+express to implement a chat room. What are the precautions for node+express to implement a chat room. The following is a practical case, let’s take a look.
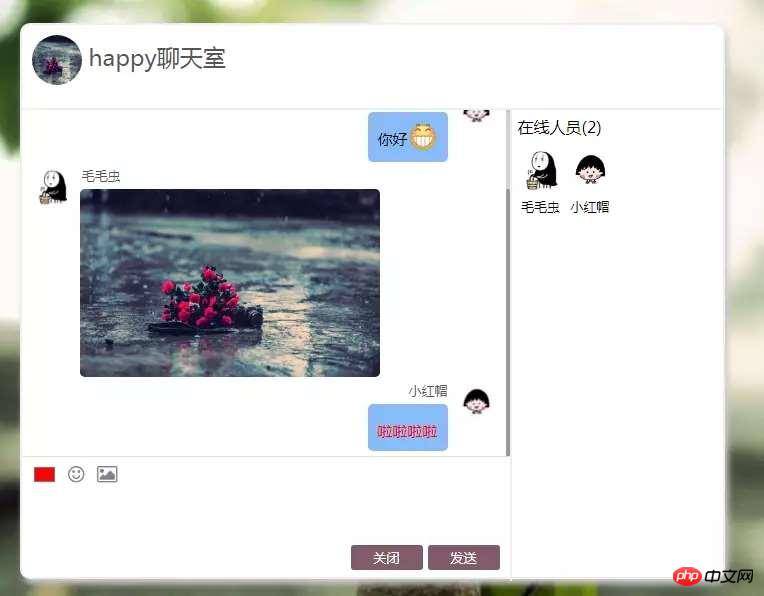
This article uses node+express+jquery to write a personalized chat room, let’s get it together~ (See the source code address at the end of the article)
Rendering
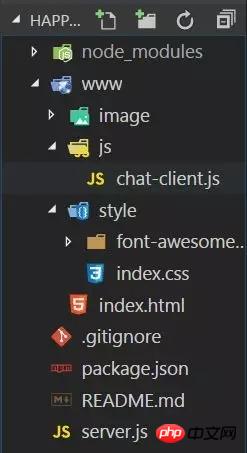
Project structure
Implementation function
Login detection
The system automatically prompts the user status (enter/leave)
Display online users
Support sending and receiving messages
Custom font color
Support sending emoticons
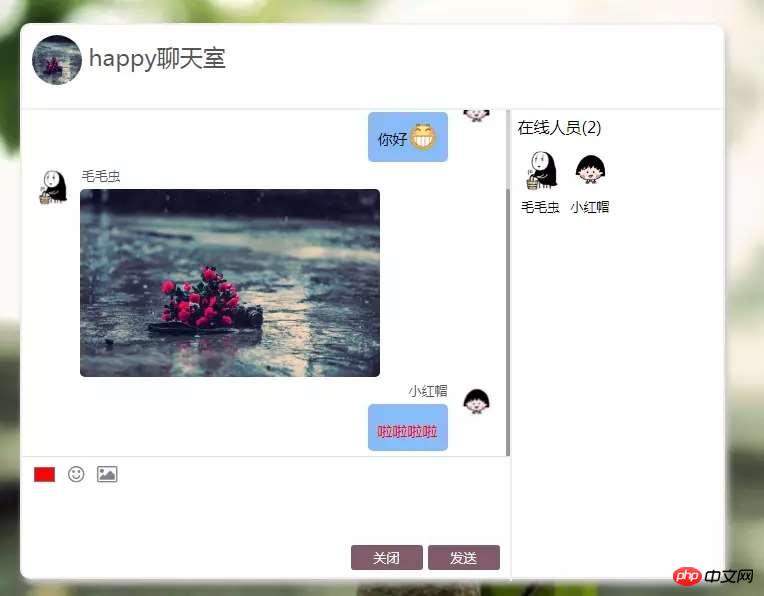
Support Send pictures
The following will explain one by one how to implement
Preliminary preparation
node and npm environment, express, and socket. io
Specific implementation
1. Deploy the chat room to the server
First build a server with node and deploy it on localhost:3000 port, first try to send a "hello world" to the browser, and create a new server.js file.
var app = require('express')(); // 引入express模块
var http = require('http').Server(app);
app.get('/', function(req, res){ // 路由为localhost:3000时向客户端响应“hello world”
 res.send('<h1>Hello world</h1>'); // 发送数据
});
http.listen(3000, function(){ // 监听3000端口
 console.log('listening on *:3000');
});Open the browser and enter the URL: localhost:3000, which is like this

A node server is successfully established.
Next use express to return an html page to the browser
#安装express模块
npm install --save express
Change the code of server.js:
var express = require('express');
var app = express();
var http = require('http').Server(app);
// 路由为/默认www静态文件夹
app.use('/', express.static(dirname + '/www'));express.static(dirname + '/www' ); is to host the www folder as a static resource, which means that the files (html, css, js) in this folder can use relative paths to each other. Add the index.html file and the corresponding css in the www folder (the corresponding css code will not be posted, see the source code for details), as shown below. The page uses the font-awesome small icon
<!doctype html>
<html>
 <head>
 <meta charset="utf-8">
 <meta name="viewport" content="width=device-width, initial-scale=1">
 <title>chat</title>
 <link rel="stylesheet" href="style/index.css" rel="external nofollow" >
 <link rel="stylesheet" href="style/font-awesome-4.7.0/css/font-awesome.min.css" rel="external nofollow" >
 </head>
 <body>
 <p class="all">
  <p class="name">
  <!-- <h2>请输入你的昵称</h2> -->
  <input type="text" id="name" placeholder="请输入昵称..." autocomplete="off">
  <button id="nameBtn">确 定</button>
  </p>
  <p class="main">
  <p class="header">
   <img src="image/logo.jpg">
   happy聊天室
  </p>
  <p id="container">
   <p class="conversation">
    <ul id="messages"></ul>
    <form action="">
     <p class="edit">
     <input type="color" id="color" value="#000000">
     <i title="双击取消选择" class="fa fa-smile-o" id="smile">
     </i><i title="双击取消选择" class="fa fa-picture-o" id="img"></i>
     <p class="selectBox">
      <p class="smile">
      </p>
      <p class="img">
      </p>
     </p>
     </p>
     <!-- autocomplete禁用自动完成功能 -->
     <textarea id="m"></textarea>
     <button class="btn rBtn" id="sub">发送</button>
     <button class="btn" id="clear">关闭</button>
    </form>
   </p>
   <p class="contacts">
   <h1>在线人员(<span id="num">0</span>)</h1>
   <ul id="users"></ul>
   <p>当前无人在线哟~</p>
   </p>
  </p>
  </p>
 </p>
 </body>
</html>
to open localhost:3000 , you will see the following:

#The chat room was successfully deployed to the server.
2. Detect login
To transmit messages between the client and the server, socket.io is required
#安装socket.io模块
npm install --save socket.io
Change server.js as follows :
var app = require('express')();
var http = require('http').Server(app);
var io = require('socket.io')(http);
app.use('/', express.static(dirname + '/www'));
io.on('connection', function(socket){ // 用户连接时触发
 console.log('a user connected');
});
http.listen(3000, function(){
 console.log('listening on *:3000');
});When localhost:3000 is opened, the connection event of the server-side io will be triggered, and "a user connected" will be printed on the server, but we want to count the number of users connected to the server. If there are users connected Just print "n users connected", n is the number of users, what should I do?
Set a global array as user in server.js. Whenever a user successfully connects, push the user's nickname into user in the connection event. Print user.length to know the number of successfully connected users.
Wait a minute.
When the user enters the nickname to log in, we should check whether the user's nickname already exists to avoid the same nickname. The server monitors a login event to determine the situation. Since everything happens to the user After connecting, the trigger event should be written in the callback function of the connection event.
io.on('connection', (socket)=> {
 // 渲染在线人员
 io.emit('disUser', usersInfo);
 // 登录,检测用户名
 socket.on('login', (user)=> {
  if(users.indexOf(user.name) > -1) { // 昵称是否存在
   socket.emit('loginError'); // 触发客户端的登录失败事件
  } else {
   users.push(user.name); //储存用户的昵称
   usersInfo.push(user); // 储存用户的昵称和头像
   socket.emit('loginSuc'); // 触发客户端的登录成功事件
   socket.nickname = user.name;
   io.emit('system', { // 向所有用户广播该用户进入房间
    name: user.name,
    status: '进入'
   });
   io.emit('disUser', usersInfo); // 渲染右侧在线人员信息
   console.log(users.length + ' user connect.'); // 打印连接人数
  }
});Ignore the system and disUser events for now, we will talk about distinguishing io.emit(foo), socket.emit(foo), socket.broadcast.emit(foo)
io.emit(foo); //会触发所有客户端用户的foo事件
socket.emit(foo); //只触发当前客户端用户的foo事件
socket.broadcast.emit(foo); //触发除了当前客户端用户的其他用户的foo事件
Next is the client End code chat-client.js
$(function() {
  // io-client
  // 连接成功会触发服务器端的connection事件
  var socket = io();
  // 点击输入昵称
  $('#nameBtn').click(()=> {
   var imgN = Math.floor(Math.random()*4)+1; // 随机分配头像
   if($('#name').val().trim()!=='')
     socket.emit('login', { // 触发服务器端登录事件
      name: $('#name').val(),
      img: 'image/user' + imgN + '.jpg'
     });
   return false;
  });
  // 登录成功,隐藏登录层
  socket.on('loginSuc', ()=> {
   $('.name').hide();
  })
  socket.on('loginError', ()=> {
   alert('用户名已存在,请重新输入!');
   $('#name').val('');
  });
});If the login is successful, you will see the following page:
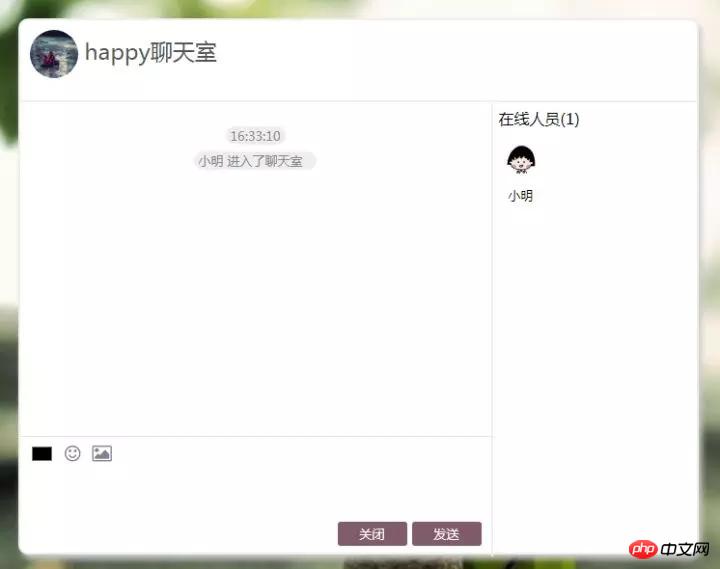
Login detection completed.
3. The system automatically prompts the user status (enter/leave)
该功能是为了实现上图所示的系统提示“XXX进入聊天室”,在登录成功时触发system事件,向所有用户广播信息,注意此时用的是io.emit而不是socket.emit,客户端代码如下
// 系统提示消息
socket.on('system', (user)=> {
var data = new Date().toTimeString().substr(0, 8);
$('#messages').append(`<p class='system'><span>${data}</span><br /><span>${user.name} ${user.status}了聊天室<span></p>`);
// 滚动条总是在最底部
$('#messages').scrollTop($('#messages')[0].scrollHeight);
});4、显示在线用户
客户端监听一个显示在线用户的事件disUser,在以下三个时间段服务器端就触发一次该事件重新渲染一次
程序开始启动时
每当用户进入房间
每当用户离开房间
// chat-client.js
// 显示在线人员
socket.on('disUser', (usersInfo)=> {
 displayUser(usersInfo);
});
// 显示在线人员
function displayUser(users) {
 $('#users').text(''); // 每次都要重新渲染
 if(!users.length) {
  $('.contacts p').show();
 } else {
  $('.contacts p').hide();
 }
 $('#num').text(users.length);
 for(var i = 0; i < users.length; i++) {
  var $html = `<li>
   <img src="${users[i].img}">
   <span>${users[i].name}</span>
  </li>`;
  $('#users').append($html);
 }
}5、支持发送和接收消息
用户发送消息时触发服务器端的sendMsg事件,并将消息内容作为参数,服务器端监听到sendMsg事件之后向其他所有用户广播该消息,用的socket.broadcast.emit(foo)
// server.js
// 发送消息事件
socket.on('sendMsg', (data)=> {
var img = '';
for(var i = 0; i < usersInfo.length; i++) {
if(usersInfo[i].name == socket.nickname) {
img = usersInfo[i].img;
}
}
socket.broadcast.emit('receiveMsg', { // 向除了发送者之外的其他用户广播
name: socket.nickname,
img: img,
msg: data.msg,
color: data.color,
side: 'left'
});
socket.emit('receiveMsg', { // 向发送者发送消息,为什么分开发送?因为css样式不同
name: socket.nickname,
img: img,
msg: data.msg,
color: data.color,
side: 'right'
});
});服务器端接受到来自用户的消息后会触发客户端的receiveMsg事件,并将用户发送的消息作为参数传递,该事件会向聊天面板添加聊天内容,以下为chat-client.js代码
// 点击按钮或回车键发送消息
$('#sub').click(sendMsg);
$('#m').keyup((ev)=> {
if(ev.which == 13) {
sendMsg();
}
});
// 接收消息
socket.on('receiveMsg', (obj)=> { // 将接收到的消息渲染到面板上
$('#messages').append(`
<li class='${obj.side}'>
<img src="${obj.img}">
<p>
<span>${obj.name}</span>
<p>${obj.msg}</p>
</p>
</li>
`);
// 滚动条总是在最底部
$('#messages').scrollTop($('#messages')[0].scrollHeight);
});
// 发送消息
function sendMsg() {
if($('#m').val() == '') { // 输入消息为空
alert('请输入内容!');
return false;
}
socket.emit('sendMsg', {
msg: $('#m').val()
});
$('#m').val('');
return false;
}6、自定义字体颜色
得益于html5的input新特性,可以通过type为color的input调用系统调色板
<!-- $('#color').val();为选中颜色,格式为#FFCCBB --> <input type='color' id='color'>
客户端根据用户选择的颜色渲染内容样式,代码很容易看懂,这里就不赘述了。
7、支持发送表情
发送表情其实很简单,将表情图片放在li中,当用户点击li时就将表情的src中的序号解析出来,用[emoji+表情序号]的格式存放在聊天框里,点击发送后再解析为src。就是一个解析加还原的过程,这一过程中我们的服务器代码不变,需要改变的是客户端监听的receiveMsg事件。
// chat-client.js
  // 显示表情选择面板
  $('#smile').click(()=> {
   $('.selectBox').css('display', "block");
  });
  $('#smile').dblclick((ev)=> {
   $('.selectBox').css('display', "none");
  });
  $('#m').click(()=> {
   $('.selectBox').css('display', "none");
  });
  // 用户点击发送表情
  $('.emoji li img').click((ev)=> {
    ev = ev || window.event;
    var src = ev.target.src;
    var emoji = src.replace(/\D*/g, '').substr(6, 8); // 提取序号
    var old = $('#m').val(); // 用户输入的其他内容
    $('#m').val(old+'[emoji'+emoji+']');
    $('.selectBox').css('display', "none");
});客户端收到之后将表情序号还原为src,更改如下
// chat-client.js
// 接收消息
socket.on('receiveMsg', (obj)=> {
// 提取文字中的表情加以渲染
var msg = obj.msg;
var content = '';
while(msg.indexOf('[') > -1) { // 其实更建议用正则将[]中的内容提取出来
var start = msg.indexOf('[');
var end = msg.indexOf(']');
content += '<span>'+msg.substr(0, start)+'</span>';
content += '<img src="image/emoji/emoji%20('+msg.substr(start+6, end-start-6)+').png">';
msg = msg.substr(end+1, msg.length);
}
content += '<span>'+msg+'</span>';
$('#messages').append(`
<li class='${obj.side}'>
<img src="${obj.img}">
<p>
<span>${obj.name}</span>
<p style="color: ${obj.color};">${content}</p>
</p>
</li>
`);
// 滚动条总是在最底部
$('#messages').scrollTop($('#messages')[0].scrollHeight);
});可以成功发送表情了。
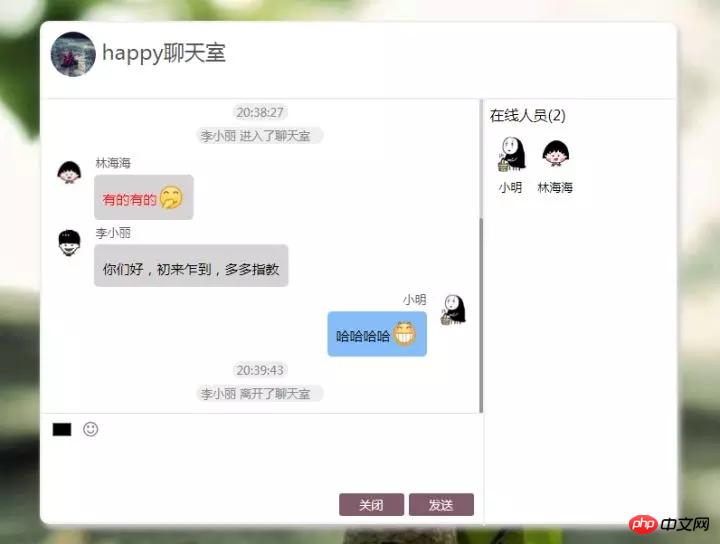
8、支持发送图片
首先是图片按钮样式,发送图片的按钮是type为file的input。这里有一个改变样式的小技巧,那就是将input的透明度设为0,z-index为5,将你想要得样式放在p中,z-index设为1覆盖在input上。
<input type="file" id="file">
<i class="fa fa-picture-o" id="img"></i>
css:
.edit #file {
  width: 32.36px;
  height: 29px;
  opacity: 0;
  z-index: 5;
}
.edit #img {
  z-index: 0;
  margin-left: -43px;
}完美

接下来是点击按钮发送图片,我们用了fileReader对象,这里有一篇不错的文章讲解了fileReader,fileReader是一个对象,可以将我们选中的文件已64位输出然后将结果存放在reader.result中,我们选中图片之后,reader.result就存放的是图片的src
// chat-client.js
// 用户发送图片
$('#file').change(function() {
var file = this.files[0]; // 上传单张图片
var reader = new FileReader();
//文件读取出错的时候触发
reader.onerror = function(){
console.log('读取文件失败,请重试!');
};
// 读取成功后
reader.onload = function() {
var src = reader.result; // 读取结果
var img = '<img class="sendImg" src="'+src+'">';
socket.emit('sendMsg', { // 发送
msg: img,
color: color,
type: 'img' // 发送类型为img
});
};
reader.readAsDataURL(file); // 读取为64位
});由于发送的是图片,所以对页面布局难免有影响,为了页面美观客户端在接收其他用户发送的消息的时候会先判断发送的是文本还是图片,根据不同的结果展示不同布局。判断的方法是在客户发送消息的时候传入一个type,根据type的值来确实发送内容的类型。所以上面发送图片代码中触发了sendMsg事件,传入参数多了一个type属性。
响应的,我们应该在chat-client.js中修改receiveMsg事件监听函数,改为根据传入type做不同操作
chat-client.js
// 接收消息
socket.on('receiveMsg', (obj)=> {
// 发送为图片
if(obj.type == 'img') {
$('#messages').append(`
<li class='${obj.side}'>
<img src="${obj.img}">
<p>
<span>${obj.name}</span>
<p style="padding: 0;">${obj.msg}</p>
</p>
</li>
`);
$('#messages').scrollTop($('#messages')[0].scrollHeight);
return;
}
// 提取文字中的表情加以渲染
// 下面不变
});现在我们可以发送图片了
相信看了本文案例你已经掌握了方法,更多精彩请关注php中文网其它相关文章!
推荐阅读:
The above is the detailed content of Node+express implements chat room. For more information, please follow other related articles on the PHP Chinese website!


