

How to use React to develop component libraries
This time I will show you how to use React to develop component libraries, and what are the precautions for using React to develop component libraries. The following is a practical case, let's take a look.
Recently, I used react to encapsulate a set of [component libraries] for daily business needs, and roughly recorded my experiences during the entire development process. Due to space reasons, only the selection and packaging, which are more tangled during the development process, will be discussed here, and the packaging of specific components will be discussed later.Overview
We all know that the component-based development model has greatly improved our development efficiency. By encapsulating the basic components we use daily, we can It greatly simplifies our focus on the basic UI, allows our work to focus on business logic, and separates the business and basic UI codes well, making the entire project more manageable. This is why we want to develop this component library. . However, there are many existing React open source components, such as ant-design and material-ui, etc. Whether you need to spend effort to create a component library suitable for your own team often needs to be considered appropriately. Let’s take a look at some of the characteristics of my existing team and business:- There are many front-end personnel, they need to cooperate with each other, and they have enough time to develop components
- The product business is relatively complex and requires customized development of certain components
- There are already mature design specifications that define various basic components, basic styles, etc.
- The current project is relatively messy, and the third-party component references are messy
Technical selection
For the encapsulation of component libraries, the first thing we face is technology selection and solution planning. It probably includes the following two points:- The most basic technical solution
- Development process and specifications
Technical Solution Selection
Webpack + React + SassSince the team’s existing projects are all developed based on React+Redux, the development language we choose is undoubtedly It's React.SASS
For css selection, although now for component development, CSS Modules and CSS-IN-JS are more popular.tip-tab {
border: 1px solid #ccc;
}
.tip-tab-item {
border: 1px solid #ccc;
&.active {
border-color: red;
}
}<Tab styleName="unique-tab" />
.unique-tab {
 :global {
   .tip-tab-item {
    border-color: #eee;

    &.active {
     border-color: blue;
    }
   }
 }
}Icon
For the project icon, it is planned to use the svg-sprite solution. However, because the product is in the process of continuous iteration, new icons are constantly being added. Currently, we do not package icons uniformly. Instead, we import all icons from the project during each component packaging process. Use the following method to introduce:import Icon from '@common/lib'
import errorIcon from '@images/error.svg'
<Icon link={errorIcon} /><Icon type="error" />
Development process and specifications
Regarding the development process and specifications, we follow the following principles:组件库完全独立于项目进行开发,便于后续多个项目进行使用等
组件库包含三种模式:开发,测试,打包,文档案例,区分不同的入口及状态
使用pure-renderautobind等尽可能保证组件的性能及效率
保证props和回调的语义性,如回调统一使用handleXXX进行处理
为了便于后续的扩展,我们更希望整个组件库完全脱离于项目进行开发。保证组件库仅对于最基本的组件进行封装,将项目UI代码与业务逻辑进行分离。
针对不同的模式下,我们有不同的文件入口,针对开发模式,我们启动一个dev-server, 在里面对组件进行基本的封装,并进行调试。打包时,我们只需对组件内容进行封装,暴露统一的接口。在文档中,我们需要进行案例和说明的展示。所以我们在利用webpack的特性进行各种环境的配置:
npm run dev // 开发
npm run test // 测试
npm run build // 构建
npm run styleguide // 文档开发
npm run styleguide:build // 文档打包
组件库作为项目的最小力度支持,我们需要保证其最基本的渲染效率,因此我们采用pure-render/autobind等对其进行基本的优化。React有很多优化方式,在此不进行赘述。
打包
基础
针对组件库的打包,我们以UMD格式对其进行打包。webpack可以针对输出进行格式设置:(引自cnode)
“var” 以变量方式输出
“this” 以 this 的一个属性输出: this[“Library”] = xxx;
“commonjs” 以 exports 的一个属性输出:exports[“Library”] = xxx;
“commonjs2” 以 module.exports 形式输出:module.exports = xxx;
“amd” 以 AMD 格式输出;
“umd” 同时以 AMD、CommonJS2 和全局属性形式输出。
配置如下:
output: {
 path: config.build.assetsRoot,
 filename: utils.assetsPath('js/[name].js'),
 chunkFilename: utils.assetsPath('js/[id].js'),
 library: 'TipUi',
 libraryTarget: 'umd'
}依赖
很明显,我们封装的是一个针对React的组件库,并不应该把React引用进去。一般我们可以采用externals的方式对其进行处理。
在这里, 我们采用dll方式将其与其他第三方依赖统一进行打包,并将manifest.json和三方依赖的输出文件输出到项目中去,在项目中也使用dllReference进行引用。避免在项目中使用到这些依赖时重复进行打包。
同时,由于我们的组件库处于一个不断维护的状态。这就需要我们维持好项目库和项目之间的打包关系,具体的流程如图所示:
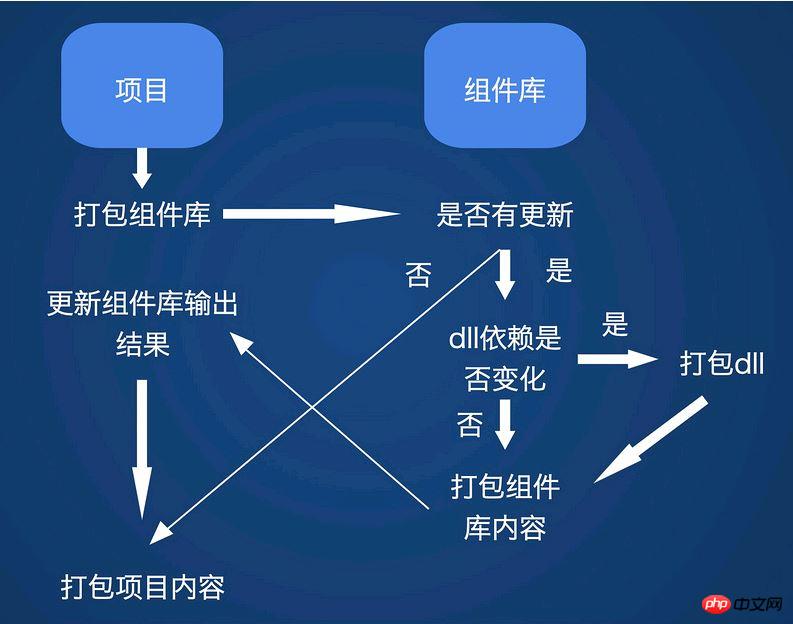
在每次进行项目打包的时候,首先检测UI库是否有更新,若没有更新,则直接进行打包。反之继续检测dll的依赖是否有变化,若有,则打包dll,否则直接打包组件库内容。然后将输出结果同步到项目中,再进行最终打包。
当然,以上的这些流程都是自动进行的。
文档和示例
一个完善的文档对于一个组件库是及其重要的,每个组件有什么样的配置参数,拥有哪些事件回调,对应的Demo和展示效果。假设没有这些,除了封装组件的人,没有人知道它该如何使用。但是写文档的过程往往是痛苦的,在这里推荐几个文档生成库,可以极大的简化文档工作:
docsify 基于Vue的组件生成器,轻量好用
react-styleguidist 基于React的组件库文档生成器,自动根据注释生成文档,支持Demo展示。超好用
bisheng ant design自己写的文档生成器
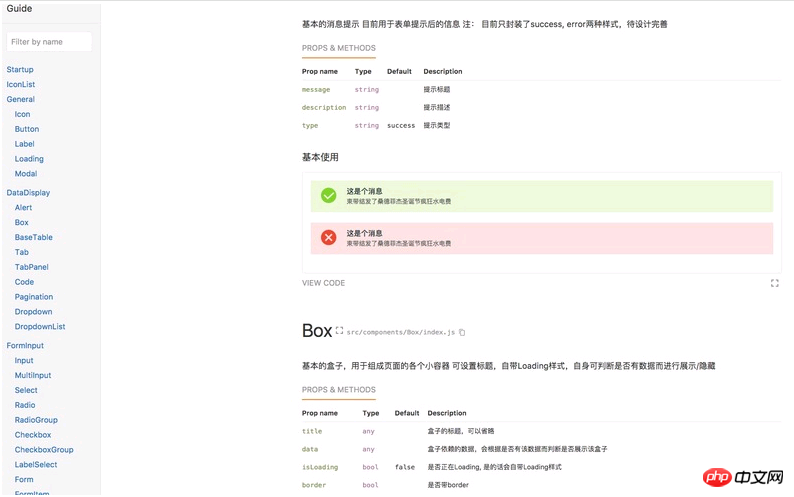
我们使用的styleguidist, 可以将md自动转化为文档,支持在md内直接调用你封装好的组件并进行展示,简单好用。最后封装的文档大概长这样:
总结
In fact, there are many things worth pondering and studying in the work of encapsulating component libraries. Due to space reasons, here we only discuss the selection and packaging that are more tangled in the development process, and we will discuss the encapsulation of specific components later. . While writing, you can learn a lot by constantly referring to excellent component libraries like ant design. It is a good process to have a deeper understanding of the idea of encapsulating components.
I believe you have mastered the method after reading the case in this article. For more exciting information, please pay attention to other related articles on the php Chinese website!
Recommended reading:
Singleton encapsulation addition, deletion and modification check
Detailed explanation of the scope and pre-parsing of js
The above is the detailed content of How to use React to develop component libraries. For more information, please follow other related articles on the PHP Chinese website!

Hot AI Tools

Undresser.AI Undress
AI-powered app for creating realistic nude photos

AI Clothes Remover
Online AI tool for removing clothes from photos.

Undress AI Tool
Undress images for free

Clothoff.io
AI clothes remover

Video Face Swap
Swap faces in any video effortlessly with our completely free AI face swap tool!

Hot Article
Hot Tools

Notepad++7.3.1
Easy-to-use and free code editor

SublimeText3 Chinese version
Chinese version, very easy to use

Zend Studio 13.0.1
Powerful PHP integrated development environment

Dreamweaver CS6
Visual web development tools

SublimeText3 Mac version
God-level code editing software (SublimeText3)
Hot Topics


 How to install the Windows 10 old version component DirectPlay
Dec 28, 2023 pm 03:43 PM
How to install the Windows 10 old version component DirectPlay
Dec 28, 2023 pm 03:43 PM
Many users always encounter some problems when playing some games on win10, such as screen freezes and blurred screens. At this time, we can solve the problem by turning on the directplay function, and the operation method of the function is also Very simple. How to install directplay, the old component of win10 1. Enter "Control Panel" in the search box and open it 2. Select large icons as the viewing method 3. Find "Programs and Features" 4. Click on the left to enable or turn off win functions 5. Select the old version here Just check the box
 PHP, Vue and React: How to choose the most suitable front-end framework?
Mar 15, 2024 pm 05:48 PM
PHP, Vue and React: How to choose the most suitable front-end framework?
Mar 15, 2024 pm 05:48 PM
PHP, Vue and React: How to choose the most suitable front-end framework? With the continuous development of Internet technology, front-end frameworks play a vital role in Web development. PHP, Vue and React are three representative front-end frameworks, each with its own unique characteristics and advantages. When choosing which front-end framework to use, developers need to make an informed decision based on project needs, team skills, and personal preferences. This article will compare the characteristics and uses of the three front-end frameworks PHP, Vue and React.
 Angular components and their display properties: understanding non-block default values
Mar 15, 2024 pm 04:51 PM
Angular components and their display properties: understanding non-block default values
Mar 15, 2024 pm 04:51 PM
The default display behavior for components in the Angular framework is not for block-level elements. This design choice promotes encapsulation of component styles and encourages developers to consciously define how each component is displayed. By explicitly setting the CSS property display, the display of Angular components can be fully controlled to achieve the desired layout and responsiveness.
 How to open the settings of the old version of win10 components
Dec 22, 2023 am 08:45 AM
How to open the settings of the old version of win10 components
Dec 22, 2023 am 08:45 AM
Win10 old version components need to be turned on by users themselves in the settings, because many components are usually closed by default. First we need to enter the settings. The operation is very simple. Just follow the steps below. Where are the win10 old version components? Open 1. Click Start, then click "Win System" 2. Click to enter the Control Panel 3. Then click the program below 4. Click "Enable or turn off Win functions" 5. Here you can choose what you want to open
 Integration of Java framework and front-end React framework
Jun 01, 2024 pm 03:16 PM
Integration of Java framework and front-end React framework
Jun 01, 2024 pm 03:16 PM
Integration of Java framework and React framework: Steps: Set up the back-end Java framework. Create project structure. Configure build tools. Create React applications. Write REST API endpoints. Configure the communication mechanism. Practical case (SpringBoot+React): Java code: Define RESTfulAPI controller. React code: Get and display the data returned by the API.
 Vue component development: implementation method of progress bar component
Nov 24, 2023 am 08:56 AM
Vue component development: implementation method of progress bar component
Nov 24, 2023 am 08:56 AM
Vue component development: Progress bar component implementation method Preface: In Web development, the progress bar is a common UI component, often used to display the progress of operations in scenarios such as data requests, file uploads, and form submissions. In Vue.js, we can easily implement a progress bar component by customizing components. This article will introduce an implementation method and provide specific code examples. I hope it will be helpful to Vue.js beginners. Component structure and style First, we need to define the basic structure and style of the progress bar component.
 Vue.js vs. React: Project-Specific Considerations
Apr 09, 2025 am 12:01 AM
Vue.js vs. React: Project-Specific Considerations
Apr 09, 2025 am 12:01 AM
Vue.js is suitable for small and medium-sized projects and fast iterations, while React is suitable for large and complex applications. 1) Vue.js is easy to use and is suitable for situations where the team is insufficient or the project scale is small. 2) React has a richer ecosystem and is suitable for projects with high performance and complex functional needs.
 UniApp error: Solution to failed introduction of 'xxx' component
Nov 25, 2023 pm 12:58 PM
UniApp error: Solution to failed introduction of 'xxx' component
Nov 25, 2023 pm 12:58 PM
UniApp is a cross-platform development framework based on Vue.js, which can develop applications on multiple platforms at the same time. However, just like other development tools, you may encounter some problems and errors while using UniApp. One of the common problems is errors when component introduction fails. This article will introduce some ways to solve this problem. The first step is to check your code for spelling errors. In UniApp, components are introduced by using the import statement in the page or component. When a component is introduced
