
 Web Front-end
JS Tutorial
How Ajax+Struts2 implements user input verification code verification function
Web Front-end
JS Tutorial
How Ajax+Struts2 implements user input verification code verification function
How Ajax+Struts2 implements user input verification code verification function
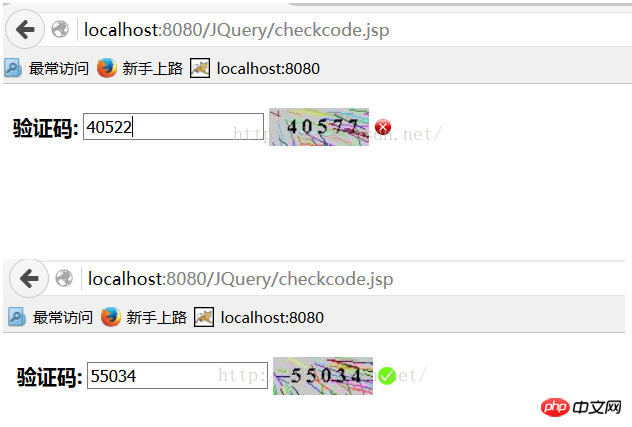
This time I will show you how Ajax+Struts2 implements the user input verification code verification function. What are the precautions for Ajax+Struts2 to implement the user input verification code verification function. , the following is a practical case, let’s take a look.
As we all know, verification codes are very common in our lives. Many companies are tossing out various verification codes. Here is a brief case to implement the function of verification codes ( ps: I actually hate the verification code thing). What I’m sharing today is to use ajax to dynamically verify whether the verification code input is correct. What we use here is ajax+struts2 for this verification. Let's create a new web project. Then you need to import the corresponding package of struts. Then we need to write a class to generate the verification code. The name here is 01_image.jsp. The main function of this type is to generate a verification code, which contains various drawn lines, random numbers, etc. I set up a 5-digit verification here. If you want to change It can be changed into other formats. The general idea is to add letters to the loop that generates numbers.1 2 3 4 5 6 7 8 9 10 11 12 13 14 15 16 17 18 19 20 21 22 23 24 25 26 27 28 29 30 31 32 33 34 35 36 37 38 39 40 41 42 43 44 45 46 47 48 49 50 |
|
1 2 3 4 5 6 7 |
|
1 2 3 4 5 6 7 8 9 10 11 12 13 14 |
|
1 2 3 4 5 6 7 8 9 10 11 12 13 14 15 16 17 18 19 20 21 22 23 24 25 26 27 28 29 30 31 32 33 34 35 36 37 |
|
1 2 3 4 5 6 7 8 9 10 11 12 13 14 15 16 17 18 19 20 21 22 23 24 25 26 27 28 29 30 31 32 33 34 35 |
|
1 2 3 4 5 6 7 8 9 |
|
The above is the detailed content of How Ajax+Struts2 implements user input verification code verification function. For more information, please follow other related articles on the PHP Chinese website!

Hot AI Tools

Undresser.AI Undress
AI-powered app for creating realistic nude photos

AI Clothes Remover
Online AI tool for removing clothes from photos.

Undress AI Tool
Undress images for free

Clothoff.io
AI clothes remover

AI Hentai Generator
Generate AI Hentai for free.
Hot Article
Hot Tools

Notepad++7.3.1
Easy-to-use and free code editor

SublimeText3 Chinese version
Chinese version, very easy to use

Zend Studio 13.0.1
Powerful PHP integrated development environment

Dreamweaver CS6
Visual web development tools

SublimeText3 Mac version
God-level code editing software (SublimeText3)
Hot Topics


 How to use Xiaohongshu account to find users? Can I find my mobile phone number?
Mar 22, 2024 am 08:40 AM
How to use Xiaohongshu account to find users? Can I find my mobile phone number?
Mar 22, 2024 am 08:40 AM
With the rapid development of social media, Xiaohongshu has become one of the most popular social platforms. Users can create a Xiaohongshu account to show their personal identity and communicate and interact with other users. If you need to find a user’s Xiaohongshu number, you can follow these simple steps. 1. How to use Xiaohongshu account to find users? 1. Open the Xiaohongshu APP, click the "Discover" button in the lower right corner, and then select the "Notes" option. 2. In the note list, find the note posted by the user you want to find. Click to enter the note details page. 3. On the note details page, click the "Follow" button below the user's avatar to enter the user's personal homepage. 4. In the upper right corner of the user's personal homepage, click the three-dot button and select "Personal Information"
 Disabling Win11 Input Experience Guide
Dec 27, 2023 am 11:07 AM
Disabling Win11 Input Experience Guide
Dec 27, 2023 am 11:07 AM
Recently, many Win11 users have encountered the problem that the input experience dialog box always flickers and cannot be turned off. This is actually caused by the default system services and components of Win11. We need to disable the relevant services first, and then disable the input experience service. Solved, let’s try it out together. How to turn off the input experience in win11: First step, right-click the start menu and open "Task Manager". Second step, find the three processes "CTF Loader", "MicrosoftIME" and "Service Host: Textinput Management Service" in order, right-click "End Task" "The third step, open the start menu, search and open "Services" at the top. The fourth step, find "Textinp" in it
 Local users and groups are missing on Windows 11: How to add it
Sep 22, 2023 am 08:41 AM
Local users and groups are missing on Windows 11: How to add it
Sep 22, 2023 am 08:41 AM
The Local Users and Groups utility is built into Computer Management and can be accessed from the console or independently. However, some users find that local users and groups are missing in Windows 11. For some people who have access to it, the message suggests that this snap-in may not work with this version of Windows 10. To manage user accounts for this computer, use the User Accounts tool in Control Panel. The issue has been reported in previous iterations of Windows 10 and is usually caused by issues or oversights on the user's side. Why are local users and groups missing in Windows 11? You are running Windows Home edition, local users and groups are available on Professional edition and above. Activity
![Windows input encounters hang or high memory usage [Fix]](https://img.php.cn/upload/article/000/887/227/170835409686241.jpg?x-oss-process=image/resize,m_fill,h_207,w_330) Windows input encounters hang or high memory usage [Fix]
Feb 19, 2024 pm 10:48 PM
Windows input encounters hang or high memory usage [Fix]
Feb 19, 2024 pm 10:48 PM
The Windows input experience is a key system service responsible for processing user input from various human interface devices. It starts automatically at system startup and runs in the background. However, sometimes this service may automatically hang or occupy too much memory, resulting in reduced system performance. Therefore, it is crucial to monitor and manage this process in a timely manner to ensure system efficiency and stability. In this article, we will share how to fix issues where the Windows input experience hangs or causes high memory usage. The Windows Input Experience Service does not have a user interface, but it is closely related to handling basic system tasks and functions related to input devices. Its role is to help the Windows system understand every input entered by the user.
 Log in to Ubuntu as superuser
Mar 20, 2024 am 10:55 AM
Log in to Ubuntu as superuser
Mar 20, 2024 am 10:55 AM
In Ubuntu systems, the root user is usually disabled. To activate the root user, you can use the passwd command to set a password and then use the su- command to log in as root. The root user is a user with unrestricted system administrative rights. He has permissions to access and modify files, user management, software installation and removal, and system configuration changes. There are obvious differences between the root user and ordinary users. The root user has the highest authority and broader control rights in the system. The root user can execute important system commands and edit system files, which ordinary users cannot do. In this guide, I'll explore the Ubuntu root user, how to log in as root, and how it differs from a normal user. Notice
 Explore Windows 11 guide: How to access user folders on your old hard drive
Sep 27, 2023 am 10:17 AM
Explore Windows 11 guide: How to access user folders on your old hard drive
Sep 27, 2023 am 10:17 AM
Certain folders are not always accessible due to permissions, and in today’s guide we will show you how to access user folders on your old hard drive on Windows 11. The process is simple but can take a while, sometimes even hours, depending on the size of the drive, so be extra patient and follow the instructions in this guide closely. Why can't I access my user folders on my old hard drive? User folders are owned by another computer, so you cannot modify them. You don't have any permissions on the folder other than ownership. How to open user files on old hard drive? 1. Take ownership of the folder and change permissions Find the old user directory, right-click on it and select Properties. Navigate to "An
 What is sudo and why is it important?
Feb 21, 2024 pm 07:01 PM
What is sudo and why is it important?
Feb 21, 2024 pm 07:01 PM
sudo (superuser execution) is a key command in Linux and Unix systems that allows ordinary users to run specific commands with root privileges. The function of sudo is mainly reflected in the following aspects: Providing permission control: sudo achieves strict control over system resources and sensitive operations by authorizing users to temporarily obtain superuser permissions. Ordinary users can only obtain temporary privileges through sudo when needed, and do not need to log in as superuser all the time. Improved security: By using sudo, you can avoid using the root account during routine operations. Using the root account for all operations may lead to unexpected system damage, as any mistaken or careless operation will have full permissions. and
 Tutorial: How to delete a normal user account in Ubuntu system?
Jan 02, 2024 pm 12:34 PM
Tutorial: How to delete a normal user account in Ubuntu system?
Jan 02, 2024 pm 12:34 PM
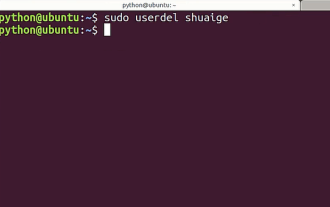
Many users have been added to the Ubuntu system. I want to delete the users that are no longer in use. How to delete them? Let’s take a look at the detailed tutorial below. 1. Open the terminal command line and use the userdel command to delete the specified user. Be sure to add the sudo permission command, as shown in the figure below. 2. When deleting, be sure to be in the administrator directory. Ordinary users do not have this permission. , as shown in the figure below 3. After the delete command is executed, how to judge whether it has been truly deleted? Next we use the cat command to open the passwd file, as shown in the figure below 4. We see that the deleted user information is no longer in the passwd file, which proves that the user has been deleted, as shown in the figure below 5. Then we enter the home file
