

How to configure the React Native development environment in VSCode
This time I will show you how to configure the React Native development environment with VSCode. What are the precautions for configuring the React Native development environment with VSCode. The following is a practical case, let’s take a look.
This article introduces the method of configuring the React Native development environment in VSCode and shares it with everyone. The details are as follows:
1.InstallationVSCode
2. Install plug-in
Press F1 and type ext install and press Enter, or use
Enter react-native to install React Native Tools
Assuming you have react native installed on your device,
If it is not installed, please use npm install -g react-native-cli to install
Or follow the official documentation
Create a new RN project and open it using VSCode
After the installation is complete, press F1 to see that there are many more options for React Native in the command
React Native Command
3. ConfigurationDebuggingEnvironment
a. Automatic configuration
Type shift cmd D or click icon
shift cmd D
Select React Native:
The launch.json file will be automatically generated, with 4 configuration options: Debug Android, Debug iOS, Debug iOS, Debug iOS
{
  "version": "0.2.0",
  "configurations": [
    {
      "name": "Debug Android",
      "program": "${workspaceRoot}/.vscode/launchReactNative.js",
      "type": "reactnative",
      "request": "launch",
      "platform": "android",
      "sourceMaps": true,
      "outDir": "${workspaceRoot}/.vscode/.react"
    },
    {
      "name": "Debug iOS",
      "program": "${workspaceRoot}/.vscode/launchReactNative.js",
      "type": "reactnative",
      "request": "launch",
      "platform": "ios",
      "target": "iPhone 5s",
      "sourceMaps": true,
      "outDir": "${workspaceRoot}/.vscode/.react"
    },
    {
      "name": "Attach to packager",
      "program": "${workspaceRoot}/.vscode/launchReactNative.js",
      "type": "reactnative",
      "request": "attach",
      "sourceMaps": true,
      "outDir": "${workspaceRoot}/.vscode/.react"
    },
    {
      "name": "Debug in Exponent",
      "program": "${workspaceRoot}/.vscode/launchReactNative.js",
      "type": "reactnative",
      "request": "launch",
      "platform": "exponent",
      "sourceMaps": true,
      "outDir": "${workspaceRoot}/.vscode/.react"
    }
  ]
}b. Manual configuration
Next we clear configurations
Click the Add Configuration button and select configuration
Add configuration
The results are as follows:
{
  "version": "0.2.0",
  "configurations": [

  ]
}Click the Add Configuration button here and select React Native: Debug iOS
Configuration options
In this way, running iOS is configured
{
  "version": "0.2.0",
  "configurations": [
    {
      "name": "Debug iOS",
      "program": "${workspaceRoot}/.vscode/launchReactNative.js",
      "type": "reactnative",
      "request": "launch",
      "platform": "ios",
      "sourceMaps": true,
      "target": "iPhone 6s",
      "outDir": "${workspaceRoot}/.vscode/.react"
    }
  ]
}Click the option on the left side of Settings, and there will be Debug iOS option
Debug iOS
Next, you can click the run button of the above option to successfully run iOS
Hello world
I believe you have mastered the method after reading the case in this article. For more exciting information, please pay attention to other related articles on the php Chinese website!
Recommended reading:
The above is the detailed content of How to configure the React Native development environment in VSCode. For more information, please follow other related articles on the PHP Chinese website!

Hot AI Tools

Undresser.AI Undress
AI-powered app for creating realistic nude photos

AI Clothes Remover
Online AI tool for removing clothes from photos.

Undress AI Tool
Undress images for free

Clothoff.io
AI clothes remover

AI Hentai Generator
Generate AI Hentai for free.

Hot Article
Hot Tools

Notepad++7.3.1
Easy-to-use and free code editor

SublimeText3 Chinese version
Chinese version, very easy to use

Zend Studio 13.0.1
Powerful PHP integrated development environment

Dreamweaver CS6
Visual web development tools

SublimeText3 Mac version
God-level code editing software (SublimeText3)
Hot Topics
 1376
1376
 52
52

 How to view word documents in vscode How to view word documents in vscode
May 09, 2024 am 09:37 AM
How to view word documents in vscode How to view word documents in vscode
May 09, 2024 am 09:37 AM
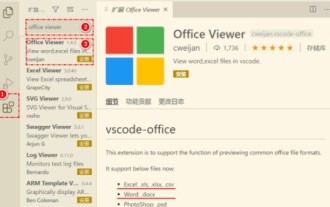
First, open the vscode software on the computer, click the [Extension] icon on the left, as shown in ① in the figure. Then, enter [officeviewer] in the search box of the extension interface, as shown in ② in the figure. Then, from the search Select [officeviewer] to install in the results, as shown in ③ in the figure. Finally, open the file, such as docx, pdf, etc., as shown below
 How to add files to vscode workspace How to add files to vscode workspace
May 09, 2024 am 09:43 AM
How to add files to vscode workspace How to add files to vscode workspace
May 09, 2024 am 09:43 AM
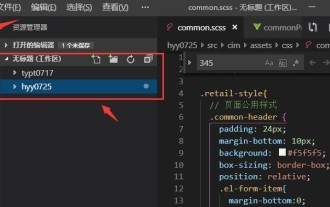
1. First, open the vscode software, click the explorer icon, and find the workspace window 2. Then, click the file menu in the upper left corner and find the add folder to workspace option 3. Finally, find the folder location in the local disk , click the add button
 How to enable background updates in vscode How to enable background updates in vscode
May 09, 2024 am 09:52 AM
How to enable background updates in vscode How to enable background updates in vscode
May 09, 2024 am 09:52 AM
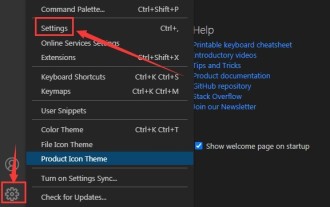
1. First, after opening the interface, click the file menu in the upper left corner. 2. Then, click the settings button in the preferences column. 3. Then, in the settings page that jumps, find the update section. 4. Finally, click the mouse to check and enable it. Download and install the new VSCode version button in the background on Windows and restart the program.
 How to disable wsl configuration file in vscode How to disable wsl configuration file in vscode
May 09, 2024 am 10:30 AM
How to disable wsl configuration file in vscode How to disable wsl configuration file in vscode
May 09, 2024 am 10:30 AM
1. First, open the settings option in the settings menu. 2. Then, find the terminal column in the commonly used page. 3. Finally, uncheck the usewslprofiles button on the right side of the column.
 How to set animation smooth insertion in VScode VScode tutorial to set animation smooth insertion
May 09, 2024 am 09:49 AM
How to set animation smooth insertion in VScode VScode tutorial to set animation smooth insertion
May 09, 2024 am 09:49 AM
1. First, after opening the interface, click the workspace interface 2. Then, in the open editing panel, click the File menu 3. Then, click the Settings button under the Preferences column 4. Finally, click the mouse to check the CursorSmoothCaretAnimation button and save Just set it
 How to open workspace trust permissions in Vscode Vscode method to open workspace trust permissions
May 09, 2024 am 10:34 AM
How to open workspace trust permissions in Vscode Vscode method to open workspace trust permissions
May 09, 2024 am 10:34 AM
1. First, after opening the editing window, click the configuration icon in the lower left corner 2. Then, click the Manage Workspace Trust button in the submenu that opens 3. Then, find the page in the editing window 4. Finally, according to your office Just check the relevant instructions if required
 How to open animation in Vscode Introduction to the method of opening animation in Vscode
May 09, 2024 am 10:28 AM
How to open animation in Vscode Introduction to the method of opening animation in Vscode
May 09, 2024 am 10:28 AM
1. First, click to open the settings option in the More menu. 2. Then, find the terminal column under the Features section. 3. Finally, on the right side of the column, click the enableanimation button with the mouse and save the settings.
 How to turn on smart commit in vscode Steps to turn on smart commit in vscode
May 09, 2024 am 10:40 AM
How to turn on smart commit in vscode Steps to turn on smart commit in vscode
May 09, 2024 am 10:40 AM
Step 1: After opening the vscode software interface, click the settings button in the settings menu below. Step 2: Find the Git option under the Extensions column. Step 3: Click to check the enablesmartcommit button.
