
This time I will bring you jQuery to implement the function of enlarging the picture when the mouse passes over. What are the precautions for jQuery to implement the function of enlarging the picture when the mouse passes over. The following is a practical case, let's take a look.
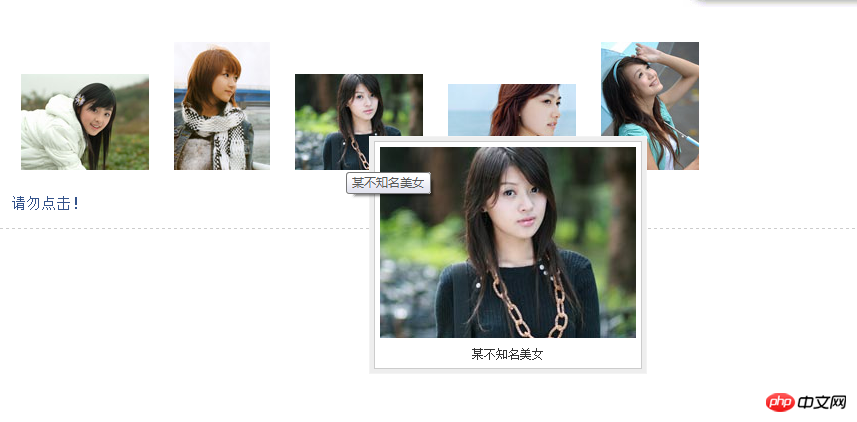
Let’s take a look at a demonstration picture first
The following is a code example:
<link rel="stylesheet" href="../css/common.css" type="text/css" />
<script type="text/javascript" src="../js/jquery-1.2.6.pack.js"></script>
<script type="text/javascript" src="../js/jquery.imagePreview.1.0.js"></script>
<script type="text/javascript">
$(function(){
	$("a.preview").preview();
});
</script>
<style type="text/css">
html{overflow-y:scroll;}
a.preview,a.preview:hover{text-decoration:none;}
a.preview img{margin:20px 10px;}
</style>
</head>
<body>
<p class="zxx_out_box">
 <p class="zxx_in_box">
  <h3 class="zxx_title">图片放大显示的jQuery插件演示页面</h3>
  <p class="zxx_main_con">
			<p class="zxx_test_list">
   	<a class="preview" href="http://image.jb51.net/image/study/s/s256/mm1.jpg" title="张含韵">
    	<img src="http://image.jb51.net/image/study/s/s128/mm1.jpg" />
    </a>
    <a class="preview" href="http://image.jb51.net/image/study/s/s256/mm2.jpg" title="某不知名美女">
    	<img src="http://image.jb51.net/image/study/s/s128/mm2.jpg" />
    </a>
    <a class="preview" href="http://image.jb51.net/image/study/s/s256/mm3.jpg" title="某不知名美女">
    	<img src="http://image.jb51.net/image/study/s/s128/mm3.jpg" />
    </a>
    <a class="preview" href="http://image.jb51.net/image/study/s/s256/mm4.jpg" title="某不知名美女">
    	<img src="http://image.jb51.net/image/study/s/s128/mm4.jpg" />
    </a>
    <a class="preview" href="http://image.jb51.net/image/study/s/s256/mm5.jpg" title="某不知名美女">
    	<img src="http://image.jb51.net/image/study/s/s128/mm5.jpg" />
    </a>
   </p>
  </p>
 </p>
</p>
</body>
</html>The above code realizes our requirements, friends What do you think?
Next let’s take a look at the brief description of how to use it:
1. You need to use the href attribute of the a tag. The principle of this jQuery plug-in is that when the mouse moves to the thumbnail (or when linking text), a large image html fragment containing the href pointing path will be loaded, which is absolutely positioned based on the position of the mouse. This produces the effect of moving the mouse over the thumbnail to display the larger image. The address of the large image is the content of the href attribute of the a tag. For example: Thumbnail If the a tag contains a method to display a large image, the page will display the image "xx.jpg" pointed to by the href.
2. The method used is: target selector.preview(); For example, the above thumbnail can use $("a ").preview(); This code achieves the effect of displaying the image xx.jpg when the mouse is moved to the text link "Thumbnail". 3. Only four formats of images, png, gif, jpg, and bmp, are supported. You can modify theregular expression of the plug-in code to expand the supported image format types.
The following is a brief introduction to the implementation process:1. Code comments:1.this.screenshotPreview=function(){}, declare a function to achieve the following effect , in this effect, this can actually be omitted, it points to the window. 2.xOffset=10, declare a variable to specify the horizontal distance of the mouse pointer from the pop-up image. 3.yOffset=30, declare a variable to specify the vertical distance of the mouse pointer from the pop-up image. 4.$("a.screenshot").hover(function(e){}, function(e){}) specifies the function to be executed when the mouse moves to the link and leaves the link. 5.this.t = this.title, assign the link's title attribute value to the t attribute, where this is the link object pointing to the current mouse hover. 6.var c = (this.t != "") ? "" c "
The above is the detailed content of jQuery realizes the function of enlarging the picture when the mouse passes over it. For more information, please follow other related articles on the PHP Chinese website!


![[Web front-end] Node.js quick start](https://img.php.cn/upload/course/000/000/067/662b5d34ba7c0227.png)


