
This time I will bring you a detailed explanation of the use of AJAX in the graphic tutorial. What are the precautions for using AJAX in the graphic tutorial? The following is a practical case, let’s take a look.
The working principle of Ajax is equivalent to adding an intermediate layer (AJAX engine) between the user and the server, making user operations and server responses asynchronous. There are many principles for introducing ajax on the Internet. This article will give you a more direct and clear introduction in the form of pictures and texts. If you need it, you can refer to it.
Recommended related video tutorials: " Quick Introduction to PHP and Ajax"
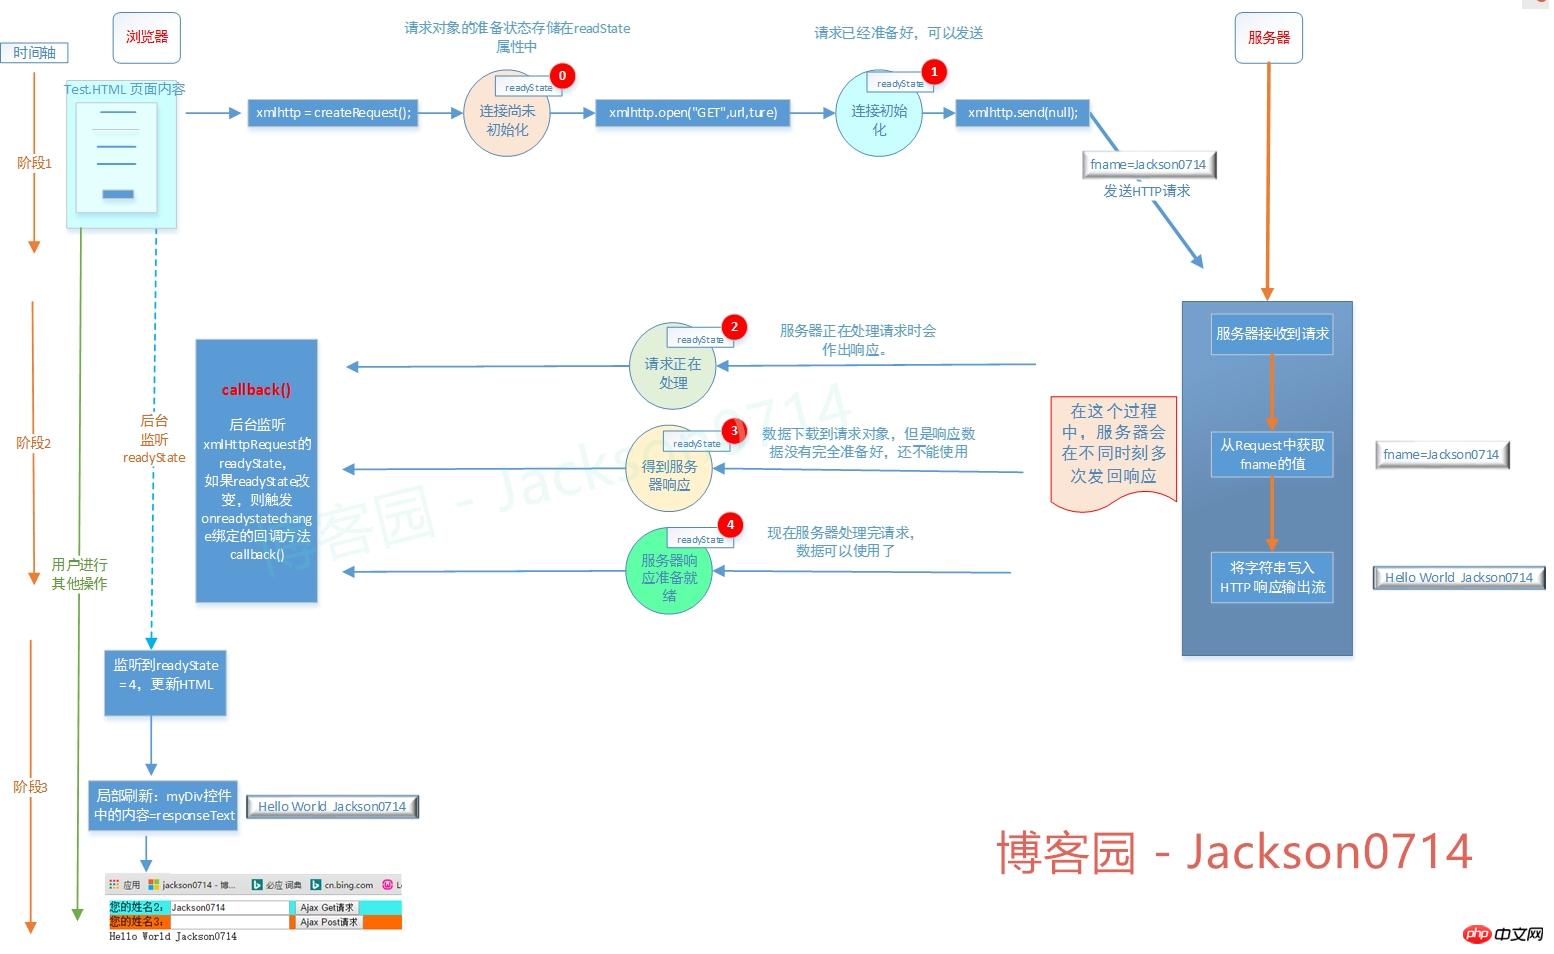
First go to the schematic diagram:
Background:
1. For traditional Web websites, submitting a form requires reloading the entire page.
2. If the server fails to return Response for a long time, the client will become unresponsive and the user experience will be very poor.
3. After the server returns the Response, the browser needs to load the entire page, which is also a heavy burden on the browser.
4. After the browser submits the form, a large amount of data is sent, causing network performance problems.
Question:
1. How to improve?
2.What is AJAX?
3. What are the advantages?
4. What are the disadvantages?
1. What is AJAX
1. Why AJAX is needed
When you need to access the server To obtain data and refresh the page, if AJAX is not used, you need to submit the entire form. When the form is submitted, a request is sent to the server. The page needs to wait for the server to send the response before the page can resume operations.
2. The concept of AJAX:
1.AJAX = Asynchronous JavaScript and XML.
2.AJAX is a technology used to create fast dynamic web pages.
3. By exchanging a small amount of data with the server in the background, the web page can be updated asynchronously.
4. You can update certain parts of the webpage without reloading the entire webpage.
3. What is asynchronous
The current page sends a request to the server. The current page does not need to wait for the server response to operate the web page. After sending the request, the current page can continue to be browsed and operated.
4. What is partial refresh?
We can achieve partial refresh in two ways.
1. How to reload the iframe page.
Although this method achieves partial refresh, it is a reload of the page, so it will also cause performance problems.
Step1. Define an Iframe in the page
<iframe id="indexFrame" name="index" width="1000" height="800"
frameborder="0" marginwidth="0" marginheight="0" scrolling="yes" style="margin-top:100px;"></iframe>Step2. Set the src of the Iframe
var indexFrame = document.getElementById("indexFrame");
indexFrame.src = "introduction.php";Step3. Add a button click Event , when this button is clicked, the src of the Iframe is reset to refresh the page in the iframe. Content outside the Iframe is not refreshed.
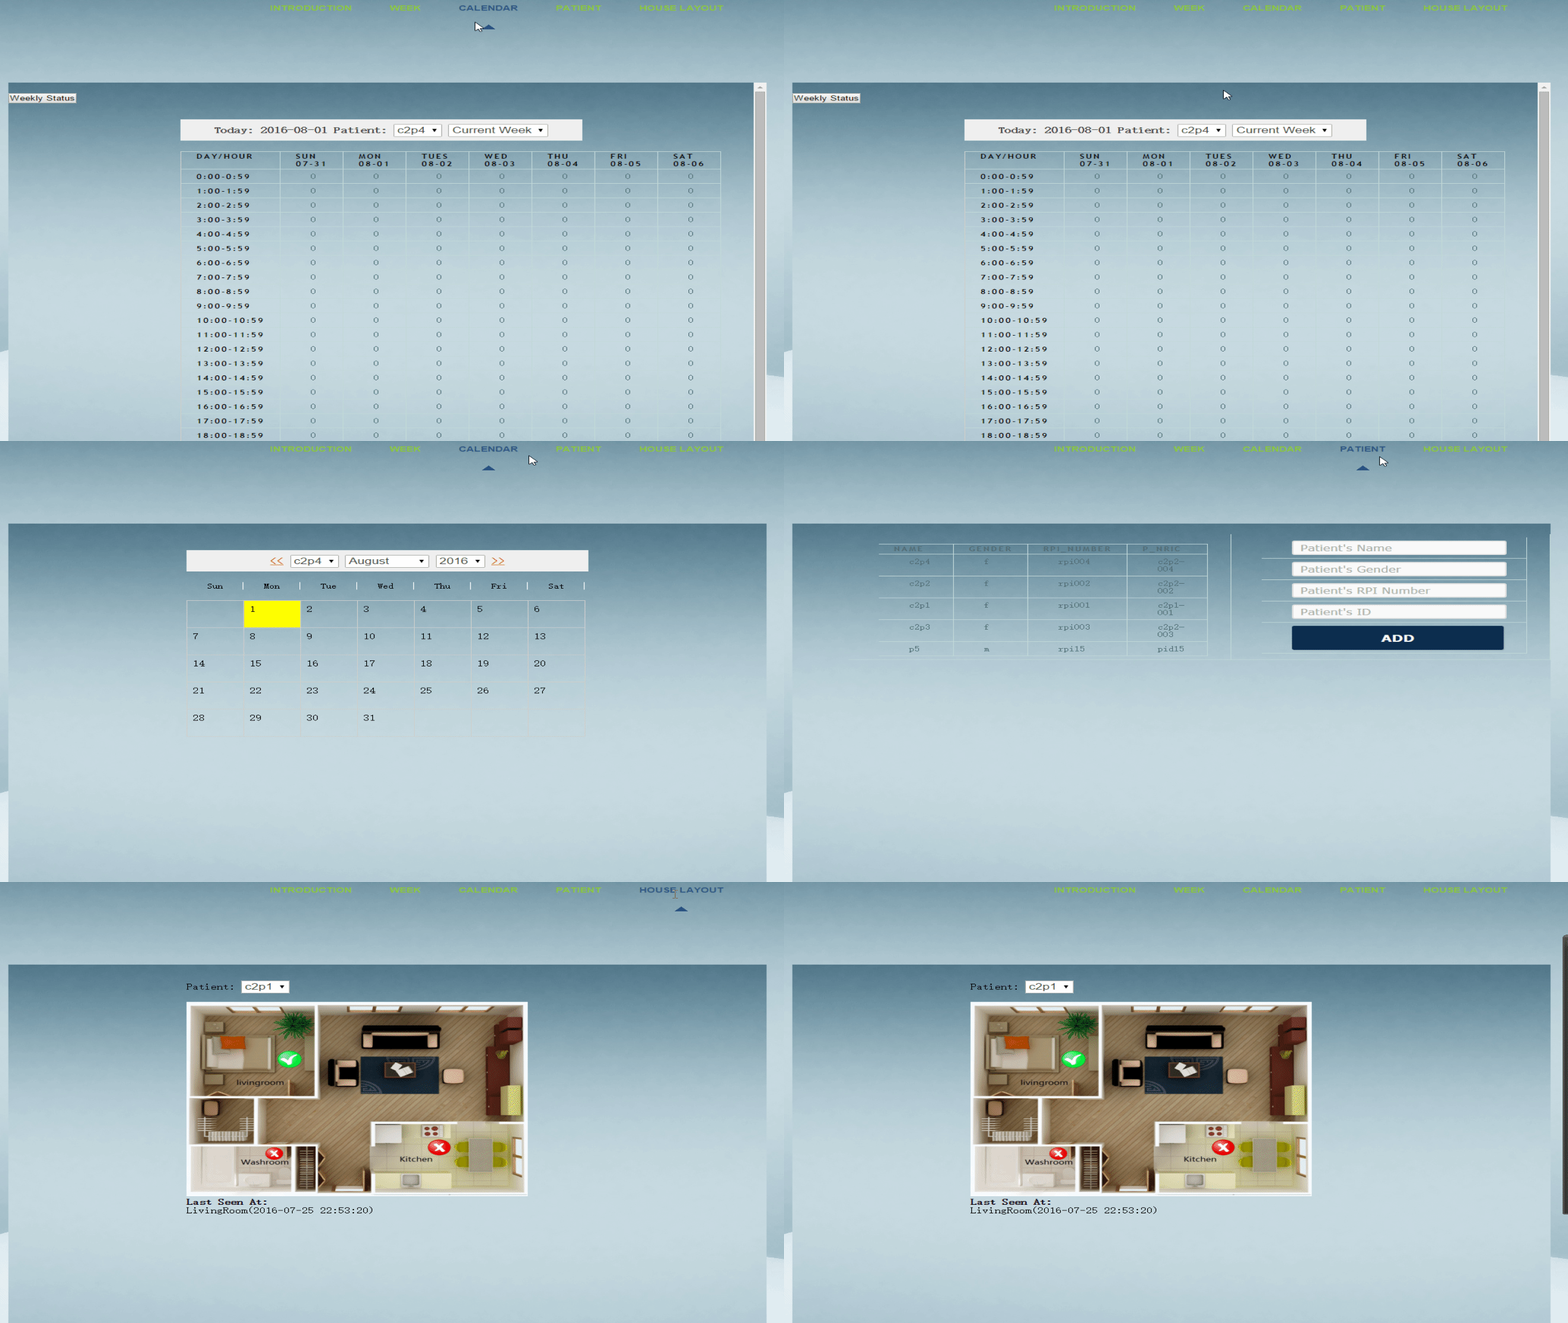
<button id="room" onclick='IndexClick("room")'>Click Me!</button>In this way we can implement the function of a navigation bar:
2.AJAX method
Step 1. JavaScrpit sends an asynchronous request
Step 2. The server queries the database and returns data
Step 3. The server returns Response
Step 4. The client responds to the response Manipulate the DOM with JavaScript.
Look at the example below:
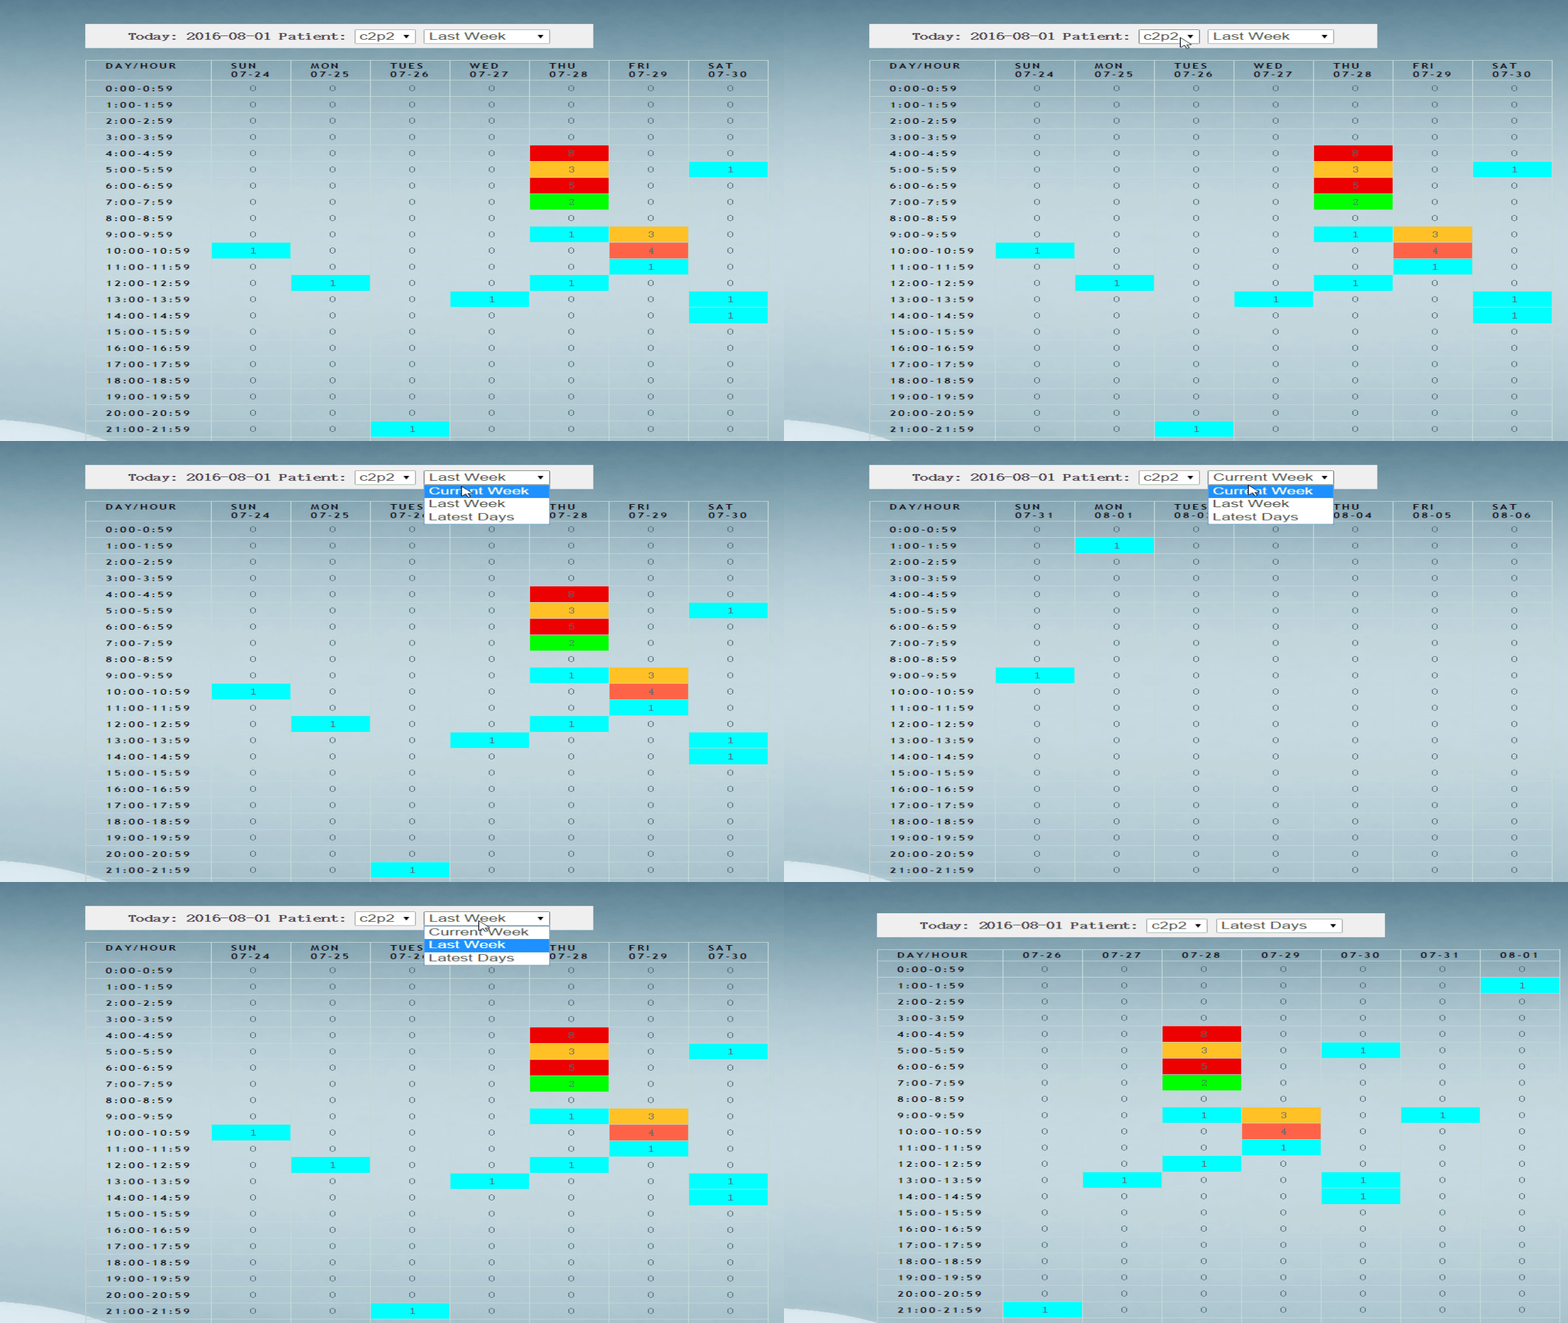
当我们切换DropDownList中的Item时,JavaScript发送异步请求给Server端,Server端返回数据,然后JavaScript将数据解析出来,拼接了一个Table,将Table呈现在页面上。
二、提交Form表单的原理
1.代码
客户端代码:
<form id="form1" action="Test.ashx" method="get">
   您的姓名1:<input type="text" name="fname" size="20" />
   <input type="submit" name="submit" value="Sumbit">
 </form>
服务端代码:
public void ProcessRequest (HttpContext context)
{
  //Delay
  for (int i = 0; i < 2; i++)
  {
   System.Threading.Thread.Sleep(1000);
  }

   //从Requset.Form中获取fname的值。使用Form获取请求的键值对的值的前提条件是HTTP request Content-Type 值必须是"application/x-www-form-urlencoded" 或 "multipart/form-data".
  string fname = context.Request["fname"];

  context.Response.ContentType = "text/plain";
 //将字符串写入 HTTP 响应输出流。
  context.Response.Write("Hello World " + fname);
}2.将代码部署到IIS

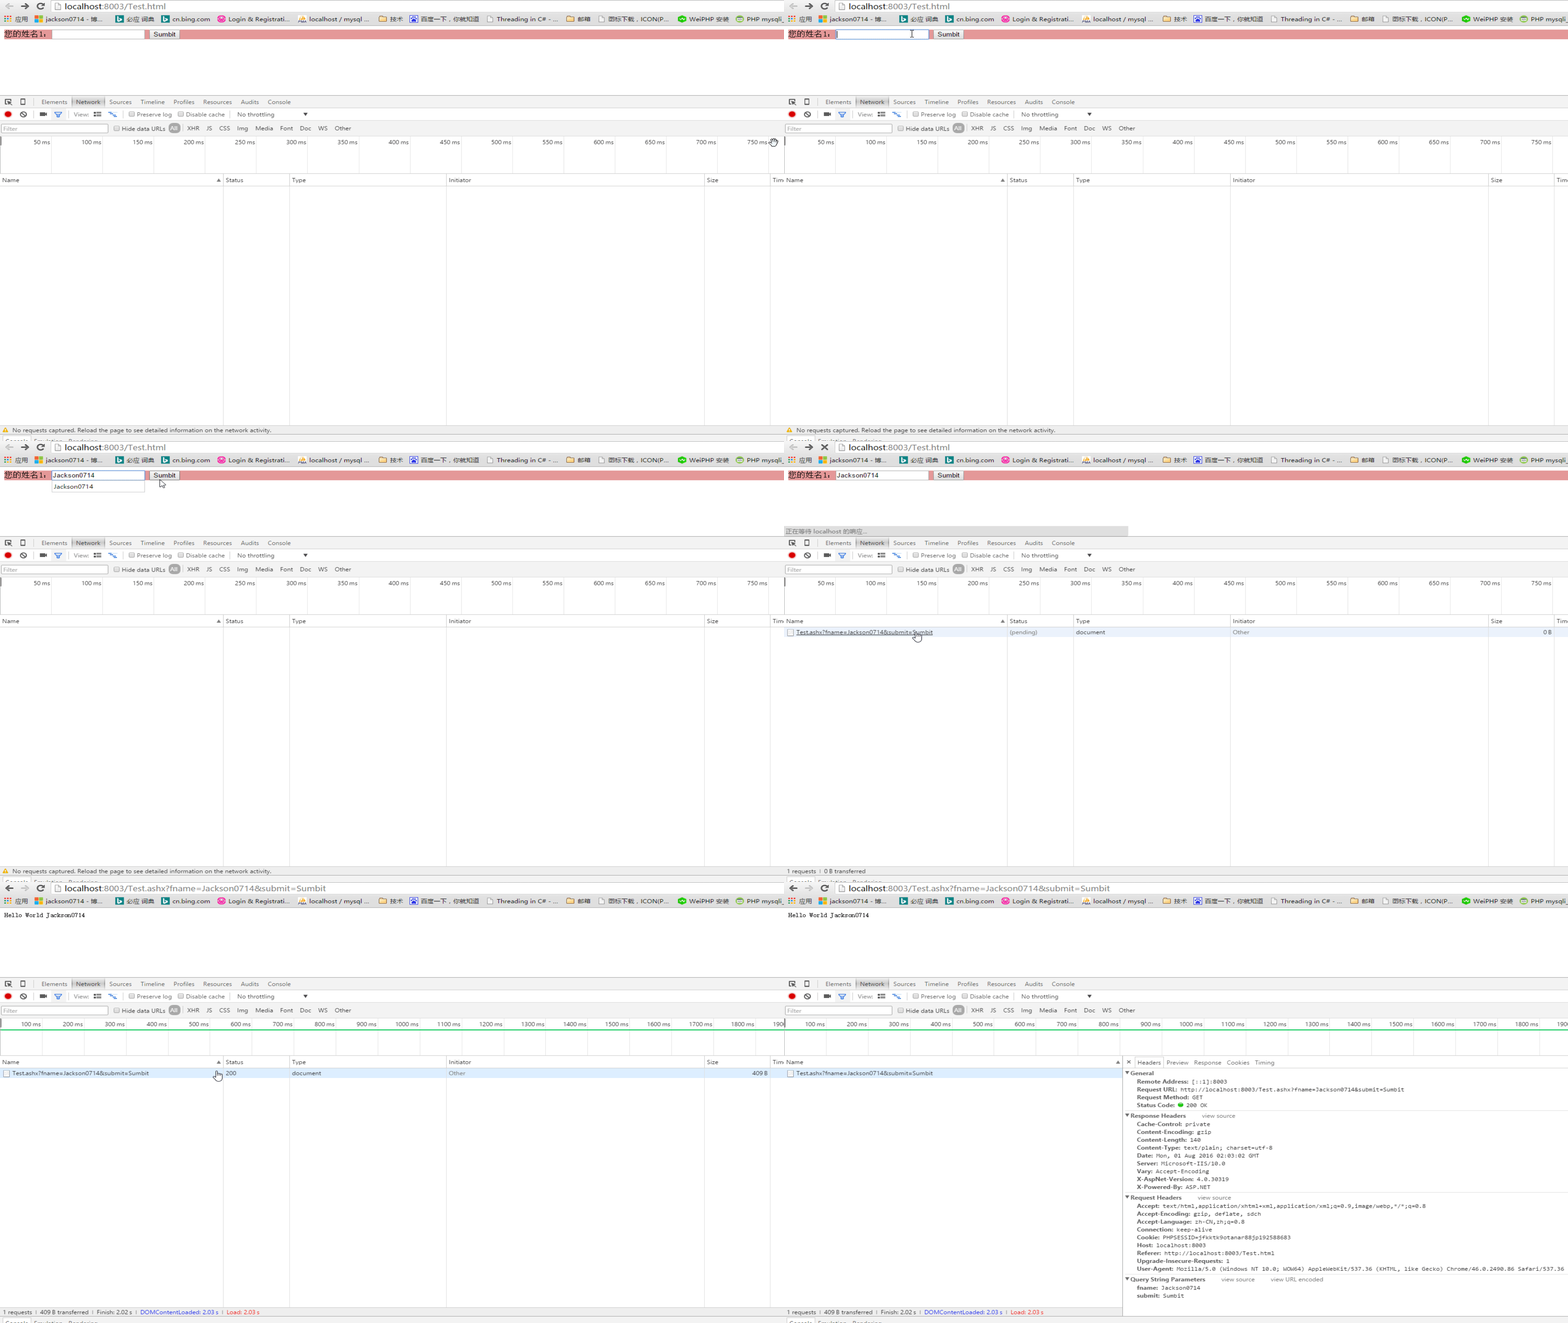
3.打开站点:
http://localhost:8003/Test.html
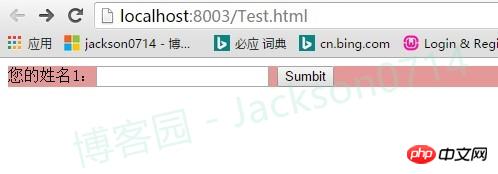
4.输入“Jackson0714”然后点击Sumbit按钮,页面会重新刷新,显示"Hello World Jackson0714"
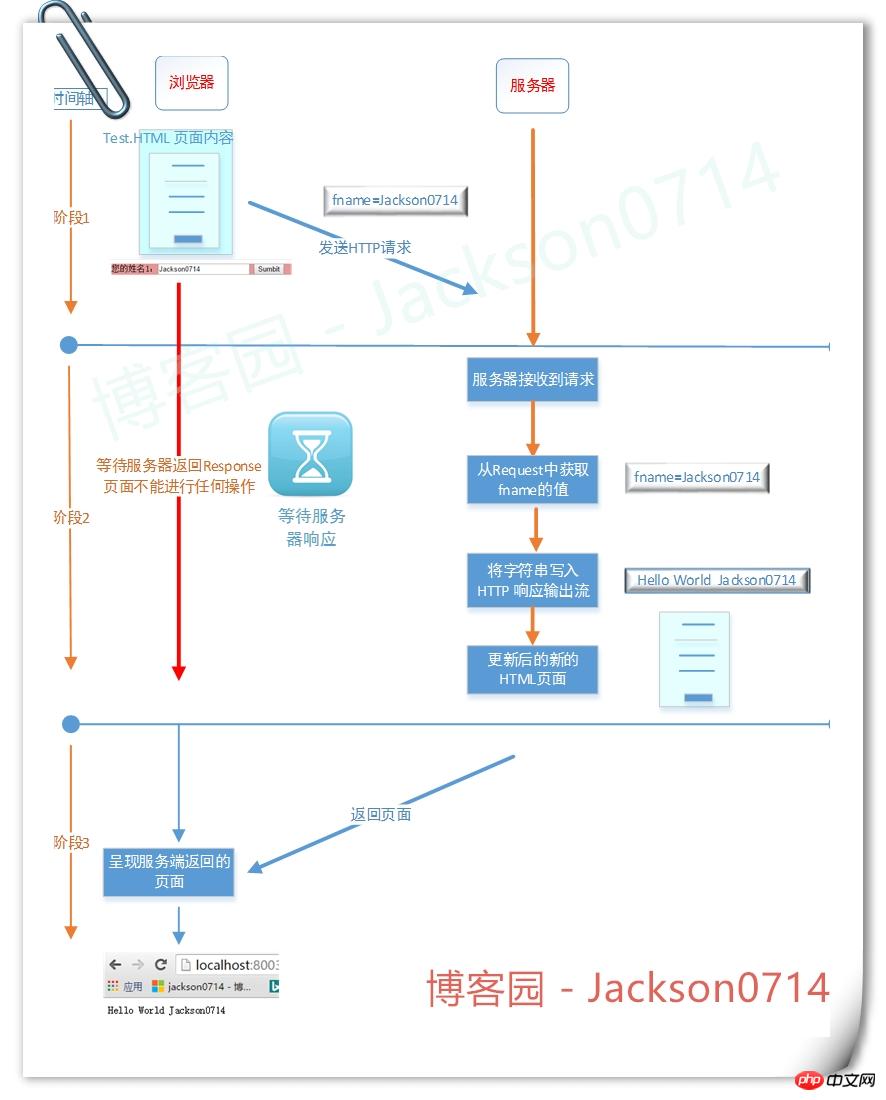
5.提交Form表单后,页面发送请求和服务端返回响应的流程
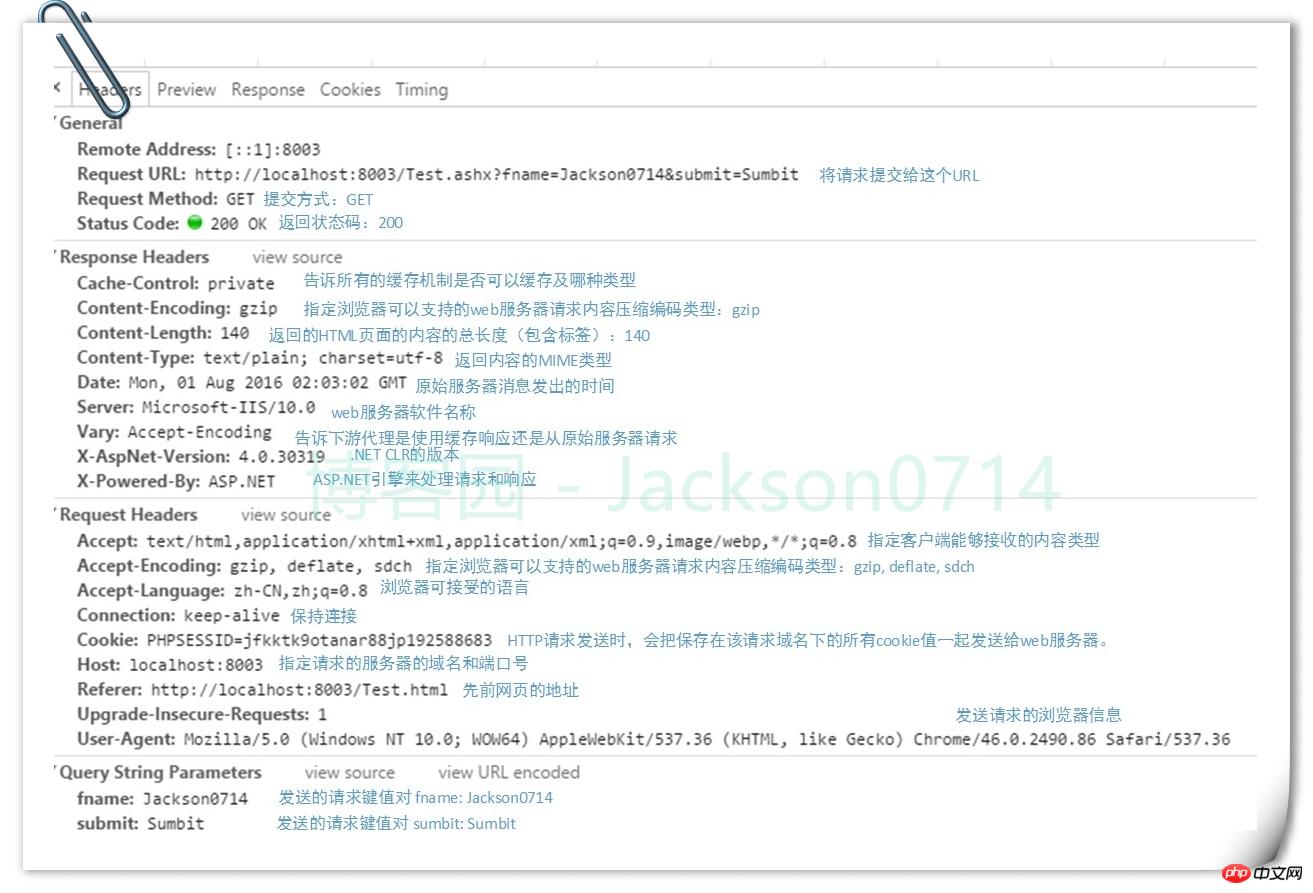
6.通过抓包,我们可以得到HTTP Headers
浏览器发送HTTP给服务端,采取的协议是HTTP协议。
在传输过程中,我们可以看下HTTP Headers。
三、AJAX提交请求和服务响应的原理
1.代码
客户端HTML代码:
<!DOCTYPE html>

<html lang="en" xmlns="http://www.w3.org/1999/xhtml">
<head>
 <meta charset="utf-8" />
 <title></title>
 <script type="text/javascript" src="Ajax.js"></script>

</head>
<body>
 <p id="Test" style="background-color:#40eeee">
  您的姓名2:<input type="text" id="testGetName" size="20" />
  <button type="button" onclick="testGet();">Ajax Get请求</button>
 </p>

 <p id="Test" style="background-color:#ff6a00">
  您的姓名3:<input type="text" id="testPostName" size="20" />
  <button type="button" onclick="testPost();">Ajax Post请求</button>
 </p>

 <p id="myp" />

</body>
</html>
客户端JS代码:
var xmlhttp = createRequest();

function testGet() {
 var fname = document.getElementById("testGetName").value;
 xmlhttp.open("GET", "Test.ashx?fname=" + fname + "&random=" + Math.random() , true);
 xmlhttp.onreadystatechange = callback;
 xmlhttp.send(null);
}

function testPost() {
 var fname = document.getElementById("testPostName").value;
 xmlhttp.open("POST", "Test.ashx?" + "&random=" + Math.random() , true);
 xmlhttp.setRequestHeader("Content-Type", "application/x-www-form-urlencoded;charset=UTF-8");
 xmlhttp.onreadystatechange = callback;
 xmlhttp.send("fname="+fname);

}

function createRequest() {
 var xmlhttp;
 if (window.XMLHttpRequest) {
  // code for IE7+, Firefox, Chrome, Opera, Safari
  xmlhttp = new XMLHttpRequest();
 }
 else {
  // code for IE6, IE5
  xmlhttp = new ActiveXObject("Microsoft.XMLHTTP");
 }
 return xmlhttp
}

function callback() {
 if (xmlhttp.readyState == 4 && xmlhttp.status == 200) {
  document.getElementById("myp").innerHTML = xmlhttp.responseText;
 }
}这里有一点需要注意
var xmlhttp = createRequest(); 。
1.让服务端能够操作这个变量,如果定义成局部变量,则服务端返回response时,不能对xmlhttp的属性赋值。回调函数要求request是全局的,才能访问这个变量和它的属性值。
2.定义成全局变量后,可能出现两个请求或多个请求共享同一个请求对象。而这个请求对象只能存放一个回调函数来处理服务器响应。当服务器返回两个请求的Response后,可能会调用后指定的回调函数。所以可能有两个完全不同的服务器响应由同一个回调函数处理,而这可能并不是正确的处理。解决办法是创建两个不同的请求对象。
服务端代码不变。
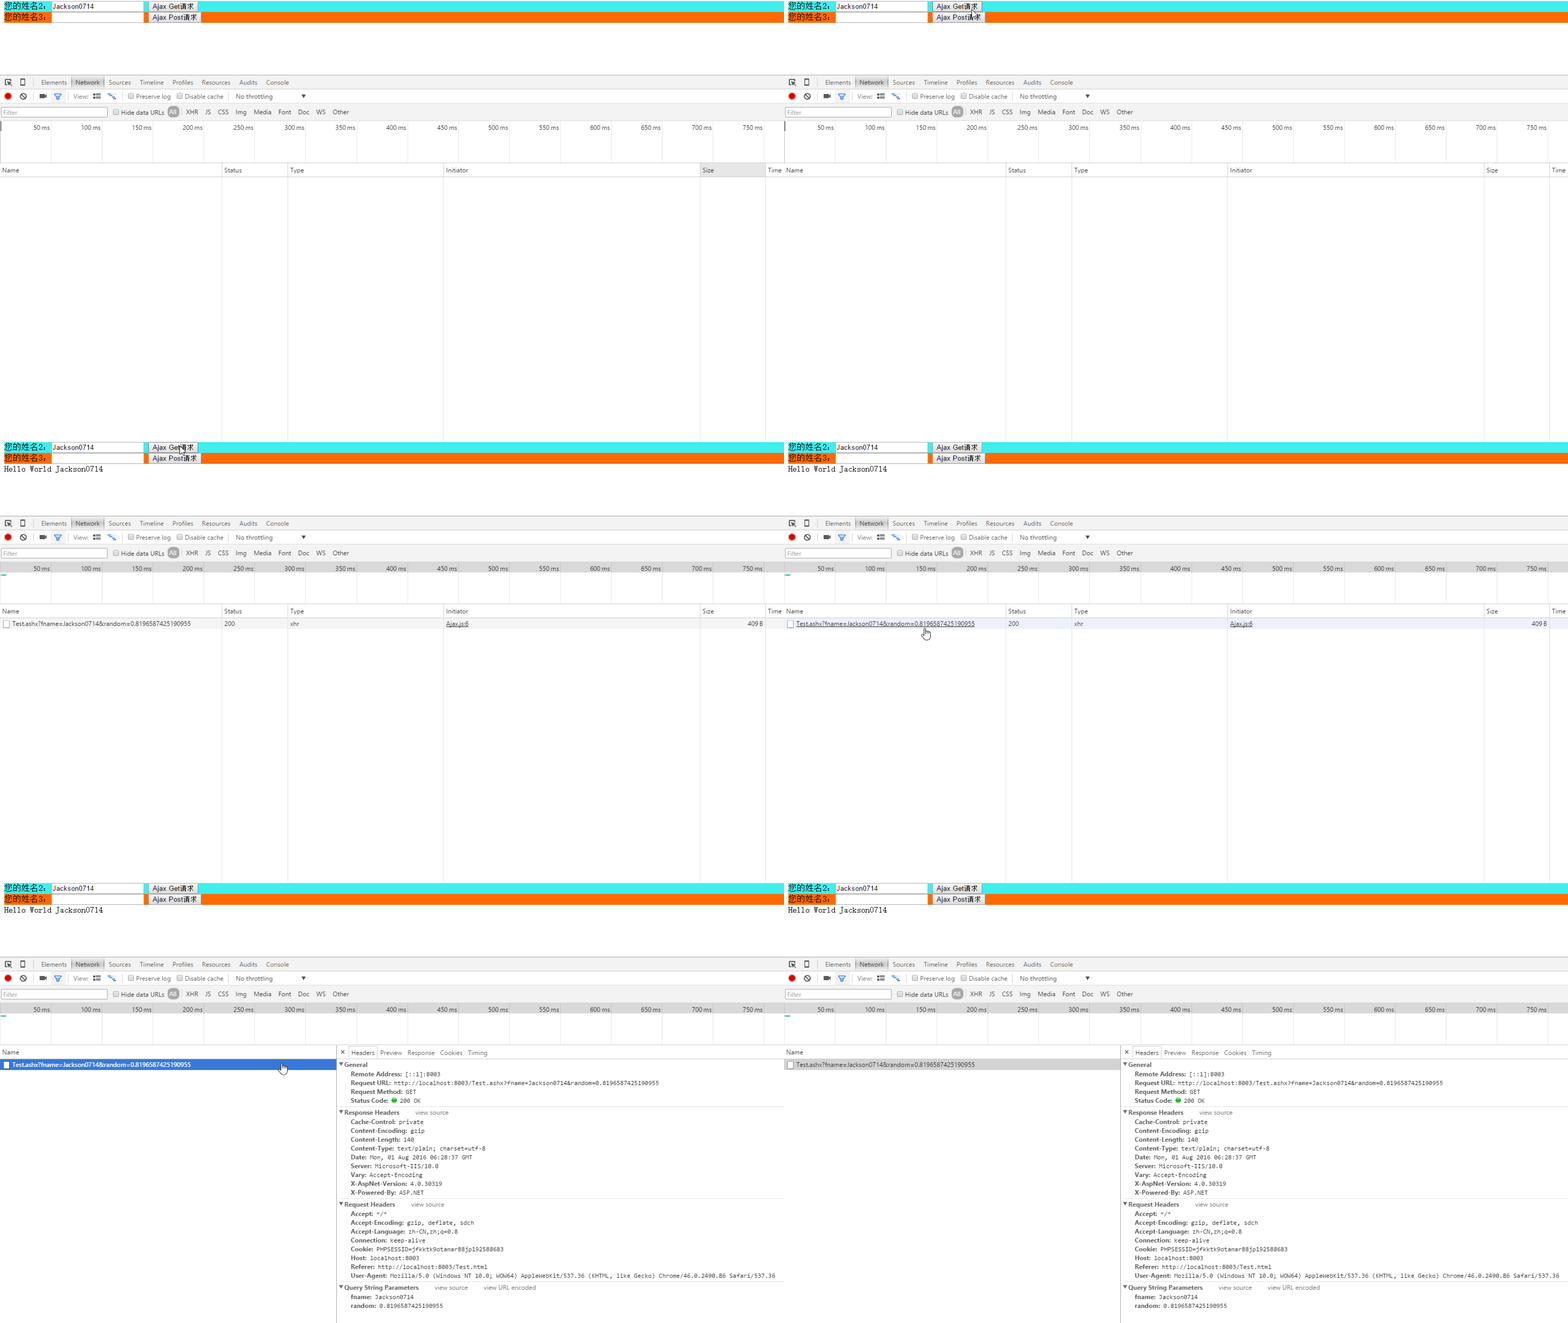
2.输入“Jackson0714”然后点击Sumbit按钮,页面不会刷新,在最下面显示"Hello World Jackson0714"
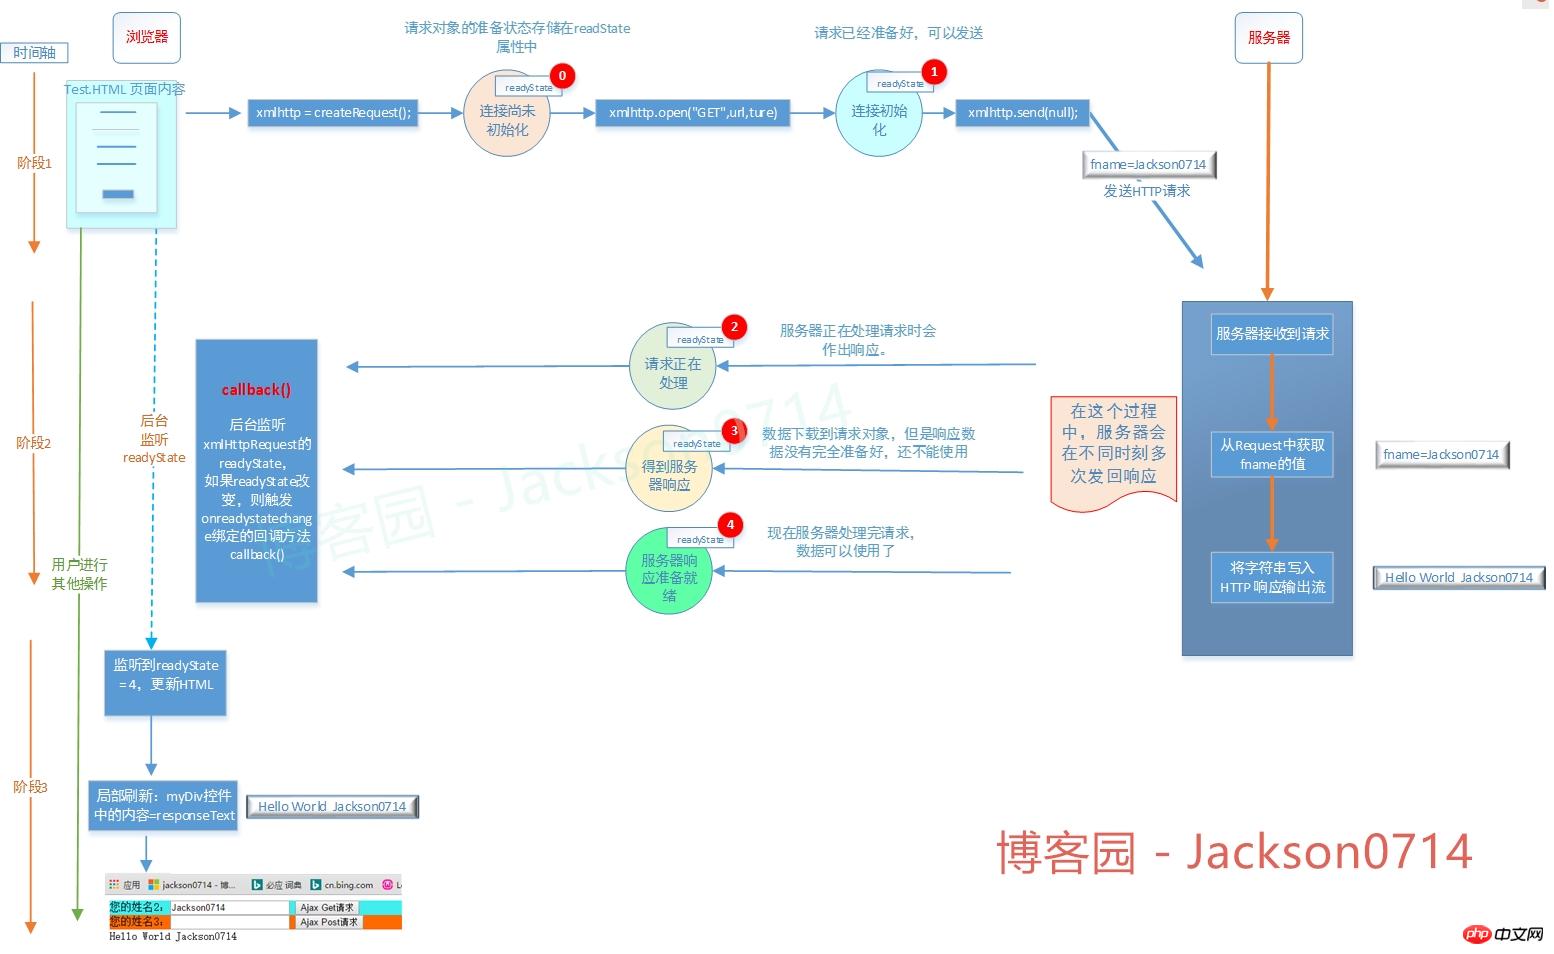
3.AJAX发送请求和服务端返回响应的流程
4.通过抓包,我们可以得到HTTP Headers
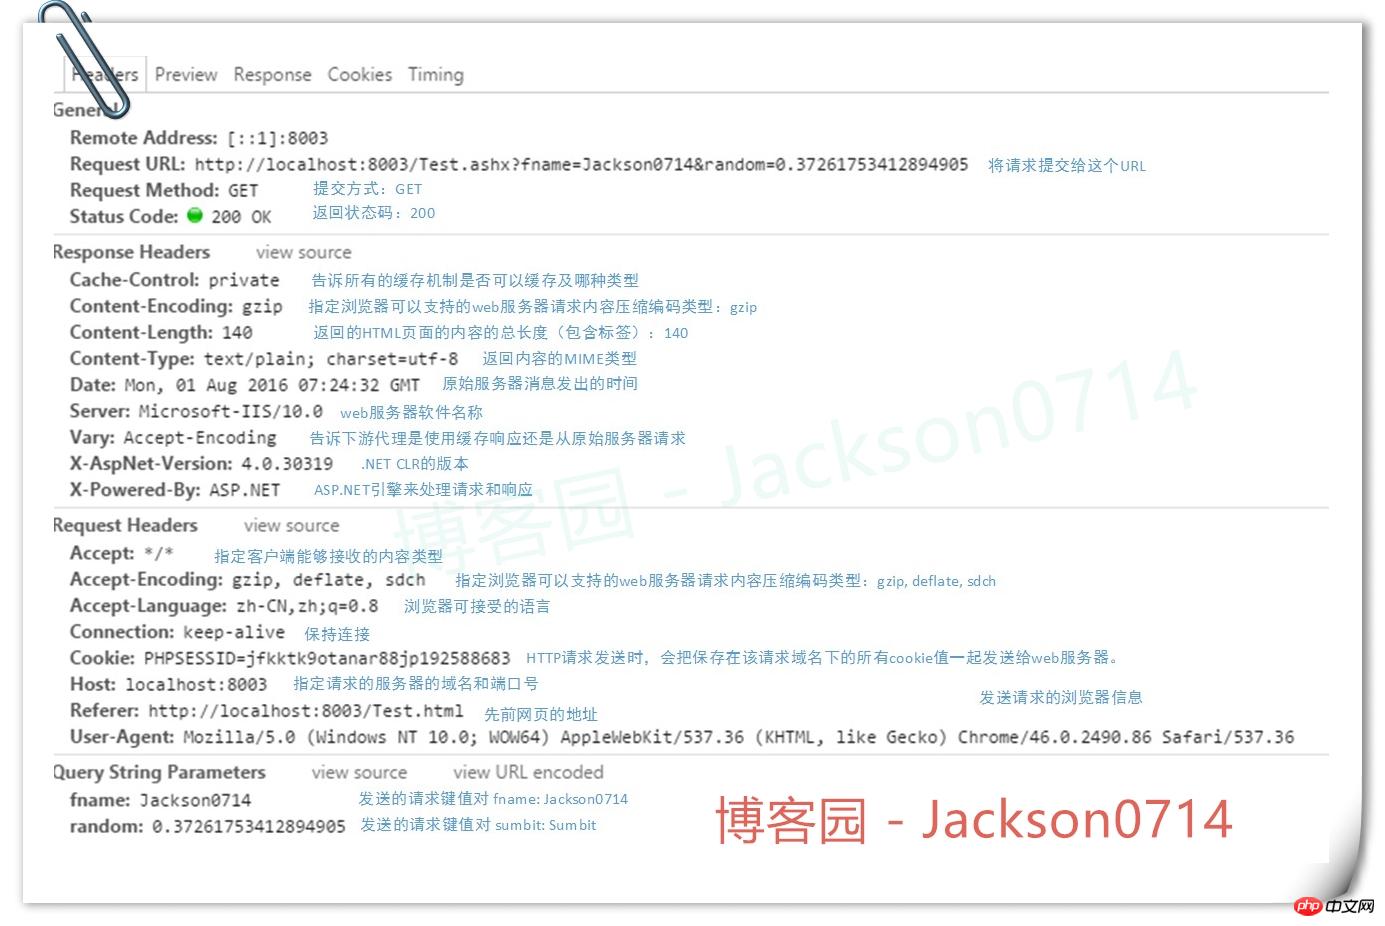
浏览器发送HTTP给服务端,采取的协议是HTTP协议。
在传输过程中,我们可以看下HTTP Headers:
5.AJAX GET和POST方式区别
AJAX发送请求和POST发送请求的代码如下:
//GET方式
function testGet() {
 var fname = document.getElementById("testGetName").value;
 xmlhttp.open("GET", "Test.ashx?fname=" + fname + "&random=" + Math.random() , true);
xmlhttp.onreadystatechange = callback;
 xmlhttp.send(null);
}

//POST方式
function testPost() {
 var fname = document.getElementById("testPostName").value;
 xmlhttp.open("POST", "Test.ashx?" + "&random=" + Math.random() , true);
 xmlhttp.setRequestHeader("Content-Type", "application/x-www-form-urlencoded;charset=UTF-8");
 xmlhttp.onreadystatechange = callback;
 xmlhttp.send("fname="+fname);

}四、XMLHttpRequest 对象的知识
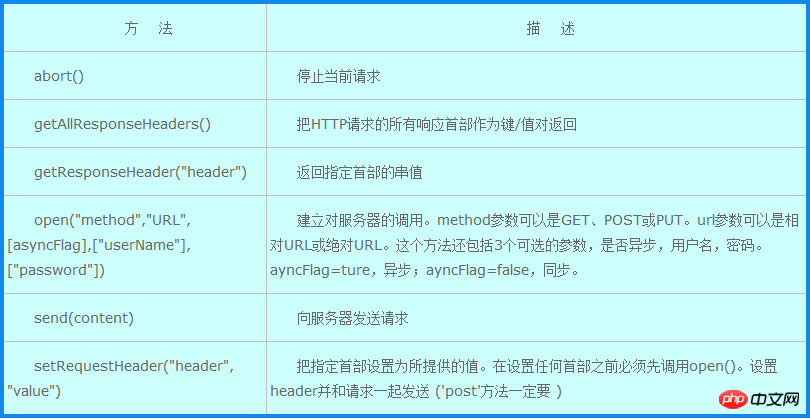
1.XMLHttpRequest 对象的方法
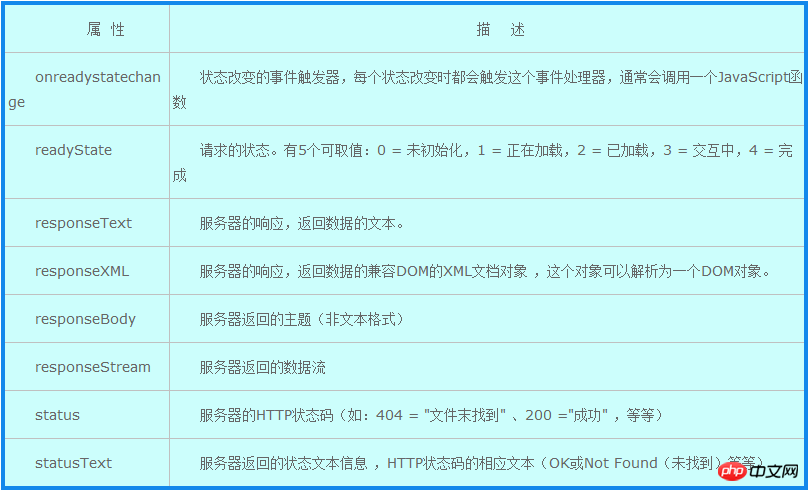
2.XMLHttpRequest 对象的属性
五、JQuery实现AJAX
下面的代码实现了当切换DropDownList的item时,触发getWeeklyCalendar方法,用JQuery的类库方法$.ajax来发送AJAX请求。
客户端JQuery代码
function getWeeklyCalendar(name,currentDate,mode){
$.ajax({
type:'POST',
url:'weekProcess.php',data:'func=getWeeklyCalender&name='+name+'¤tDate='+currentDate+'& mode='+mode,
success:function(data){
paintWeeklyCandler(data);
}
});
}后台成功返回Response后,执行paintWeeklyCandler(data)方法
后台PHP代码
<?php<br> //定义返回的Response的格式为JSON格式
 header('Content-type: text/json');<br> //引入自定义的数据库连接文件
 include 'dbConfig.php';<br> //引入自定义的设置session的文件
 include_once 'session.php';
 /*
 * Function requested by Ajax
 */
 if(isset($_POST['func']) && !empty($_POST['func']))
 {
  switch($_POST['func']){
    case 'getWeeklyCalender':
      getWeeklyCalender($_POST['name'],$_POST['currentDate'],$_POST['mode']);
       break;
     case 'getWeeklyStatus':
      getWeeklyStatus($_POST['name'],$_POST['currentDate'],$_POST['mode']);
      break;
     case 'getEvents':
      getEvents($_POST['date'],$_POST['name']);
      break;
    default:
      break;
 }
}
 function getWeeklyCalender($name = '',$currentDate = '',$mode = '')
 {
  //逻辑代码<br>    <br>  <br>    //返回JSON格式的Response
  echo json_encode(array('result'=>$DaysOfWeekResultsArray));
}<br>?>六、优势
1.使用异步方式与服务器通信,页面不需要重新加载,页面无刷新
2.按需取数据,减少服务器的负担
3.使得Web应用程序更为迅捷地响应用户交互
4.AJAX基于标准化的并被广泛支持的技术,不需要下载浏览器插件或者小程序,但需要客户允许JavaScript在浏览器上执行
5.浏览器的内容和服务端代码进行分离。页面的内容全部由JAVAScript来控制,服务端负责逻辑的校验和从数据库中拿数据。
七、缺点
1.安全问题:将服务端的方法暴露出来,黑客可利用这一点进行攻击
2.大量JS代码,容易出错
3.Ajax的无刷新重载,由于页面的变化没有刷新重载那么明显,所以容易给用户带来困扰——用户不太清楚现在的数据是新的还是已经更新过的;现有的解决有:在相关位置提示、数据更新的区域设计得比较明显、数据更新后给用户提示等
4.可能破坏浏览器后退按钮的正常行为;
5.一些手持设备(如手机、PAD等)自带的浏览器现在还不能很好的支持Ajax
八、应用场景
1.对数据进行过滤和操纵相关数据的场景
2.添加/删除树节点
3.添加/删除列表中的某一行记录
4.切换下拉列表item
5.注册用户名重名的校验
九、不适用场景
1.整个页面内容的保存
2.导航
相信看了本文案例你已经掌握了方法,更多精彩请关注php中文网其它相关文章!
推荐阅读:
The above is the detailed content of Detailed graphic and text explanation of AJAX usage tutorial (with video). For more information, please follow other related articles on the PHP Chinese website!