

Uploadify implements display progress bar to upload pictures
这次给大家带来Uploadify实现显示进度条上传图片,Uploadify实现显示进度条上传图片的注意事项有哪些,下面就是实战案例,一起来看一下。
Uploadify是一个简单易用的多文件上传方案。作为一个Jquery插件,Uploadify使用简单,并具有高度的定制性。
Uploadify特性:
Uploadify简单说来,是基于Jquery的一款文件上传插件。它的功能特色总结如下:
1)、支持单文件或多文件上传,可控制并发上传的文件数
2)、在服务器端支持各种语言与之配合使用,诸如PHP,.NET,Java……
3)、通过参数可配置上传文件类型及大小限制
4)、通过参数可配置是否选择文件后自动上传
5)、易于扩展,可控制每一步骤的回调函数(onSelect, onCancel……)
6)、通过接口参数和CSS控制外观
7)、提供上传进度的事件回调,实时显示上传进度
8)、开始之前要先下载插件安装包到本地并引用,详细实现请看代码注释,下面开始代码。
1、html代码
<p id="webApplogo_file" style="display: block; width: 800px; background-color: #fff;">
<ul>
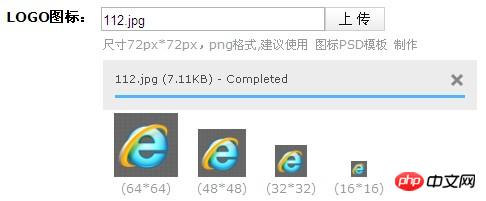
<li style="margin-left: 213px;"><span class="black_blod14">LOGO图标:</span></li>
<li style="margin-left: 3px;">
<input type="text" readonly="readonly" id="text_webApplogo" name="app_logo" class="appipt1" value="<%=applogo %>" /></li>
<li style="padding-top: 1px;">
<input type="file" id="webApplogo" name="webApplogo" />
</li>
<li><span style="display: none; margin-left: 5px; padding-left: 20px; color: #EA5200;
font-size: 12px; background: url('Images/icon_03.gif' ) no-repeat 0px 0px;" id="textporApplogo">
请上传LOGO图标!</span></li>
<li style="margin-left: 220px;"><span class="grey999" style="margin-left: 90px; float: left;">
尺寸72px*72px,png格式,建议使用 图标PSD模板 制作</span>
<p id="QID_webApplogo" class="fileQueue"></p>
<table id="webApplogo_tab" width="50%" border="0" cellspacing="0" cellpadding="0"
align="center" class="grey999" style="display: none; margin-left: 90px; float: left;">
<tr>
<td align="center" valign="bottom">
<img style="width: 64px; height: 64px;" id="img_64" src="images/icon_02.gif" border="0" /><br />
(64*64)
</td>
<td align="center" valign="bottom">
<img style="width: 48px; height: 48px;" id="img_48" src="images/icon_02.gif" border="0" /><br />
(48*48)
</td>
<td align="center" valign="bottom">
<img style="width: 32px; height: 32px;" id="img_32" src="images/icon_02.gif" border="0" /><br />
(32*32)
</td>
<td align="center" valign="bottom">
<img style="width: 16px; height: 16px;" id="img_16" src="images/icon_02.gif" border="0" /><br />
(16*16)
</td>
</tr>
</table>
</li>
</ul>
</p>2、Javascript代码(关键部分)
$("#webApplogo").uploadify({
   'uploader': 'js/uploadify-v2.1.4/uploadify.swf',//进度条,Uploadify里面含有
   'script': 'UploadApplogo.ashx',//一般处理程序
   'cancelImg': 'js/uploadify-v2.1.4/cancel.png',//取消图片路径
   'folder': 'Imagelogo',//上传文件夹名
   'auto': true, //文件添加到上传队列后,自动进行上传。默认为false
   'multi': false,//是否允许多文件上传。默认为false
   'fileExt':'*.gif;*.jpg;*.jpeg;*.png',//允许上传的文件类型,使用分号(”;)”分割 例如:*.jpg;*.gif,默认为null(所有文件类型)
   'fileDesc':'不超过2M的图片 (*.gif;*.jpg;*.png)',
   'sizeLimit': 2048000, //允许上传的文件大小(kb) 此为2M
   'onSelectOnce': function(event,data) { //在单文件或多文件上传时,选择文件时触发
    //event 事件对象(the event object)
    //data 选择的操作信息
    //data.filesSelected 选择文件操作中选中的文件数量
    $('#status-message').text(data.filesSelected + ' 文件正在等待上传…….');
   },
   'onComplete': function(event, queueID, fileObj, response, data) {//当单个文件上传完成后触发
    //event:事件对象(the event object)
    //ID:该文件在文件队列中的唯一表示
    //fileObj:选中文件的对象,他包含的属性列表
    //response:服务器端返回的Response文本,我这里返回的是处理过的文件名称
    //data:文件队列详细信息和文件上传的一般数据
    alert("文件:" + fileObj.name + " 上传成功!");
    //设置图片名称
    $("#applogo").attr("value",response);
    //设置输入框的值
    $("#text_webApplogo").attr("value",fileObj.name);
    //设置图片路径
    $("#img_64").attr("src","Imagelogo/64_"+response);
    $("#img_48").attr("src","Imagelogo/48_"+response);
    $("#img_32").attr("src","Imagelogo/32_"+response);
    $("#img_16").attr("src","Imagelogo/16_"+response);
    //图片路径设置完成后,显示图片
    $("#webApplogo_tab").css("display","block");
   },
   'onError': function(event, queueID, fileObj) {//当单个文件上传出错时触发
    alert("文件:" + fileObj.name + " 上传失败!");
   },
   'buttonImg':'Images/bn_04.gif',//浏览按钮的图片路径
   'width':60,//浏览按钮的宽和高
   'height':24
   ,'queueID':'QID_webApplogo'//页面上作为文件上传队列的元素的ID
});3、服务器端处理文件上传
/// <summary>
 /// 上传文件
 /// </summary>
 public class UploadApplogo : IHttpHandler
 {
  System.Drawing.Image image, image64, image48, image32, image16; //定义image类的对象
  protected string imagePath;//图片路径
  protected string imageType;//图片类型
  protected string imageName;//图片名称
  protected string fileName;//图片名称
  //提供一个回调方法,用于确定Image对象在执行生成缩略图操作时何时提前取消执行
  //如果此方法确定 GetThumbnailImage 方法应提前停止执行,则返回 true;否则返回 false
  System.Drawing.Image.GetThumbnailImageAbort callb = null;
  public void ProcessRequest(HttpContext context)
  {
   context.Response.ContentType = "text/plain";
   HttpPostedFile UploadImage = context.Request.Files["FileData"];
   //物理路径
   string uploadpath = HttpContext.Current.Server.MapPath(context.Request["folder"] + "\\");
   if (UploadImage != null)
   {
    //是否有目录,如没有就创建
    if (!Directory.Exists(uploadpath))
    {
     Directory.CreateDirectory(uploadpath);
    }
    //客户端文件完全名称
    string filename = UploadImage.FileName;
    string extname = filename.Substring(filename.LastIndexOf(".") + 1);
    //为不重复,设置文件名
    fileName = Guid.NewGuid().ToString() + "." + extname;
    //context.Response.Write("1");
    context.Response.Write(fileName);
   }
   else
   {
    context.Response.Write("0");
   }
   string mPath;
   imagePath = UploadImage.FileName;
   //取得图片类型
   imageType = imagePath.Substring(imagePath.LastIndexOf(".") + 1);
   //取得图片名称
   imageName = imagePath.Substring(imagePath.LastIndexOf("\\") + 1);
   Stream imgStream = UploadImage.InputStream;//流文件,准备读取上载文件的内容
   int imgLen = UploadImage.ContentLength;//上载文件大小
   //建立虚拟路径
   mPath = HttpContext.Current.Server.MapPath(context.Request["folder"]);
   //保存到虚拟路径
   UploadImage.SaveAs(mPath + "\\" + fileName);
   ////显示原图
   //imageSource.ImageUrl = "upFile/" + imageName;
   //为上传的图片建立引用
   image = System.Drawing.Image.FromFile(mPath + "\\" + fileName);
   //生成缩略图
   image64 = image.GetThumbnailImage(64, 64, callb, new System.IntPtr());
   //把缩略图保存到指定的虚拟路径
   image64.Save(HttpContext.Current.Server.MapPath(context.Request["folder"]) + "\\64_" + fileName);
   //释放image64对象的资源
   image64.Dispose();
   //生成缩略图
   image48 = image.GetThumbnailImage(48, 48, callb, new System.IntPtr());
   image48.Save(HttpContext.Current.Server.MapPath(context.Request["folder"]) + "\\48_" + fileName);
   image48.Dispose();
   //生成缩略图
   image32 = image.GetThumbnailImage(32, 32, callb, new System.IntPtr());
   image32.Save(HttpContext.Current.Server.MapPath(context.Request["folder"]) + "\\32_" + fileName);
   image32.Dispose();
   //生成缩略图
   image16 = image.GetThumbnailImage(16, 16, callb, new System.IntPtr());
   image16.Save(HttpContext.Current.Server.MapPath(context.Request["folder"]) + "\\16_" + fileName);
   image16.Dispose();
   //释放image对象占用的资源
   image.Dispose();
  }
  public bool IsReusable
  {
   get
   {
    return false;
   }
  }
}4、效果如下
相信看了本文案例你已经掌握了方法,更多精彩请关注php中文网其它相关文章!
推荐阅读:
The above is the detailed content of Uploadify implements display progress bar to upload pictures. For more information, please follow other related articles on the PHP Chinese website!

Hot AI Tools

Undresser.AI Undress
AI-powered app for creating realistic nude photos

AI Clothes Remover
Online AI tool for removing clothes from photos.

Undress AI Tool
Undress images for free

Clothoff.io
AI clothes remover

Video Face Swap
Swap faces in any video effortlessly with our completely free AI face swap tool!

Hot Article
Hot Tools

Notepad++7.3.1
Easy-to-use and free code editor

SublimeText3 Chinese version
Chinese version, very easy to use

Zend Studio 13.0.1
Powerful PHP integrated development environment

Dreamweaver CS6
Visual web development tools

SublimeText3 Mac version
God-level code editing software (SublimeText3)
Hot Topics
 1662
1662
 14
1419
52
1311
25
1261
29
1234
24
14
1419
52
1311
25
1261
29
1234
24

 How to implement file upload and processing in FastAPI
Jul 28, 2023 pm 03:01 PM
How to implement file upload and processing in FastAPI
Jul 28, 2023 pm 03:01 PM
How to implement file upload and processing in FastAPI FastAPI is a modern, high-performance web framework that is easy to use and powerful. It provides native support for file upload and processing. In this article, we will learn how to implement file upload and processing functions in the FastAPI framework, and provide code examples to illustrate specific implementation steps. First, we need to import the required libraries and modules: fromfastapiimportFastAPI,UploadF
 How to solve the problem of slow upload speed on Win10 computer
Jul 01, 2023 am 11:25 AM
How to solve the problem of slow upload speed on Win10 computer
Jul 01, 2023 am 11:25 AM
How to solve the slow upload speed of Win10 computer? When we use the computer, we may feel that the file upload speed of our computer is very slow. So what is the situation? In fact, this is because the default upload speed of the computer is 20%, so the upload speed is very slow. Many friends do not know how to operate in detail. The editor has compiled the steps to format the C drive in Win11 below. If you are interested, follow Let’s take a look below! Solution to the slow upload speed of Win10 1. Press win+R to call up run, enter gpedit.msc, and press Enter. 2. Select the management template, click Network--Qos Packet Scheduler, and double-click Limit to reserve bandwidth. 3. Select Enabled, which will bring
 How to upload lyrics to QQ Music
Feb 23, 2024 pm 11:45 PM
How to upload lyrics to QQ Music
Feb 23, 2024 pm 11:45 PM
With the advent of the digital age, music platforms have become one of the main ways for people to obtain music. However, sometimes when we listen to songs, we find that there are no lyrics, which is very disturbing. Many people hope that lyrics can be displayed when listening to songs to better understand the content and emotions of the songs. QQ Music, as one of the largest music platforms in China, also provides users with the function of uploading lyrics, so that users can better enjoy music and feel the connotation of the songs. The following will introduce how to upload lyrics on QQ Music. first
 Simple steps to upload your own music on Kugou
Mar 25, 2024 pm 10:56 PM
Simple steps to upload your own music on Kugou
Mar 25, 2024 pm 10:56 PM
1. Open Kugou Music and click on your profile picture. 2. Click the settings icon in the upper right corner. 3. Click [Upload Music Works]. 4. Click [Upload Works]. 5. Select the song and click [Next]. 6. Finally, click [Upload].
 How to improve computer upload speed
Jan 15, 2024 pm 06:51 PM
How to improve computer upload speed
Jan 15, 2024 pm 06:51 PM
Upload speed becomes very slow? I believe this is a problem that many friends will encounter when uploading things on their computers. If the network is unstable when using a computer to transfer files, the upload speed will be very slow. So how can I increase the network upload speed? Below, the editor will tell you how to solve the problem of slow computer upload speed. When it comes to network speed, we all know that the speed of opening web pages, download speed, and upload speed are also very critical. Especially some users often need to upload files to the network disk, so a fast upload speed will undoubtedly save you a lot of money. Less time, what should I do if the upload speed is slow? Below, the editor brings you pictures and texts on how to deal with slow computer upload speeds. How to solve the problem of slow computer upload speed? Click "Start--Run" or "Window key"
 How to implement avatar upload function in Vue
Nov 07, 2023 am 08:01 AM
How to implement avatar upload function in Vue
Nov 07, 2023 am 08:01 AM
Vue is a popular front-end framework that can be used to build highly interactive applications. During the development process, uploading avatars is one of the common requirements. Therefore, in this article, we will introduce how to implement the avatar upload function in Vue and provide specific code examples. Using a third-party library In order to implement the avatar upload function, we can use a third-party library, such as vue-upload-component. This library provides an upload component that can be easily integrated into Vue applications. Here is a simple example
 How to take photos and upload them on computer
Jan 16, 2024 am 10:45 AM
How to take photos and upload them on computer
Jan 16, 2024 am 10:45 AM
As long as the computer is equipped with a camera, it can take pictures, but some users still don't know how to take pictures and upload them. Now I will give you a detailed introduction to the method of taking pictures on the computer, so that users can upload the pictures wherever they want. How to take photos and upload them on a computer 1. Mac computer 1. Open Finder and click the application on the left. 2. After opening, click the Camera application. 3. Just click the photo button below. 2. Windows computer 1. Open the search box below and enter camera. 2. Then open the searched application. 3. Click the photo button next to it.
 How to implement video playback and upload functions through the PHP Kuaishou API interface
Jul 21, 2023 pm 04:37 PM
How to implement video playback and upload functions through the PHP Kuaishou API interface
Jul 21, 2023 pm 04:37 PM
How to implement video playback and upload functions through the PHP Kuaishou API interface. Introduction: With the rise of social media, the public’s demand for video content has gradually increased. Kuaishou, as a short video-themed social application, is loved by many users. This article will introduce how to use PHP to write code to implement video playback and upload functions through the Kuaishou API interface. 1. Obtain the access token. Before using the Kuaishou API interface, you first need to obtain the access token. Token is the identity for accessing the API interface
