
 Web Front-end
JS Tutorial
Detailed explanation of the steps to customize button icon using Jquery+Mobile
Web Front-end
JS Tutorial
Detailed explanation of the steps to customize button icon using Jquery+Mobile
Detailed explanation of the steps to customize button icon using Jquery+Mobile
This time I will bring you a detailed explanation of the Jquery Mobile custom button icon steps, what are the precautions for Jquery Mobile custom button icon, the following is a practical case, let’s take a look one time.
Many friends have reported that jquery mobile has very few built-in icons. In addition, I also feel that the icons are too small (the ones that come with the system are 18*18), so I am thinking about how to customize the buttons. icon, I will share my method with you below.
I just came into contact with the Jquery Mobile framework and encountered a very practical problem, that is, how to customize button icons. I think jquery mobile has too few built-in icons. In addition, I think the icons are also too small (the system automatically The one I brought should be 18*18) The following is my method, I hope everyone will enthusiastically participate.
1. The first method is relatively simple, but it has a premise. The premise is that the size of your customized icon should be consistent with the built-in system, so that there will be no problems with typesetting. The specific method is as follows:
First define the css file
.ui-icon-email{
  background:url('./images/email.png') no-repeat 0px 0px;
}
data-icon="email"That’s it.
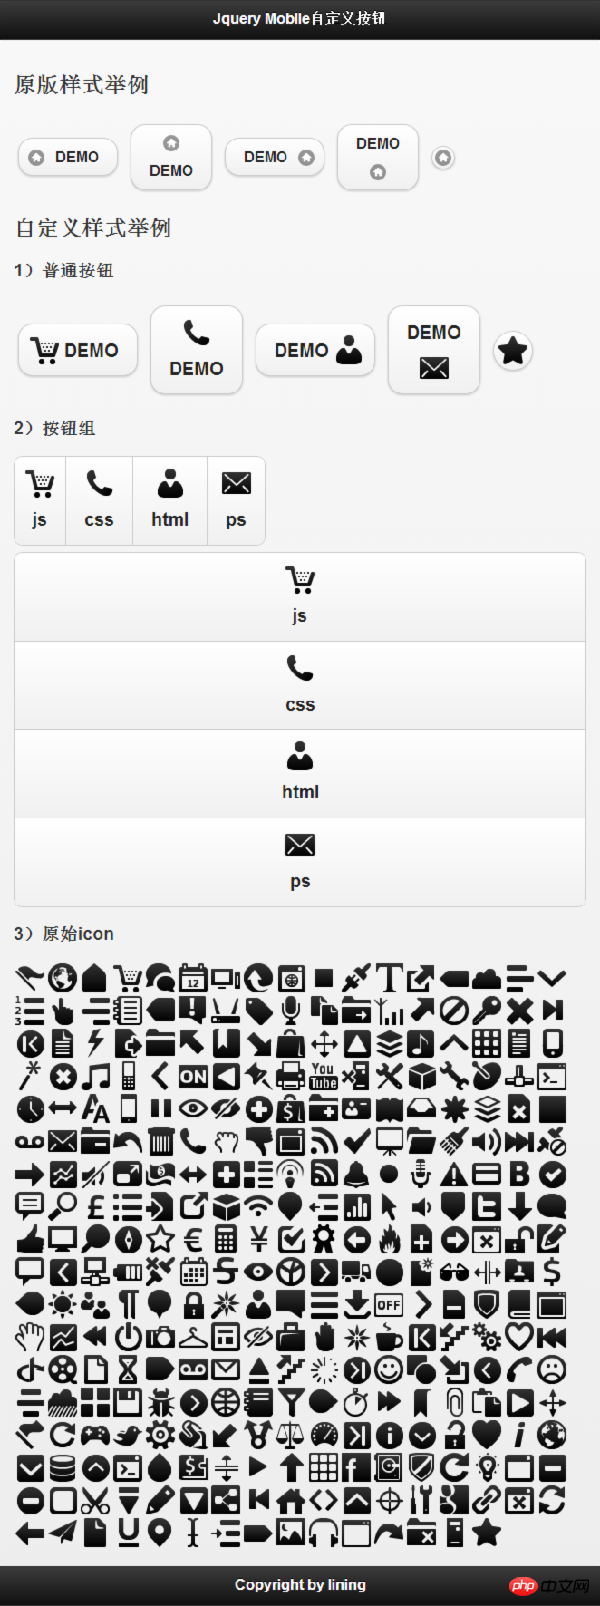
2. The second method. This method is suitable for situations where the custom icon size is inconsistent with the system. Without further ado, let’s look at the renderings first.
3. The code is as follows:
[css code]
/** 图标大小 **/
.user-ui-btn .ui-icon{
 width:36px;
 height:36px;
}
/** 设置字体大小,由于图标变大,所以文字适当的调大一些 **/
.user-ui-btn .ui-btn-text{
 line-height:36px;
 font-size:20px;
}
/** 无文字按钮 **/
.user-ui-btn .ui-btn-icon-notext{
 width:42px;
 height:42px;
 webkit-border-radius: 2em;
 border-radius: 2em;
}
/** 图标左边 **/
.user-ui-btn .ui-btn-icon-left .ui-btn-inner {
 padding-left: 50px;
}
.user-ui-btn .ui-btn-icon-left .ui-icon{
 left:10px;
 margin-top: -18px;
}
/** 图标在右边 **/
.user-ui-btn .ui-btn-icon-right .ui-btn-inner {
 padding-right: 50px;
}
.user-ui-btn .ui-btn-icon-right .ui-icon{
 right:10px;
 margin-top: -18px;
}
/** 图标在上边 **/
.user-ui-btn .ui-btn-icon-top .ui-btn-inner {
 padding-top: 50px;
}
.user-ui-btn .ui-btn-icon-top .ui-icon{
 top:10px;
 margin-left: -18px;
}
/** 图标在下边 **/
.user-ui-btn .ui-btn-icon-bottom .ui-btn-inner {
 padding-bottom: 50px;
}
.user-ui-btn .ui-btn-icon-bottom .ui-icon{
 bottom:10px;
 margin-left: -18px;
}
/** 定义自己的图标 **/
.user-ui-btn .ui-icon-demo1{
 background:url('./images/gentleface_full.png') no-repeat -108px 0px;
}
.user-ui-btn .ui-icon-demo2{
 background:url('./images/gentleface_full.png') no-repeat -180px -180px;
}
.user-ui-btn .ui-icon-demo3{
 background:url('./images/gentleface_full.png') no-repeat -252px -360px;
}
.user-ui-btn .ui-icon-demo4{
 background:url('./images/gentleface_full.png') no-repeat -36px -180px;
}
.user-ui-btn .ui-icon-demo5{
 background:url('./images/gentleface_full.png') no-repeat -504px -612px;
}
<!doctype html>
<html>
<head>
 <meta charset="utf-8" />
 <meta name="viewport" content="width=device-width, initial-scale=1">
 <link rel="stylesheet" type="text/css" href="js/jquery.mobile-1.3.2.css" />
 <script src="js/jquery.js"></script>
 <script src="js/jquery.mobile-1.3.2.js"></script>
 <link rel="stylesheet" type="text/css" href="js/demo.mobile-1.0.css" />
</head>
<body>
<p data-role="page" id="page">
 <p data-role="header">
  <h1>Jquery Mobile自定义按钮</h1>
 </p>
 <p data-role="content">
  <h2>原版样式举例</h2>
  <p>
 <a href="#" data-role="button" data-icon="home" data-inline="true" data-iconpos="left">DEMO</a>
 <a href="#" data-role="button" data-icon="home" data-inline="true" data-iconpos="top">DEMO</a>
 <a href="#" data-role="button" data-icon="home" data-inline="true" data-iconpos="right">DEMO</a>
 <a href="#" data-role="button" data-icon="home" data-inline="true" data-iconpos="bottom">DEMO</a>
 <a href="#" data-role="button" data-icon="home" data-inline="true" data-iconpos="notext">DEMO</a>
 </p>
 <h2>自定义样式举例</h2>
 <h3>1)普通按钮</h3>
 <p class="user-ui-btn">
 <a class="user-ui-btn" href="#" data-role="button" data-icon="demo1" data-inline="true" data-iconpos="left">DEMO</a>
 <a class="user-ui-btn" href="#" data-role="button" data-icon="demo2" data-inline="true" data-iconpos="top">DEMO</a>
 <a class="user-ui-btn" href="#" data-role="button" data-icon="demo3" data-inline="true" data-iconpos="right">DEMO</a>
 <a class="user-ui-btn" href="#" data-role="button" data-icon="demo4" data-inline="true" data-iconpos="bottom">DEMO</a>
 <a class="user-ui-btn" href="#" data-role="button" data-icon="demo5" data-inline="true" data-iconpos="notext">DEMO</a>
 </p>
 <h3>2)按钮组</h3>
 <p class="user-ui-btn" data-role="controlgroup" data-type="horizontal">
   <a data-role="button" data-icon="demo1" data-iconpos="top">js</a>
   <a data-role="button" data-icon="demo2" data-iconpos="top">css</a>
   <a data-role="button" data-icon="demo3" data-iconpos="top">html</a>
   <a data-role="button" data-icon="demo4" data-iconpos="top">ps</a>
  </p>
 <p class="user-ui-btn" data-role="controlgroup">
   <a data-role="button" data-icon="demo1" data-iconpos="top">js</a>
   <a data-role="button" data-icon="demo2" data-iconpos="top">css</a>
   <a data-role="button" data-icon="demo3" data-iconpos="top">html</a>
   <a data-role="button" data-icon="demo4" data-iconpos="top">ps</a>
  </p>
 <h3>3)原始icon</h3>
 <img src="./js/images/gentleface_full.png" alt="原始icon" border=0 width=612 height=648>
 </p>
 <p data-role="footer">
  <h4>Copyright by lining</h4>
 </p>
</p>
</body>
</html>I believe you have mastered the method after reading the case in this article. For more exciting information, please pay attention to other related articles on the php Chinese website!
Recommended reading:
How to use Mobile to control the get request when the page returns
Detailed explanation of the use of button button components in Mobile
The above is the detailed content of Detailed explanation of the steps to customize button icon using Jquery+Mobile. For more information, please follow other related articles on the PHP Chinese website!

Hot AI Tools

Undresser.AI Undress
AI-powered app for creating realistic nude photos

AI Clothes Remover
Online AI tool for removing clothes from photos.

Undress AI Tool
Undress images for free

Clothoff.io
AI clothes remover

Video Face Swap
Swap faces in any video effortlessly with our completely free AI face swap tool!

Hot Article
Hot Tools

Notepad++7.3.1
Easy-to-use and free code editor

SublimeText3 Chinese version
Chinese version, very easy to use

Zend Studio 13.0.1
Powerful PHP integrated development environment

Dreamweaver CS6
Visual web development tools

SublimeText3 Mac version
God-level code editing software (SublimeText3)
Hot Topics
 1657
1657
 14
1415
52
1309
25
1257
29
1230
24
14
1415
52
1309
25
1257
29
1230
24

 How to make Google Maps the default map in iPhone
Apr 17, 2024 pm 07:34 PM
How to make Google Maps the default map in iPhone
Apr 17, 2024 pm 07:34 PM
The default map on the iPhone is Maps, Apple's proprietary geolocation provider. Although the map is getting better, it doesn't work well outside the United States. It has nothing to offer compared to Google Maps. In this article, we discuss the feasible steps to use Google Maps to become the default map on your iPhone. How to Make Google Maps the Default Map in iPhone Setting Google Maps as the default map app on your phone is easier than you think. Follow the steps below – Prerequisite steps – You must have Gmail installed on your phone. Step 1 – Open the AppStore. Step 2 – Search for “Gmail”. Step 3 – Click next to Gmail app
 Steps to upgrade to the latest version of WeChat (Easily master the upgrade method to the latest version of WeChat)
Jun 01, 2024 pm 10:24 PM
Steps to upgrade to the latest version of WeChat (Easily master the upgrade method to the latest version of WeChat)
Jun 01, 2024 pm 10:24 PM
WeChat is one of the social media platforms in China that continuously launches new versions to provide a better user experience. Upgrading WeChat to the latest version is very important to keep in touch with family and colleagues, to stay in touch with friends, and to keep abreast of the latest developments. 1. Understand the features and improvements of the latest version. It is very important to understand the features and improvements of the latest version before upgrading WeChat. For performance improvements and bug fixes, you can learn about the various new features brought by the new version by checking the update notes on the WeChat official website or app store. 2. Check the current WeChat version We need to check the WeChat version currently installed on the mobile phone before upgrading WeChat. Click to open the WeChat application "Me" and then select the menu "About" where you can see the current WeChat version number. 3. Open the app
 This Apple ID is not yet in use in the iTunes Store: Fix
Jun 10, 2024 pm 05:42 PM
This Apple ID is not yet in use in the iTunes Store: Fix
Jun 10, 2024 pm 05:42 PM
When logging into iTunesStore using AppleID, this error saying "This AppleID has not been used in iTunesStore" may be thrown on the screen. There are no error messages to worry about, you can fix them by following these solution sets. Fix 1 – Change Shipping Address The main reason why this prompt appears in iTunes Store is that you don’t have the correct address in your AppleID profile. Step 1 – First, open iPhone Settings on your iPhone. Step 2 – AppleID should be on top of all other settings. So, open it. Step 3 – Once there, open the “Payment & Shipping” option. Step 4 – Verify your access using Face ID. step
 How to quickly set up a custom avatar in Netflix
Feb 19, 2024 pm 06:33 PM
How to quickly set up a custom avatar in Netflix
Feb 19, 2024 pm 06:33 PM
An avatar on Netflix is a visual representation of your streaming identity. Users can go beyond the default avatar to express their personality. Continue reading this article to learn how to set a custom profile picture in the Netflix app. How to quickly set a custom avatar in Netflix In Netflix, there is no built-in feature to set a profile picture. However, you can do this by installing the Netflix extension on your browser. First, install a custom profile picture for the Netflix extension on your browser. You can buy it in the Chrome store. After installing the extension, open Netflix on your browser and log into your account. Navigate to your profile in the upper right corner and click
 Shazam app not working in iPhone: Fix
Jun 08, 2024 pm 12:36 PM
Shazam app not working in iPhone: Fix
Jun 08, 2024 pm 12:36 PM
Having issues with the Shazam app on iPhone? Shazam helps you find songs by listening to them. However, if Shazam isn't working properly or doesn't recognize the song, you'll have to troubleshoot it manually. Repairing the Shazam app won't take long. So, without wasting any more time, follow the steps below to resolve issues with Shazam app. Fix 1 – Disable Bold Text Feature Bold text on iPhone may be the reason why Shazam is not working properly. Step 1 – You can only do this from your iPhone settings. So, open it. Step 2 – Next, open the “Display & Brightness” settings there. Step 3 – If you find that “Bold Text” is enabled
 Clock app missing in iPhone: How to fix it
May 03, 2024 pm 09:19 PM
Clock app missing in iPhone: How to fix it
May 03, 2024 pm 09:19 PM
Is the clock app missing from your phone? The date and time will still appear on your iPhone's status bar. However, without the Clock app, you won’t be able to use world clock, stopwatch, alarm clock, and many other features. Therefore, fixing missing clock app should be at the top of your to-do list. These solutions can help you resolve this issue. Fix 1 – Place the Clock App If you mistakenly removed the Clock app from your home screen, you can put the Clock app back in its place. Step 1 – Unlock your iPhone and start swiping to the left until you reach the App Library page. Step 2 – Next, search for “clock” in the search box. Step 3 – When you see “Clock” below in the search results, press and hold it and
 iPhone screenshots not working: How to fix it
May 03, 2024 pm 09:16 PM
iPhone screenshots not working: How to fix it
May 03, 2024 pm 09:16 PM
Screenshot feature not working on your iPhone? Taking a screenshot is very easy as you just need to hold down the Volume Up button and the Power button at the same time to grab your phone screen. However, there are other ways to capture frames on the device. Fix 1 – Using Assistive Touch Take a screenshot using the Assistive Touch feature. Step 1 – Go to your phone settings. Step 2 – Next, tap to open Accessibility settings. Step 3 – Open Touch settings. Step 4 – Next, open the Assistive Touch settings. Step 5 – Turn on Assistive Touch on your phone. Step 6 – Open “Customize Top Menu” to access it. Step 7 – Now you just need to link any of these functions to your screen capture. So click on the first
 Detailed explanation of the steps to obtain Win11 system administrator permissions
Mar 08, 2024 pm 09:09 PM
Detailed explanation of the steps to obtain Win11 system administrator permissions
Mar 08, 2024 pm 09:09 PM
Windows 11, as the latest operating system launched by Microsoft, is deeply loved by users. In the process of using Windows 11, sometimes we need to obtain system administrator rights in order to perform some operations that require permissions. Next, we will introduce in detail the steps to obtain system administrator rights in Windows 11. The first step is to click "Start Menu". You can see the Windows icon in the lower left corner. Click the icon to open the "Start Menu". In the second step, find and click "
