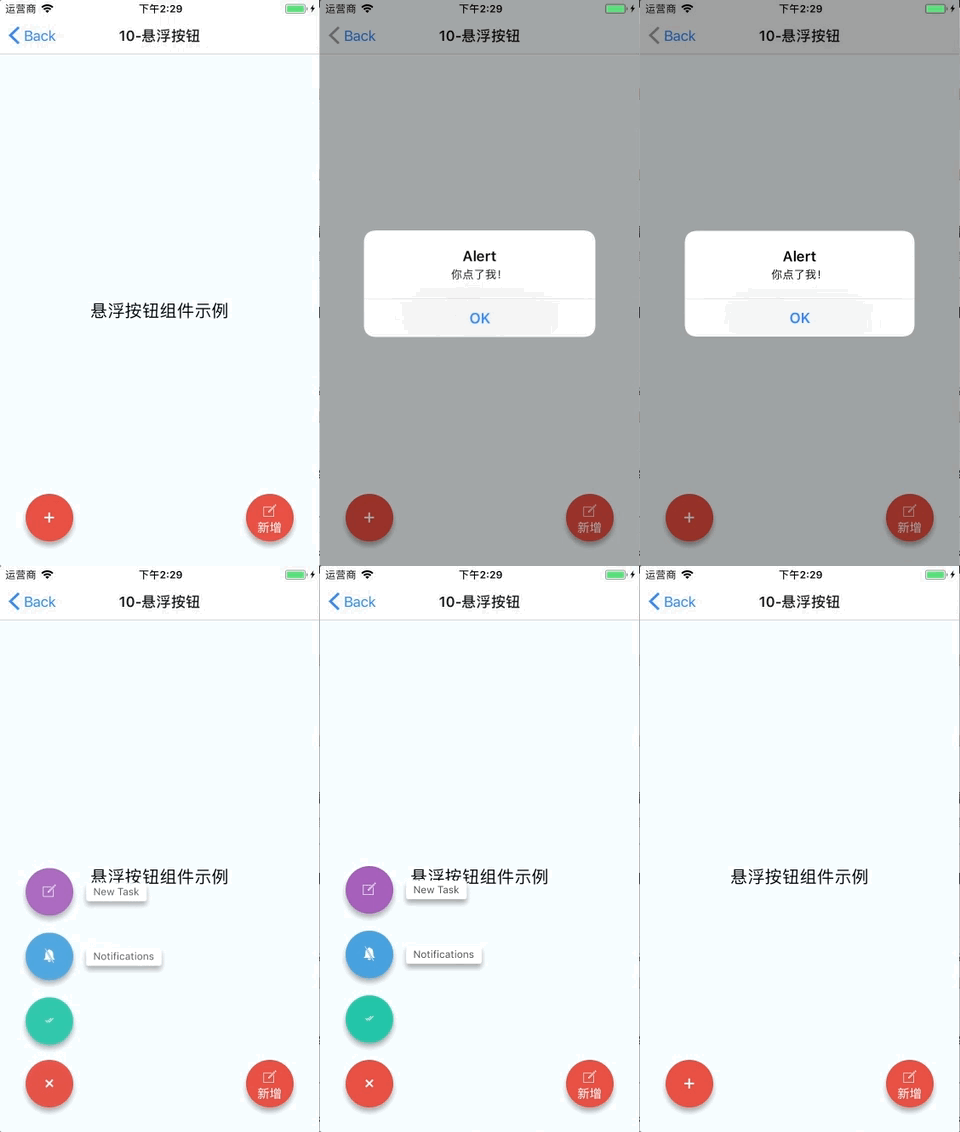
How to implement floating buttons in React Native
May 02, 2018 am 11:02 AMThis time I will show you how to implement floating buttons in React Native. What are the precautions for implementing floating buttons in React Native? The following is a practical case, let's take a look.
React Native SuspensionRendering

Installation method
npm i react-native-action-button --save
react-native link react-native-vector-icons
Sample code
<View style={styles.container}>
  <Text style={styles.welcome}>
   悬浮按钮组件示例
  </Text>
  <ActionButton buttonColor="rgba(231,76,60,1)" position='left' verticalOrientation='up'>
   <ActionButton.Item buttonColor='#9b59b6' title="New Task" onPress={() => console.log("notes tapped!")}>
   <Icon name="ios-create-outline" style={styles.actionButtonIcon} />
   </ActionButton.Item>
   <ActionButton.Item buttonColor='#3498db' title="Notifications" onPress={() => {}}>
   <Icon name="ios-notifications-off" style={styles.actionButtonIcon} />
   </ActionButton.Item>
   <ActionButton.Item buttonColor='#1abc9c' onPress={() => {}}>
   <Icon name="ios-done-all-outline" style={styles.actionButtonIcon} />
   </ActionButton.Item>
  </ActionButton>
  <ActionButton
   buttonColor="rgba(231,76,60,1)"
   onPress={() => { alert('你点了我!')}}
   renderIcon={() => (<View style={styles.actionButtonView}><Icon name="ios-create-outline" style={styles.actionButtonIcon} />
   <Text style={styles.actionButtonText}>新增</Text>
   </View>)}
  />
</View>Main parameter description
ActionButton
- size: The size of the button, the default is 56
- active: Whether to display the button
- position: The position of the button, which can be left center right
- offsetX: The offset position on the X axis
- offsetY : Offset position on the Y axis
- onPress : Click
- onLongPress : Long press event
- buttonText: Button title
- verticalOrientation: The direction of the pop-up button, up or down
- renderIcon: Yes Customize the button display style. The default is a plus sign
ActionButton.Item
- size: the size of the button , the default is 56
- title: button title
- buttonColor: button color
- onPress: Click event
Detailed explanation of webpack mobile terminal automated build rem steps
Angular5 step instructions for adding style class to component tags
The above is the detailed content of How to implement floating buttons in React Native. For more information, please follow other related articles on the PHP Chinese website!

Hot Article

Hot tools Tags

Hot Article

Hot Article Tags

Notepad++7.3.1
Easy-to-use and free code editor

SublimeText3 Chinese version
Chinese version, very easy to use

Zend Studio 13.0.1
Powerful PHP integrated development environment

Dreamweaver CS6
Visual web development tools

SublimeText3 Mac version
God-level code editing software (SublimeText3)

Hot Topics
 How to build a real-time chat app with React and WebSocket
Sep 26, 2023 pm 07:46 PM
How to build a real-time chat app with React and WebSocket
 Guide to React front-end and back-end separation: How to achieve decoupling and independent deployment of front-end and back-end
Sep 28, 2023 am 10:48 AM
Guide to React front-end and back-end separation: How to achieve decoupling and independent deployment of front-end and back-end
 How to build simple and easy-to-use web applications with React and Flask
Sep 27, 2023 am 11:09 AM
How to build simple and easy-to-use web applications with React and Flask
 How to build a reliable messaging app with React and RabbitMQ
Sep 28, 2023 pm 08:24 PM
How to build a reliable messaging app with React and RabbitMQ
 How to build a fast data analysis application using React and Google BigQuery
Sep 26, 2023 pm 06:12 PM
How to build a fast data analysis application using React and Google BigQuery
 React code debugging guide: How to quickly locate and solve front-end bugs
Sep 26, 2023 pm 02:25 PM
React code debugging guide: How to quickly locate and solve front-end bugs
 React responsive design guide: How to achieve adaptive front-end layout effects
Sep 26, 2023 am 11:34 AM
React responsive design guide: How to achieve adaptive front-end layout effects
 React Router User Guide: How to implement front-end routing control
Sep 29, 2023 pm 05:45 PM
React Router User Guide: How to implement front-end routing control


