

Puppeteer entry-level code
This time I will bring you the Puppeteer entry-level code. What are the precautions for getting started with Puppeteer? The following is a practical case, let’s take a look.
1. Introduction to Puppeteer
Puppeteer is a node library that provides a set of APIs for controlling Chrome. In layman’s terms, A headless chrome browser (of course you can also configure it to have a UI, but it doesn't have one by default). Since it is a browser, Puppeteer can do everything we can do manually on the browser. In addition, Puppeteer is translated into Chinese as "puppet", so just listen to the name and you will know that it is very convenient to operate and you can operate it very conveniently. She implements: 1) Generate web page screenshots or PDF2) Advanced crawler that can crawl a large number of web pages with asynchronously rendered content
3) Simulate keyboard input, automatic form submission, login web pages, etc. , implement UI automated testing
4) Capture the timeline of the site to track your website and help analyze website performance issues
2. Running environment
Check Puppeteer’s official API and you will find a full screen of async, await, etc., these are all ES7 Specification, so you need:- Nodejs version cannot be lower than v7.6.0, needs to support async, await.
- Requires the latest chrome driver, which the system will automatically download when you install Puppeteer through npm
npm install puppeteer --save
3. Basic usage
Let’s take a look at the official introductory DEMOconst puppeteer = require('puppeteer');
(async () => {
const browser = await puppeteer.launch();
const page = await browser.newPage();
await page.goto('https://example.com');
await page.screenshot({path: 'example.png'});
await browser.close();
})();- Pass it first puppeteer.launch() creates a browser instance Browser object
- #Then create the page Page object through the Browser object
- Then page.goto() Jump to the specified page
- Call page.screenshot() to take a screenshot of the page
- Close the browser
3.1 puppeteer.launch(options)
Use puppeteer.launch() to run puppeteer, it will return a promise, use the then method to get the browser instance, of course the higher version Nodejs already supports the await feature, so the above example uses the await keyword. This needs special explanation. Almost all operations of Puppeteer are asynchronous. In order to use a large number of then to reduce the readability of the code, all of this article The demo code is all implemented using async and await methods. This is also the officially recommended way of writing by Puppeteer. options parameter details| 参数名称 | 参数类型 | 参数说明 |
| ignoreHTTPSErrors | boolean | 在请求的过程中是否忽略 Https 报错信息,默认为 false |
| headless | boolean | 是否以”无头”的模式运行 chrome, 也就是不显示 UI, 默认为 true |
| executablePath | string | 可执行文件的路劲,Puppeteer 默认是使用它自带的 chrome webdriver, 如果你想指定一个自己的 webdriver 路径,可以通过这个参数设置 |
| slowMo | number | 使 Puppeteer 操作减速,单位是毫秒。如果你想看看 Puppeteer 的整个工作过程,这个参数将非常有用。 |
| args | Array(String) | 传递给 chrome 实例的其他参数,比如你可以使用”–ash-host-window-bounds=1024x768” 来设置浏览器窗口大小。更多参数参数列表可以参考这里 |
| handleSIGINT | boolean | 是否允许通过进程信号控制 chrome 进程,也就是说是否可以使用 CTRL+C 关闭并退出浏览器. |
| timeout | number | 等待 Chrome 实例启动的最长时间。默认为30000(30秒)。如果传入 0 的话则不限制时间 |
| dumpio | boolean | 是否将浏览器进程stdout和stderr导入到process.stdout和process.stderr中。默认为false。 |
| userDataDir | string | 设置用户数据目录,默认linux 是在 ~/.config 目录,window 默认在 C:\Users{USER}\AppData\Local\Google\Chrome\User Data, 其中 {USER} 代表当前登录的用户名 |
| env | Object | 指定对Chromium可见的环境变量。默认为process.env。 |
| devtools | boolean | 是否为每个选项卡自动打开DevTools面板, 这个选项只有当 headless 设置为 false 的时候有效 |
3.2 Browser 对象
当 Puppeteer 连接到一个 Chrome 实例的时候就会创建一个 Browser 对象,有以下两种方式:
Puppeteer.launch 和 Puppeteer.connect.
下面这个 DEMO 实现断开连接之后重新连接浏览器实例
const puppeteer = require('puppeteer');
puppeteer.launch().then(async browser => {
 // 保存 Endpoint,这样就可以重新连接 Chromium
 const browserWSEndpoint = browser.wsEndpoint();
 // 从Chromium 断开连接
 browser.disconnect();
 // 使用endpoint 重新和 Chromiunm 建立连接
 const browser2 = await puppeteer.connect({browserWSEndpoint});
 // Close Chromium
 await browser2.close();
});Browser 对象 API
| 方法名称 | 返回值 | 说明 |
| browser.close() | Promise | 关闭浏览器 |
| browser.disconnect() | void | 断开浏览器连接 |
| browser.newPage() | Promise(Page) | 创建一个 Page 实例 |
| browser.pages() | Promise(Array(Page)) | 获取所有打开的 Page 实例 |
| browser.targets() | Array(Target) | 获取所有活动的 targets |
| browser.version() | Promise(String) | 获取浏览器的版本 |
| browser.wsEndpoint() | String | 返回浏览器实例的 socket 连接 URL, 可以通过这个 URL 重连接 chrome 实例 |
好了,Puppeteer 的API 就不一一介绍了,官方提供的详细的 API, 戳这里
4、Puppeteer 实战
了解 API 之后我们就可以来一些实战了,在此之前,我们先了解一下 Puppeteer 的设计原理,简单来说 Puppeteer 跟 webdriver 以及 PhantomJS 最大的 的不同就是它是站在用户浏览的角度,而 webdriver 和 PhantomJS 最初设计就是用来做自动化测试的,所以它是站在机器浏览的角度来设计的,所以它们 使用的是不同的设计哲学。举个栗子,加入我需要打开京东的首页并进行一次产品搜索,分别看看使用 Puppeteer 和 webdriver 的实现流程:
Puppeteer 的实现流程:
打开京东首页
将光标 focus 到搜索输入框
键盘点击输入文字
点击搜索按钮
webdriver 的实现流程:
打开京东首页
找到输入框的 input 元素
设置 input 的值为要搜索文字
触发搜索按钮的单机事件
个人感觉 Puppeteer 设计哲学更符合任何的操作习惯,更自然一些。
下面我们就用一个简单的需求实现来进行 Puppeteer 的入门学习。这个简单的需求就是:
在京东商城抓取10个手机商品,并把商品的详情页截图。
首先我们来梳理一下操作流程
打开京东首页
输入“手机”关键字并搜索
获取前10个商品的 A 标签,并获取 href 属性值,获取商品详情链接
分别打开10个商品的详情页,截取网页图片
要实现上面的功能需要用到查找元素,获取属性,键盘事件等,那接下来我们就一个一个的讲解一下。
4.1 获取元素
Page 对象提供了2个 API 来获取页面元素
(1). Page.$(selector) 获取单个元素,底层是调用的是 document.querySelector() , 所以选择器的 selector 格式遵循css 选择器规范
let inputElement = await page.$("#search", input => input);
//下面写法等价
let inputElement = await page.$('#search');(2). Page.$$(selector) 获取一组元素,底层调用的是 document.querySelectorAll(). 返回 Promise(Array(ElemetHandle)) 元素数组.
const links = await page.$$("a");
//下面写法等价
const links = await page.$$("a", links => links);最终返回的都是 ElemetHandle 对象
4.2 获取元素属性
Puppeteer 获取元素属性跟我们平时写前段的js的逻辑有点不一样,按照通常的逻辑,应该是现获取元素,然后在获取元素的属性。但是上面我们知道 获取元素的 API 最终返回的都是 ElemetHandle 对象,而你去查看 ElemetHandle 的 API 你会发现,它并没有获取元素属性的 API.
事实上 Puppeteer 专门提供了一套获取属性的 API, Page.$eval() 和 Page.$$eval()
(1). Page.$$eval(selector, pageFunction[, …args]), 获取单个元素的属性,这里的选择器 selector 跟上面 Page.$(selector) 是一样的。
const value = await page.$eval('input[name=search]', input => input.value);
const href = await page.$eval('#a", ele => ele.href);
const content = await page.$eval('.content', ele => ele.outerHTML);4.3 执行自定义的 JS 脚本
Puppeteer 的 Page 对象提供了一系列 evaluate 方法,你可以通过他们来执行一些自定义的 js 代码,主要提供了下面三个 API
(1). page.evaluate(pageFunction, …args) 返回一个可序列化的普通对象,pageFunction 表示要在页面执行的函数, args 表示传入给 pageFunction 的参数, 下面的 pageFunction 和 args 表示同样的意思。
const result = await page.evaluate(() => {
 return Promise.resolve(8 * 7);
});
console.log(result); // prints "56"这个方法很有用,比如我们在获取页面的截图的时候,默认是只截图当前浏览器窗口的尺寸大小,默认值是800x600,那如果我们需要获取整个网页的完整 截图是没办法办到的。Page.screenshot() 方法提供了可以设置截图区域大小的参数,那么我们只要在页面加载完了之后获取页面的宽度和高度就可以解决 这个问题了。
(async () => {
 const browser = await puppeteer.launch({headless:true});
 const page = await browser.newPage();
 await page.goto('https://jr.dayi35.com');
 await page.setViewport({width:1920, height:1080});
 const documentSize = await page.evaluate(() => {
 return {
 width: document.documentElement.clientWidth,
 height : document.body.clientHeight,
 }
 })
 await page.screenshot({path:"example.png", clip : {x:0, y:0, width:1920, height:documentSize.height}});
 await browser.close();
})();(2). Page.evaluateHandle(pageFunction, …args) 在 Page 上下文执行一个 pageFunction, 返回 JSHandle 实体
const aWindowHandle = await page.evaluateHandle(() => Promise.resolve(window));
aWindowHandle; // Handle for the window object.
const aHandle = await page.evaluateHandle('document'); // Handle for the 'document'.从上面的代码可以看出,page.evaluateHandle() 方法也是通过 Promise.resolve 方法直接把 Promise 的最终处理结果返回, 只不过把最后返回的对象封装成了 JSHandle 对象。本质上跟 evaluate 没有什么区别。
下面这段代码实现获取页面的动态(包括js动态插入的元素) HTML 代码.
const aHandle = await page.evaluateHandle(() => document.body);
const resultHandle = await page.evaluateHandle(body => body.innerHTML, aHandle);
console.log(await resultHandle.jsonValue());
await resultHandle.dispose();
(3). page.evaluateOnNewDocument(pageFunction, …args), 在文档页面载入前调用 pageFunction, 如果页面中有 iframe 或者 frame, 则函数调用 的上下文环境将变成子页面的,即iframe 或者 frame, 由于是在页面加载前调用,这个函数一般是用来初始化 javascript 环境的,比如重置或者 初始化一些全局变量。
4.4 Page.exposeFunction
除此上面三个 API 之外,还有一类似的非常有用的 API, 那就是 Page.exposeFunction,这个 API 用来在页面注册全局函数,非常有用:
因为有时候需要在页面处理一些操作的时候需要用到一些函数,虽然可以通过 Page.evaluate() API 在页面定义函数,比如:
const docSize = await page.evaluate(()=> {
 function getPageSize() {
 return {
 width: document.documentElement.clientWidth,
 height : document.body.clientHeight,
 }
 }
 return getPageSize();
});但是这样的函数不是全局的,需要在每个 evaluate 中去重新定义,无法做到代码复用,在一个就是 nodejs 有很多工具包可以很轻松的实现很复杂的功能 比如要实现 md5 加密函数,这个用纯 js 去实现就不太方便了,而用 nodejs 却是几行代码的事情。
下面代码实现给 Page 上下文的 window 对象添加 md5 函数:
const puppeteer = require('puppeteer');
const crypto = require('crypto');
puppeteer.launch().then(async browser => {
 const page = await browser.newPage();
 page.on('console', msg => console.log(msg.text));
 await page.exposeFunction('md5', text =>
 crypto.createHash('md5').update(text).digest('hex')
 );
 await page.evaluate(async () => {
 // use window.md5 to compute hashes
 const myString = 'PUPPETEER';
 const myHash = await window.md5(myString);
 console.log(`md5 of ${myString} is ${myHash}`);
 });
 await browser.close();
});可以看出,Page.exposeFunction API 使用起来是很方便的,也非常有用,在比如给 window 对象注册 readfile 全局函数:
const puppeteer = require('puppeteer');
const fs = require('fs');
puppeteer.launch().then(async browser => {
 const page = await browser.newPage();
 page.on('console', msg => console.log(msg.text));
 await page.exposeFunction('readfile', async filePath => {
 return new Promise((resolve, reject) => {
 fs.readFile(filePath, 'utf8', (err, text) => {
 if (err)
  reject(err);
 else
  resolve(text);
 });
 });
 });
 await page.evaluate(async () => {
 // use window.readfile to read contents of a file
 const content = await window.readfile('/etc/hosts');
 console.log(content);
 });
 await browser.close();
});5、Page.emulate 修改模拟器(客户端)运行配置
Puppeteer 提供了一些 API 供我们修改浏览器终端的配置
Page.setViewport() 修改浏览器视窗大小
Page.setUserAgent() 设置浏览器的 UserAgent 信息
Page.emulateMedia() 更改页面的CSS媒体类型,用于进行模拟媒体仿真。 可选值为 “screen”, “print”, “null”, 如果设置为 null 则表示禁用媒体仿真。
Page.emulate() 模拟设备,参数设备对象,比如 iPhone, Mac, Android 等
page.setViewport({width:1920, height:1080}); //设置视窗大小为 1920x1080
page.setUserAgent('Mozilla/5.0 (X11; Linux x86_64) AppleWebKit/537.36 (KHTML, like Gecko) Chrome/60.0.3112.90 Safari/537.36');
page.emulateMedia('print'); //设置打印机媒体样式除此之外我们还可以模拟非 PC 机设备, 比如下面这段代码模拟 iPhone 6 访问google:
const puppeteer = require('puppeteer');
const devices = require('puppeteer/DeviceDescriptors');
const iPhone = devices['iPhone 6'];
puppeteer.launch().then(async browser => {
 const page = await browser.newPage();
 await page.emulate(iPhone);
 await page.goto('https://www.google.com');
 // other actions...
 await browser.close();
});Puppeteer 支持很多设备模拟仿真,比如Galaxy, iPhone, IPad 等,想要知道详细设备支持,请戳这里 DeviceDescriptors.js.
6、键盘和鼠标
键盘和鼠标的API比较简单,键盘的几个API如下:
keyboard.down(key[, options]) 触发 keydown 事件
keyboard.press(key[, options]) 按下某个键,key 表示键的名称,比如 ‘ArrowLeft' 向左键,详细的键名映射请戳这里
keyboard.sendCharacter(char) 输入一个字符
keyboard.type(text, options) 输入一个字符串
keyboard.up(key) 触发 keyup 事件
page.keyboard.press("Shift"); //按下 Shift 键
page.keyboard.sendCharacter('嗨');
page.keyboard.type('Hello'); // 一次输入完成
page.keyboard.type('World', {delay: 100}); // 像用户一样慢慢输入鼠标操作:
mouse.click(x, y, [options]) 移动鼠标指针到指定的位置,然后按下鼠标,这个其实 mouse.move 和 mouse.down 或 mouse.up 的快捷操作
mouse.down([options]) 触发 mousedown 事件,options 可配置:
options.button 按下了哪个键,可选值为[left, right, middle], 默认是 left, 表示鼠标左键
options.clickCount 按下的次数,单击,双击或者其他次数
delay 按键延时时间
mouse.move(x, y, [options]) 移动鼠标到指定位置, options.steps 表示移动的步长
mouse.up([options]) 触发 mouseup 事件
7、另外几个有用的 API
Puppeteer 还提供几个非常有用的 API, 比如:
7.1 Page.waitFor 系列 API
page.waitFor(selectorOrFunctionOrTimeout[, options[, …args]]) 下面三个的综合 API
page.waitForFunction(pageFunction[, options[, …args]]) 等待 pageFunction 执行完成之后
page.waitForNavigation(options) 等待页面基本元素加载完之后,比如同步的 HTML, CSS, JS 等代码
page.waitForSelector(selector[, options]) 等待某个选择器的元素加载之后,这个元素可以是异步加载的,这个 API 非常有用,你懂的。
比如我想获取某个通过 js 异步加载的元素,那么直接获取肯定是获取不到的。这个时候就可以使用 page.waitForSelector 来解决:
await page.waitForSelector('.gl-item'); //等待元素加载之后,否则获取不到异步加载的元素
const links = await page.$$eval('.gl-item > .gl-i-wrap > .p-img > a', links => {
 return links.map(a => {
 return {
 href: a.href.trim(),
 name: a.title
 }
 });
});其实上面的代码就可以解决我们最上面的需求,抓取京东的产品,因为是异步加载的,所以使用这种方式。
7.2 page.getMetrics()
通过 page.getMetrics() 可以得到一些页面性能数据, 捕获网站的时间线跟踪,以帮助诊断性能问题。
Timestamp 度量标准采样的时间戳
Documents 页面文档数
Frames 页面 frame 数
JSEventListeners 页面内事件监听器数
Nodes 页面 DOM 节点数
LayoutCount 页面布局总数
RecalcStyleCount 样式重算数
LayoutDuration 所有页面布局的合并持续时间
RecalcStyleDuration 所有页面样式重新计算的组合持续时间。
ScriptDuration 所有脚本执行的持续时间
TaskDuration 所有浏览器任务时长
JSHeapUsedSize JavaScript 占用堆大小
JSHeapTotalSize JavaScript 堆总量
8、总结和源码
本文通过一个实际需求来学习了 Puppeteer 的一些基本的常用的 API, API 的版本是 v0.13.0-alpha. 最新邦本的 API 请参考 Puppeteer 官方API.
总的来说,Puppeteer 真是一款不错的 headless 工具,操作简单,功能强大。用来做UI自动化测试,和一些小工具都是很不错的。
下面贴上我们开始的需求实现源码,仅供参考:
//延时函数
function sleep(delay) {
 return new Promise((resolve, reject) => {
 setTimeout(() => {
 try {
 resolve(1)
 } catch (e) {
 reject(0)
 }
 }, delay)
 })
}
const puppeteer = require('puppeteer');
puppeteer.launch({
 ignoreHTTPSErrors:true,
 headless:false,slowMo:250,
 timeout:0}).then(async browser => {
 let page = await browser.newPage();
 await page.setJavaScriptEnabled(true);
 await page.goto("https://www.jd.com/");
 const searchInput = await page.$("#key");
 await searchInput.focus(); //定位到搜索框
 await page.keyboard.type("手机");
 const searchBtn = await page.$(".button");
 await searchBtn.click();
 await page.waitForSelector('.gl-item'); //等待元素加载之后,否则获取不异步加载的元素
 const links = await page.$$eval('.gl-item > .gl-i-wrap > .p-img > a', links => {
 return links.map(a => {
 return {
 href: a.href.trim(),
 title: a.title
 }
 });
 });
 page.close();
 const aTags = links.splice(0, 10);
 for (var i = 1; i < aTags.length; i++) {
 page = await browser.newPage()
 page.setJavaScriptEnabled(true);
 await page.setViewport({width:1920, height:1080});
 var a = aTags[i];
 await page.goto(a.href, {timeout:0}); //防止页面太长,加载超时
 //注入代码,慢慢把滚动条滑到最底部,保证所有的元素被全部加载
 let scrollEnable = true;
 let scrollStep = 500; //每次滚动的步长
 while (scrollEnable) {
 scrollEnable = await page.evaluate((scrollStep) => {
 let scrollTop = document.scrollingElement.scrollTop;
 document.scrollingElement.scrollTop = scrollTop + scrollStep;
 return document.body.clientHeight > scrollTop + 1080 ? true : false
 }, scrollStep);
 await sleep(100);
 }
 await page.waitForSelector("#footer-2014", {timeout:0}); //判断是否到达底部了
 let filename = "images/items-"+i+".png";
 //这里有个Puppeteer的bug一直没有解决,发现截图的高度最大只能是16384px, 超出部分被截掉了。
 await page.screenshot({path:filename, fullPage:true});
 page.close();
 }
 browser.close();
});相信看了本文案例你已经掌握了方法,更多精彩请关注php中文网其它相关文章!
推荐阅读:
The above is the detailed content of Puppeteer entry-level code. For more information, please follow other related articles on the PHP Chinese website!

Hot AI Tools

Undresser.AI Undress
AI-powered app for creating realistic nude photos

AI Clothes Remover
Online AI tool for removing clothes from photos.

Undress AI Tool
Undress images for free

Clothoff.io
AI clothes remover

AI Hentai Generator
Generate AI Hentai for free.

Hot Article
Hot Tools

Notepad++7.3.1
Easy-to-use and free code editor

SublimeText3 Chinese version
Chinese version, very easy to use

Zend Studio 13.0.1
Powerful PHP integrated development environment

Dreamweaver CS6
Visual web development tools

SublimeText3 Mac version
God-level code editing software (SublimeText3)
Hot Topics
 1382
1382
 52
52

 A Diffusion Model Tutorial Worth Your Time, from Purdue University
Apr 07, 2024 am 09:01 AM
A Diffusion Model Tutorial Worth Your Time, from Purdue University
Apr 07, 2024 am 09:01 AM
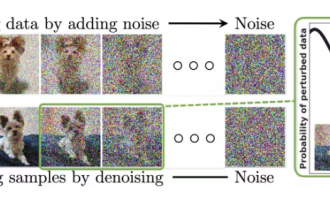
Diffusion can not only imitate better, but also "create". The diffusion model (DiffusionModel) is an image generation model. Compared with the well-known algorithms such as GAN and VAE in the field of AI, the diffusion model takes a different approach. Its main idea is a process of first adding noise to the image and then gradually denoising it. How to denoise and restore the original image is the core part of the algorithm. The final algorithm is able to generate an image from a random noisy image. In recent years, the phenomenal growth of generative AI has enabled many exciting applications in text-to-image generation, video generation, and more. The basic principle behind these generative tools is the concept of diffusion, a special sampling mechanism that overcomes the limitations of previous methods.
 Generate PPT with one click! Kimi: Let the 'PPT migrant workers' become popular first
Aug 01, 2024 pm 03:28 PM
Generate PPT with one click! Kimi: Let the 'PPT migrant workers' become popular first
Aug 01, 2024 pm 03:28 PM
Kimi: In just one sentence, in just ten seconds, a PPT will be ready. PPT is so annoying! To hold a meeting, you need to have a PPT; to write a weekly report, you need to have a PPT; to make an investment, you need to show a PPT; even when you accuse someone of cheating, you have to send a PPT. College is more like studying a PPT major. You watch PPT in class and do PPT after class. Perhaps, when Dennis Austin invented PPT 37 years ago, he did not expect that one day PPT would become so widespread. Talking about our hard experience of making PPT brings tears to our eyes. "It took three months to make a PPT of more than 20 pages, and I revised it dozens of times. I felt like vomiting when I saw the PPT." "At my peak, I did five PPTs a day, and even my breathing was PPT." If you have an impromptu meeting, you should do it
 What to do if the blue screen code 0x0000001 occurs
Feb 23, 2024 am 08:09 AM
What to do if the blue screen code 0x0000001 occurs
Feb 23, 2024 am 08:09 AM
What to do with blue screen code 0x0000001? The blue screen error is a warning mechanism when there is a problem with the computer system or hardware. Code 0x0000001 usually indicates a hardware or driver failure. When users suddenly encounter a blue screen error while using their computer, they may feel panicked and at a loss. Fortunately, most blue screen errors can be troubleshooted and dealt with with a few simple steps. This article will introduce readers to some methods to solve the blue screen error code 0x0000001. First, when encountering a blue screen error, we can try to restart
 All CVPR 2024 awards announced! Nearly 10,000 people attended the conference offline, and a Chinese researcher from Google won the best paper award
Jun 20, 2024 pm 05:43 PM
All CVPR 2024 awards announced! Nearly 10,000 people attended the conference offline, and a Chinese researcher from Google won the best paper award
Jun 20, 2024 pm 05:43 PM
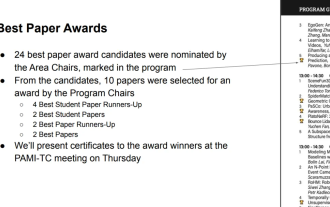
In the early morning of June 20th, Beijing time, CVPR2024, the top international computer vision conference held in Seattle, officially announced the best paper and other awards. This year, a total of 10 papers won awards, including 2 best papers and 2 best student papers. In addition, there were 2 best paper nominations and 4 best student paper nominations. The top conference in the field of computer vision (CV) is CVPR, which attracts a large number of research institutions and universities every year. According to statistics, a total of 11,532 papers were submitted this year, and 2,719 were accepted, with an acceptance rate of 23.6%. According to Georgia Institute of Technology’s statistical analysis of CVPR2024 data, from the perspective of research topics, the largest number of papers is image and video synthesis and generation (Imageandvideosyn
 GE universal remote codes program on any device
Mar 02, 2024 pm 01:58 PM
GE universal remote codes program on any device
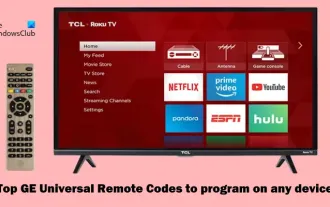
Mar 02, 2024 pm 01:58 PM
If you need to program any device remotely, this article will help you. We will share the top GE universal remote codes for programming any device. What is a GE remote control? GEUniversalRemote is a remote control that can be used to control multiple devices such as smart TVs, LG, Vizio, Sony, Blu-ray, DVD, DVR, Roku, AppleTV, streaming media players and more. GEUniversal remote controls come in various models with different features and functions. GEUniversalRemote can control up to four devices. Top Universal Remote Codes to Program on Any Device GE remotes come with a set of codes that allow them to work with different devices. you may
 From bare metal to a large model with 70 billion parameters, here is a tutorial and ready-to-use scripts
Jul 24, 2024 pm 08:13 PM
From bare metal to a large model with 70 billion parameters, here is a tutorial and ready-to-use scripts
Jul 24, 2024 pm 08:13 PM
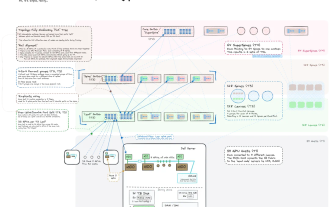
We know that LLM is trained on large-scale computer clusters using massive data. This site has introduced many methods and technologies used to assist and improve the LLM training process. Today, what we want to share is an article that goes deep into the underlying technology and introduces how to turn a bunch of "bare metals" without even an operating system into a computer cluster for training LLM. This article comes from Imbue, an AI startup that strives to achieve general intelligence by understanding how machines think. Of course, turning a bunch of "bare metal" without an operating system into a computer cluster for training LLM is not an easy process, full of exploration and trial and error, but Imbue finally successfully trained an LLM with 70 billion parameters. and in the process accumulate
 AI in use | AI created a life vlog of a girl living alone, which received tens of thousands of likes in 3 days
Aug 07, 2024 pm 10:53 PM
AI in use | AI created a life vlog of a girl living alone, which received tens of thousands of likes in 3 days
Aug 07, 2024 pm 10:53 PM
Editor of the Machine Power Report: Yang Wen The wave of artificial intelligence represented by large models and AIGC has been quietly changing the way we live and work, but most people still don’t know how to use it. Therefore, we have launched the "AI in Use" column to introduce in detail how to use AI through intuitive, interesting and concise artificial intelligence use cases and stimulate everyone's thinking. We also welcome readers to submit innovative, hands-on use cases. Video link: https://mp.weixin.qq.com/s/2hX_i7li3RqdE4u016yGhQ Recently, the life vlog of a girl living alone became popular on Xiaohongshu. An illustration-style animation, coupled with a few healing words, can be easily picked up in just a few days.
 A must-read for technical beginners: Analysis of the difficulty levels of C language and Python
Mar 22, 2024 am 10:21 AM
A must-read for technical beginners: Analysis of the difficulty levels of C language and Python
Mar 22, 2024 am 10:21 AM
Title: A must-read for technical beginners: Difficulty analysis of C language and Python, requiring specific code examples In today's digital age, programming technology has become an increasingly important ability. Whether you want to work in fields such as software development, data analysis, artificial intelligence, or just learn programming out of interest, choosing a suitable programming language is the first step. Among many programming languages, C language and Python are two widely used programming languages, each with its own characteristics. This article will analyze the difficulty levels of C language and Python
