Home > Web Front-end > JS Tutorial > Method to customize player based on vue-video-player

Method to customize player based on vue-video-player

亚连
Release: 2018-05-26 16:50:15
Original
2321 people have browsed it

This article mainly introduces the method of customizing the player based on vue-video-player, mainly the use of vue-video-player developed based on video.js, and how to operate the API in video.js. Friends in need can refer to

to see the effect first.

Figure 1--Show the sidebar
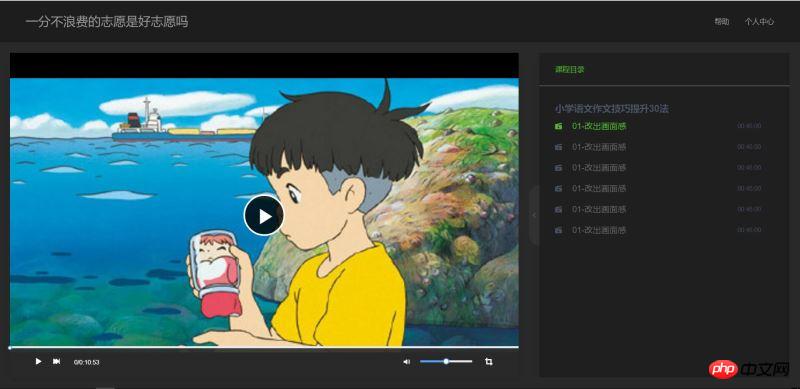
Figure 2-Collapse the sidebar;
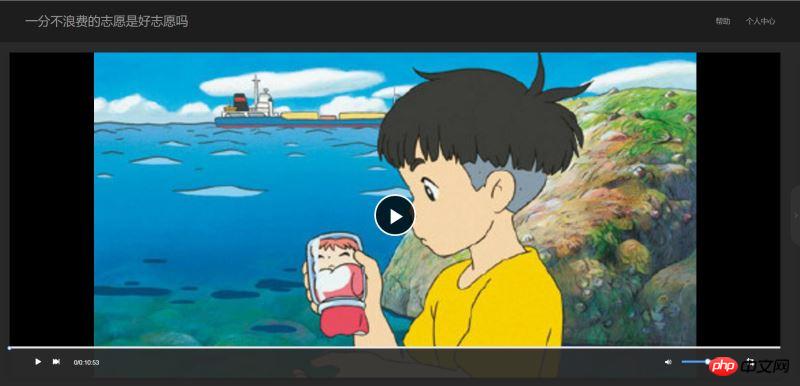
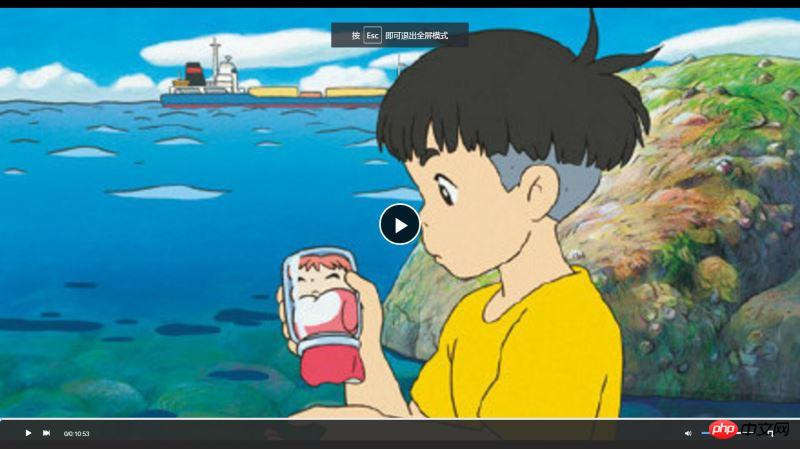
Figure 3: Full screen.
Written in front

You need to use vue in this project, vue-video-player , I use the ui framework of iview, but the ui framework does not matter. What I focus on here is the use of vue-video-player developed based on video.js, and how to operate the API in video.js.

vue-video-player Project address: https://github.com/surmon-china/vue-video-player.

video.js document address: http://docs.videojs.com/docs/api/player.html.

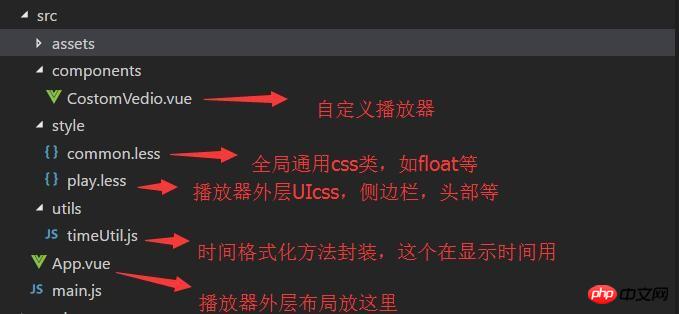
Project directory:
1. Outer ui layout

Figure 1 As you can see, this project uses a two-column adaptive layout. The right side is the playlist with a fixed width of 500px, and the left side is the player box. The playlist box can be expanded or collapsed according to the click of the handle, and the player The box also adapts its width according to the expansion/contraction of the playlist.

(Because the recorded animation is too large to be uploaded, you can clone my program and run it to see it).

The html code structure is as follows:

##Add an excessive animation when shrinking and expanding. Here we choose to use css handwritten animation:

.transition{  
       transition: all 1s ease;  
       -moz-transition: all 1s ease;  
       -webkit-transition: all 1s ease;   
       -o-transition: all 1s ease;   
   }
Copy after login
.toLeft{  
        .transition;  
        margin-right: 540px !important;  
    }  
    .toRight{  
        .transition;  
        margin-right: 40px !important;  
    }  
    .toHide{  
        .transition;  
        right: -500px !important;  
    }  
    .toShow{  
        .transition;  
        right: 0px !important;  
    }
Copy after login
// 播放区  
    .player-box{  
        margin-right: 540px;  
        height: 100%;  
        position: relative;  
         
    }
Copy after login
//侧边信息区  
    .info-box{  
        width: 520px;  
        height: 100%;  
        background: transparent;      
        position: relative;  
        overflow: hidden;  
    }
Copy after login
// 内容区  
.content{  
    background: #292929;  
    position: relative;  
    padding: 20px 0 20px 20px;  
  
}
Copy after login

2. Player ui

The entire customized player ui is encapsulated into a component-CostomVedio.vue, and the playback area uses vue -video-player player, but the bottom control bar is customized and does not use the controlBar that comes with the player. Usually these common ones do not meet the requirements of the designer, so we need to customize the player UI.

The html structure code is as follows:

<template>  
    <p class="custom-video-outer-box" @mouseover="videoMouseOver">  
      <video-player  class="video-player-box"  
                 ref="videoPlayer"  
                 :options="playerOptions"  
                 :playsinline="true"  
                 customEventName="customstatechangedeventname"  
                 @play="onPlayerPlay($event)"  
                 @pause="onPlayerPause($event)"  
                 @ended="onPlayerEnded($event)"  
                 @waiting="onPlayerWaiting($event)"  
                 @playing="onPlayerPlaying($event)"  
                 @loadeddata="onPlayerLoadeddata($event)"     
                 @timeupdate="onPlayerTimeupdate($event)"  
                 @statechanged="playerStateChanged($event)"  
                 @ready="playerReadied"  
                 >  
                   
                  <!-- @canplay="onPlayerCanplay($event)" -->  
                   <!-- @canplaythrough="onPlayerCanplaythrough($event)" -->  
                  
       </video-player>  
       <!-- 底部进度条 start -->  
         <transition name="fade">  
                <p class="bottomCtrl" v-show="isBottomCtrlShow" id="bottomCtrl">  
                    <!--  -->  
                    <!-- <p class="bottomCtrl" v-show="false"> -->  
                <!-- <p class="bottomCtrl"  > -->  
                      
                    <Slider v-model="playerCtrl.currentTimeInt" class="progress-slider" :max="playerCtrl.durationInt" :tip-format="progressTipFormat" @on-change="progressChange"></Slider>  
                    <p class="clearfix" >  
                        <p class="left">  
                                <!-- 暂停 -->  
                                <span v-on:click="play" v-if="!playerCtrl.isPlay" class="icon">  
                                    <Icon type="play"></Icon>  
                                </span>  
                                <!-- 播放 -->  
                                <span v-else v-on:click="pause" class="icon">  
                                     <Icon type="stop"></Icon>  
                                </span>  
                                 
                                <!-- 下一曲 -->  
                                <span class="icon" v-on:click="nextClick">  
                                    <Icon type="skip-forward"></Icon>  
                                </span>  
                            
                            <span class="time">  
                                {{playerCtrl.currentTime}}/{{playerCtrl.duration}}  
                            </span>  
                        </p>  
                        <p class="right clearfix">  
                                <p class="voice-box clearfix left">   
                                    <!-- 音量 -->  
                                    <Icon type="volume-medium" class="left icon"></Icon>  
                                    <Slider v-model="playerCtrl.voiceSlider" class="voice-slider left " max=100 @on-change="volumeChange"></Slider>  
                                </p>  
                                 <!-- 全屏 -->  
                                 <span class="icon left" @click="fullScreenHandle">  
                                    <Icon type="crop" class="full-screen" ></Icon>  
                                 </span>  
                        </p>  
                    </p>  
                </p>  
         </transition>  
       </p>  
  </template>
Copy after login

The specific idea is to use the player to fill the playback area, and use position positioning to fix the custom controlBar at the bottom of the playback area. Pay attention to the z of the controlBar here. -The index must be large enough, otherwise it will not be visible at the top when it is full screen.

css style:

<style lang="less">  
    .video-player-box{  
        height: 100% !important;  
        width: 100% !important;  
    }  
    //底部进度条  
    .bottomCtrl{  
        line-height: 60px;  
        height: 60px;  
        overflow: visible;  
        position: absolute;  
        bottom: 0;  
        left: 0;  
        background-color: rgba(45, 45, 45, .92);  
        width: 100%;  
        padding: 0 50px;  
        color: #fff;  
        z-index: 999999999999999;  
  
        .icon{  
            font-size: 16px;  
            line-height: 60px;  
            cursor: pointer;  
        }  
  
        .icon+.icon{  
            margin-left: 20px;  
        }  
    }  
    .custom-video-outer-box{  
        position: relative;  
        height: 100%;  
        width: 100%;  
    }  
    .progress-slider{  
        position: absolute;  
        width: 100%;  
        top: 0;  
        left: 0;  
        height: 18px;  
        line-height: 18px;  
        .ivu-slider-wrap{  
            margin: 0 !important;  
            border-radius: 0 !important;  
        }  
        .ivu-slider-button-wrap{  
             line-height: normal !important;  
        }  
        .ivu-slider-button{  
            height: 8px !important;  
            width: 8px !important;  
             
        }  
    }  
    .voice-box{  
        .voice-slider{  
            width: 100px;  
            margin-left: 20px;  
        }  
        .ivu-slider-wrap{  
            margin: 27px 0 !important;  
        }  
  
    }  
    .time{  
        margin-left: 25px;  
    }  
    .full-screen{  
       margin-left: 25px;  
        line-height: 60px;  
    }  
    
    .ivu-progress-outer{  
        padding: 0 10px !important;  
    }  
      
    .vjs-big-play-button{  
        height: 80px !important;  
        width: 80px !important;  
        line-height: 80px !important;  
        text-align: center;  
        background:rgba(0, 0, 0, 0.8) !important;  
        border-radius: 50% !important;  
        top: 50% !important;  
        left: 50% !important;  
        margin-left: -40px !important;  
        margin-top: -40px !important;  
    }  
    #vjs_video_3{  
        max-height: 100% !important;  
        width: 100% !important;  
        height: 100% !important;  
    }  
    .video-player-box>p{  
        height: 100% !important;  
        width: 100% !important;  
    }  
    .video-js .vjs-big-play-button{  
        font-size: 5em !important;  
    }  
    video{  
        max-height: 100% !important;  
  
    }  
     
</style>
Copy after login

3. Implement the custom controlBar function

The next step is to implement the custom controlBar function , such as play, pause, next song, play progress, remaining time, full screen, volume adjustment, etc.

Here we must first look at the corresponding API of video.js. Although it is in English, it is written very clearly and is easy to understand.

video.js api document address: http://docs.videojs.com/docs/api/player.html

1. Play, pause, next song, full screen are mainly for monitoring We add a custom button click event, and then call the player API to perform the corresponding operation and change the state.

// 播放  
 play(){  
     this.player.play();  
 },  
 // 暂停  
 pause(){  
      this.player.pause();  
 },  
 //下一曲  
 nextClick(){  
     console.log("自定义","下一曲点击");  
      
 },  
 //全屏  
 fullScreenHandle(){  
     console.log("全屏");  
     if(!this.player.isFullscreen()){  
         this.player.requestFullscreen();  
         this.player.isFullscreen(true);  
     }else{  
          this.player.exitFullscreen();  
          this.player.isFullscreen(false);  
     }  
 },
Copy after login

Of course, the player in vue-video-player will monitor state changes in the callback method:


<video-player  class="video-player-box"  
                ref="videoPlayer"  
                :options="playerOptions"  
                :playsinline="true"  
                customEventName="customstatechangedeventname"  
                @play="onPlayerPlay($event)"  
                @pause="onPlayerPause($event)"  
                @ended="onPlayerEnded($event)"  
                @waiting="onPlayerWaiting($event)"  
                @playing="onPlayerPlaying($event)"  
                @loadeddata="onPlayerLoadeddata($event)"     
                @timeupdate="onPlayerTimeupdate($event)"  
                @statechanged="playerStateChanged($event)"  
                @ready="playerReadied"  
                >  
                  
                 <!-- @canplay="onPlayerCanplay($event)" -->  
                  <!-- @canplaythrough="onPlayerCanplaythrough($event)" -->  
                 
      </video-player>
Copy after login

We can change our behavior accordingly based on these state changes. UI, such as displaying a "pause" button when playing, displaying "play" and other functions when pausing.

2. Playback progress, remaining time, volume adjustment

The playback progress is based on the currentTime method in the player onPlayerTimeupdate() callback method to obtain the current playback progress time, unit S, because I am using slider here and the progress is calculated by integers, so I need two variables to store here, one is in integer form, and the other is the string form after formatting hours, minutes and seconds for display.

//时间更新    
           onPlayerTimeupdate(player){  
               this.playerCtrl.currentTime=timeUtil.secondToDate(player.currentTime());  
               this.playerCtrl.currentTimeInt=Math.floor(player.currentTime());  
               console.log("当前音量",player.volume());  
           },
Copy after login

Fixed-point playback, that is, the user clicks somewhere on the progress bar to progress the playback at this point. The slider's


@on-change="progressChange"
Copy after login

method is used to monitor the slider's fixed point,

//进度条被拉动  
           progressChange(val){  
               this.player.currentTime(val);  
               this.playerCtrl.currentTimeInt=val;  
               this.playerCtrl.currentTime=timeUtil.secondToDate(val);  
           },
Copy after login

Get the value of the fixed point, and then jump to the fixed point playback through the player's currentTime setting.

The volume adjustment method is similar to the playback progress:

When initializing, remember to configure

muted:false,//开始声音
Copy after login

to turn on the sound, otherwise adjusting the sound in the muted state will be invalid.


Use the player.volume(val) API to set the volume, where val=0 means the sound is off, val=1 means the sound is the loudest, and 0.5 means the sound is set at half.

The above is what I compiled for everyone. I hope it will be helpful to everyone in the future.

Related articles:

Loop scheme in Ajax

Quick solution for ajax to return object Object

Introduction to the 4 common request methods of ajax in jQuery

The above is the detailed content of Method to customize player based on vue-video-player. For more information, please follow other related articles on the PHP Chinese website!

Related labels:
source:php.cn
Statement of this Website
The content of this article is voluntarily contributed by netizens, and the copyright belongs to the original author. This site does not assume corresponding legal responsibility. If you find any content suspected of plagiarism or infringement, please contact admin@php.cn
Popular Tutorials
More>
Latest Downloads
More>
Web Effects
Website Source Code
Website Materials
Front End Template