

Sample code for file upload and download in Koa2
This article mainly introduces the sample code for file upload and download in Koa2. Now I share it with you and give it as a reference.
Preface
Uploading and downloading are relatively common in web applications, whether they are pictures or other files. In Koa, there are many middlewares that can help us quickly implement functions.
File Upload
When uploading files in the front-end, we upload them through forms. However, the uploaded files cannot be passed through ctx like ordinary parameters on the server side. .request.body gets. We can use the koa-body middleware to handle file uploads, which can put the request body into ctx.request.
// app.js
const koa = require('koa');
const app = new koa();
const koaBody = require('koa-body');

app.use(koaBody({
  multipart: true,
  formidable: {
    maxFileSize: 200*1024*1024 // 设置上传文件大小最大限制,默认2M
  }
}));

app.listen(3001, ()=>{
  console.log('koa is listening in 3001');
})After using the middleware, you can get the uploaded file content in ctx.request.body.files. What needs to be paid attention to is setting maxFileSize, otherwise an error will be reported once the uploaded file exceeds the default limit.
After receiving the file, we need to save the file to the directory and return a url to the front end. The process in node is
Create a readable stream const reader = fs.createReadStream(file.path)
Create a writable stream const writer = fs.createWriteStream('upload/newpath.txt')
The readable stream is written to the writable stream through the pipe reader.pipe(writer)
const router = require('koa-router')();
const fs = require('fs');

router.post('/upload', async (ctx){
 const file = ctx.request.body.files.file; // 获取上传文件
 const reader = fs.createReadStream(file.path); // 创建可读流
 const ext = file.name.split('.').pop(); // 获取上传文件扩展名
 const upStream = fs.createWriteStream(`upload/${Math.random().toString()}.${ext}`); // 创建可写流
 reader.pipe(upStream); // 可读流通过管道写入可写流
 return ctx.body = '上传成功';
})This method is suitable for uploading images, text files, compressed files, etc.
File Download
koa-send is a static file service middleware that can be used to implement the file download function.
const router = require('koa-router')();
const send = require('koa-send');

router.post('/download/:name', async (ctx){
 const name = ctx.params.name;
 const path = `upload/${name}`;
 ctx.attachment(path);
  await send(ctx, path);
})There are two methods for downloading on the front end: window.open and form submission. The simpler window.open is used here.
<button onclick="handleClick()">立即下载</button>
<script>
const handleClick = () => {
window.open('/download/1.png');
}
</script>The default window.open here is to open a new window, flash and then close, which does not give the user a good experience. You can add the second parameter window.open('/download/1.png ', '_self'); , so it will be downloaded directly in the current window. However, this replaces the current page with the url, which will trigger page events such as beforeunload. If your page listens to this event and performs some operations, it will have an impact. Then you can also use a hidden iframe window to achieve the same effect.
<button onclick="handleClick()">立即下载</button>
<iframe name="myIframe" style="display:none"></iframe>
<script>
const handleClick = () => {
window.open('/download/1.png', 'myIframe');
}
</script>Batch download
There is no difference between batch download and single download, just perform a few more downloads. There is really nothing wrong with this. If you pack so many files into a compressed package and then download only this compressed package, wouldn't the experience be better?
File Packaging
archiver is a module that can realize cross-platform packaging function in Node.js, supporting zip and tar formats.
const router = require('koa-router')();
const send = require('koa-send');
const archiver = require('archiver');

router.post('/downloadAll', async (ctx){
 // 将要打包的文件列表
 const list = [{name: '1.txt'},{name: '2.txt'}];
 const zipName = '1.zip';
 const zipStream = fs.createWriteStream(zipName);
  const zip = archiver('zip');
  zip.pipe(zipStream);
 for (let i = 0; i < list.length; i++) {
 // 添加单个文件到压缩包
 zip.append(fs.createReadStream(list[i].name), { name: list[i].name })
 }
 await zip.finalize();
 ctx.attachment(zipName);
 await send(ctx, zipName);
})If you package the entire folder directly, you do not need to traverse each file and append it to the compressed package.
const zipStream = fs.createWriteStream('1.zip');
const zip = archiver('zip');
zip.pipe(zipStream);
// 添加整个文件夹到压缩包
zip.directory('upload/');
zip.finalize();
Note: When packaging the entire folder, the generated compressed package file cannot be stored in this folder, otherwise it will be packaged continuously.
Chinese encoding issues
When the file name contains Chinese characters, some unexpected situations may occur. So when uploading, if it contains Chinese, I will encode the file name with encodeURI() to save it, and then decrypt it with decodeURI() when downloading.
ctx.attachment(decodeURI(path));
await send(ctx, path);
ctx.attachment Set Content-Disposition to "attachment" to instruct the client to prompt for download. Use the decoded file name as the name of the downloaded file to download. In this way, when downloaded locally, the Chinese name will still be displayed.
However, in the source code of koa-send, the file path will be decoded with decodeURIComponent():
// koa-send
path = decode(path)

function decode (path) {
 try {
  return decodeURIComponent(path)
 } catch (err) {
  return -1
 }
}At this time, after decoding, download the path containing Chinese, and the path stored in our server It is an encoded path, so naturally the corresponding file cannot be found.
To solve this problem, don't let it be decoded. If you don’t want to touch the koa-send source code, you can use another middleware koa-sendfile instead.
const router = require('koa-router')();
const sendfile = require('koa-sendfile');

router.post('/download/:name', async (ctx){
 const name = ctx.params.name;
 const path = `upload/${name}`;
 ctx.attachment(decodeURI(path));
  await sendfile(ctx, path);
})The above is what I compiled for everyone. I hope it will be helpful to everyone in the future.
Related articles:
Detailed explanation of Js interview algorithm
JS simple method example of obtaining and modifying the content of the input text box
Detailed explanation of vue form
The above is the detailed content of Sample code for file upload and download in Koa2. For more information, please follow other related articles on the PHP Chinese website!

Hot AI Tools

Undresser.AI Undress
AI-powered app for creating realistic nude photos

AI Clothes Remover
Online AI tool for removing clothes from photos.

Undress AI Tool
Undress images for free

Clothoff.io
AI clothes remover

Video Face Swap
Swap faces in any video effortlessly with our completely free AI face swap tool!

Hot Article
Hot Tools

Notepad++7.3.1
Easy-to-use and free code editor

SublimeText3 Chinese version
Chinese version, very easy to use

Zend Studio 13.0.1
Powerful PHP integrated development environment

Dreamweaver CS6
Visual web development tools

SublimeText3 Mac version
God-level code editing software (SublimeText3)
Hot Topics
 1653
1653
 14
1413
52
1305
25
1251
29
1224
24
14
1413
52
1305
25
1251
29
1224
24

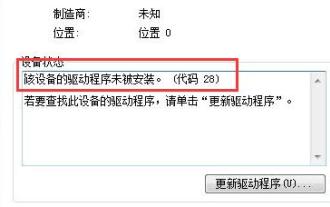 How to solve win7 driver code 28
Dec 30, 2023 pm 11:55 PM
How to solve win7 driver code 28
Dec 30, 2023 pm 11:55 PM
Some users encountered errors when installing the device, prompting error code 28. In fact, this is mainly due to the driver. We only need to solve the problem of win7 driver code 28. Let’s take a look at what should be done. Do it. What to do with win7 driver code 28: First, we need to click on the start menu in the lower left corner of the screen. Then, find and click the "Control Panel" option in the pop-up menu. This option is usually located at or near the bottom of the menu. After clicking, the system will automatically open the control panel interface. In the control panel, we can perform various system settings and management operations. This is the first step in the nostalgia cleaning level, I hope it helps. Then we need to proceed and enter the system and
 What to do if the blue screen code 0x0000001 occurs
Feb 23, 2024 am 08:09 AM
What to do if the blue screen code 0x0000001 occurs
Feb 23, 2024 am 08:09 AM
What to do with blue screen code 0x0000001? The blue screen error is a warning mechanism when there is a problem with the computer system or hardware. Code 0x0000001 usually indicates a hardware or driver failure. When users suddenly encounter a blue screen error while using their computer, they may feel panicked and at a loss. Fortunately, most blue screen errors can be troubleshooted and dealt with with a few simple steps. This article will introduce readers to some methods to solve the blue screen error code 0x0000001. First, when encountering a blue screen error, we can try to restart
 Solve the 'error: expected initializer before 'datatype'' problem in C++ code
Aug 25, 2023 pm 01:24 PM
Solve the 'error: expected initializer before 'datatype'' problem in C++ code
Aug 25, 2023 pm 01:24 PM
Solve the "error:expectedinitializerbefore'datatype'" problem in C++ code. In C++ programming, sometimes we encounter some compilation errors when writing code. One of the common errors is "error:expectedinitializerbefore'datatype'". This error usually occurs in a variable declaration or function definition and may cause the program to fail to compile correctly or
 The computer frequently blue screens and the code is different every time
Jan 06, 2024 pm 10:53 PM
The computer frequently blue screens and the code is different every time
Jan 06, 2024 pm 10:53 PM
The win10 system is a very excellent high-intelligence system. Its powerful intelligence can bring the best user experience to users. Under normal circumstances, users’ win10 system computers will not have any problems! However, it is inevitable that various faults will occur in excellent computers. Recently, friends have been reporting that their win10 systems have encountered frequent blue screens! Today, the editor will bring you solutions to different codes that cause frequent blue screens in Windows 10 computers. Let’s take a look. Solutions to frequent computer blue screens with different codes each time: causes of various fault codes and solution suggestions 1. Cause of 0×000000116 fault: It should be that the graphics card driver is incompatible. Solution: It is recommended to replace the original manufacturer's driver. 2,
 GE universal remote codes program on any device
Mar 02, 2024 pm 01:58 PM
GE universal remote codes program on any device
Mar 02, 2024 pm 01:58 PM
If you need to program any device remotely, this article will help you. We will share the top GE universal remote codes for programming any device. What is a GE remote control? GEUniversalRemote is a remote control that can be used to control multiple devices such as smart TVs, LG, Vizio, Sony, Blu-ray, DVD, DVR, Roku, AppleTV, streaming media players and more. GEUniversal remote controls come in various models with different features and functions. GEUniversalRemote can control up to four devices. Top Universal Remote Codes to Program on Any Device GE remotes come with a set of codes that allow them to work with different devices. you may
 Resolve code 0xc000007b error
Feb 18, 2024 pm 07:34 PM
Resolve code 0xc000007b error
Feb 18, 2024 pm 07:34 PM
Termination Code 0xc000007b While using your computer, you sometimes encounter various problems and error codes. Among them, the termination code is the most disturbing, especially the termination code 0xc000007b. This code indicates that an application cannot start properly, causing inconvenience to the user. First, let’s understand the meaning of termination code 0xc000007b. This code is a Windows operating system error code that usually occurs when a 32-bit application tries to run on a 64-bit operating system. It means it should
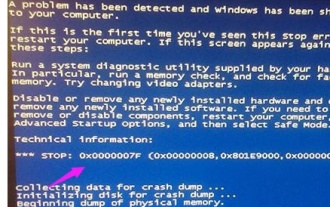 Detailed explanation of the causes and solutions of 0x0000007f blue screen code
Dec 25, 2023 pm 02:19 PM
Detailed explanation of the causes and solutions of 0x0000007f blue screen code
Dec 25, 2023 pm 02:19 PM
Blue screen is a problem we often encounter when using the system. Depending on the error code, there will be many different reasons and solutions. For example, when we encounter the problem of stop: 0x0000007f, it may be a hardware or software error. Let’s follow the editor to find out the solution. 0x000000c5 blue screen code reason: Answer: The memory, CPU, and graphics card are suddenly overclocked, or the software is running incorrectly. Solution 1: 1. Keep pressing F8 to enter when booting, select safe mode, and press Enter to enter. 2. After entering safe mode, press win+r to open the run window, enter cmd, and press Enter. 3. In the command prompt window, enter "chkdsk /f /r", press Enter, and then press the y key. 4.
 How to use Copilot to generate code
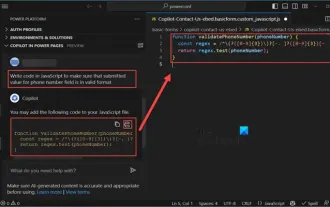
Mar 23, 2024 am 10:41 AM
How to use Copilot to generate code
Mar 23, 2024 am 10:41 AM
As a programmer, I get excited about tools that simplify the coding experience. With the help of artificial intelligence tools, we can generate demo code and make necessary modifications as per the requirement. The newly introduced Copilot tool in Visual Studio Code allows us to create AI-generated code with natural language chat interactions. By explaining functionality, we can better understand the meaning of existing code. How to use Copilot to generate code? To get started, we first need to get the latest PowerPlatformTools extension. To achieve this, you need to go to the extension page, search for "PowerPlatformTool" and click the Install button
