
 Web Front-end
JS Tutorial
Detailed explanation of Vue.js project API and Router configuration split practice
Web Front-end
JS Tutorial
Detailed explanation of Vue.js project API and Router configuration split practice
Detailed explanation of Vue.js project API and Router configuration split practice
This article mainly introduces the detailed explanation of the Vue.js project API and Router configuration splitting practice. Now I will share it with you and give you a reference.
Separate front-end and back-end development methods. The front-end has higher control.
With the rapid development of front-end framework technology, the concept of Router has also been rapidly popularized in front-end projects. , in the early period when there was no separation, there was no clear concept of routing. Most front-end page jumps were forwarded through the back-end. For example, in the Spring MVC project, a page jump is as follows (red line part) :
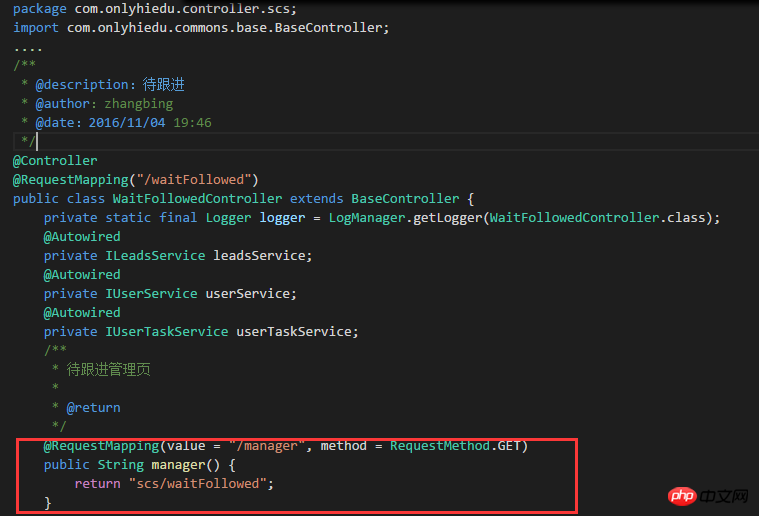
The front end needs a hyperlink, the link's href=/manager, so that the hyperlink is forwarded to the page specified by the scs/waitFollowed path.
After the separation of front and back, the way of front-end page jump has changed. Back-end processing is no longer needed, and the data exchange method has also changed. Therefore, the front-end needs to define Router configuration files and API configuration files. . In the permission configuration management of the project, there is no need for the back-end at all. It can be said that the permission configuration table can be taken out separately and maintained by the front-end.
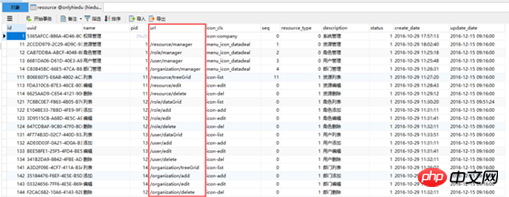
For example, this url field depends heavily on the backend when the frontend and backend are not separated. The url is the backend interface address. If it needs to be changed, it needs to be changed. The backend modifies the code to modify the interface address, and now the frontend can freely control the value of the url.
At the interface level, the front end will also have its own configuration file, and the interfaces provided by the back end can be renamed, combined, etc. For example,
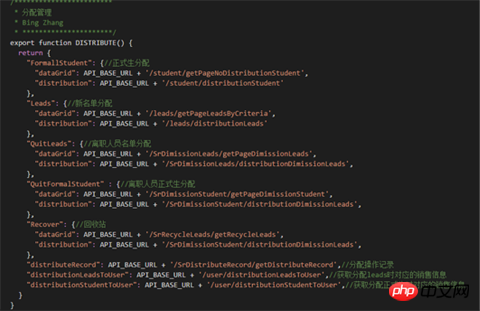
the front-end is managed uniformly using module name interface name. It doesn’t matter what the interface provided by the back-end is called. It is more convenient both visually and in maintenance. When used on the page, the query is also very intuitive:
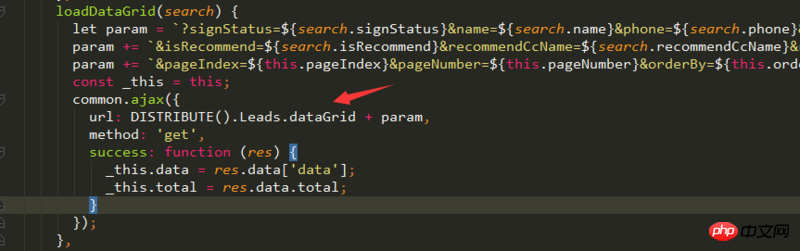
You will know this when you see the interface DISTRBUTE().Leads.dataGrid It is the list query interface under the Leasd function under the DISTRBUTE module
API and Router configuration in Vue.js
Under the Vue.js project, we only use one api.config.js configuration file at the beginning. All interfaces are defined in it, and the router is the same, all configured in one router.config .js, the following is the API configuration file in our project

You can see that many business modules and many interfaces have reached 570 Multiple lines. As the business further advances, the interface expands rapidly and the file becomes larger and larger.
At this time, there is an urgent need to split the different business modules into individual API configuration files. Similarly, let’s take a look at the Router configuration file before splitting:

#The biggest disadvantage of having one and more routers is that it will lead to router naming conflicts.
Split! Split! Split!
First consider how to split the API configuration file. For the interface, we must have multiple sets of environments. If there are multiple sets of environments, the API URLs will be different. After splitting into multiple files, multiple files need They share the same method of obtaining apiBase, so this apiBase must be written in a public place, where the original api.config.js becomes Public configuration, apiBase is placed in this file.
export function apiBase() {
 let hostname = window.location.hostname,
  API_BASE_URL = 'http://test2api.dunizb.com';//默认环境
 if(hostname === 'crm.dunizb.cn') { //正式环境
  API_BASE_URL = 'http://api.dunizb.cn';
 } else if(hostname === 'admin.dunizb.com') {//公网测试环境
  API_BASE_URL = 'http://testapi.dunizb.com';
 } else if(hostname === 'manager.dunizb.com') {//内网测试环境
  API_BASE_URL = 'http://test2api.dunizb.com';
 }
 return API_BASE_URL;
}Then introduce it in each sub-API configuration file:
import {apiBase} from '../api.config'; The specific function API does not need to be changed, just copy the corresponding module API to the sub-module API configuration file.

Router splitting is a little more complicated. The split file directory is the same as the API directory:

The idea of splitting is exactly the same, but make sure there is only one router.startThat is:
return router.start(App, '#app');
Although you Writing the page in the sub-router configuration file will work normally, but Vue.js will report an error in the console:
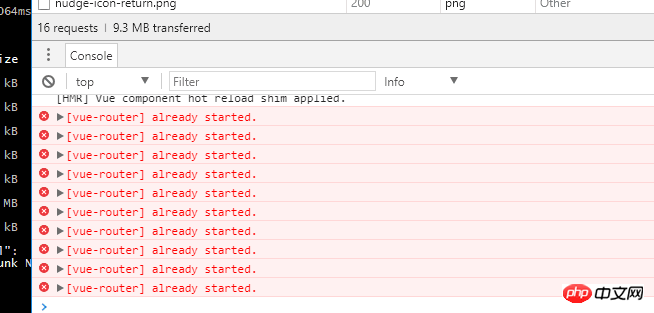
这个错误的意思就是router已经启动,无需启动多次。所以,子router文件中不能存在 return router.start(App, '#app'); 这样的代码。
拆分后router.config.js内容如下:
/**
 * 路由总文件
 * Created by Bing on 2017/6/19 0019.
 */
import App from './App';
import authority from './routers/authority';
import publics from './routers/public';
import study from './routers/study';
... ...
export default function(router){
 authority(router);//基础与权限模块
 publics(router);//公共模块
 study(router);//教学相关
 ... ...
 return router.start(App, '#app');
}而子router配置文件的写法就是这样(以study模块为例):
/**
 * 教学排课
 * 教研
 * Created by Bing on 2017/6/19 0019.
 */
import courseIndex from 'components/studyCourse/index/index';
import waitCourse from 'components/studyCourse/waitCourse/waitCourse';
import alreadyCourse from 'components/studyCourse/alreadyCourse/alreadyCourse';
import gearCourse from 'components/studyCourse/waitCourse/gearCourse';
import courseWare from 'components/teachingResearch/courseware/courseware.vue';
import courseWareLibrary from 'components/teachingResearch/courseware/library.vue';
export default function(router) {
 router.map({
  '/study/index': {component: courseIndex},
  '/study/waitCourse': {component: waitCourse},//待排课程
  '/study/waitCourse/gearCourse': {component: gearCourse},//待排
  '/study/course': {component: alreadyCourse},//已排课程
  '/tr/courseware': {component: courseWare},//课件管理
  '/tr/courseWare/library': {component: courseWareLibrary},//自主上传课件库
 });
}拆分后,每个模块管理它自己领域的router、api,router.config.js和api.config.js就大大瘦身了,也降低了命名冲突的问题和将来混乱的问题。
上面是我整理给大家的,希望今后会对大家有帮助。
相关文章:
The above is the detailed content of Detailed explanation of Vue.js project API and Router configuration split practice. For more information, please follow other related articles on the PHP Chinese website!

Hot AI Tools

Undresser.AI Undress
AI-powered app for creating realistic nude photos

AI Clothes Remover
Online AI tool for removing clothes from photos.

Undress AI Tool
Undress images for free

Clothoff.io
AI clothes remover

Video Face Swap
Swap faces in any video effortlessly with our completely free AI face swap tool!

Hot Article
Hot Tools

Notepad++7.3.1
Easy-to-use and free code editor

SublimeText3 Chinese version
Chinese version, very easy to use

Zend Studio 13.0.1
Powerful PHP integrated development environment

Dreamweaver CS6
Visual web development tools

SublimeText3 Mac version
God-level code editing software (SublimeText3)
Hot Topics
 1667
1667
 14
1426
52
1328
25
1273
29
1255
24
14
1426
52
1328
25
1273
29
1255
24

 How to implement an online speech recognition system using WebSocket and JavaScript
Dec 17, 2023 pm 02:54 PM
How to implement an online speech recognition system using WebSocket and JavaScript
Dec 17, 2023 pm 02:54 PM
How to use WebSocket and JavaScript to implement an online speech recognition system Introduction: With the continuous development of technology, speech recognition technology has become an important part of the field of artificial intelligence. The online speech recognition system based on WebSocket and JavaScript has the characteristics of low latency, real-time and cross-platform, and has become a widely used solution. This article will introduce how to use WebSocket and JavaScript to implement an online speech recognition system.
 WebSocket and JavaScript: key technologies for implementing real-time monitoring systems
Dec 17, 2023 pm 05:30 PM
WebSocket and JavaScript: key technologies for implementing real-time monitoring systems
Dec 17, 2023 pm 05:30 PM
WebSocket and JavaScript: Key technologies for realizing real-time monitoring systems Introduction: With the rapid development of Internet technology, real-time monitoring systems have been widely used in various fields. One of the key technologies to achieve real-time monitoring is the combination of WebSocket and JavaScript. This article will introduce the application of WebSocket and JavaScript in real-time monitoring systems, give code examples, and explain their implementation principles in detail. 1. WebSocket technology
 How to use JavaScript and WebSocket to implement a real-time online ordering system
Dec 17, 2023 pm 12:09 PM
How to use JavaScript and WebSocket to implement a real-time online ordering system
Dec 17, 2023 pm 12:09 PM
Introduction to how to use JavaScript and WebSocket to implement a real-time online ordering system: With the popularity of the Internet and the advancement of technology, more and more restaurants have begun to provide online ordering services. In order to implement a real-time online ordering system, we can use JavaScript and WebSocket technology. WebSocket is a full-duplex communication protocol based on the TCP protocol, which can realize real-time two-way communication between the client and the server. In the real-time online ordering system, when the user selects dishes and places an order
 How to implement an online reservation system using WebSocket and JavaScript
Dec 17, 2023 am 09:39 AM
How to implement an online reservation system using WebSocket and JavaScript
Dec 17, 2023 am 09:39 AM
How to use WebSocket and JavaScript to implement an online reservation system. In today's digital era, more and more businesses and services need to provide online reservation functions. It is crucial to implement an efficient and real-time online reservation system. This article will introduce how to use WebSocket and JavaScript to implement an online reservation system, and provide specific code examples. 1. What is WebSocket? WebSocket is a full-duplex method on a single TCP connection.
 JavaScript and WebSocket: Building an efficient real-time weather forecasting system
Dec 17, 2023 pm 05:13 PM
JavaScript and WebSocket: Building an efficient real-time weather forecasting system
Dec 17, 2023 pm 05:13 PM
JavaScript and WebSocket: Building an efficient real-time weather forecast system Introduction: Today, the accuracy of weather forecasts is of great significance to daily life and decision-making. As technology develops, we can provide more accurate and reliable weather forecasts by obtaining weather data in real time. In this article, we will learn how to use JavaScript and WebSocket technology to build an efficient real-time weather forecast system. This article will demonstrate the implementation process through specific code examples. We
 Simple JavaScript Tutorial: How to Get HTTP Status Code
Jan 05, 2024 pm 06:08 PM
Simple JavaScript Tutorial: How to Get HTTP Status Code
Jan 05, 2024 pm 06:08 PM
JavaScript tutorial: How to get HTTP status code, specific code examples are required. Preface: In web development, data interaction with the server is often involved. When communicating with the server, we often need to obtain the returned HTTP status code to determine whether the operation is successful, and perform corresponding processing based on different status codes. This article will teach you how to use JavaScript to obtain HTTP status codes and provide some practical code examples. Using XMLHttpRequest
 JavaScript and WebSocket: Building an efficient real-time image processing system
Dec 17, 2023 am 08:41 AM
JavaScript and WebSocket: Building an efficient real-time image processing system
Dec 17, 2023 am 08:41 AM
JavaScript is a programming language widely used in web development, while WebSocket is a network protocol used for real-time communication. Combining the powerful functions of the two, we can create an efficient real-time image processing system. This article will introduce how to implement this system using JavaScript and WebSocket, and provide specific code examples. First, we need to clarify the requirements and goals of the real-time image processing system. Suppose we have a camera device that can collect real-time image data
 How to get HTTP status code in JavaScript the easy way
Jan 05, 2024 pm 01:37 PM
How to get HTTP status code in JavaScript the easy way
Jan 05, 2024 pm 01:37 PM
Introduction to the method of obtaining HTTP status code in JavaScript: In front-end development, we often need to deal with the interaction with the back-end interface, and HTTP status code is a very important part of it. Understanding and obtaining HTTP status codes helps us better handle the data returned by the interface. This article will introduce how to use JavaScript to obtain HTTP status codes and provide specific code examples. 1. What is HTTP status code? HTTP status code means that when the browser initiates a request to the server, the service
