This time I will show you how to use vue multi-page development and packaging, and what are the precautions for using vue multi-page development and packaging. The following is a practical case, let's take a look.

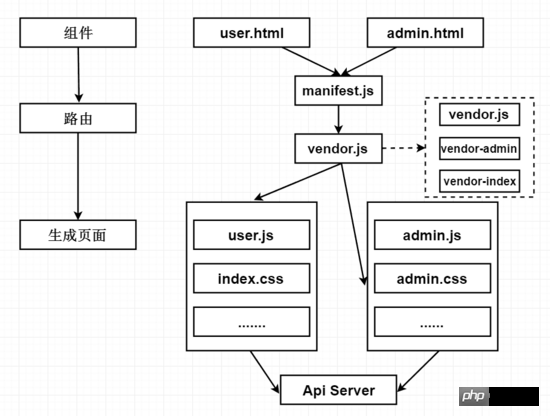
I was working on a project some time ago. The technology stack was vue webpack. It mainly consisted of the official website homepage and the backend management system. Based on the situation at the time, I analyzed three solutions
One project code embeds two spa applications (official website and backend system)
Separate two sets of project source codes
One There is a spa application in the project source code
Thinking:
directly negates the spa application in the project source code Application (UI styles will cover each other, and it will be difficult to maintain later if there is no code specification)
If there are two sets of source codes, two ports may be opened in the background, and then nginx reverse proxy may be needed. It is troublesome, and front-end development is also troublesome. After all, two git warehouses and two sets of git online processes need to be maintained, which may consume a lot of time.
I am (blindly) confident in my own technology and want to try new things. It is not very complicated to analyze the needs. I chose the first option, which is to apply multiple single pages in a set of source code
Previous multi-page structure diagram

Download vue spa template
npm install vue-cli -g
vue init webpack multiple-vue-amazing
Modify multi-page application
npm install glob --save-dev
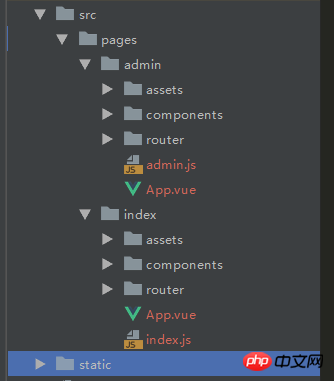
Modify the directory structure under the src folder

Add
/* 这里是添加的部分 ---------------------------- 开始 */
// glob是webpack安装时依赖的一个第三方模块,还模块允许你使用 *等符号, 例如lib/*.js就是获取lib文件夹下的所有js后缀名的文件
var glob = require('glob')
// 页面模板
var HtmlWebpackPlugin = require('html-webpack-plugin')
// 取得相应的页面路径,因为之前的配置,所以是src文件夹下的pages文件夹
var PAGE_PATH = path.resolve(__dirname, '../src/pages')
// 用于做相应的merge处理
var merge = require('webpack-merge')
//多入口配置
// 通过glob模块读取pages文件夹下的所有对应文件夹下的js后缀文件,如果该文件存在
// 那么就作为入口处理
exports.entries = function () {
 var entryFiles = glob.sync(PAGE_PATH + '/*/*.js')
 var map = {}
 entryFiles.forEach((filePath) => {
  var filename = filePath.substring(filePath.lastIndexOf('\/') + 1, filePath.lastIndexOf('.'))
  map[filename] = filePath
 })
 return map
}
//多页面输出配置
// 与上面的多页面入口配置相同,读取pages文件夹下的对应的html后缀文件,然后放入数组中
exports.htmlPlugin = function () {
 let entryHtml = glob.sync(PAGE_PATH + '/*/*.html')
 let arr = []
 entryHtml.forEach((filePath) => {
  let filename = filePath.substring(filePath.lastIndexOf('\/') + 1, filePath.lastIndexOf('.'))
  let conf = {
   // 模板来源
   template: filePath,
   // 文件名称
   filename: filename + '.html',
   // 页面模板需要加对应的js脚本,如果不加这行则每个页面都会引入所有的js脚本
   chunks: ['manifest', 'vendor', filename],
   inject: true
  }
  if (process.env.NODE_ENV === 'production') {
   conf = merge(conf, {
    minify: {
     removeComments: true,
     collapseWhitespace: true,
     removeAttributeQuotes: true
    },
    chunksSortMode: 'dependency'
   })
  }
  arr.push(new HtmlWebpackPlugin(conf))
 })
 return arr
}
/* 这里是添加的部分 ---------------------------- 结束 */
webpack.base.conf.js 文件
/* 修改部分 ---------------- 开始 */
 entry: utils.entries(),
 /* 修改部分 ---------------- 结束 */
webpack.dev.conf.js 文件
/* 注释这个区域的文件 ------------- 开始 */
 // new HtmlWebpackPlugin({
 // filename: 'index.html',
 // template: 'index.html',
 // inject: true
 // }),
 /* 注释这个区域的文件 ------------- 结束 */
 new FriendlyErrorsPlugin()
 /* 添加 .concat(utils.htmlPlugin()) ------------------ */
 ].concat(utils.htmlPlugin())
webpack.prod.conf.js 文件
/* 注释这个区域的内容 ---------------------- 开始 */
 // new HtmlWebpackPlugin({
 // filename: config.build.index,
 // template: 'index.html',
 // inject: true,
 // minify: {
 //  removeComments: true,
 //  collapseWhitespace: true,
 //  removeAttributeQuotes: true
 //  // more options:
 //  // https://github.com/kangax/html-minifier#options-quick-reference
 // },
 // // necessary to consistently work with multiple chunks via CommonsChunkPlugin
 // chunksSortMode: 'dependency'
 // }),
 /* 注释这个区域的内容 ---------------------- 结束 */
 // copy custom static assets
 new CopyWebpackPlugin([
  {
  from: path.resolve(__dirname, '../static'),
  to: config.build.assetsSubDirectory,
  ignore: ['.*']
  }
 ])
 /* 该位置添加 .concat(utils.htmlPlugin()) ------------------- */
].concat(utils.htmlPlugin())Introduce third-party ui library in util.js
npm install element-ui bootstrap-vue --save
Introduce different ui index.js on different pages
import BootstrapVue from 'bootstrap-vue'
Vue.use(BootstrapVue)
admin.js
import ElementUI from 'element-ui'
import 'element-ui/lib/theme-chalk/index.css'
Vue.use(ElementUI)
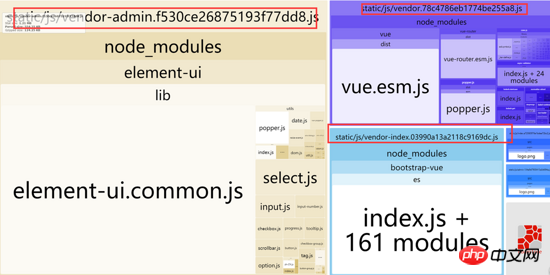
The configuration of the multiple pages above is based on the Internet, and the ideas on the Internet are mostly similar. The core is to change multiple entries. After the configuration is completed, it cannot be found during development. Problem, and then it was developed for about a month. After the development, when performing performance analysis on the official website, it was found that the network loading time of vendor.js packaged by webpack was extremely long, resulting in a very long white screen on the first screen. Finally, through -webpack-bundle -analyzer analysis has concluded
npm run build --report

You will find that vendor.js contains the common parts of index.html and admin.html, so this vendor package is bound to be very large. Redundancy
Solution
Since the vendor is too large and causes slow loading, just detach the vendor. This is what I think, extract the third-party code used in each page into vendor.js, and then package the third-party code used in each page into its own vendor-x.js, such as the existing page index .html, admin.html, vendor.js, vendor-index.js, vendor-admin.js will eventually be packaged.
webpack.prod.conf.js file
new webpack.optimize.CommonsChunkPlugin({
  name: 'vendor-admin',
  chunks: ['vendor'],
  minChunks: function (module, count) {
  return (
   module.resource &&
   /\.js$/.test(module.resource) &&
   module.resource.indexOf(path.join(__dirname, '../node_modules')) === 0 &&
   module.resource.indexOf('element-ui') != -1
  )
  }
 }),
 new webpack.optimize.CommonsChunkPlugin({
  name: 'vendor-index',
  chunks: ['vendor'],
  minChunks: function (module, count) {
  return (
   module.resource &&
   /\.js$/.test(module.resource) &&
   module.resource.indexOf(path.join(__dirname, '../node_modules')) === 0 &&
   module.resource.indexOf('bootstrap-vue') != -1
  )
  }
}),Analysis again, everything is ok, vendor.js is separated into vendor.js, vendor-index, vendor-admin.js

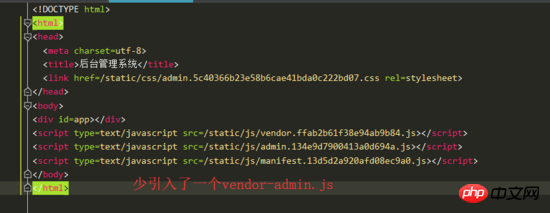
I originally thought that the problem of separating vendor.js of CommonsChunkPlugin was solved, and that was it. Then I packaged it and found that both index.html and admin.html were missing an introduction (each corresponding The vendor-xx.js)

Solution
This problem is actually a problem with HtmlWebpackPlugin Change the original chunksSortMode: 'dependency' to the configuration of the custom function, as follows
util.js file
chunksSortMode: function (chunk1, chunk2) {
   var order1 = chunks.indexOf(chunk1.names[0])
   var order2 = chunks.indexOf(chunk2.names[0])
   return order1 - order2
},Final implementation
Each Pages load their own chunks
Each page has different parameters
Each page can share a common chunk
Browser cache, better performance
If it is still too slow, enable gzip
Impressions
It’s done. Although the configuration looks very simple, I thought about it for a long time when I was developing it, so if you are not familiar with CommonsChunkPlugin and HtmlWebpackPlugin or only use other third-party configuration tables , it may be a big pitfall. For example, if CommonsChunkPlugin does not specify chunks, what is the default? Most people in minChunks can only write a numerical value, but the way of writing a custom function is actually the most powerful. According to my personal experience, the way of writing chunks combined with the minChunks custom function can solve almost all the supernatural events of CommonsChunkPlugin.
I believe you have mastered the method after reading the case in this article. For more exciting information, please pay attention to other related articles on the php Chinese website!
Recommended reading:
vue.js element-ui makes a menu tree structure
How to use it in the project JS decorator function
The above is the detailed content of How to use vue multi-page development and packaging. For more information, please follow other related articles on the PHP Chinese website!


