

Use webpack+vue2 for project construction
This article mainly introduces the method of webpack vue2 to build the skeleton of the vue project. Now I will share it with you and give you a reference.
The front-end project packaging tool webpack and the front-end development framework vue are now very popular technologies after the front-end and back-end separation. Today we mainly talk about using webpack and vue2 to build the basic skeleton of a front-end and back-end separation project. Although using vue-cli scaffolding can help us build a project skeleton, I think it is still important to understand the principles, so this article mainly writes about building a basic project with webpack and vue. The premise is that nodejs has been installed.
The entire project needs to be installed through npm dependencies
css: style-loader, css-loader, sass-loader, node-sass
js :babel-core、babel-loader、babel-preset-es2015
webpack:webpack、webpack-dev-server
vue:vuer、vue-loade、vue-html-loader、vue -template-compiler
Create a new project directory
We first need to create a new directory myApp to store our project, enter the project in the terminal, and then start Initialize the project.
Initializing the project
$ npm init
When initializing the project, if there is no special need, just press the "Enter key". After the project initialization is completed, a package.json file will be generated to mainly store the project dependency directory and configure the project startup command.
Installing dependencies
$ npm i style-loader --D
When using npm to install dependencies, we will add "--D" at the end, because adding "--D" will Leave a record in packge.json. If we open the project in other systems, we will find that the dependencies installed through npm during development cannot be used. This is because of system compatibility. And if you add "--D" to the installation dependencies when developing the project, the node_modules in the project do not need to be copied. Before opening the project, we only need to install all dependencies through npm.
$ npm i
Configuring the webpack.config.js file
All configurations of webpack are in the webpack.config.js file, so after initializing the project, we need to create a new webpack .config.js file then configure. Since I have already written about the basic configuration of webpack last time, I will not repeat it here. I will paste my configuration code directly:
module.exports = {

 entry: './src/main.js',

 output:{

  path: __dirname + '/dist/',

  filename: 'bundle.js'

 },

 devtool:'source-map',

 devServer:{

  // 主要改变项目的根目录

  contentBase: __dirname + '/dist/',

  port:8080,

  inline:true

 },

 module:{

  loaders:[

   {test:/\.css$/,loader :'style-loader!css-loader'},

   {test:/\.js$/, loader:'babel-loader',exclude:/node_modules/},

   { test: /\.vue$/, loader: 'vue-loader' }

  ]

 },

 //vue文件想要解析必须要要加上这句才能成功

 resolve: { alias: { 'vue': 'vue/dist/vue.js' } }

}Configuration package.json
package The main things that need to be configured in .json are the project startup command, a development mode start and the packaged project build.

Start the project
$ npm start
Package the project
$ npm run build
The directory of the entire project
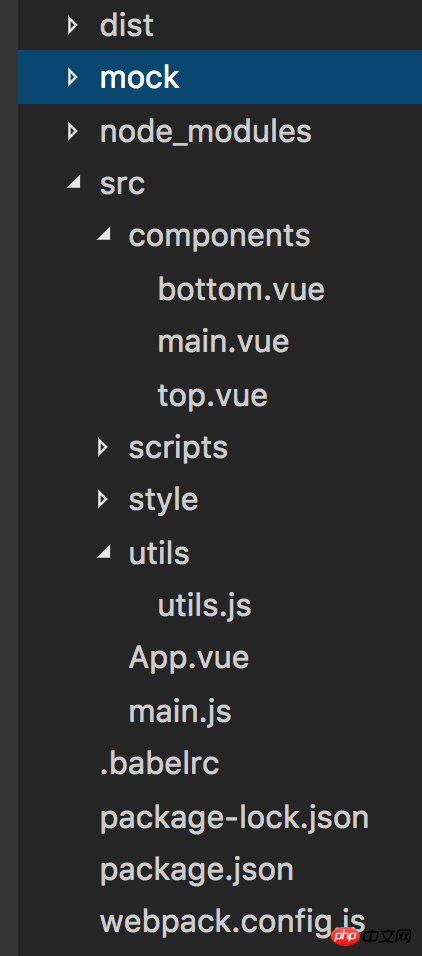
src: The source files we develop are placed in this directory
components: used to store all components
styles: stores all style files
utils: Store all the method functions that need to be written by yourself
app.vue: Entry file for all vue files
main.js: JS entry file for the entire project
index.html : This file can be placed in the root directory of the real project myApp, or in the directory dist generated by webpack packaging. If it is placed in the root directory, contentBase: __dirname in webpack.config.js, if it is in dist Then contentBase: __dirname '/dist/'. The main purpose is to change the location of the project's service root directory, which is the directory displayed by the browser when we open localhos:8080. (After testing, it will be better to place it in the dist directory generated by the package, mainly in the development mode to achieve real-time updates. This may not be accurate, and will be modified after testing later)
index.html file code
<!DOCTYPE html>
<html lang="en">
<head>
 <meta charset="UTF-8">
 <meta name="viewport" content="width=device-width, initial-scale=1.0">
 <meta http-equiv="X-UA-Compatible" content="ie=edge">
 <title>webpack+vue</title>
</head>
<body>
 <p id="app"></p>
 <script src="./bundle.js"></script>
</body>
</html>
main.js file code
//引入vue框架<br>
//import是es6的写法,其实和var Vue = require('vue')是相同的意义<br>import Vue from 'vue';<br>
//引入App.vue文件,这个文件也是vue所有组件的入口,我们的项目就是将这个文件追加到index.html文件里面
import App from './App.vue';
new Vue({
el:'#app',
components: {App},<br>//主要目点就是将App追加到“#app”里面去
render: h => h(App)
})
App.vue文件代码
<template>
<p>Hello VueJS!</p>
</template>
<script>
export default{
name:"app"
}
</script>At this point, the entire project has basically completed the basic structure. Enter: localhost:8080 in the browser, and you can see the display:
Above I compiled it for everyone. I hope it will be helpful to everyone in the future.
Related articles:
How to write Form components using async-validator (detailed tutorial)
How to implement using casperjs and resemble.js Pixel comparison (detailed tutorial)
How to implement quick sorting using JavaScript (detailed tutorial)
The above is the detailed content of Use webpack+vue2 for project construction. For more information, please follow other related articles on the PHP Chinese website!

Hot AI Tools

Undresser.AI Undress
AI-powered app for creating realistic nude photos

AI Clothes Remover
Online AI tool for removing clothes from photos.

Undress AI Tool
Undress images for free

Clothoff.io
AI clothes remover

AI Hentai Generator
Generate AI Hentai for free.

Hot Article
Hot Tools

Notepad++7.3.1
Easy-to-use and free code editor

SublimeText3 Chinese version
Chinese version, very easy to use

Zend Studio 13.0.1
Powerful PHP integrated development environment

Dreamweaver CS6
Visual web development tools

SublimeText3 Mac version
God-level code editing software (SublimeText3)
Hot Topics
 1382
1382
 52
52

 How to add functions to buttons for vue
Apr 08, 2025 am 08:51 AM
How to add functions to buttons for vue
Apr 08, 2025 am 08:51 AM
You can add a function to the Vue button by binding the button in the HTML template to a method. Define the method and write function logic in the Vue instance.
 How to use bootstrap in vue
Apr 07, 2025 pm 11:33 PM
How to use bootstrap in vue
Apr 07, 2025 pm 11:33 PM
Using Bootstrap in Vue.js is divided into five steps: Install Bootstrap. Import Bootstrap in main.js. Use the Bootstrap component directly in the template. Optional: Custom style. Optional: Use plug-ins.
 How to reference js file with vue.js
Apr 07, 2025 pm 11:27 PM
How to reference js file with vue.js
Apr 07, 2025 pm 11:27 PM
There are three ways to refer to JS files in Vue.js: directly specify the path using the <script> tag;; dynamic import using the mounted() lifecycle hook; and importing through the Vuex state management library.
 How to use watch in vue
Apr 07, 2025 pm 11:36 PM
How to use watch in vue
Apr 07, 2025 pm 11:36 PM
The watch option in Vue.js allows developers to listen for changes in specific data. When the data changes, watch triggers a callback function to perform update views or other tasks. Its configuration options include immediate, which specifies whether to execute a callback immediately, and deep, which specifies whether to recursively listen to changes to objects or arrays.
 How to return to previous page by vue
Apr 07, 2025 pm 11:30 PM
How to return to previous page by vue
Apr 07, 2025 pm 11:30 PM
Vue.js has four methods to return to the previous page: $router.go(-1)$router.back() uses <router-link to="/" component window.history.back(), and the method selection depends on the scene.
 What does vue multi-page development mean?
Apr 07, 2025 pm 11:57 PM
What does vue multi-page development mean?
Apr 07, 2025 pm 11:57 PM
Vue multi-page development is a way to build applications using the Vue.js framework, where the application is divided into separate pages: Code Maintenance: Splitting the application into multiple pages can make the code easier to manage and maintain. Modularity: Each page can be used as a separate module for easy reuse and replacement. Simple routing: Navigation between pages can be managed through simple routing configuration. SEO Optimization: Each page has its own URL, which helps SEO.
 How to query the version of vue
Apr 07, 2025 pm 11:24 PM
How to query the version of vue
Apr 07, 2025 pm 11:24 PM
You can query the Vue version by using Vue Devtools to view the Vue tab in the browser's console. Use npm to run the "npm list -g vue" command. Find the Vue item in the "dependencies" object of the package.json file. For Vue CLI projects, run the "vue --version" command. Check the version information in the <script> tag in the HTML file that refers to the Vue file.
 How to use function intercept vue
Apr 08, 2025 am 06:51 AM
How to use function intercept vue
Apr 08, 2025 am 06:51 AM
Function interception in Vue is a technique used to limit the number of times a function is called within a specified time period and prevent performance problems. The implementation method is: import the lodash library: import { debounce } from 'lodash'; Use the debounce function to create an intercept function: const debouncedFunction = debounce(() => { / Logical / }, 500); Call the intercept function, and the control function is called at most once in 500 milliseconds.
