

How to implement server-side rendering using vue-ssr
This article mainly introduces the detailed introduction to server-side rendering based on vue-ssr. Now I will share it with you and give you a reference.
Part 1 Basic Introduction
1. Foreword
Server-side rendering implementation principle and mechanism: parse and render data on the server side, and directly generate html The fragment is returned to the front end. Then the front-end can parse the html fragment returned by the back-end to the front-end page. There are roughly two forms:
1. The server directly renders the entire page through a template engine, such as the vm template engine of the java back-end, and the php back-end. smarty template engine.
2. Service rendering generates html code blocks, the front end obtains them through AJAX and then adds them dynamically using js.
2. Advantages and disadvantages of server-side rendering
Server-side rendering can solve two major problems:
1. SEO problem, which is helpful for search engine spiders to crawl website content. Conducive to the inclusion and ranking of the website.
2. The problem of slow loading of the first screen. For example, in mature SPA projects, opening the homepage requires loading a lot of resources. Server-side rendering can speed up the rendering of the first screen.
Similarly, server-side rendering also has disadvantages. The main thing is to choose the appropriate method according to your own business scenario. Since server-side rendering of front-end pages will definitely increase pressure on the server.
3. The implementation principle of SSR
The client requests the server, the server obtains the matching component according to the request address, and returns Promise (officially preFetch) after calling the matched component. method) to get the required data. Finally, write it to the web page through
<script>window.__initial_state=data</script>
, and finally return the web page rendered by the server.
Next, the client will replace the initial_state written by vuex with the current global state tree, and then use this state tree to check whether there are any problems with the data rendered by the server. When encountering a component that has not been rendered by the server, send an asynchronous request to get the data. To put it bluntly, it is a Diff operation similar to React's shouldComponentUpdate.
Vue2 uses a one-way data flow. Using it, you can return the only global state through SSR and confirm whether a component has been SSR.
4. Main plug-in for vue back-end rendering: vue-server-renderer
Due to the introduction of virtual dom, server-side rendering of vue becomes possible. The following is The rendering flow chart provided by the official vue-server-renderer:
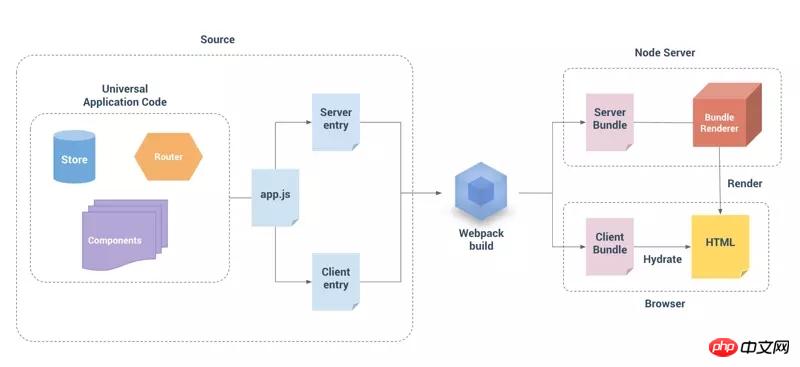
It can be seen that the back-end rendering of vue is composed of three parts: the source code of the page (source), the node layer The rendering part and the browser-side rendering part.
Source is divided into two entry points, one is the client entry of the front-end page, which is mainly used to instantiate the Vue object and mount it into the page; the other is the back-end rendering service entrance server entry, which is mainly used to instantiate the Vue object and mount it into the page. It controls the server-side rendering module callback, returns a Promise object, and finally returns a Vue object (after testing, it is also possible to directly return a Vue object);
The source part in front is the business development code. After the development is completed Build through webpack and generate the corresponding bundle. I won’t go into details here. The client bundle is a packaging file that can be executed on the browser side. Let’s talk about the server bundle. Vue2 provides the vue-server-renderer module. The module can provide two renders. : rendererer/bundleRenderer, these two renders are introduced below.
renderer receives a vue object and then renders it. This can be done for simple vue objects, but for complex projects, if you use this method to directly require a vue object, this is not suitable for server-side code. The structure and logic are not very friendly. First of all, the status of the module will continue for each rendering request. We need to manage and avoid the status of this rendering request from affecting subsequent requests, so vue-server-renderer provides another A rendering mode that uses a bundleRenderer to render.
bundleRenderer is the officially recommended way for server-side rendering of more complex projects. It uses webpack to package server entries according to certain requirements to generate a server-bundle, which is equivalent to the packaging and compression of an app that can be used on the server. file, each call will re-initialize the vue object, ensuring that each request is independent. For developers, they only need to focus on the current business and do not need to develop more logic codes for server-side rendering. After the renderer is generated, there are two interfaces, namely renderToString and renderToStream. One is to render the page into a string file at one time, and the other is streaming rendering, which is suitable for web servers that support streaming. It can be the speed of requesting service. Faster.
The second part builds from scratch
1. Preface
In the previous section we briefly talked about why we need to use vue back-end rendering, and The basic principles of vue back-end rendering. In this section, we will build our own vue back-end rendering scaffolding from scratch. Of course, we must refer to the official page response example vue-hackernews-2.0 to build the project from scratch. The source code will be in Share it with you in the next section.
2、前期准备
基本环境要求:node版本6.10.1以上,npm版本3.10.10以上,本机环境是这样的,建议升级到官方最新版本。
使用的技术栈:
1、vue 2.4.2
2、vuex 2.3.1
3、vue-router 2.7.0
4、vue-server-renderer 2.4.2
5、express 4.15.4
6、axios 0.16.2
7、qs 6.5.0
8、q https://github.com/kriskowal/q.git
9、webpack 3.5.0
10、mockjs 1.0.1-beta3
11、babel 相关插件
以上是主要是用的技术栈,在构建过程中会是用相应的插件依赖包来配合进行压缩打包,以下是npm init后package.json文件所要添加的依赖包。
"dependencies": {
 "axios": "^0.16.2",
 "es6-promise": "^4.1.1",
 "express": "^4.15.4",
 "lodash": "^4.17.4",
 "q": "git+https://github.com/kriskowal/q.git",
 "qs": "^6.5.0",
 "vue": "^2.4.2",
 "vue-router": "^2.7.0",
 "vue-server-renderer": "^2.4.2",
 "vuex": "^2.3.1"
 },
 "devDependencies": {
 "autoprefixer": "^7.1.2",
 "babel-core": "^6.25.0",
 "babel-loader": "^7.1.1",
 "babel-plugin-syntax-dynamic-import": "^6.18.0",
 "babel-plugin-transform-runtime": "^6.22.0",
 "babel-preset-env": "^1.6.0",
 "babel-preset-stage-2": "^6.22.0",
 "compression": "^1.7.1",
 "cross-env": "^5.0.5",
 "css-loader": "^0.28.4",
 "extract-text-webpack-plugin": "^3.0.0",
 "file-loader": "^0.11.2",
 "friendly-errors-webpack-plugin": "^1.6.1",
 "glob": "^7.1.2",
 "less": "^2.7.2",
 "less-loader": "^2.2.3",
 "lru-cache": "^4.1.1",
 "mockjs": "^1.0.1-beta3",
 "style-loader": "^0.19.0",
 "sw-precache-webpack-plugin": "^0.11.4",
 "url-loader": "^0.5.9",
 "vue-loader": "^13.0.4",
 "vue-style-loader": "^3.0.3",
 "vue-template-compiler": "^2.4.2",
 "vuex-router-sync": "^4.2.0",
 "webpack": "^3.5.0",
 "webpack-dev-middleware": "^1.12.0",
 "webpack-hot-middleware": "^2.18.2",
 "webpack-merge": "^4.1.0",
 "webpack-node-externals": "^1.6.0"
}3、项目主目录搭建
基本目录结构如下:
├── LICENSE
├── README.md
├── build
│ ├── setup-dev-server.js
│ ├── vue-loader.config.js
│ ├── webpack.base.config.js
│ ├── webpack.client.config.js
│ └── webpack.server.config.js
├── log
│ ├── err.log
│ └── out.log
├── package.json
├── pmlog.json
├── server.js
└── src
 ├── App.vue
 ├── app.js
 ├── assets
 │ ├── images
 │ ├── style
 │ │ └── css.less
 │ └── views
 │  └── index.css
 ├── components
 │ ├── Banner.vue
 │ ├── BottomNav.vue
 │ ├── FloorOne.vue
 │ └── Header.vue
 ├── entry-client.js
 ├── entry-server.js
 ├── index.template.html
 ├── public
 │ ├── conf.js
 │ └── utils
 │  ├── api.js
 │  └── confUtils.js
 ├── router
 │ └── index.js
 ├── static
 │ ├── img
 │ │ └── favicon.ico
 │ └── js
 │  └── flexible.js
 ├── store
 │ ├── actions.js
 │ ├── getters.js
 │ ├── index.js
 │ ├── modules
 │ │ └── Home.js
 │ ├── mutationtypes.js
 │ └── state.js
 └── views
  └── index
   ├── conf.js
   ├── index.vue
   ├── mock.js
   └── service.js
文件目录基本介绍:
views文件夹下分模块文件,模块文件下下又分模块本身的.vue文件(模版文件),index.js文件(后台数据交互文件),mock.js(本模块的mock假数据),conf.js(配置本模块一些参数,请求路径,模块名称等信息)
components 公共组件文件夹
router 主要存放前端路由配置文件,写法规范按照vue-router官方例子即可。
store 主要是存放共享状态文件,里面包含action.js,getter.js,mutationtype.js等,后期会根据模块再细分这些。
public 主要存放公共组件代码和项目使用的公共文件代码,例如后期我们将axios封装成公共的api库文件等等
static文件夹代表静态文件,不会被webpack打包的
app.js 是项目入口文件
App.vue 是项目入口文件
entry-client和entry-server分别是客户端入口文件和服务端的入口文件
index.template.html是整个项目的模版文件
开始编写app.js项目入口代码
使用vue开发项目入口文件一般都会如下写法:
import Vue from 'vue';
import App from './index.vue';
import router from './router'
import store from './store';

new Vue({
 el: '#app',
 store,
 router,
 render: (h) => h(App)
});这种写法是程序共享一个vue实例,但是在后端渲染中很容易导致交叉请求状态污染,导致数据流被污染了。
所以,避免状态单例,我们不应该直接创建一个应用程序实例,而是应该暴露一个可以重复执行的工厂函数,为每个请求创建新的应用程序实例,同样router和store入口文件也需要重新创建一个实例。
为了配合webpack动态加载路由配置,这里会改写常规路由引入写法,这样可以根据路由路径来判断加载相应的组件代码:
import Home from '../views/index/index.vue'
// 改写成
component: () => ('../views/index/index.vue')
以下是路由的基本写法router,对外会抛出一个createRouter方法来创建一个新的路由实例:
import Vue from 'vue'
import Router from 'vue-router';
Vue.use(Router)
export function createRouter() {
 return new Router({
  mode: 'history',
  routes: [{
   name:'Home',
   path: '/',
   component: () =>
    import ('../views/index/index.vue')
  }]
 })
}以下是store状态管理的基本写法,对外暴露了一个createStore方法,方便每次访问创建一个新的实例:
// store.js
import Vue from 'vue'
import Vuex from 'vuex'
import * as actions from './actions'
import getters from './getters'
import modules from './modules/index'
Vue.use(Vuex)
export function createStore() {
 return new Vuex.Store({
 actions,
 getters,
 modules,
 strict: false
 })
}结合写好的router和store入口文件代码来编写整个项目的入口文件app.js代码内容,同样最终也会对外暴露一个createApp方法,在每次创建app的时候保证router,store,app都是新创建的实例,这里还引入了一个vue路由插件vuex-router-sync,主要作用是同步路由状态(route state)到 store,以下是app.js完整代码:
import Vue from 'vue'
import App from './App.vue'
import { createRouter } from './router'
import { createStore } from './store'
import { sync } from 'vuex-router-sync'
require('./assets/style/css.less');
export function createApp () {
 // 创建 router 和 store 实例
 const router = createRouter()
 const store = createStore()
 // 同步路由状态(route state)到 store
 sync(store, router)
 // 创建应用程序实例,将 router 和 store 注入
 const app = new Vue({
 router,
 store,
 render: h => h(App)
 })
 // 暴露 app, router 和 store。
 return { app, router, store }
}entry-client.js代码编写:
首页引入从app文件中暴露出来的createApp方法,在每次调用客户端的时候,重新创建一个新的app,router,store,部分代码如下:
import { createApp } from './app'
const { app, router, store } = createApp()这里我们会使用到onReady方法,此方法通常用于等待异步的导航钩子完成,比如在进行服务端渲染的时候,例子代码如下:
import { createApp } from './app'
const { app, router, store } = createApp()
router.onReady(() => {
 app.$mount('#app')
})我们会调用一个新方法beforeResolve,只有在router2.5.0以上的版本才会有的方法,注册一个类似于全局路由保护router.beforeEach(),除了在导航确认之后,在所有其他保护和异步组件已解决之后调用。基本写法如下:
router.beforeResolve((to, from, next) => {
 // to 和 from 都是 路由信息对象
 // 返回目标位置或是当前路由匹配的组件数组(是数组的定义/构造类,不是实例)。通常在服务端渲染的数据预加载时时候。
 const matched = router.getMatchedComponents(to)
 const prevMatched = router.getMatchedComponents(from)
})服务端把要给客户端的 state 放在了 window. INITIAL_STATE 这个全局变量上面。前后端的 HTML 结构应该是一致的。然后要把 store 的状态树写入一个全局变量( INITIAL_STATE ),这样客户端初始化 render 的时候能够校验服务器生成的 HTML 结构,并且同步到初始化状态,然后整个页面被客户端接管。基本代码如下:
// 将服务端渲染时候的状态写入vuex中
if (window.__INITIAL_STATE__) {
 store.replaceState(window.__INITIAL_STATE__)
}接下来贴出来完整的客户端代码,这里的Q也可以不用引入,直接使用babel就能编译es6自带的Promise,因为本人使用习惯了,这里可以根据自身的需求是否安装:
import { createApp } from './app'
import Q from 'q'
import Vue from 'vue'

Vue.mixin({
 beforeRouteUpdate (to, from, next) {
 const { asyncData } = this.$options
 if (asyncData) {
  asyncData({
  store: this.$store,
  route: to
  }).then(next).catch(next)
 } else {
  next()
 }
 }
})
const { app, router, store } = createApp()

// 将服务端渲染时候的状态写入vuex中
if (window.__INITIAL_STATE__) {
 store.replaceState(window.__INITIAL_STATE__)
}

router.onReady(() => {
 router.beforeResolve((to, from, next) => {
  const matched = router.getMatchedComponents(to)
  const prevMatched = router.getMatchedComponents(from)
  // 我们只关心之前没有渲染的组件
  // 所以我们对比它们,找出两个匹配列表的差异组件
  let diffed = false
  const activated = matched.filter((c, i) => {
  return diffed || (diffed = (prevMatched[i] !== c))
  })
  if (!activated.length) {
  return next()
  }
  // 这里如果有加载指示器(loading indicator),就触发
  Q.all(activated.map(c => {
  if (c.asyncData) {
   return c.asyncData({ store, route: to })
  }
  })).then(() => {
  // 停止加载指示器(loading indicator)
  next()
  }).catch(next)
 })
 app.$mount('#app')
})entry-server.js代码编写:
基本编写和客户端的差不多,因为这是服务端渲染,涉及到与后端数据交互定义的问题,我们需要在这里定义好各组件与后端交互使用的方法名称,这样方便在组件内部直接使用,这里根我们常规在组件直接使用ajax获取数据有些不一样,代码片段如下:
//直接定义组件内部asyncData方法来触发相应的ajax获取数据
if (Component.asyncData) {
 return Component.asyncData({
 store,
 route: router.currentRoute
 })
}以下是完整的服务端代码:
import { createApp } from './app'
import Q from 'q'
export default context => {
 return new Q.Promise((resolve, reject) => {
 const { app, router, store } = createApp()
 router.push(context.url)
 router.onReady(() => {
  const matchedComponents = router.getMatchedComponents()
  if (!matchedComponents.length) {
  return reject({ code: 404 })
  }
  // 对所有匹配的路由组件调用 `asyncData()`
  Q.all(matchedComponents.map(Component => {
  if (Component.asyncData) {
   return Component.asyncData({
   store,
   route: router.currentRoute
   })
  }
  })).then(() => {
  // 在所有预取钩子(preFetch hook) resolve 后,
  // 我们的 store 现在已经填充入渲染应用程序所需的状态。
  // 当我们将状态附加到上下文,
  // 并且 `template` 选项用于 renderer 时,
  // 状态将自动序列化为 `window.__INITIAL_STATE__`,并注入 HTML。
  context.state = store.state
  resolve(app)
  }).catch(reject)
 }, reject)
 })
}4、脚手架其他目录介绍:
到这里src下面主要的几个文件代码已经编写完成,接下里介绍下整个项目的目录结构如下:
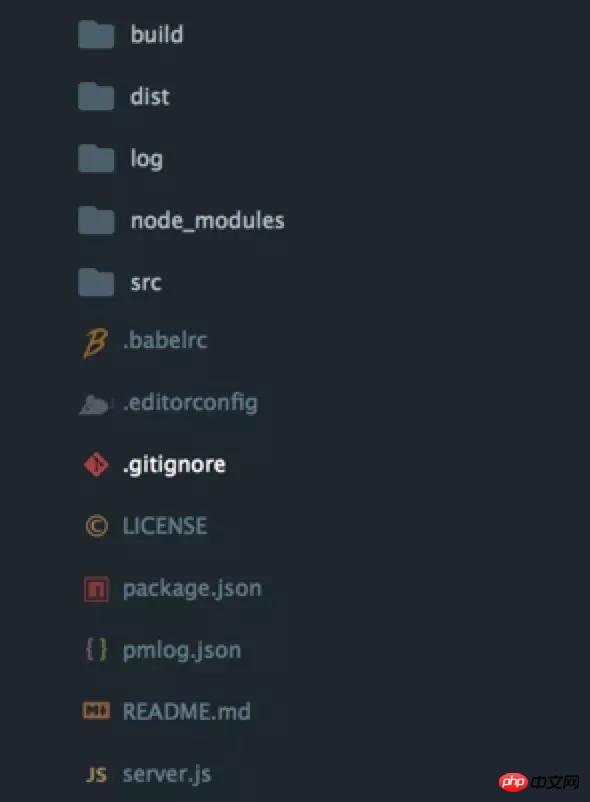
主要几个文件介绍如下:
build 主要存放webpack打包配置文件
dist webpack打包后生成的目录
log 使用pm2监控进程存放的日志文件目录
server.js node服务器启动文件
pmlog.json pm2配置文件
server.js入口文件编写
我们还需要编写在服务端启动服务的代码server.js,我们会使用到部分node原生提供的api,片段代码如下:
const Vue = require('vue')
const express = require('express')
const path = require('path')
const LRU = require('lru-cache')
const { createBundleRenderer } = require('vue-server-renderer')
const fs = require('fs')
const net = require('net')大致思路是,引入前端模版页面index.template.html,使用express启动服务,引入webpack打包项目代码的dist文件,引入缓存模块(这里不做深入介绍,后期会单独详细介绍),判断端口是否被占用,自动启动其他接口服务。
引入前端模版文件并且设置环境变量为production,片段代码如下:
const template = fs.readFileSync('./src/index.template.html', 'utf-8')
const isProd = process.env.NODE_ENV === 'production'
vue-server-renderer插件的具体使用,通过读取dist文件夹下的目录文件,来创建createBundleRenderer函数,并且使用LRU来设置缓存的时间,通过判断是生产环境还是开发环境,调用不同的方法,代码片段如下:
const resolve = file => path.resolve(__dirname, file)
function createRenderer (bundle, options) {
 return createBundleRenderer(bundle, Object.assign(options, {
 template,
 cache: LRU({
  max: 1000,
  maxAge: 1000 * 60 * 15
 }),
 basedir: resolve('./dist'),
 runInNewContext: false
 }))
}
let renderer;
let readyPromise
if (isProd) {
 const bundle = require('./dist/vue-ssr-server-bundle.json')
 const clientManifest = require('./dist/vue-ssr-client-manifest.json')
 renderer = createRenderer(bundle, {
 clientManifest
 })
} else {
 readyPromise = require('./build/setup-dev-server')(server, (bundle, options) => {
 renderer = createRenderer(bundle, options)
 })
}使用express启动服务,代码片段如下:
const server = express();

//定义在启动服务钱先判断中间件中的缓存是否过期,是否直接调用dist文件。
const serve = (path, cache) => express.static(resolve(path), {
 maxAge: cache && isProd ? 1000 * 60 * 60 * 24 * 30 : 0
})
server.use('/dist', serve('./dist', true))
server.get('*', (req, res) => {
 const context = {
 title: 'hello',
 url: req.url
 }
 renderer.renderToString(context, (err, html) => {
 if (err) {
  res.status(500).end('Internal Server Error')
  return
 }
 res.end(html)
 })
})判断端口是否被占用,片段代码如下:
function probe(port, callback) {
 let servers = net.createServer().listen(port)
 let calledOnce = false
 let timeoutRef = setTimeout(function() {
  calledOnce = true
  callback(false, port)
 }, 2000)
 timeoutRef.unref()
 let connected = false
 servers.on('listening', function() {
  clearTimeout(timeoutRef)

  if (servers)
   servers.close()

  if (!calledOnce) {
   calledOnce = true
   callback(true, port)
  }
 })
 servers.on('error', function(err) {
  clearTimeout(timeoutRef)

  let result = true
  if (err.code === 'EADDRINUSE')
   result = false

  if (!calledOnce) {
   calledOnce = true
   callback(result, port)
  }
 })
}
const checkPortPromise = new Promise((resolve) => {
 (function serverport(_port) {
  let pt = _port || 8080;
  probe(pt, function(bl, _pt) {
   // 端口被占用 bl 返回false
   // _pt:传入的端口号
   if (bl === true) {
    // console.log("\n Static file server running at" + "\n\n=> http://localhost:" + _pt + '\n');
    resolve(_pt);
   } else {
    serverport(_pt + 1)
   }
  })
 })()

})
checkPortPromise.then(data => {
 uri = 'http://localhost:' + data;
 console.log('启动服务路径'+uri)
 server.listen(data);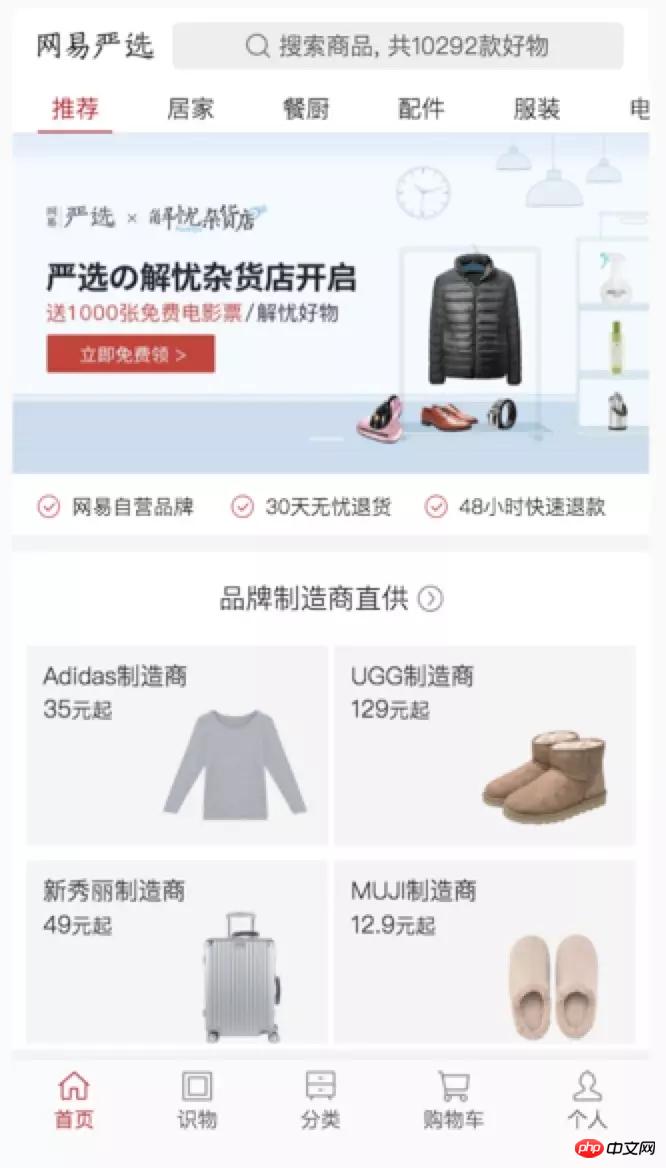
});到这里,基本的代码已经编写完成,webpack打包配置文件基本和官方保持不变,接下来可以尝试启动本地的项目服务,这里简要的使用网易严选首页作为demo示例,结果如下:
第三部分 mockjs和axios配合使用
1、前言
上一节大致介绍了服务端和客户端入口文件代码内容,现在已经可以正常运行你的后端渲染脚手架了,这一节,跟大家分享下如何使用axios做ajax请求,如何使用mockjs做本地假数据,跑通本地基本逻辑,为以后前后端连调做准备。
2、前期准备
需要用npm安装axios,mockjs依赖包,由于mockjs只是代码开发的辅助工具,所以安装的时候我会加--save-dev来区分,具体可以根据自己的需求来定,当然,如果有mock服务平台的话,可以直接走mock平台造假数据,本地直接访问mock平台的接口,例如可以使用阿里的Rap平台管理工具生成。
npm install axios --save
npm install mockjs --save-dev
3、简要介绍axios
其他请求方式,代码示例如下:
axios.request(config);
axios.get(url[,config]);
axios.delete(url[,config]);
axios.head(url[,config]);
axios.post(url[,data[,config]]);
axios.put(url[,data[,config]])
axios.patch(url[,data[,config]])
具体详细可以点击查看axios基本使用介绍
api.js完整代码如下:
import axios from 'axios'
import qs from 'qs'
import Q from 'q'
/**
 * 兼容 不支持promise 的低版本浏览器
 */
require('es6-promise').polyfill();
import C from '../conf'

axios.defaults.headers.post['Content-Type'] = 'application/x-www-form-urlencoded; charset=UTF-8'
axios.defaults.withCredentials = true

function ajax(url, type, options) {

 return Q.Promise((resolve, reject) => {
 axios({
  method: type,
  url: C.HOST + url,
  params: type === 'get' ? options : null,
  data: type !== 'get' ? qs.stringify(options) : null
  })
  .then((result) => {
  if (result && result.status === 401) {
   // location.href = '/views/401.html'
  }
  if (result && result.status === 200) {
   if (result.data.code === 200) {
   resolve(result.data.data);
   } else if (result.data.code === 401) {
   reject({
    nopms: true,
    msg: result.data.msg
   });
   } else {
   reject({
    error: true,
    msg: result.data.msg
   });
   }
  } else {
   reject({
   errno: result.errno,
   msg: result.msg
   });
  }
  })
  .catch(function(error) {
  console.log(error, url);
  });
 })
}

const config = {
 get(url, options) {
 const _self = this;
 return Q.Promise((resolve, reject) => {
  ajax(url, 'get', options)
  .then((data) => {
   resolve(data);
  }, (error) => {
   reject(error);
  });
 })
 },

 post(url, options) {
 const _self = this;
 return Q.Promise((resolve, reject) => {
  ajax(url, 'post', options)
  .then((data) => {
   resolve(data);
  }, (error) => {
   reject(error);
  });
 })
 },

 put(url, options) {
 const _self = this;
 return Q.Promise((resolve, reject) => {
  ajax(url, 'put', options)
  .then((data) => {
   resolve(data);
  }, (error) => {
   reject(error);
  });
 })
 },

 delete(url, options) {
 const _self = this;
 return Q.Promise((resolve, reject) => {
  ajax(url, 'delete', options)
  .then((data) => {
   resolve(data);
  }, (error) => {
   reject(error);
  });
 })
 },

 jsonp(url, options) {
 const _self = this;
 return Q.Promise((resolve, reject) => {
  ajax(url, 'jsonp', options)
  .then((data) => {
   resolve(data);
  }, (error) => {
   reject(error);
  });
 })
 }
};

export default config;mockjs项目基本配置如下:
1、在public下新建conf.js全局定义请求url地址,代码如下:
module.exports = {
 HOST: "http://www.xxx.com",
 DEBUGMOCK: true
};2、在views/index根目录下新建conf.js,定义组件mock的请求路径,并且定义是否开始单个组件使用mock数据还是线上接口数据,代码如下:
const PAGEMOCK = true;
const MODULECONF = {
 index: {
 NAME: '首页',
 MOCK: true,
 API: {
  GET: '/api/home',
 }
 }
};3、在组件内部定义mockjs来编写mock假数据,代码如下:
import Mock from 'mockjs';
const mData = {
 index: {
 API: {
  GET: {
  "code": 200,
  "data": {
   "pin": 'wangqi',
   "name": '王奇'
  }
  }
 }
 }
}上面是我整理给大家的,希望今后会对大家有帮助。
相关文章:
The above is the detailed content of How to implement server-side rendering using vue-ssr. For more information, please follow other related articles on the PHP Chinese website!

Hot AI Tools

Undresser.AI Undress
AI-powered app for creating realistic nude photos

AI Clothes Remover
Online AI tool for removing clothes from photos.

Undress AI Tool
Undress images for free

Clothoff.io
AI clothes remover

AI Hentai Generator
Generate AI Hentai for free.

Hot Article
Hot Tools

Notepad++7.3.1
Easy-to-use and free code editor

SublimeText3 Chinese version
Chinese version, very easy to use

Zend Studio 13.0.1
Powerful PHP integrated development environment

Dreamweaver CS6
Visual web development tools

SublimeText3 Mac version
God-level code editing software (SublimeText3)
Hot Topics
 1382
1382
 52
52

 How to add functions to buttons for vue
Apr 08, 2025 am 08:51 AM
How to add functions to buttons for vue
Apr 08, 2025 am 08:51 AM
You can add a function to the Vue button by binding the button in the HTML template to a method. Define the method and write function logic in the Vue instance.
 How to use bootstrap in vue
Apr 07, 2025 pm 11:33 PM
How to use bootstrap in vue
Apr 07, 2025 pm 11:33 PM
Using Bootstrap in Vue.js is divided into five steps: Install Bootstrap. Import Bootstrap in main.js. Use the Bootstrap component directly in the template. Optional: Custom style. Optional: Use plug-ins.
 How to reference js file with vue.js
Apr 07, 2025 pm 11:27 PM
How to reference js file with vue.js
Apr 07, 2025 pm 11:27 PM
There are three ways to refer to JS files in Vue.js: directly specify the path using the <script> tag;; dynamic import using the mounted() lifecycle hook; and importing through the Vuex state management library.
 How to use watch in vue
Apr 07, 2025 pm 11:36 PM
How to use watch in vue
Apr 07, 2025 pm 11:36 PM
The watch option in Vue.js allows developers to listen for changes in specific data. When the data changes, watch triggers a callback function to perform update views or other tasks. Its configuration options include immediate, which specifies whether to execute a callback immediately, and deep, which specifies whether to recursively listen to changes to objects or arrays.
 How to return to previous page by vue
Apr 07, 2025 pm 11:30 PM
How to return to previous page by vue
Apr 07, 2025 pm 11:30 PM
Vue.js has four methods to return to the previous page: $router.go(-1)$router.back() uses <router-link to="/" component window.history.back(), and the method selection depends on the scene.
 What does vue multi-page development mean?
Apr 07, 2025 pm 11:57 PM
What does vue multi-page development mean?
Apr 07, 2025 pm 11:57 PM
Vue multi-page development is a way to build applications using the Vue.js framework, where the application is divided into separate pages: Code Maintenance: Splitting the application into multiple pages can make the code easier to manage and maintain. Modularity: Each page can be used as a separate module for easy reuse and replacement. Simple routing: Navigation between pages can be managed through simple routing configuration. SEO Optimization: Each page has its own URL, which helps SEO.
 How to query the version of vue
Apr 07, 2025 pm 11:24 PM
How to query the version of vue
Apr 07, 2025 pm 11:24 PM
You can query the Vue version by using Vue Devtools to view the Vue tab in the browser's console. Use npm to run the "npm list -g vue" command. Find the Vue item in the "dependencies" object of the package.json file. For Vue CLI projects, run the "vue --version" command. Check the version information in the <script> tag in the HTML file that refers to the Vue file.
 How to use function intercept vue
Apr 08, 2025 am 06:51 AM
How to use function intercept vue
Apr 08, 2025 am 06:51 AM
Function interception in Vue is a technique used to limit the number of times a function is called within a specified time period and prevent performance problems. The implementation method is: import the lodash library: import { debounce } from 'lodash'; Use the debounce function to create an intercept function: const debouncedFunction = debounce(() => { / Logical / }, 500); Call the intercept function, and the control function is called at most once in 500 milliseconds.
