

Using Angular5 to implement server-side rendering practice
This article mainly introduces the detailed explanation of Angular5 server-side rendering practice. Now I share it with you and give it as a reference.
This article continues development based on the previous Angular5 article. The above article talks about the process of building Angular5 Youdao Translation and the solutions to the problems encountered.

Then the UI was changed from bootstrap4 to angular material. I won’t go into details here. Server-side rendering has nothing to do with modifying the UI.
Those who have read the previous articles will find that the content of the articles is biased towards server-side rendering, vue’s nuxt, and react’s next.
Before this revision, I also tried to find top-level packaging libraries like nuxt.js and next.js, which can greatly save time, but to no avail.
Finally decided to use the front-end and back-end isomorphic solution Angular Universal (Universal (isomorphic) JavaScript support for Angular.) that has been available since Angular2.
I will not introduce the document content in detail here. This article also Try to use easy-to-understand language to bring Angular's SSR
Prerequisite
The udao project written above is completely compliant with angular-cli, from construction to packaging , which also makes this article universally applicable to all angular5 projects built with angular-cli.
Building process
First install the server dependencies
yarn add @angular/platform-server express
yarn add -D ts-loader webpack-node-externals npm-run-all
It should be noted here that the version number of @angular/platform-server is best based on the current Install the angular version, such as: @angular/platform-server@5.1.0 to avoid version conflicts with other dependencies.
Create file: src/app/app.server.module.ts
import { NgModule } from '@angular/core'
import { ServerModule } from '@angular/platform-server'

import { AppModule } from './app.module'
import { AppComponent } from './app.component'

@NgModule({
 imports: [
  AppModule,
  ServerModule
 ],
 bootstrap: [AppComponent],
})
export class AppServerModule { }Update file: src/app/app.module.ts
import { BrowserModule } from '@angular/platform-browser'
import { NgModule } from '@angular/core'
// ...

import { AppComponent } from './app.component'
// ...

@NgModule({
 declarations: [
  AppComponent
  // ...
 ],
 imports: [
  BrowserModule.withServerTransition({ appId: 'udao' })
  // ...
 ],
 providers: [],
 bootstrap: [AppComponent]
})
export class AppModule { }We need a master File to export the server module
Create the file: src/main.server.ts
export { AppServerModule } from './app/app.server.module'Now let’s update the configuration file of @angular/cli.angular-cli.json
{
 "$schema": "./node_modules/@angular/cli/lib/config/schema.json",
 "project": {
  "name": "udao"
 },
 "apps": [
  {
   "root": "src",
   "outDir": "dist/browser",
   "assets": [
    "assets",
    "favicon.ico"
   ]
   // ...
  },
  {
   "platform": "server",
   "root": "src",
   "outDir": "dist/server",
   "assets": [],
   "index": "index.html",
   "main": "main.server.ts",
   "test": "test.ts",
   "tsconfig": "tsconfig.server.json",
   "testTsconfig": "tsconfig.spec.json",
   "prefix": "app",
   "scripts": [],
   "environmentSource": "environments/environment.ts",
   "environments": {
    "dev": "environments/environment.ts",
    "prod": "environments/environment.prod.ts"
   }
  }
 ]
 // ...
}The //... above means omitting it, but there is no comment in json, which looks weird....
Of course, the configuration of .angular-cli.json is not fixed, and it depends on the needs. Modify by yourself
We need to create a tsconfig configuration file for the server: src/tsconfig.server.json
{
 "extends": "../tsconfig.json",
 "compilerOptions": {
  "outDir": "../out-tsc/app",
  "baseUrl": "./",
  "module": "commonjs",
  "types": []
 },
 "exclude": [
  "test.ts",
  "**/*.spec.ts",
  "server.ts"
 ],
 "angularCompilerOptions": {
  "entryModule": "app/app.server.module#AppServerModule"
 }
}Then update: src/tsconfig.app.json
{
 "extends": "../tsconfig.json",
 "compilerOptions": {
  "outDir": "../out-tsc/app",
  "baseUrl": "./",
  "module": "es2015",
  "types": []
 },
 "exclude": [
  "test.ts",
  "**/*.spec.ts",
  "server.ts"
 ]
}Now You can execute the following command to see if the configuration is valid
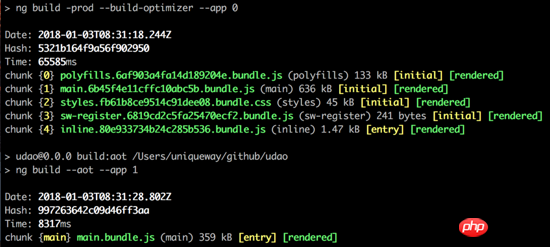
ng build -prod --build-optimizer --app 0
ng build --aot --app 1
The running result should be as shown in the figure below
Then create the Express.js service and create the file: src /server.ts
import 'reflect-metadata'
import 'zone.js/dist/zone-node'
import { renderModuleFactory } from '@angular/platform-server'
import { enableProdMode } from '@angular/core'
import * as express from 'express'
import { join } from 'path'
import { readFileSync } from 'fs'

enableProdMode();

const PORT = process.env.PORT || 4200
const DIST_FOLDER = join(process.cwd(), 'dist')

const app = express()

const template = readFileSync(join(DIST_FOLDER, 'browser', 'index.html')).toString()
const { AppServerModuleNgFactory } = require('main.server')

app.engine('html', (_, options, callback) => {
 const opts = { document: template, url: options.req.url }

 renderModuleFactory(AppServerModuleNgFactory, opts)
  .then(html => callback(null, html))
});

app.set('view engine', 'html')
app.set('views', 'src')

app.get('*.*', express.static(join(DIST_FOLDER, 'browser')))

app.get('*', (req, res) => {
 res.render('index', { req })
})

app.listen(PORT, () => {
 console.log(`listening on http://localhost:${PORT}!`)
})Of course you need a webpack configuration file to package the server.ts file: webpack.config.js
const path = require('path');
var nodeExternals = require('webpack-node-externals');

module.exports = {
 entry: {
  server: './src/server.ts'
 },
 resolve: {
  extensions: ['.ts', '.js'],
  alias: {
   'main.server': path.join(__dirname, 'dist', 'server', 'main.bundle.js')
  }
 },
 target: 'node',
 externals: [nodeExternals()],
 output: {
  path: path.join(__dirname, 'dist'),
  filename: '[name].js'
 },
 module: {
  rules: [
   { test: /\.ts$/, loader: 'ts-loader' }
  ]
 }
}For the convenience of packaging, it is best to add a few lines of scripts to package.json , as follows:
"scripts": {
 "ng": "ng",
 "start": "ng serve",
 "build": "run-s build:client build:aot build:server",
 "build:client": "ng build -prod --build-optimizer --app 0",
 "build:aot": "ng build --aot --app 1",
 "build:server": "webpack -p",
 "test": "ng test",
 "lint": "ng lint",
 "e2e": "ng e2e"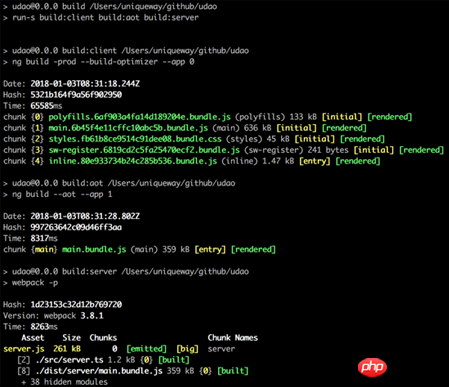
}Now try to run npm run build and you will see the following output:
node Run the node dist/server you just packaged. js file
Open http://localhost:4200/ and the project main page will be displayed normally
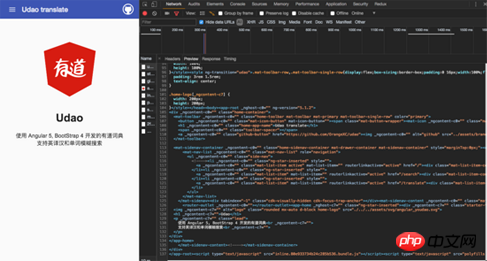
It can be seen from the above developer tools that the html document is The server renders directly. Next, try to request data.
Note: None of the explicit (clickable menu) route initializations of this project request data, but the details page of word explanation will obtain data in the ngOnInit() method, for example: http:// A strange phenomenon will occur when localhost:4200/detail/add is opened directly. The request is sent once to the server and the client respectively. The request for the initialization data of the first screen of the normal server-side rendering project is executed on the server side and not twice on the client side. requests!
After discovering the problem, let’s eliminate this pit
Imagine if a mark is used to distinguish whether the server has obtained the data. If the data is not obtained, the client requests it. , do not send a request if the data has been obtained
Of course Angular has already prepared it, that is Angular Modules for Transfer State
So how to actually use it? See below
Request to fill in the pit
Introduce TransferStateModule at the server entrance and client entrance respectively
import { ServerModule, ServerTransferStateModule } from '@angular/platform-server';
// ...

@NgModule({
 imports: [
  // ...
  ServerModule,
  ServerTransferStateModule
 ]
 // ...
})
export class AppServerModule { }
import { BrowserModule, BrowserTransferStateModule } from '@angular/platform-browser';
// ...

@NgModule({
 declarations: [
  AppComponent
  // ...
 ],
 imports: [
  BrowserModule.withServerTransition({ appId: 'udao' }),
  BrowserTransferStateModule
  // ...
 ]
 // ...
})
export class AppModule { }Take this project as an example in detail.component.ts and modify it as follows
import { Component, OnInit } from '@angular/core'
import { HttpClient } from '@angular/common/http'
import { Router, ActivatedRoute, NavigationEnd } from '@angular/router'
import { TransferState, makeStateKey } from '@angular/platform-browser'

const DETAIL_KEY = makeStateKey('detail')

// ...

export class DetailComponent implements OnInit {
 details: any

 // some variable

 constructor(
  private http: HttpClient,
  private state: TransferState,
  private route: ActivatedRoute,
  private router: Router
 ) {}

 transData (res) {
  // translate res data
 }

 ngOnInit () {
  this.details = this.state.get(DETAIL_KEY, null as any)

  if (!this.details) {
   this.route.params.subscribe((params) => {
    this.loading = true

    const apiURL = `https://dict.youdao.com/jsonapi?q=${params['word']}`

    this.http.get(`/?url=${encodeURIComponent(apiURL)}`)
    .subscribe(res => {
     this.transData(res)
     this.state.set(DETAIL_KEY, res as any)
     this.loading = false
    })
   })
  } else {
   this.transData(this.details)
  }
 }
}The code is simple and clear enough, consistent with the principle described above
Now we only need to make small adjustments to the main.ts file to run our code when DOMContentLoaded, so that TransferState works normally:
import { enableProdMode } from '@angular/core'
import { platformBrowserDynamic } from '@angular/platform-browser-dynamic'

import { AppModule } from './app/app.module'
import { environment } from './environments/environment'

if (environment.production) {
 enableProdMode()
}

document.addEventListener('DOMContentLoaded', () => {
 platformBrowserDynamic().bootstrapModule(AppModule)
  .catch(err => console.log(err))
})Go here and run npm run build && node dist/server.js and then refresh http://localhost:4200/detail/add to the console to view the network as follows:
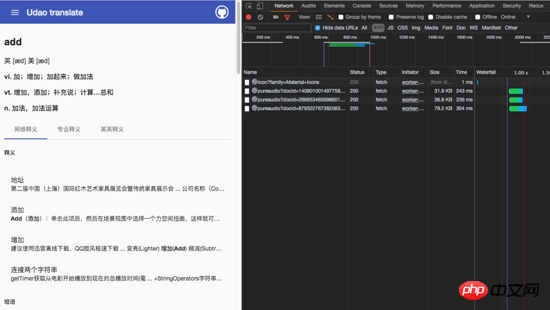
It was found that no request was initiated in the XHR category, only the cache of service-worker was hit.
All the pitfalls have been overcome here. The project is running normally and no other bugs have been found.
Summarize
2018 The first article aims to explore the implementation of server-side rendering in all popular frameworks, and opens up angular, a framework that was not tried in the end.
Of course, Orange is still a front-end elementary school student. I only know how to implement it. The principles are not very clear, and the source code is not very clear. If there are any mistakes, I hope you can enlighten me.
The final Github address is the same as the previous article: https://github.com/OrangeXC/udao
The above is what I compiled for everyone. I hope it will be helpful to everyone in the future.
Related articles:
Detailed explanation of how to implement vuex (detailed tutorial)
Implement WeChat payment through vue.js
Implementing user permission control in Vue2.0
The above is the detailed content of Using Angular5 to implement server-side rendering practice. For more information, please follow other related articles on the PHP Chinese website!

Hot AI Tools

Undresser.AI Undress
AI-powered app for creating realistic nude photos

AI Clothes Remover
Online AI tool for removing clothes from photos.

Undress AI Tool
Undress images for free

Clothoff.io
AI clothes remover

Video Face Swap
Swap faces in any video effortlessly with our completely free AI face swap tool!

Hot Article
Hot Tools

Notepad++7.3.1
Easy-to-use and free code editor

SublimeText3 Chinese version
Chinese version, very easy to use

Zend Studio 13.0.1
Powerful PHP integrated development environment

Dreamweaver CS6
Visual web development tools

SublimeText3 Mac version
God-level code editing software (SublimeText3)
Hot Topics
 1666
1666
 14
1425
52
1327
25
1273
29
1253
24
14
1425
52
1327
25
1273
29
1253
24

 JavaScript Engines: Comparing Implementations
Apr 13, 2025 am 12:05 AM
JavaScript Engines: Comparing Implementations
Apr 13, 2025 am 12:05 AM
Different JavaScript engines have different effects when parsing and executing JavaScript code, because the implementation principles and optimization strategies of each engine differ. 1. Lexical analysis: convert source code into lexical unit. 2. Grammar analysis: Generate an abstract syntax tree. 3. Optimization and compilation: Generate machine code through the JIT compiler. 4. Execute: Run the machine code. V8 engine optimizes through instant compilation and hidden class, SpiderMonkey uses a type inference system, resulting in different performance performance on the same code.
 Python vs. JavaScript: The Learning Curve and Ease of Use
Apr 16, 2025 am 12:12 AM
Python vs. JavaScript: The Learning Curve and Ease of Use
Apr 16, 2025 am 12:12 AM
Python is more suitable for beginners, with a smooth learning curve and concise syntax; JavaScript is suitable for front-end development, with a steep learning curve and flexible syntax. 1. Python syntax is intuitive and suitable for data science and back-end development. 2. JavaScript is flexible and widely used in front-end and server-side programming.
 From C/C to JavaScript: How It All Works
Apr 14, 2025 am 12:05 AM
From C/C to JavaScript: How It All Works
Apr 14, 2025 am 12:05 AM
The shift from C/C to JavaScript requires adapting to dynamic typing, garbage collection and asynchronous programming. 1) C/C is a statically typed language that requires manual memory management, while JavaScript is dynamically typed and garbage collection is automatically processed. 2) C/C needs to be compiled into machine code, while JavaScript is an interpreted language. 3) JavaScript introduces concepts such as closures, prototype chains and Promise, which enhances flexibility and asynchronous programming capabilities.
 JavaScript and the Web: Core Functionality and Use Cases
Apr 18, 2025 am 12:19 AM
JavaScript and the Web: Core Functionality and Use Cases
Apr 18, 2025 am 12:19 AM
The main uses of JavaScript in web development include client interaction, form verification and asynchronous communication. 1) Dynamic content update and user interaction through DOM operations; 2) Client verification is carried out before the user submits data to improve the user experience; 3) Refreshless communication with the server is achieved through AJAX technology.
 JavaScript in Action: Real-World Examples and Projects
Apr 19, 2025 am 12:13 AM
JavaScript in Action: Real-World Examples and Projects
Apr 19, 2025 am 12:13 AM
JavaScript's application in the real world includes front-end and back-end development. 1) Display front-end applications by building a TODO list application, involving DOM operations and event processing. 2) Build RESTfulAPI through Node.js and Express to demonstrate back-end applications.
 Understanding the JavaScript Engine: Implementation Details
Apr 17, 2025 am 12:05 AM
Understanding the JavaScript Engine: Implementation Details
Apr 17, 2025 am 12:05 AM
Understanding how JavaScript engine works internally is important to developers because it helps write more efficient code and understand performance bottlenecks and optimization strategies. 1) The engine's workflow includes three stages: parsing, compiling and execution; 2) During the execution process, the engine will perform dynamic optimization, such as inline cache and hidden classes; 3) Best practices include avoiding global variables, optimizing loops, using const and lets, and avoiding excessive use of closures.
 Python vs. JavaScript: Community, Libraries, and Resources
Apr 15, 2025 am 12:16 AM
Python vs. JavaScript: Community, Libraries, and Resources
Apr 15, 2025 am 12:16 AM
Python and JavaScript have their own advantages and disadvantages in terms of community, libraries and resources. 1) The Python community is friendly and suitable for beginners, but the front-end development resources are not as rich as JavaScript. 2) Python is powerful in data science and machine learning libraries, while JavaScript is better in front-end development libraries and frameworks. 3) Both have rich learning resources, but Python is suitable for starting with official documents, while JavaScript is better with MDNWebDocs. The choice should be based on project needs and personal interests.
 Python vs. JavaScript: Development Environments and Tools
Apr 26, 2025 am 12:09 AM
Python vs. JavaScript: Development Environments and Tools
Apr 26, 2025 am 12:09 AM
Both Python and JavaScript's choices in development environments are important. 1) Python's development environment includes PyCharm, JupyterNotebook and Anaconda, which are suitable for data science and rapid prototyping. 2) The development environment of JavaScript includes Node.js, VSCode and Webpack, which are suitable for front-end and back-end development. Choosing the right tools according to project needs can improve development efficiency and project success rate.
