This article mainly introduces the implementation code of left and right sliding in the WeChat applet. It is very good and has reference value. Friends in need can refer to it
If you don’t want to slide left or right, Another person
No matter you are a programmer or a programmer, what you do every day is coding or coding, and there are problems that cannot be solved by code (what problems have you not clicked in your mind abcd (number), Tantan can help you solve it. Recently, a dating software is very popular on the Internet called Tantan (it is said to be a YP software). As a former Tantan veteran player who only browsed pictures but had never tried it, and a girl who loves front-end, I decided to imitate this app. Since it is developed by Zhiji, it is not up to Zhiji. There is no doubt that the theme style of the entire APP has been changed to my favorite ultimate girl fan hhh. Let us feel the charm of Tantan together. ~
Overall effect of the project
##Project Analysis of some function points
The homepage picture slides left and right to correspond to the button change
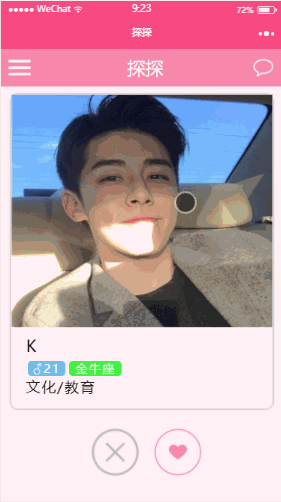
First of all, let’s talk about what gives me the most headache The place is the left and right sliding event on the main page and the corresponding button will change accordingly. That is, if I slide left to the gray button under the picture, there will be a corresponding animation effect, and if I slide to the right, it will correspond to the red button under the picture. For a girl who has just entered the mini program pit, she doesn’t know how long it will take to get out of the logic pit without the guidance of a master. With the guidance of an expert, I realized this function perfectly.
Here are three large boxes to store pictures and text information, and then put them inside the swiper-item, and use the swiper component to realize the left and right sliding of the entire box
1 2 3 4 5 6 7 8 9 10 11 | <swiper class='swiper-item__content' current="" bindchange="changeswiper">
<swiper-item class="swip">
<view class='page__bd_content'>
<image class="slide-image" src="http://pic.qqtn.com/up/2017-12/15126388387704237.jpg" mode="scaleToFill"/>
<view class="name">K</view>
<view class="age">♂21</view>
<view class="conste">金牛座</view>
<view class="status">文化/教育</view>
</view>
</swiper-item>
</swiper>
|
Copy after login
The bottom of the box is not Button, I put two pictures.
1 2 3 4 | <view class="page__ft">
<image class="notlike {{left?'active':''}}" src="../../images/notlike.png" />
<image class="like {{right?'active':''}}" src="../../images/like.png" />
</view>
|
Copy after login
First write them an animation effect that is triggered when sliding
1 2 3 4 5 6 7 8 9 10 11 12 13 14 | .active {
animation: active 1s ease;
}
@keyframes active {
0% {
transform: scale(0.8);
}
50% {
transform: scale(1.2);
}
100% {
transform: scale(1.0);
}
}
|
Copy after login
Define three variables in the data of the page, and bind the left and right variables to the corresponding pictures
1 2 3 4 5 | data: {
left: false ,
right: false,
activeIndex: 0
},
|
Copy after login
Determine the left and right sliding events specifically in the swiper binding event
1 2 3 4 5 6 7 8 9 10 11 12 13 14 15 16 17 18 19 | changeswiper: function(e) {
var index = e.detail.current;
if(index > this.data.activeIndex) {
this.setData({
left: true
})
} else if(index < this.data.activeIndex) {
this.setData({
right: true
})
}
setTimeout(() => {
this.setData({
activeIndex: index,
left:false,
right:false
})
}, 1000);
},
|
Copy after login
Upload pictures from local

Just check the mini program development documentation for this. First bind a data variable to the src where you want to upload the image.
1 | <image class="addImg" src="{{imgUrl}}" bindtap="uploadImg" />
|
Copy after login
Put in the default address of the image, that is Add pictures before uploading them
1 2 3 | data: {
imgUrl: '../../images/addImg.png'
},
|
Copy after login
Replace the uploaded picture address by binding the tap event
1 2 3 4 5 6 7 8 9 10 11 12 13 14 15 16 17 18 | uploadImg: function(e) {
var that = this;
wx.chooseImage({
count: 1,
sizeType: ['original', 'compressed'],
sourceType: ['album', 'camera'],
success: function (res) {
var tempFilePaths = res.tempFilePaths;
that.setData({
imgUrl: tempFilePaths
})
wx.showToast({
title: '上传成功',
icon: 'success',
duration: 2000
})
}
}),
|
Copy after login
Get the background data through easy-mock after pairing is successful

block wx:for rendering a structural block containing multiple nodes
1 2 3 4 5 6 7 8 9 10 11 12 13 14 15 | <swiper-item>
<view class="swiper-item__content">
<block wx:for="{{friendsList}}" wx:key="index">
<view class="weui-tab__content">
<view class="weui-media-box__hd">
<image src="{{item.avatar}}" mode="aspectFit"></image>
</view>
<view class="weui-media-box__bd">
<view class="weui-media-box__nickname">{{item.nickname}}</view>
<view class="weui-media-box__message">{{item.message}}</view>
</view>
</view>
</block>
</view>
</swiper-item>
|
Copy after login
Getting background data
1 2 3 4 5 6 7 8 9 | wx.request({
url: 'https:
success: (res) => {
this.setData({
friendsList: res.data.data.friendsList
})
}
})
|
Copy after login
The rest is almost to cut pages, I am not used to it for personal reasons The official style of weui, each page is coded with great effort by myself, so if you don’t like it, I’m still studying hard~~~
The above is what I compiled for everyone. I hope that in the future It will be helpful to everyone.
Related articles:
Detailed introduction to routing and middleware in node.js
How to achieve entry in Vue /Leave animation
Detailed interpretation of the entry function run in webpack
Solution to the Bootstrap modal box submission BUG
The above is the detailed content of How to achieve left and right sliding in WeChat mini program. For more information, please follow other related articles on the PHP Chinese website!


![[Web front-end] Node.js quick start](https://img.php.cn/upload/course/000/000/067/662b5d34ba7c0227.png)


