This article mainly introduces the implementation method of nav navigation bar in vue project in detail. It has certain reference value. Interested friends can refer to it
Every web page project is indispensable for navigation bar. , basically can be written through the original method. But if you want to write code with less code and low redundancy, you need to use your brain to think about it.
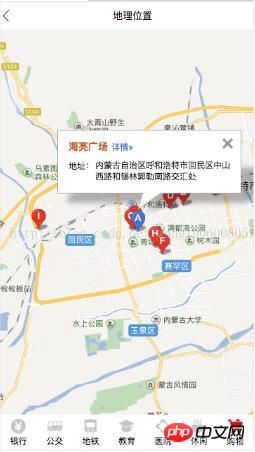
I recently wrote a Baidu Map project, which requires a navigation bar at the bottom. The details are as follows:

#First of all, we got all the icon pictures in the bottom navigation bar. There are two types of pictures. The gray ones represent unselected ones, and the selected ones are replaced with pictures with sample colors.
Let’s take a look first, the html structure in the component: use the v-for method provided by vue to traverse and display the footNav array. The array contains {title: "Bank", url: " ", url1: " "}. Bind the src of the image to isSelect and make a judgment. If it is equal to the current title, the current navigation is selected and displayed. Image url1 when selected.
<p class="footer">
 <ul>
 <li v-for="item in footNav" @click="selectMapNav(item.title)">
  <img :src="isSelect === item.title ? item.url1 : item.url" alt="">
  <p>{{item.title}}</p>
 </li>
 </ul>
</p>The style is written in the extension language less, and everyone should be able to understand it. It is just nested briefly. Add a width of 100% and a fixed height to this area. Because it needs to be displayed at the bottom, a fixed positioning and background color are added. I am writing a mobile project, and the browsers are relatively new, so there is no need to consider compatibility issues. The bold flex layout can easily implement the navigation bar.
.footer ul{
 width:100%;
 height:50px;
 position:fixed;
 bottom:0;
 z-index:1;
 background-color:#fff;
 display:flex;
 li{
 text-align:center;
 flex:1;
 img{height:23px;width:23px;margin-top:5px;}
 p{font-size:0.1rem;height:15px;line-height:10px;}
 }
}Define an array in vue data (), which stores the title of each navigation, such as 'Bank', the image url displayed when it is not selected, and the image url1 when it is selected. isSelect indicates the currently selected one, and the bank is selected by default.
isSelect: '银行',
footNav: [{title: '银行', url: '../../../static/baiduMap/23@2x.png', url1: '../../../static/baiduMap/22@2x.png'},
 {title: '公交 ', url: '../../../static/baiduMap/11@2x.png', url1: '../../../static/baiduMap/10@2x.png'},
 {title: '地铁 ', url: '../../../static/baiduMap/13@2x.png', url1: '../../../static/baiduMap/12@2x.png'},
 {title: '教育 ', url: '../../../static/baiduMap/15@2x.png', url1: '../../../static/baiduMap/14@2x.png'},
 {title: '医院 ', url: '../../../static/baiduMap/17@2x.png', url1: '../../../static/baiduMap/16@2x.png'},
 {title: '休闲 ', url: '../../../static/baiduMap/19@2x.png', url1: '../../../static/baiduMap/18@2x.png'},
 {title: '购物 ', url: '../../../static/baiduMap/21@2x.png', url1: '../../../static/baiduMap/20@2x.png'}
]In the methods method, write the event called in html. Through the click event selectMapNav(item.title) in the html structure layer, the title passed by is assigned to isSelect to realize the change of the click state of the navigation bar.
selectMapNav (title) {
this.isSelect = title }Let’s take a look at the final result, it’s perfect.

The above is what I compiled for everyone. I hope it will be helpful to everyone in the future.
Related articles:
Explanation of scope scope in angularjs
##How to achieve high-performance loading order in javascript
How to implement global registration in axios
How to implement login verification jump using Vue Flask (detailed tutorial)
The above is the detailed content of How to implement nav navigation bar using vue. For more information, please follow other related articles on the PHP Chinese website!


