
 Web Front-end
JS Tutorial
Introduction to Vue webapp project packaging native APP through HBulider
Web Front-end
JS Tutorial
Introduction to Vue webapp project packaging native APP through HBulider
Introduction to Vue webapp project packaging native APP through HBulider

This article mainly introduces the detailed explanation of Vue webapp project packaging native APP through HBulider. The content is quite good. Now I will share it with you and give it as a reference.
The Vue webapp project packages the native APP through HBulider
1. The webapp project has been written through the scaffolding built by vue-cli, and then packaged into a deployment file list through webpack, as follows :

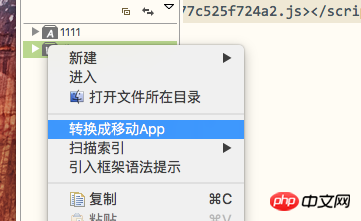
2. Open HBulider, open the directory, select this list, and change the project name yourself. (Or create a new app project directly, and then keep the unpackage and manifest inside, and replace the others with the contents of your own dist file)

# This is a web project and needs to be changed to an APP project (if you create a new app directly, please ignore this step)
Before changing: 
After changes: 
3. Open this dist in HB, and you can see that there is a manifest.json file. This file is used to configure application information. The entry file must correspond well. I used VUE to write a single-page application, so there is only one index.html.

Then configure the icon

#Just configure it according to the requirements of your own project, as listed below in HB Very detailed.
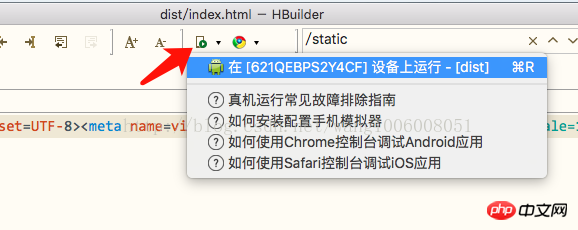
4. Next, you can connect the mobile phone to the computer with a USB cable for real machine debugging. (It must be connected through a USB cable. HB does not support wireless connection.) Needless to say, Windows computers can be solved by using some 360 assistants or something. If your phone is Android, it's not that easy on an Apple computer. Later, I also figured it out through Baidu and my own exploration. The method is to download the Android File Transfer software on your Apple computer. When you want to charge, just click on the trial. You need to turn on USB debugging on the phone, and then select Internal CD to connect to the Apple computer. The phone itself also has a prompt (which is really heart-warming)

After the connection is successful, you can start debugging on the real machine.
Note: Many people on the Internet say that their VUE project opens blank. Remember to change the export path of the bulid module in index.js under the config. Because the content in index.html is introduced through script tags, and your path is wrong, it will definitely be blank when opened. Let’s take a look at the default path first.
module.exports = {
 build: {
  env: require('./prod.env'),
  index: path.resolve(__dirname, '../dist/index.html'),
  assetsRoot: path.resolve(__dirname, '../dist'),
  assetsSubDirectory: 'static',
  assetsPublicPath: '/',
productionSourceMap: true,The default assetsPublicPath is ‘/’ which is the root directory. Our index.html and static are in the same directory. So it needs to be changed to ‘./ ‘
There is also one more thing to note. The default mode in the router/index.js routing configuration in src is hash. If you change it to history mode, it will be blank when you open it. So change it to hash or delete the mode configuration directly and make it the default.
// mode: 'history' // 默认hash
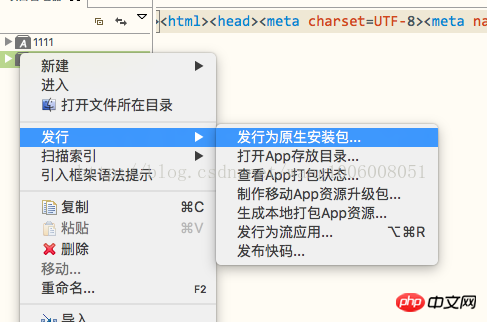
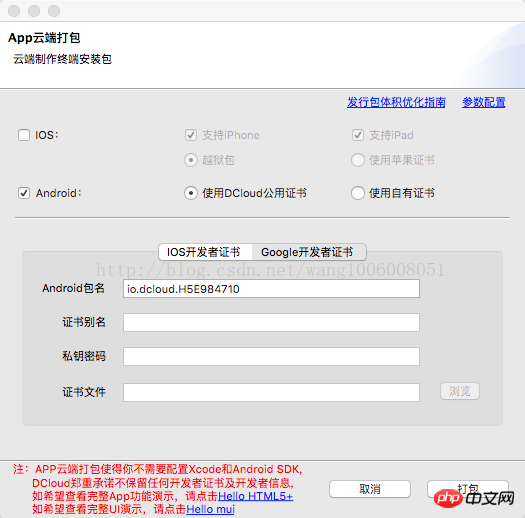
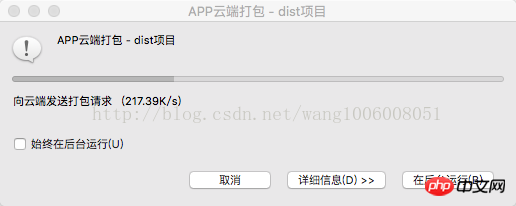
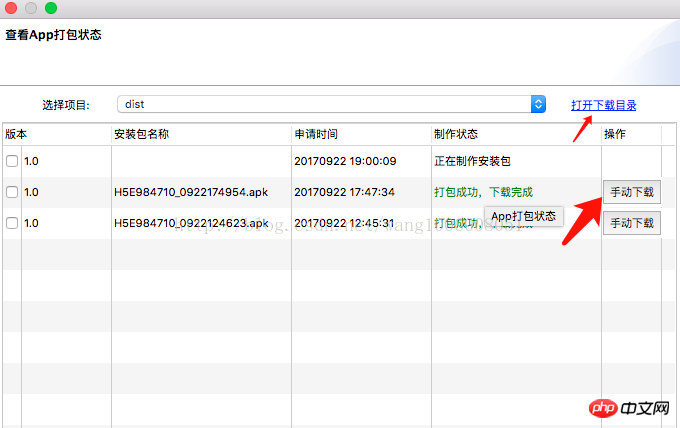
5. If there is no problem in the real machine test. Then you can actually package it into an APP.


The above is the entire content of this article. I hope it will be helpful to everyone's study. For more related content, please pay attention to the PHP Chinese website!
Related recommendations:
How to solve the problem of blank page when the vue project is packaged
How to solve the routing History under Vue The page is blank after mode packaging
Introduction to first screen optimization of Vue SPA single-page application
The above is the detailed content of Introduction to Vue webapp project packaging native APP through HBulider. For more information, please follow other related articles on the PHP Chinese website!

Hot AI Tools

Undresser.AI Undress
AI-powered app for creating realistic nude photos

AI Clothes Remover
Online AI tool for removing clothes from photos.

Undress AI Tool
Undress images for free

Clothoff.io
AI clothes remover

AI Hentai Generator
Generate AI Hentai for free.

Hot Article
Hot Tools

Notepad++7.3.1
Easy-to-use and free code editor

SublimeText3 Chinese version
Chinese version, very easy to use

Zend Studio 13.0.1
Powerful PHP integrated development environment

Dreamweaver CS6
Visual web development tools

SublimeText3 Mac version
God-level code editing software (SublimeText3)
Hot Topics
 1377
1377
 52
52

 How to add functions to buttons for vue
Apr 08, 2025 am 08:51 AM
How to add functions to buttons for vue
Apr 08, 2025 am 08:51 AM
You can add a function to the Vue button by binding the button in the HTML template to a method. Define the method and write function logic in the Vue instance.
 How to reference js file with vue.js
Apr 07, 2025 pm 11:27 PM
How to reference js file with vue.js
Apr 07, 2025 pm 11:27 PM
There are three ways to refer to JS files in Vue.js: directly specify the path using the <script> tag;; dynamic import using the mounted() lifecycle hook; and importing through the Vuex state management library.
 How to use bootstrap in vue
Apr 07, 2025 pm 11:33 PM
How to use bootstrap in vue
Apr 07, 2025 pm 11:33 PM
Using Bootstrap in Vue.js is divided into five steps: Install Bootstrap. Import Bootstrap in main.js. Use the Bootstrap component directly in the template. Optional: Custom style. Optional: Use plug-ins.
 How to use watch in vue
Apr 07, 2025 pm 11:36 PM
How to use watch in vue
Apr 07, 2025 pm 11:36 PM
The watch option in Vue.js allows developers to listen for changes in specific data. When the data changes, watch triggers a callback function to perform update views or other tasks. Its configuration options include immediate, which specifies whether to execute a callback immediately, and deep, which specifies whether to recursively listen to changes to objects or arrays.
 How to return to previous page by vue
Apr 07, 2025 pm 11:30 PM
How to return to previous page by vue
Apr 07, 2025 pm 11:30 PM
Vue.js has four methods to return to the previous page: $router.go(-1)$router.back() uses <router-link to="/" component window.history.back(), and the method selection depends on the scene.
 Vue realizes marquee/text scrolling effect
Apr 07, 2025 pm 10:51 PM
Vue realizes marquee/text scrolling effect
Apr 07, 2025 pm 10:51 PM
Implement marquee/text scrolling effects in Vue, using CSS animations or third-party libraries. This article introduces how to use CSS animation: create scroll text and wrap text with <div>. Define CSS animations and set overflow: hidden, width, and animation. Define keyframes, set transform: translateX() at the beginning and end of the animation. Adjust animation properties such as duration, scroll speed, and direction.
 How to use vue traversal
Apr 07, 2025 pm 11:48 PM
How to use vue traversal
Apr 07, 2025 pm 11:48 PM
There are three common methods for Vue.js to traverse arrays and objects: the v-for directive is used to traverse each element and render templates; the v-bind directive can be used with v-for to dynamically set attribute values for each element; and the .map method can convert array elements into new arrays.
 How to query the version of vue
Apr 07, 2025 pm 11:24 PM
How to query the version of vue
Apr 07, 2025 pm 11:24 PM
You can query the Vue version by using Vue Devtools to view the Vue tab in the browser's console. Use npm to run the "npm list -g vue" command. Find the Vue item in the "dependencies" object of the package.json file. For Vue CLI projects, run the "vue --version" command. Check the version information in the <script> tag in the HTML file that refers to the Vue file.
