This article mainly introduces the detailed explanation of webpack4.0 configuration, which has certain reference value. Now I share it with everyone. Friends in need can refer to it
Opportunities It is always reserved for those who are prepared. If you want to stand out in this chaotic job hunting season, you can get the offer you have been waiting for. Then you should know a lot of things that others don't know, so that your wings can be full and you can soar in the sky. The ability of an eagle to soar into the sky is not due to innate talent, but rather the danger of falling off a cliff when one was young. The stupid bird flies first, not by wisdom, but by tireless efforts.
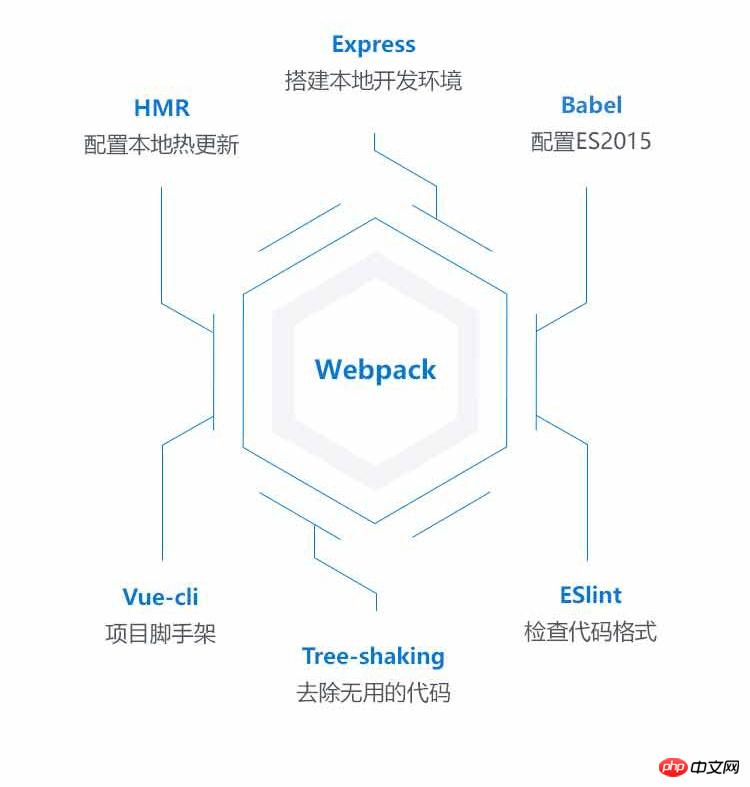
Webpack is a packaging tool. Its purpose is to package all static resources. Some people will ask why webpack is needed? Webpack is the cornerstone of modern front-end technology. Conventional development methods, such as jquery, html, and css static web development, have fallen behind. Now is the era of MVVM, data-driven interface. Webpack collects and packages various new and useful technologies in modern js development. The descriptions of webpack are overwhelming, so I won’t waste everyone’s time. Understand this kind of diagram and you will know the ecosystem of webpack: 
const path = require('path');  //引入node的path模块
const webpack = require('webpack'); //引入的webpack,使用lodash
const HtmlWebpackPlugin = require('html-webpack-plugin')  //将html打包
const ExtractTextPlugin = require('extract-text-webpack-plugin')     //打包的css拆分,将一部分抽离出来
const CopyWebpackPlugin = require('copy-webpack-plugin')
// console.log(path.resolve(__dirname,'dist')); //物理地址拼接
module.exports = {
    entry: './src/index.js', //入口文件  在vue-cli main.js
    output: {       //webpack如何输出
        path: path.resolve(__dirname, 'dist'), //定位,输出文件的目标路径
        filename: '[name].js'
    },
    module: {       //模块的相关配置
        rules: [     //根据文件的后缀提供一个loader,解析规则
            {
                test: /\.js$/,  //es6 => es5
                include: [
                    path.resolve(__dirname, 'src')
                ],
                // exclude:[], 不匹配选项(优先级高于test和include)
                use: 'babel-loader'
            },
            {
                test: /\.less$/,
                use: ExtractTextPlugin.extract({
                    fallback: 'style-loader',
                    use: [
                    'css-loader',
                    'less-loader'
                    ]
                })
            },
            {       //图片loader
                test: /\.(png|jpg|gif)$/,
                use: [
                    {
                        loader: 'file-loader' //根据文件地址加载文件
                    }
                ]
            }
        ]
    },
    resolve: { //解析模块的可选项
        // modules: [ ]//模块的查找目录 配置其他的css等文件
        extensions: [".js", ".json", ".jsx",".less", ".css"],  //用到文件的扩展名
        alias: { //模快别名列表
            utils: path.resolve(__dirname,'src/utils')
        }
    },
    plugins: [  //插进的引用, 压缩,分离美化
        new ExtractTextPlugin('[name].css'),  //[name] 默认  也可以自定义name  声明使用
        new HtmlWebpackPlugin({  //将模板的头部和尾部添加css和js模板,dist 目录发布到服务器上,项目包。可以直接上线
            file: 'index.html', //打造单页面运用 最后运行的不是这个
            template: 'src/index.html'  //vue-cli放在跟目录下
        }),
        new CopyWebpackPlugin([  //src下其他的文件直接复制到dist目录下
            { from:'src/assets/favicon.ico',to: 'favicon.ico' }
        ]),
        new webpack.ProvidePlugin({  //引用框架 jquery  lodash工具库是很多组件会复用的,省去了import
            '_': 'lodash'  //引用webpack
        })
    ],
    devServer: {  //服务于webpack-dev-server  内部封装了一个express
        port: '8080',
        before(app) {
            app.get('/api/test.json', (req, res) => {
                res.json({
                    code: 200,
                    message: 'Hello World'
                })
            })
        }
    }

}We use npm or yarn to install webpack
npm install webpack webpack-cli -g
# 或者
yarn global add webpack webpack-cli
Why is webpack divided into two files? In webpack 3, webpack itself and its cli used to be in the same package, but in version 4, they have separated the two to manage them better.
Create a new webpack folder, create a try-webpack under it (to prevent the project name from having the same name as the installation package during init) and initialize and configure webpack.
 npm init -y  //-y 默认所有的配置
 yarn add webpack webpack-cli -D  //-D webpack安装在devDependencies环境中
In the environment project built above, we go to package.json to configure our scripts and let webpack
  "scripts": {
    "build": "webpack --mode production" //我们在这里配置,就可以使用npm run build 启动我们的webpack
  },
  "devDependencies": {
    "webpack": "^4.16.0",
    "webpack-cli": "^3.0.8"
}configure us When using webpack's running environment, think of vue-cli. Normally using vue-cli will automatically help us configure and generate projects. We develop the project under src, and finally use npm run build to package and generate our dist directory. I don’t know if you still remember it, but let’s go to the next section and let us feel the actual process.
Create a new src directory with try-webpack under our root project. Create a new index.js file in the src directory. We can write any code in it, focusing on the case:
const a = 1;
After writing, we run our command npm run build in the terminal; you will find new A dist directory has been added, which contains the main.js file packaged by webpack. This is the same as what we do in vue-cli.
What files under src do we usually package during development? We can recall that in fact, the vue-cli project src only has these points:
HTML, css, js required for publishing
css precompiler stylus, less, sass
Advanced syntax of es6
Image resources.png, .gif, .ico, .jpg
require between files
alias@ and other modifiers
Then I will We will explain the configuration of webpack.config.js in webpack in these points, and follow the steps to complete our process line step by step.
Create a new webpack.config.js file under try-webpack, the root directory of the project, output it using the commonJS modular mechanism, and create a new index. html.
module.exports = {}
Configure our entry entry, which in vue-cli is equivalent to main.js in the directory, our export output. We can understand webpack as a factory. Entering is equivalent to putting various raw materials into our factory, and then the factory performs a series of packaging operations to output the packaged things, and then they can be sold. (online).
const path = require('path'); //引入我们的node模块里的path
//测试下 console.log(path.resolve(__dirname,'dist')); //物理地址拼接
module.exports = {
    entry: './src/index.js', //入口文件  在vue-cli main.js
    output: {       //webpack如何向外输出
        path: path.resolve(__dirname, 'dist'),//定位,输出文件的目标路径
        filename: '[name].js' //文件名[name].js默认,也可自行配置
},HTML packaging we need to install and introduce html-webpack-plugin
yarn add html-webpack-plugin -D //在开发环境中安装
const HtmlWebpackPlugin = require('html-webpack-plugin') //引入打包我们的HTMLConfigure our plugins (plug-ins) in module.exports:
 plugins: [  //插进的引用, 压缩,分离美化
        new HtmlWebpackPlugin({  //将模板的头部和尾部添加css和js模板,dist 目录发布到服务器上,项目包。可以直接上线
            file: 'index.html', //打造单页面运用 最后运行的不是这个
            template: 'src/index.html'  //vue-cli放在跟目录下
        }),
],After configuration, in After entering npm run dev in the terminal, webpack packages our html and automatically imports our js.
    <p>Hello World</p>
<script></script>
live-sever our dist directory, start a 8080 port, and we can see our Hello World. This is our online version of the page.
The above is the detailed content of Detailed explanation of webpack4.0 configuration. For more information, please follow other related articles on the PHP Chinese website!


