 Web Front-end
 JS Tutorial
 How to obtain audio and video collection resources in js? How to collect audio and video using js
How to obtain audio and video collection resources in js? How to collect audio and video using js
How does js collect audio and video resources? I believe that everyone should be unfamiliar with this method. In fact, js can collect audio and video, but the compatibility may not be very good. Today, I will share with my friends how to collect audio and video with js.
Let’s first list the APIs used:
getUserMedia: Open the camera and microphone interface (Document link)
MediaRecorder: Collect audio and video streams (Document link)
srcObject: The video tag can directly play the video stream. This is something that everyone should rarely use. In fact, it is very compatible. Good attributes, I recommend everyone to know about them (Documentation link)
captureStream: Canvas output stream, in fact, it is not just canvas, but this function is listed here, you can see the documentation for details (Document link)
1. Display the video from the camera
First, open the camera
// 这里是打开摄像头和麦克设备(会返回一个Promise对象)
navigator.mediaDevices.getUserMedia({
  audio: true,
  video: true
}).then(stream => {
  console.log(stream) // 放回音视频流
}).catch(err => {
  console.log(err)  // 错误回调
})Above we successfully turned on the camera and microphone, and obtained the audio and video streams. The next step is to present the stream into the interactive interface.
Second, display video
<!DOCTYPE html>
<html lang="en">
<head>
<meta charset="UTF-8">
<meta name="viewport" content="width=device-width, initial-scale=1.0">
<meta http-equiv="X-UA-Compatible" content="ie=edge">
<title>Document</title>
</head>
<body>
<video id="video" width="500" height="500" autoplay></video>
</body>
<script>
var video = document.getElementById('video')
navigator.mediaDevices.getUserMedia({
audio: true,
video: true
}).then(stream => {
// 这里就要用到srcObject属性了,可以直接播放流资源
video.srcObject = stream
}).catch(err => {
console.log(err) // 错误回调
})
</script>The effect is as shown below:
So far we have successfully placed our camera on the page Shows. The next step is how to capture the video and download the video file.
2. Obtain video from the camera
The MediaRecorder object is used here:
Create a new MediaRecorder object , returns a MediaStream object for recording operations, and supports configuration items to configure the MIME type of the container (such as "video/webm" or "video/mp4") or the audio bit rate video bit rate
MediaRecorder receives two The first parameter is the stream audio and video stream, and the second is the option configuration parameter. Next we can add the stream obtained by the above camera to the MediaRecorder.
var video = document.getElementById('video')
navigator.mediaDevices.getUserMedia({
  audio: true,
  video: true
}).then(stream => {
  // 这里就要用到srcObject属性了,可以直接播放流资源
  video.srcObject = stream
  var mediaRecorder = new MediaRecorder(stream, {
    audioBitsPerSecond : 128000,  // 音频码率
    videoBitsPerSecond : 100000,  // 视频码率
    mimeType : 'video/webm;codecs=h264' // 编码格式
  })
}).catch(err => {
  console.log(err)  // 错误回调
}) Above we created the instance mediaRecorder of MediaRecorder. The next step is to control the method of starting and stopping collection of mediaRecorder.
MediaRecorder provides some methods and events for us to use:
MediaRecorder.start(): Start recording media. When calling this method, you can set a millisecond value for the timeslice parameter. If you set this millisecond value, Then the recorded media will be divided into individual blocks according to the value you set, instead of recording a very large entire block of content in the default way.
MediaRecorder.stop(): Stop recording. At the same time, the dataavailable event is triggered and a recording data that stores the Blob content is returned. Afterwards, the
ondataavailable event is no longer recorded: MediaRecorder.stop triggers this event, which can be used to obtain the recorded media (Blob is in the data attribute of the event Can be used as an object)
// 这里我们增加两个按钮控制采集的开始和结束
var start = document.getElementById('start')
var stop = document.getElementById('stop')
var video = document.getElementById('video')
navigator.mediaDevices.getUserMedia({
  audio: true,
  video: true
}).then(stream => {
  // 这里就要用到srcObject属性了,可以直接播放流资源
  video.srcObject = stream
  var mediaRecorder = new MediaRecorder(stream, {
    audioBitsPerSecond : 128000,  // 音频码率
    videoBitsPerSecond : 100000,  // 视频码率
    mimeType : 'video/webm;codecs=h264' // 编码格式
  })
  // 开始采集
  start.onclick = function () {
    mediaRecorder.start()
    console.log('开始采集')
  }
  // 停止采集
  stop.onclick = function () {
    mediaRecorder.stop()
    console.log('停止采集')
  }
  // 事件
  mediaRecorder.ondataavailable = function (e) {
    console.log(e)
    // 下载视频
    var blob = new Blob([e.data], { 'type' : 'video/mp4' })
    let a = document.createElement('a')
    a.href = URL.createObjectURL(blob)
    a.download = `test.mp4`
    a.click()
  }
}).catch(err => {
  console.log(err)  // 错误回调
})ok, now perform a wave of operations;

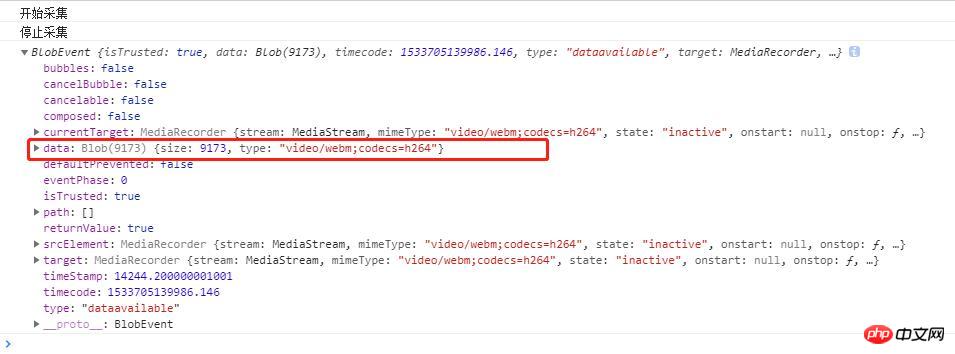
As you can see from the above figure, there are data returned by the ondataavailable event after the collection is completed. A Blob object, this is the video resource, and then we can download the Blob to the local url through the URL.createObjectURL() method. The collection and downloading of the video is complete, it is very simple and crude.
The above is an example of video capture and download. If you only want audio capture, just set "mimeType" in the same way. I won't give examples here. Below I will introduce recording canvas as a video file
3. Canvas output video stream
The captureStream method is used here. It is also possible to output the canvas stream and then use video to display it, or use MediaRecorder to collect resources.
// 这里就闲话少说直接上重点了因为和上面视频采集的是一样的道理的。 <!DOCTYPE html> <html lang="en"> <head> <meta charset="UTF-8"> <meta name="viewport" content="width=device-width, initial-scale=1.0"> <meta http-equiv="X-UA-Compatible" content="ie=edge"> <title>Document</title> </head> <body> <canvas width="500" height="500" id="canvas"></canvas> <video id="video" width="500" height="500" autoplay></video> </body> <script> var video = document.getElementById('video') var canvas = document.getElementById('canvas') var stream = $canvas.captureStream(); // 这里获取canvas流对象 // 接下来你先为所欲为都可以了,可以参考上面的我就不写了。 </script>
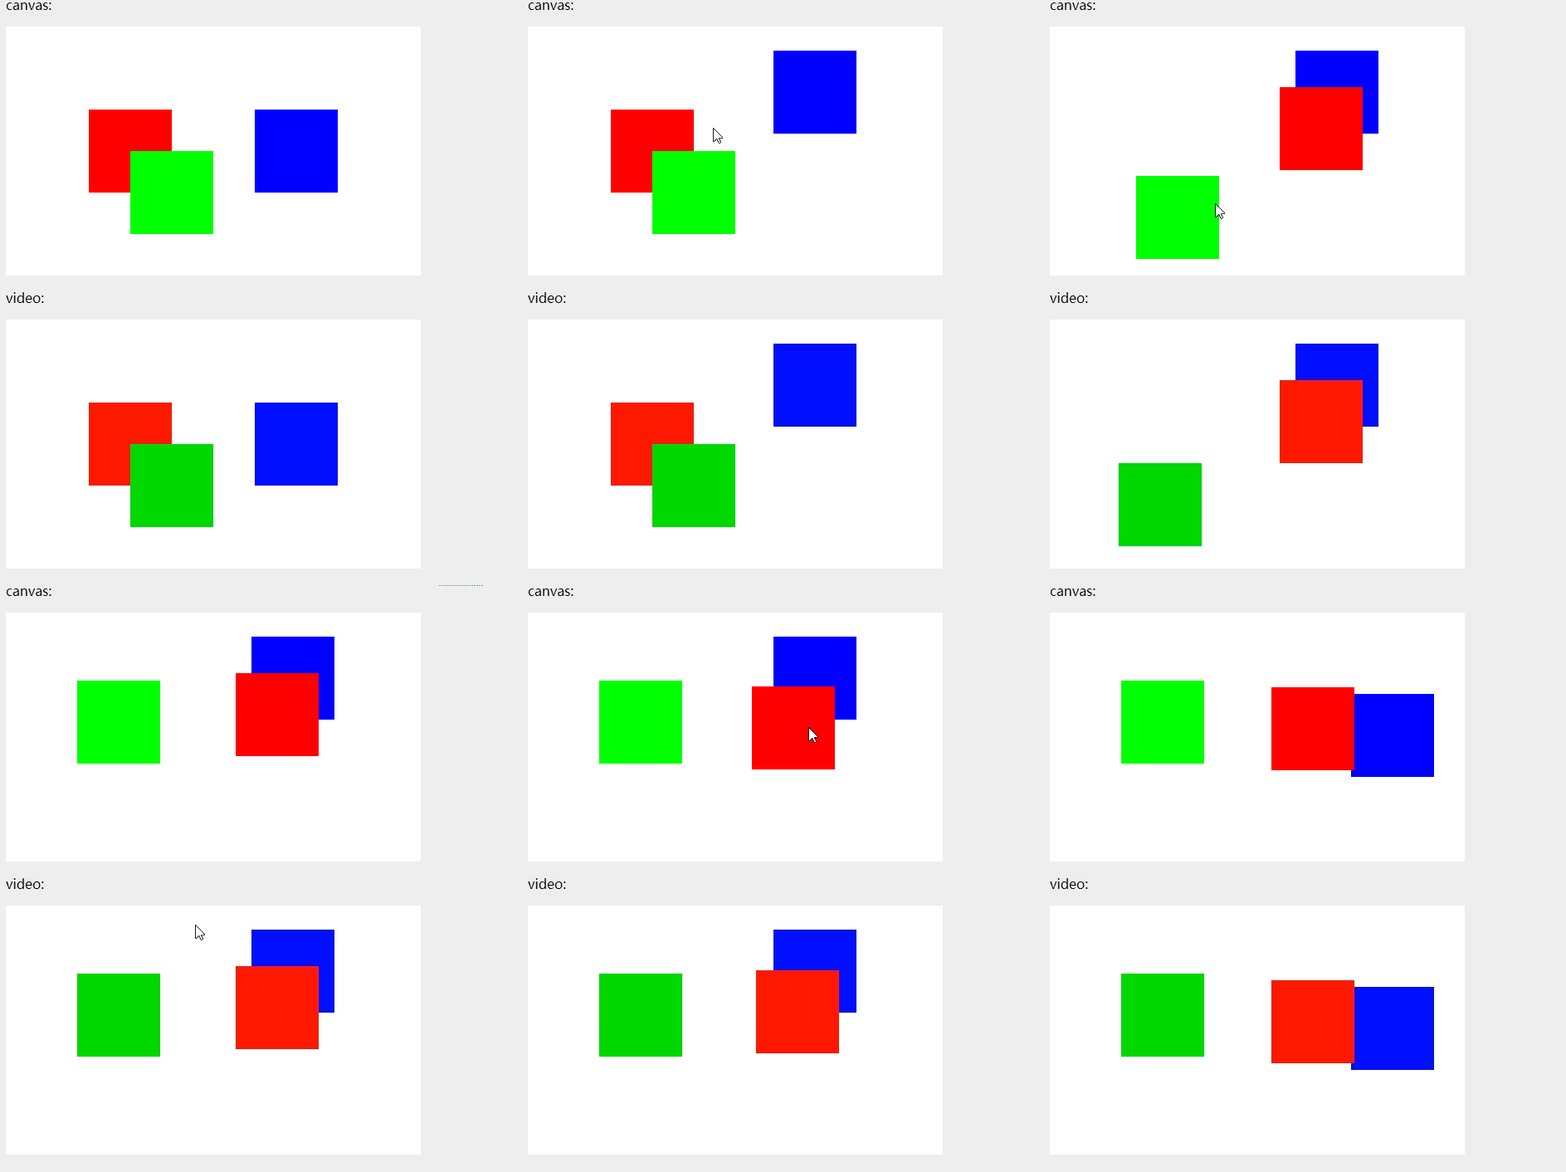
I will post another gif below (this is a combination of the canvas event demo I wrote last time and this video collection) Portal (Canvas event binding)
Hope everyone The following effects can be achieved. In fact, you can also insert background music and so on into the canvas video. These are relatively simple.

Recommended related articles:
JS preloading video audio/video screenshot sharing skills
HTML5 video and audio implementation steps
How to use H5 to operate audio and video
The above is the detailed content of How to obtain audio and video collection resources in js? How to collect audio and video using js. For more information, please follow other related articles on the PHP Chinese website!

Hot AI Tools

Undresser.AI Undress
AI-powered app for creating realistic nude photos

AI Clothes Remover
Online AI tool for removing clothes from photos.

Undress AI Tool
Undress images for free

Clothoff.io
AI clothes remover

Video Face Swap
Swap faces in any video effortlessly with our completely free AI face swap tool!

Hot Article

Hot Tools

Notepad++7.3.1
Easy-to-use and free code editor

SublimeText3 Chinese version
Chinese version, very easy to use

Zend Studio 13.0.1
Powerful PHP integrated development environment

Dreamweaver CS6
Visual web development tools

SublimeText3 Mac version
God-level code editing software (SublimeText3)

Hot Topics
 What should I do if I encounter garbled code printing for front-end thermal paper receipts?
Apr 04, 2025 pm 02:42 PM
Frequently Asked Questions and Solutions for Front-end Thermal Paper Ticket Printing In Front-end Development, Ticket Printing is a common requirement. However, many developers are implementing...
 Demystifying JavaScript: What It Does and Why It Matters
Apr 09, 2025 am 12:07 AM
JavaScript is the cornerstone of modern web development, and its main functions include event-driven programming, dynamic content generation and asynchronous programming. 1) Event-driven programming allows web pages to change dynamically according to user operations. 2) Dynamic content generation allows page content to be adjusted according to conditions. 3) Asynchronous programming ensures that the user interface is not blocked. JavaScript is widely used in web interaction, single-page application and server-side development, greatly improving the flexibility of user experience and cross-platform development.
 Who gets paid more Python or JavaScript?
Apr 04, 2025 am 12:09 AM
There is no absolute salary for Python and JavaScript developers, depending on skills and industry needs. 1. Python may be paid more in data science and machine learning. 2. JavaScript has great demand in front-end and full-stack development, and its salary is also considerable. 3. Influencing factors include experience, geographical location, company size and specific skills.
 How to achieve parallax scrolling and element animation effects, like Shiseido's official website?
or:
How can we achieve the animation effect accompanied by page scrolling like Shiseido's official website?
Apr 04, 2025 pm 05:36 PM
Discussion on the realization of parallax scrolling and element animation effects in this article will explore how to achieve similar to Shiseido official website (https://www.shiseido.co.jp/sb/wonderland/)...
 The Evolution of JavaScript: Current Trends and Future Prospects
Apr 10, 2025 am 09:33 AM
The latest trends in JavaScript include the rise of TypeScript, the popularity of modern frameworks and libraries, and the application of WebAssembly. Future prospects cover more powerful type systems, the development of server-side JavaScript, the expansion of artificial intelligence and machine learning, and the potential of IoT and edge computing.
 Is JavaScript hard to learn?
Apr 03, 2025 am 12:20 AM
Learning JavaScript is not difficult, but it is challenging. 1) Understand basic concepts such as variables, data types, functions, etc. 2) Master asynchronous programming and implement it through event loops. 3) Use DOM operations and Promise to handle asynchronous requests. 4) Avoid common mistakes and use debugging techniques. 5) Optimize performance and follow best practices.
 How to merge array elements with the same ID into one object using JavaScript?
Apr 04, 2025 pm 05:09 PM
How to merge array elements with the same ID into one object in JavaScript? When processing data, we often encounter the need to have the same ID...
 Zustand asynchronous operation: How to ensure the latest state obtained by useStore?
Apr 04, 2025 pm 02:09 PM
Data update problems in zustand asynchronous operations. When using the zustand state management library, you often encounter the problem of data updates that cause asynchronous operations to be untimely. �...


