

How to insert Html into Baidu rich text editor ueditor

The main content of this article is to teach you how to insert Baidu Rich Text Editor into Html. Friends who are interested can learn about it. I hope it will be helpful to you.
In daily work, you will definitely need a rich text editor. The rich text editor is powerful and easy to use. If you use Baidu rich text editor, you first need to download the demo of Baidu editor, and then Create the ueditor.html file, introduce Baidu editor, then introduce it in the html file, and then use js to instantiate the editor. The code is as follows:
<!DOCTYPE html>
<html>
<head>
<title>百度编辑器</title>
</head>
<body>
<script type="text/javascript" charset="utf-8" src="ueditor/ueditor.config.js"></script>
<script type="text/javascript" charset="utf-8" src="ueditor/ueditor.all.min.js"></script>
<script type="text/javascript" charset="utf-8" src="ueditor/lang/zh-cn/zh-cn.js"></script>
<script id="editor" type="text/plain" name="gdesc" style="width:100%;height:350px;"></script>
<script type="text/javascript">
//实例化编辑器
var ue = UE.getEditor('editor', {});
</script>
</body>
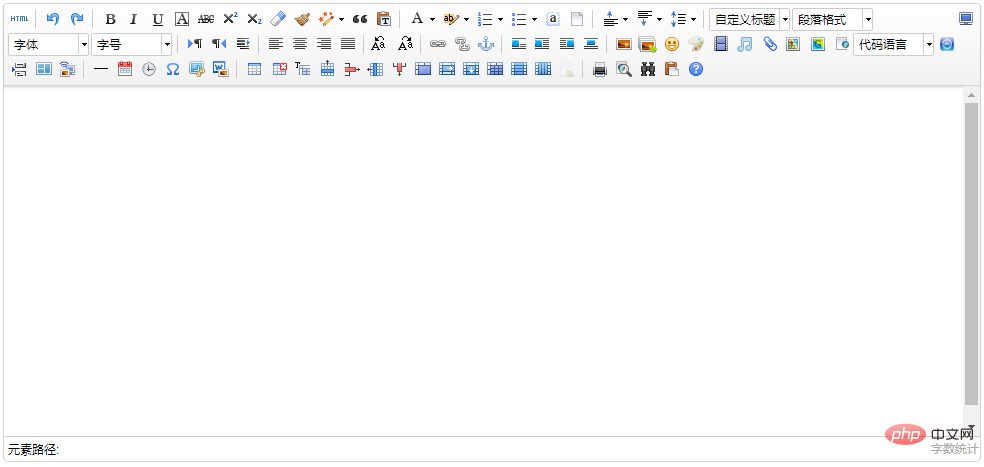
</html>Go here and open the ueditor.html file above in the browser and you will see the following picture:
This is instantiation There are many functions in the initial editor, some of which may not be used by us at all. What should we do if we want to customize it? Don’t worry, Baidu provides customizable functions. Just use the js that instantiates the editor above. Change the code to the following code:
<script type="text/javascript">
//实例化编辑器
var ue = UE.getEditor('editor', {
toolbars: [
[
'undo', //撤销
'bold', //加粗
'underline', //下划线
'preview', //预览
'horizontal', //分隔线
'inserttitle', //插入标题
'cleardoc', //清空文档
'fontfamily', //字体
'fontsize', //字号
'paragraph', //段落格式
'simpleupload', //单图上传
'insertimage', //多图上传
'attachment', //附件
'music', //音乐
'inserttable', //插入表格
'emotion', //表情
'insertvideo', //视频
'justifyleft', //居左对齐
'justifyright', //居右对齐
'justifycenter', //居中对
'justifyjustify', //两端对齐
'forecolor', //字体颜色
'fullscreen', //全屏
'edittip ', //编辑提示
'customstyle', //自定义标题
'template', //模板
]
]
});
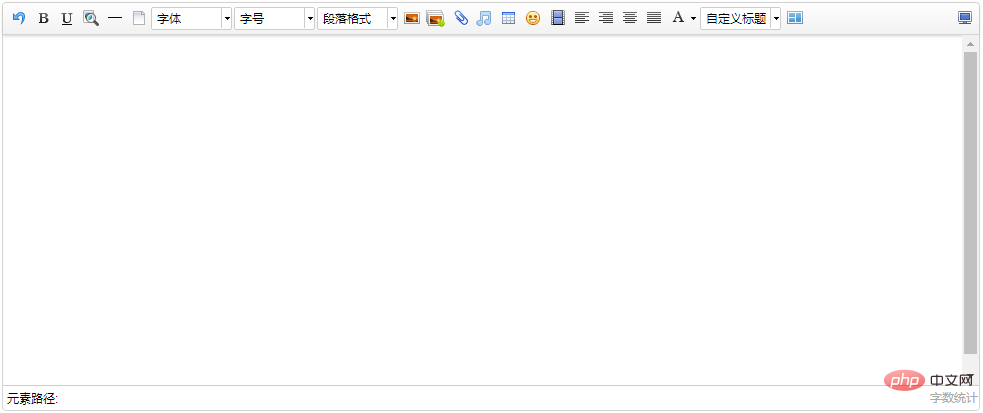
</script>Refresh the ueditor.html page and you will see the changes:
If you want to customize any functions, just refer to the above In the ueditor.config.js file in the downloaded editor demo, add the corresponding string to the toolbars attribute:
        //工具栏上的所有的功能按钮和下拉框,可以在new编辑器的实例时选择自己需要的重新定义
        , toolbars: [[
            'fullscreen', 'source', '|', 'undo', 'redo', '|',
            'bold', 'italic', 'underline', 'fontborder', 'strikethrough', 'superscript', 'subscript', 'removeformat', 'formatmatch', 'autotypeset', 'blockquote', 'pasteplain', '|', 'forecolor', 'backcolor', 'insertorderedlist', 'insertunorderedlist', 'selectall', 'cleardoc', '|',
            'rowspacingtop', 'rowspacingbottom', 'lineheight', '|',
            'customstyle', 'paragraph', 'fontfamily', 'fontsize', '|',
            'directionalityltr', 'directionalityrtl', 'indent', '|',
            'justifyleft', 'justifycenter', 'justifyright', 'justifyjustify', '|', 'touppercase', 'tolowercase', '|',
            'link', 'unlink', 'anchor', '|', 'imagenone', 'imageleft', 'imageright', 'imagecenter', '|',
            'simpleupload', 'insertimage', 'emotion', 'scrawl', 'insertvideo', 'music', 'attachment', 'map', 'gmap', 'insertframe', 'insertcode', 'webapp', 'pagebreak', 'template', 'background', '|',
            'horizontal', 'date', 'time', 'spechars', 'snapscreen', 'wordimage', '|',
            'inserttable', 'deletetable', 'insertparagraphbeforetable', 'insertrow', 'deleterow', 'insertcol', 'deletecol', 'mergecells', 'mergeright', 'mergedown', 'splittocells', 'splittorows', 'splittocols', 'charts', '|',
            'print', 'preview', 'searchreplace', 'drafts', 'help'
]]ueditor.config.js file can customize the editor For many functions, you only need to remove the '//' in front of the corresponding attribute. True means on, false means off and set it. For example:
        //elementPathEnabled
        //是否启用元素路径,默认是显示
        ,elementPathEnabled : false

        //wordCount
        ,wordCount:false          //是否开启字数统计
//,maximumWords:10000 //允许的最大字符数 // Whether to automatically grow taller, the default is true
,autoHeightEnabled:false
After modifying the ueditor.config.js file according to the above code, refresh the page and you will see the difference:
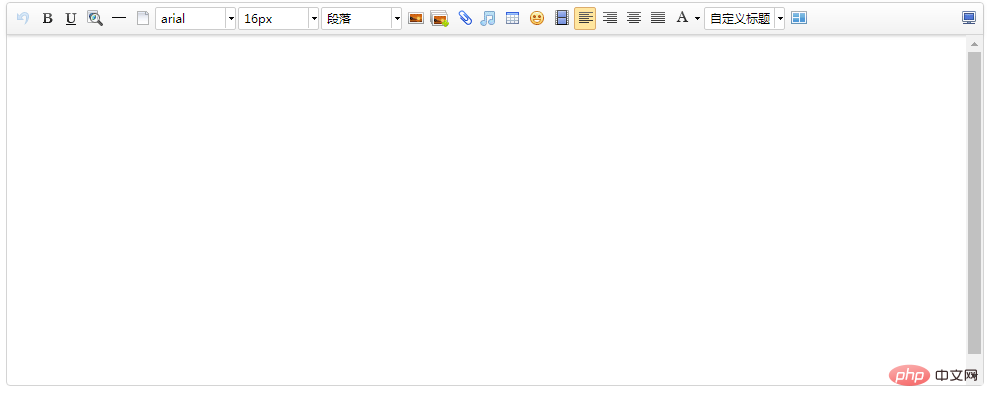
The following The element path and word count have disappeared. Isn’t it more beautiful? O(∩_∩)O~
In practical application, we may also upload content edited by Baidu editor under a domain name (for example: A picture was uploaded under the domain name www.52lnamp.com), and the requirement is not only to display it under this domain name, but also to display it under other domain names. In this case, the picture will not exist,
This is because the default upload path in the Baidu Editor configuration file is a relative path, which means that the address of the image uploaded above is uploaded relative to the current domain name, and can only be displayed under the domain name you uploaded. Other domain names cannot be displayed.
If you want to display it on another domain name, you only need to modify the configuration file to an absolute path. Open the demo downloaded above, find the php/config.json file, and open it. Then you will see

where the attribute imageUrlPrefix can be added to the domain name: "imageUrlPrefix": "http://www.xxx.com", /* Image access Path prefix */
It should be noted that when adding a domain name, you must include http or https. Only if it is written in this way can it be displayed normally. If not, it will be displayed normally. When you quote, you will repeatedly add a domain name in front of it. A basic understanding of these is enough to meet daily needs. If you have other alternative needs, you can refer to the Baidu editor documentation. You are also welcome to supplement and learn from each other.
Related tutorials: javascript video tutorial
The above is the detailed content of How to insert Html into Baidu rich text editor ueditor. For more information, please follow other related articles on the PHP Chinese website!

Hot AI Tools

Undresser.AI Undress
AI-powered app for creating realistic nude photos

AI Clothes Remover
Online AI tool for removing clothes from photos.

Undress AI Tool
Undress images for free

Clothoff.io
AI clothes remover

AI Hentai Generator
Generate AI Hentai for free.

Hot Article
Hot Tools

Notepad++7.3.1
Easy-to-use and free code editor

SublimeText3 Chinese version
Chinese version, very easy to use

Zend Studio 13.0.1
Powerful PHP integrated development environment

Dreamweaver CS6
Visual web development tools

SublimeText3 Mac version
God-level code editing software (SublimeText3)
Hot Topics
 1381
1381
 52
52

 Table Border in HTML
Sep 04, 2024 pm 04:49 PM
Table Border in HTML
Sep 04, 2024 pm 04:49 PM
Guide to Table Border in HTML. Here we discuss multiple ways for defining table-border with examples of the Table Border in HTML.
 HTML margin-left
Sep 04, 2024 pm 04:48 PM
HTML margin-left
Sep 04, 2024 pm 04:48 PM
Guide to HTML margin-left. Here we discuss a brief overview on HTML margin-left and its Examples along with its Code Implementation.
 Nested Table in HTML
Sep 04, 2024 pm 04:49 PM
Nested Table in HTML
Sep 04, 2024 pm 04:49 PM
This is a guide to Nested Table in HTML. Here we discuss how to create a table within the table along with the respective examples.
 HTML Table Layout
Sep 04, 2024 pm 04:54 PM
HTML Table Layout
Sep 04, 2024 pm 04:54 PM
Guide to HTML Table Layout. Here we discuss the Values of HTML Table Layout along with the examples and outputs n detail.
 HTML Input Placeholder
Sep 04, 2024 pm 04:54 PM
HTML Input Placeholder
Sep 04, 2024 pm 04:54 PM
Guide to HTML Input Placeholder. Here we discuss the Examples of HTML Input Placeholder along with the codes and outputs.
 HTML Ordered List
Sep 04, 2024 pm 04:43 PM
HTML Ordered List
Sep 04, 2024 pm 04:43 PM
Guide to the HTML Ordered List. Here we also discuss introduction of HTML Ordered list and types along with their example respectively
 Moving Text in HTML
Sep 04, 2024 pm 04:45 PM
Moving Text in HTML
Sep 04, 2024 pm 04:45 PM
Guide to Moving Text in HTML. Here we discuss an introduction, how marquee tag work with syntax and examples to implement.
 HTML onclick Button
Sep 04, 2024 pm 04:49 PM
HTML onclick Button
Sep 04, 2024 pm 04:49 PM
Guide to HTML onclick Button. Here we discuss their introduction, working, examples and onclick Event in various events respectively.
