

JS method to achieve simple image carousel effect_javascript skills

The example in this article describes how to implement a simple image carousel effect using JS. Share it with everyone for your reference. The details are as follows:
Here uses JS to create a simple image carousel effect:
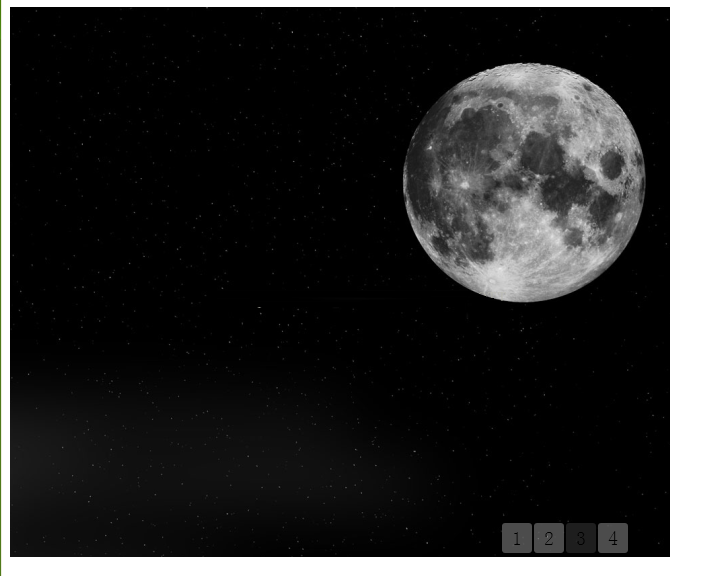
The production is relatively rough, the image used is width: 660ppx, height: 550px;
The rendering is as follows:
The code part is as follows:
<!DOCTYPE html>
<html lang="en">
<head>
 <meta http-equiv="Content-Type" content="text/html; charset=utf-8" />
 <title>JS幻灯代码</title>
 <script type="text/javascript">
  window.onload = function () {
   flag = 0;
   obj1 = document.getElementById("slider");
   obj2 = document.getElementsByTagName("li");
   obj2[0].style.backgroundColor = "#666666";
   //默认被选中颜色
   time = setInterval("turn();", 5000);
   obj1.onmouseover = function () {
    clearInterval(time);
   }
   obj1.onmouseout = function () {
    time = setInterval("turn();", 6000);
   }

   for (var num = 0; num < obj2.length; num++) {
    obj2[num].onmouseover = function () {
     turn(this.innerHTML);
     clearInterval(time);
    }
    obj2[num].onmouseout = function () {
     time = setInterval("turn();", 6000);
    }
   }
   //延迟加载图片,演示的时候,使用本地图片
   //上线后请改为二级域名提供的图片地址
   document.getElementById("second").src = "images/2.png";
   //使用图片宽660,高550
   document.getElementById("third").src = "images/3.png";
   document.getElementById("four").src = "images/4.png";
  }
  function turn(value) {
   if (value != null) {
    flag = value - 2;
   }
   if (flag < obj2.length - 1)
    flag++;
   else
    flag = 0;
   obj1.style.top = flag * (-550) + "px";
   for (var j = 0; j < obj2.length; j++) {
    obj2[j].style.backgroundColor = "#ffffff";
   }
   obj2[flag].style.backgroundColor = "#666666";
  }
 </script>
 <style type="text/css">
  #wrap
  {
   height: 550px;
   width: 660px;
   overflow: hidden;
   position: relative;
   overflow: hidden;
  }
  #wrap ul
  {
   list-style: none;
   position: absolute;
   top: 500px;
   left: 450px;
  }
  #wrap li
  {
   margin-left:2px;
   opacity: .3;
   filter: alpha(opacity=30);
   text-align: center;
   line-height: 30px;
   font-size: 20px;
   height: 30px;
   width: 30px;
   background-color: #fff;
   float: left;
   border-radius:3px;
   cursor:pointer;
  }
  #slider
  {
   position: absolute;
   top: 0px;
   left: 0px;
  }
  #slider img
  {
   float: left;
   border: none;
  }
 </style>
</head>
<body>
 <div id="wrap">
  <div id="slider">
   <a target="_blank" href="#"><img src="images/1.png" /></a>
   <a target="_blank" href="#"><img id="second" /></a>
   <a target="_blank" href="#"><img id="third" /></a>
   <a target="_blank" href="#"><img id="four" /></a>
  </div>
  <ul>
   <li>1</li>
   <li>2</li>
   <li>3</li>
   <li>4</li>
  </ul>
 </div>
</body>
</html>I hope this article will be helpful to everyone’s JavaScript programming design.

Hot AI Tools

Undresser.AI Undress
AI-powered app for creating realistic nude photos

AI Clothes Remover
Online AI tool for removing clothes from photos.

Undress AI Tool
Undress images for free

Clothoff.io
AI clothes remover

Video Face Swap
Swap faces in any video effortlessly with our completely free AI face swap tool!

Hot Article
Hot Tools

Notepad++7.3.1
Easy-to-use and free code editor

SublimeText3 Chinese version
Chinese version, very easy to use

Zend Studio 13.0.1
Powerful PHP integrated development environment

Dreamweaver CS6
Visual web development tools

SublimeText3 Mac version
God-level code editing software (SublimeText3)
Hot Topics


 Users encounter rare glitches: Samsung Watch smartwatches suddenly experience white screen issues
Apr 03, 2024 am 08:13 AM
Users encounter rare glitches: Samsung Watch smartwatches suddenly experience white screen issues
Apr 03, 2024 am 08:13 AM
You may have encountered the problem of green lines appearing on the screen of your smartphone. Even if you have never seen it, you must have seen related pictures on the Internet. So, have you ever encountered a situation where the smart watch screen turns white? On April 2, CNMO learned from foreign media that a Reddit user shared a picture on the social platform, showing the screen of the Samsung Watch series smart watches turning white. The user wrote: "I was charging when I left, and when I came back, it was like this. I tried to restart, but the screen was still like this during the restart process." Samsung Watch smart watch screen turned white. The Reddit user did not specify the smart watch. Specific model. However, judging from the picture, it should be Samsung Watch5. Previously, another Reddit user also reported
 How to write a novel in the Tomato Free Novel app. Share the tutorial on how to write a novel in Tomato Novel.
Mar 28, 2024 pm 12:50 PM
How to write a novel in the Tomato Free Novel app. Share the tutorial on how to write a novel in Tomato Novel.
Mar 28, 2024 pm 12:50 PM
Tomato Novel is a very popular novel reading software. We often have new novels and comics to read in Tomato Novel. Every novel and comic is very interesting. Many friends also want to write novels. Earn pocket money and edit the content of the novel you want to write into text. So how do we write the novel in it? My friends don’t know, so let’s go to this site together. Let’s take some time to look at an introduction to how to write a novel. Share the Tomato novel tutorial on how to write a novel. 1. First open the Tomato free novel app on your mobile phone and click on Personal Center - Writer Center. 2. Jump to the Tomato Writer Assistant page - click on Create a new book at the end of the novel.
 How to recover deleted contacts on WeChat (simple tutorial tells you how to recover deleted contacts)
May 01, 2024 pm 12:01 PM
How to recover deleted contacts on WeChat (simple tutorial tells you how to recover deleted contacts)
May 01, 2024 pm 12:01 PM
Unfortunately, people often delete certain contacts accidentally for some reasons. WeChat is a widely used social software. To help users solve this problem, this article will introduce how to retrieve deleted contacts in a simple way. 1. Understand the WeChat contact deletion mechanism. This provides us with the possibility to retrieve deleted contacts. The contact deletion mechanism in WeChat removes them from the address book, but does not delete them completely. 2. Use WeChat’s built-in “Contact Book Recovery” function. WeChat provides “Contact Book Recovery” to save time and energy. Users can quickly retrieve previously deleted contacts through this function. 3. Enter the WeChat settings page and click the lower right corner, open the WeChat application "Me" and click the settings icon in the upper right corner to enter the settings page.
 The secret of hatching mobile dragon eggs is revealed (step by step to teach you how to successfully hatch mobile dragon eggs)
May 04, 2024 pm 06:01 PM
The secret of hatching mobile dragon eggs is revealed (step by step to teach you how to successfully hatch mobile dragon eggs)
May 04, 2024 pm 06:01 PM
Mobile games have become an integral part of people's lives with the development of technology. It has attracted the attention of many players with its cute dragon egg image and interesting hatching process, and one of the games that has attracted much attention is the mobile version of Dragon Egg. To help players better cultivate and grow their own dragons in the game, this article will introduce to you how to hatch dragon eggs in the mobile version. 1. Choose the appropriate type of dragon egg. Players need to carefully choose the type of dragon egg that they like and suit themselves, based on the different types of dragon egg attributes and abilities provided in the game. 2. Upgrade the level of the incubation machine. Players need to improve the level of the incubation machine by completing tasks and collecting props. The level of the incubation machine determines the hatching speed and hatching success rate. 3. Collect the resources required for hatching. Players need to be in the game
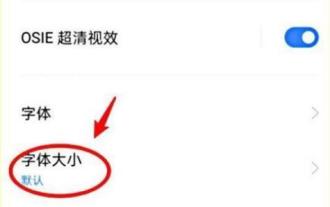 How to set font size on mobile phone (easily adjust font size on mobile phone)
May 07, 2024 pm 03:34 PM
How to set font size on mobile phone (easily adjust font size on mobile phone)
May 07, 2024 pm 03:34 PM
Setting font size has become an important personalization requirement as mobile phones become an important tool in people's daily lives. In order to meet the needs of different users, this article will introduce how to improve the mobile phone use experience and adjust the font size of the mobile phone through simple operations. Why do you need to adjust the font size of your mobile phone - Adjusting the font size can make the text clearer and easier to read - Suitable for the reading needs of users of different ages - Convenient for users with poor vision to use the font size setting function of the mobile phone system - How to enter the system settings interface - In Find and enter the "Display" option in the settings interface - find the "Font Size" option and adjust it. Adjust the font size with a third-party application - download and install an application that supports font size adjustment - open the application and enter the relevant settings interface - according to the individual
 Kyushu Fengshen Assassin 4S Radiator Review Air-cooled 'Assassin Master' Style
Mar 28, 2024 am 11:11 AM
Kyushu Fengshen Assassin 4S Radiator Review Air-cooled 'Assassin Master' Style
Mar 28, 2024 am 11:11 AM
Speaking of ASSASSIN, I believe players will definitely think of the master assassins in "Assassin's Creed". They are not only skilled, but also have the creed of "devoting themselves to the darkness and serving the light". The ASSASSIN series of flagship air-cooled radiators from the appliance brand DeepCool coincide with each other. Recently, the latest product of this series, ASSASSIN4S, has been launched. "Assassin in Suit, Advanced" brings a new air-cooling experience to advanced players. The appearance is full of details. The Assassin 4S radiator adopts a double tower structure + a single fan built-in design. The outside is covered with a cube-shaped fairing, which has a strong overall sense. It is available in white and black colors to meet different colors. Tie
 Recommended: Excellent JS open source face detection and recognition project
Apr 03, 2024 am 11:55 AM
Recommended: Excellent JS open source face detection and recognition project
Apr 03, 2024 am 11:55 AM
Face detection and recognition technology is already a relatively mature and widely used technology. Currently, the most widely used Internet application language is JS. Implementing face detection and recognition on the Web front-end has advantages and disadvantages compared to back-end face recognition. Advantages include reducing network interaction and real-time recognition, which greatly shortens user waiting time and improves user experience; disadvantages include: being limited by model size, the accuracy is also limited. How to use js to implement face detection on the web? In order to implement face recognition on the Web, you need to be familiar with related programming languages and technologies, such as JavaScript, HTML, CSS, WebRTC, etc. At the same time, you also need to master relevant computer vision and artificial intelligence technologies. It is worth noting that due to the design of the Web side
 Quickly master: How to open two WeChat accounts on Huawei mobile phones revealed!
Mar 23, 2024 am 10:42 AM
Quickly master: How to open two WeChat accounts on Huawei mobile phones revealed!
Mar 23, 2024 am 10:42 AM
In today's society, mobile phones have become an indispensable part of our lives. As an important tool for our daily communication, work, and life, WeChat is often used. However, it may be necessary to separate two WeChat accounts when handling different transactions, which requires the mobile phone to support logging in to two WeChat accounts at the same time. As a well-known domestic brand, Huawei mobile phones are used by many people. So what is the method to open two WeChat accounts on Huawei mobile phones? Let’s reveal the secret of this method. First of all, you need to use two WeChat accounts at the same time on your Huawei mobile phone. The easiest way is to
