
 Operation and Maintenance
Linux Operation and Maintenance
Linux user and permission management functions
Operation and Maintenance
Linux Operation and Maintenance
Linux user and permission management functions
Linux user and permission management functions
linux系统是多用户(Multi-users)和多任务(Multi-tasks)的,这样的目的是为了一台linux主机可以给很多用户提供服务同时运行多种服务,但是我们是怎么区分每个用户呢?作为一个管理员我对linux系统权限有哪些?作为一个普通的用户又可以对linux系统有哪些操作呢?这里就牵扯到了linux的用户类别和权限管理。本次博客就用户和权限管理作出详细的解释。
用户和组类型
在linux系统中,有着用户和组着两个概念,用户是被包含在组里面的。
用户可以分为以下2中类别:
管理员:也就是我们常说的root
普通用户:分为系统用户(为了能够让有些后台进程或服务类进程以非管理员的身份运行,通常需要为此创建多个普通用户,这类用户从不用登录系统)和登录用户
作为合法居民都应该有自己的ID号,在linux中,用户也有自己的用户标识的UID,是由16bits的二进制数字来标识的,所以取值范围为0-65535.不同类型的用户取值范围如下:
管理员:0
普通用户:
系统用户:1-499(centos6),1-999(centos7)
登录用户:500-60000(centos6),1000-60000(centos7)
组按不同的分类可以分为以下3中类型的组:
1.按管理员组合普通用户组
管理员组:对系统有着管理权限的组
普通用户组:和普通用户对应也有着系统组和登录组
组也有着自己的GID,不同组的取值范围如下(和用户取值范围相同)
2.按基本组和附加组
基本组:用户在创建的时候,都会默认创建一个与其名字相同的基本组
附加组:一个用户可以属于一个基本组后,也可以添加其他的组中,这个其他组就称为这个用户的附加组
3.按用户数目
私有组:组名通用户名,且只包含一个用户
公用组:组内包含着多个用户
下面我们来说一下系统是怎么识别这个用户是合法用户的,用户在登录的时候,必须要键入用户名和密码,系统会把用户提供密码与系统中配置文件中的密码对比(当然这里不是简简单单的明文对比),如果相同则允许登入,否则不允许。管理员在定义用户密码的时候后最好要遵循以下定义标准(虽然linux允许用户设置弱类型密码):
1.使用随机的密码
2.最短长度不要低于8位
3.应该使用大写字母、小写字母、数字和标点符号四类字符中至少三类
4.定期更换
我们都知道,定义的密码都是明文的,那么保存在配置文件中是以明文的吗?那肯定不是的,密码一般都会被算法加密,在centos中有以下加密算法,密码被加密成的bit位也不一样,越长说明安全性越高,加密等级为(1-6),在加密前还会添加上一段随机数进行加密,centos默认以sha512加密:
可以使用命令对一段明文加密:
[root@localhost ~]# echo "Frank" | sha512sum
d373aa36ac1061fab63c4a8ee098102476de1ff1bdff11be3629c54ccb14a35d27f658a4745a61ec183fbbd1077561a5bfcba5ead0fa4b32e2e63492e8fed3ea  -
用户和组的相关配置文件
/etc/passwd
我们先看一下这个文件:
[root@localhost ~]# cat /etc/passwdroot:x:0:0:root:/root:/bin/bash
bin:x:1:1:bin:/bin:/sbin/nologin
daemon:x:2:2:daemon:/sbin:/sbin/nologin
adm:x:3:4:adm:/var/adm:/sbin/nologinlp:x:4:7:lp:/var/spool/lpd:/sbin/nologinsync:x:5:0:sync:/sbin:/bin/syncshutdown:x:6:0:shutdown:/sbin:/sbin/shutdown
halt:x:7:0:halt:/sbin:/sbin/halt
mail:x:8:12:mail:/var/spool/mail:/sbin/nologin
operator:x:11:0:operator:/root:/sbin/nologin
......(省略)
tcpdump:x:72:72::/:/sbin/nologin
claire:x:1001:1001::/home/claire:/bin/bash
会看到一行从左到右被冒号分割成了7个部分,下面就这七个部分作出解释,我们以最后一行为例:
1.claire,也就是用户名啦
2.x,密码占位符,密码不是没有保存在这个文件下,后面会讲
3.1001,UID,也就是用户ID
4.1001,GID,也就是组ID
5.空的,这里一般是注释信息,可能是用户的全称
6./home/claire,用户的家目录
7./bin/bash,用户登录的默认shell
我们可以看到前面为UID为0的为管理员root,那些UID小于等于999的,如bin为1,是系统用户,他的默认shell为/nologin,也就是不允许登录的。
/etc/shadow
我们先来看一下这个文件:
[root@localhost ~]# cat /etc/shadow
root:$6$0CIKvP15hvSin5V5$oc.amWyL11jfB1pYxYiaGNfyN8HVq2s0iaVW0KiUd5RrS2SwKmWhTTqUzJ5uNnHi7.pc3OEqO/BMeLIFPOnpJ.::0:99999:7:::
bin:*:17110:0:99999:7:::
daemon:*:17110:0:99999:7:::
adm:*:17110:0:99999:7:::lp:*:17110:0:99999:7:::sync:*:17110:0:99999:7:::
.....(省略)
tcpdump:!!:17348::::::
claire:$6$ZZ5ZKnr4$UI7/gW2z6rtmZygBpH81V8MawY7oLgPTaU65w.zmNyi8Bd9rWVgLQPuZtB1.Q6p6T5KOcd9wnCEJapqcAKCLj.:17357:0:99999:7:::
会看到一行被冒号分为了9个部分,我们还是以claire为例子来说明:
1.claire,用户名
2.用户被加密后的密码,第一个$和$之间的为加密等级,"6"为sha512(前面说过咯),第二个$和第三个$之间为随机数(也被称为加salt),之后为加密后的密文,当密码前有"!"或者"*"代表这个用户被禁用了
3.用户最近修改密码的日期,用天数表示,表示从1970年1月1日到被修改那天之间的天数,可以通过以下方法将天数换算成具体的日期:
[root@localhost ~]# date -u -d "1970-01-01 UTC $((17357 * 86400 )) seconds"Mon Jul 10 00:00:00 UTC 2017
4.密码最短使用天数,"0"表示可以随时修改密码,如果为"3",那么表示用户只有在最近一次修改的三天之后才能修改改密码
5.密码最长使用天数,"99999"就不需要修改了,对你来说也就是永久的了
6.密码告警时间,也就是你密码最长使用天数的,前多少天提醒你,如果的你的密码最长使用天数为100天,密码告警时间为7,那么在 94天的时候,就会提示用户改修改密码了
7.密码过期的恕限时间,如果这里的值为2,当你在告警时间结束之后,仍然没有修改密码,那么在2天内,你还可以使用这个密码登录
8.账号失效时间,也是基于1970年1月1日的天数,当用户到了这个时间的时候,就无法在使用了,这一项一般会被使用在收费服务的系统中,当超过这个时间的时候,账户就不能使用了。
9.保留位,未来有可能会使用
/etc/group
我们还是先看一下这配置文件下有什么
[root@localhost ~]# cat /etc/group
root:x:0:
bin:x:1:
daemon:x:2:
sys:x:3:
adm:x:4:
......(省略)
slocate:x:21:
tcpdump:x:72:
claire:x:1001:
每一行被冒号从左至右分割成了4个部分,还是以最后一行来说明:
1.claire:默认创建一个用户,就会自己创建一个与其同名的组
2.x,组密码占位符,密码也不是放在这里的哦
3.1001,GID,组ID
4.是一个以逗号分隔的用户列表,以此组为附加组的用户的用户列表
/etc/gshadow
先打开文件看一下:
[root@localhost ~]# cat /etc/gshadow
root:::
bin:::
daemon:::
sys:::
......
avahi:!::
slocate:!::
tcpdump:!::
claire:!::
每一行被冒号从左至右分割成了4个部分,还是以最后一行来说明:
1.claire:默认创建一个用户,就会自己创建一个与其同名的组
2.如果为"!"或者是"*",那么其他用户就不需要密码就可以加入到这个组中,如果组是设置的密码,则为一串密文,如果是空,则表示只有该组的成员可以获得组的权限
3.用户组管理员,是一个以逗号分隔的用户列表,用户组管理员可以修改密码和组成员,也很组里其他成员拥有相同的权限
4.成员,是一个以逗号分隔的用户列表,以此组为附加组的用户的用户列表,应该要和/etc/group下的用户列表一样
用户和组管理常用命令
作为一个管理员,我们可以增删用户、增删组、修改用户和组属性,下面我们就来介绍常用的用户和组管理命令。
groupadd
NAME:创建一个新的组
SYNOPSIS:groupadd [options] group
常用选项:
-g GID:指定GID,默认是上一个组的GID+1
-r:创建系统组
举例如下:
[root@localhost ~]# groupadd my_group
[root@localhost ~]# tail -2 /etc/group
claire:x:1001:
my_group:x:1002:    #默认上一个组号加一,注意必须是同类型的组,这里都位登录用户组
[root@localhost ~]# groupadd -g 1500 cloud    #指定GID为1500
[root@localhost ~]# tail -2 /etc/group
my_group:x:1002:
cloud:x:1500:    #GID被指定为1500
[root@localhost ~]# groupadd -r my_sys    #创建系统用户组 my_sys
[root@localhost ~]# tail -2 /etc/group
cloud:x:1500:
my_sys:x:983:    #系统用户组的GID为983
groupmod
NAME:修改组的属性
SYNOPSIS:groupmod [options] GROUP
常用选项:
-g GID:修改GID
-n new_name:修改组名
举例如下:
[root@localhost ~]# tail -3 /etc/group
my_group:x:1002:
cloud:x:1500:
my_sys:x:983:
[root@localhost ~]# groupmod -g 1003 cloud    #修改GID为1003
[root@localhost ~]# tail -3 /etc/group
my_group:x:1002:
cloud:x:1003:
my_sys:x:983:
[root@localhost ~]# groupmod -n  my_system my_sys    #将组名my_sys修改为my_system
[root@localhost ~]# tail -3 /etc/group
my_group:x:1002:
cloud:x:1003:
my_system:x:983:
groupdel
NAME:删除一个组
SYNOPSIS:groupdel [options] GROUP
举例如下:
[root@localhost ~]# tail -3 /etc/group
my_group:x:1002:
cloud:x:1003:
my_system:x:983:
[root@localhost ~]# groupdel my_system   #删除系统组my_system
[root@localhost ~]# tail -3 /etc/group
claire:x:1001:
my_group:x:1002:
cloud:x:1003:
useradd
NAME:创建一个用户或者更新用户的信息
SYNOPSIS:useradd [options] LOGIN
useradd -D
useradd -D [options]
常用选项:
-u:--uid UID:指定UID
-g:--gid GROUP:指定基本组,此组得事先存在
-G:--groups GROUP1[,GROUP2,...[,GROUPN]]]:指定用户所属的附加组,多个组之间用逗号分隔
-c:--comment COMMENT:指明注释信息
-d:--home HOME_DIR:指定的路径为用户的家目录:通过复制/etc/skel此目录并重命名实现,指定的家目录路径如果事先存在,则不 会为用户复制环境配置文件
-s:--shell SHELL:指定用户的默认shell,可用所有的shell存放在/etc/shells下
-r:--system:创建系统用户
举个例子
创建一个组ID为1200,基本组为cloud(已存在),附加组为"my_group",注释信息为"my_test",家目录为"/home/my_home",shell为csh,用户名为my_test的用户
[root@localhost ~]# useradd -u 1200 -g cloud -G my_group -c "my_test" -d /home/my_home  -s /bin/csh my_test
[root@localhost home]# id my_test    id命令后面会讲到
uid=1200(my_test) gid=1003(cloud) groups=1003(cloud),1002(my_group)
[root@localhost home]#
[root@localhost home]# tail -1 /etc/passwdmy_test:x:1200:1003:my_test:/home/my_home:/bin/csh
[root@localhost home]# tail -3 /etc/group
claire:x:1001:
my_group:x:1002:my_test
cloud:x:1003:
[root@localhost home]# ll -a  /home/my_home/total 12drwx------. 3 my_test cloud  78 Jul 10 06:23 .
drwxr-xr-x. 5 root    root   48 Jul 10 06:23 ..-rw-r--r--. 1 my_test cloud  18 Aug  2  2016 .bash_logout-rw-r--r--. 1 my_test cloud 193 Aug  2  2016 .bash_profile-rw-r--r--. 1 my_test cloud 231 Aug  2  2016 .bashrc
drwxr-xr-x. 4 my_test cloud  39 Jul  1 07:56 .mozilla
注意:创建用户时的默认设定配置文件为/etc/login.defs如:
PASS_MAX_DAYS    99999PASS_MIN_DAYS    0PASS_MIN_LEN    5PASS_WARN_AGE    7#
# Min/max values for automatic uid selection in useradd
#
UID_MIN                  1000UID_MAX                 60000# System accounts
SYS_UID_MIN               201SYS_UID_MAX               999#
# Min/max values for automatic gid selection in groupadd
#
GID_MIN                  1000GID_MAX                 60000# System accounts
SYS_GID_MIN               201SYS_GID_MAX               999.....
CREATE_HOME    yes
UMASK           077ENCRYPT_METHOD SHA512
也可使用useradd -D显示创建用户的默认配置
[root@localhost home]# useradd -D
GROUP=100HOME=/home
INACTIVE=-1EXPIRE=SHELL=/bin/bash
SKEL=/etc/skel
CREATE_MAIL_SPOOL=yes
修改默认的属性
useradd -D
选项:
-b,--base-dir:家目录
-e,--expiredate:账号失效时间
-f,--inactive:密码过期的恕限时间
-g,--gid:在创建新的用户的时候,一般都会自动创建与其同命的组,当在创建用户的时候使用了-N/--no-user-group,也就是不创建组或者在/etc/login.defs里的USERGROUPS_ENAB变量被设置成了no,就会将默认指定的组(默认为组100,user)指定改用户的组。
[root@localhost ~]# useradd -N no_group
[root@localhost ~]# id no_group
uid=1201(no_group) gid=100(users) groups=100(users)
-s,--shell:用户登录的shell
usermod
NAME:修改一个用户的属性
SYNOPSIS:usermod [options] LOGIN
常用选项:
与useradd类型,这里就不在多说了
userdel
NAME:删除一个用户和其相关的文件
SYNOPSIS:userdel [options] LOGIN
常用选项:
-r:删除用户时一并删除其家目录,默认不删除
[root@localhost home]# userdel no_group
[root@localhost home]# ll /home/total 0drwx------. 3 claire  claire 78 Jul 10 03:35 claire
drwx------. 2 frank   frank  62 Jun 30 10:17 frank
drwx------. 3 my_test cloud  78 Jul 10 06:23 my_home
drwx------. 3    1201 users  78 Jul 10 06:49 no_group
passwd
NAME:修改用户的认证信息
SYNOPSIS: passwd [-k] [-l] [-u [-f]] [-d] [-e] [-n mindays] [-x maxdays] [-w warndays] [-i inactivedays] [-S] [--stdin] [username]
仅适用passwd,修改用户自己的密码,要输入2次,输入密码的密码为隐藏状态
[root@localhost home]# passwdChanging password for user root.
New password:
Retype new password:
passwd: all authentication tokens updated successfully.
passwd USERNAME:修改指定用户的密码,一般只用管理员root才可以修改
常用选项:
-l,-u:锁定和解锁用户
-d:清除用户密码
-e DATE:账户失效时间,日期,也可以使用1970年1月1日到现在的天数,试过不可用,如果兄弟试了可用,麻烦告知,可以通过设置/etc/default/useradd的EXPIRE的day数,默认不设置,当设置为"99999"时,创建账户Never_user默认账户失效时间就被设为了"99999",也可以使用后面的命令chage,后面再说!
[root@localhost home]# cat /etc/default/useradd
# useradd defaults fileGROUP=100HOME=/home
INACTIVE=-1EXPIRE=99999SHELL=/bin/bash
SKEL=/etc/skel
CREATE_MAIL_SPOOL=yes
[root@localhost home]# useradd Never_user
[root@localhost home]# tail -1 /etc/shadow   #用户失效时间被设置为了99999
Never_user:!!:0:0:99999:7::99999:
-i DAYS:密码过期的恕限时间
以上亲测(除-e之外)均可设置,
--stdin:标准输入,避免重复输入2次密码
使用方法:
[root@localhost home]# echo "Never_user" | passwd --stdin Never_user
Changing password for user Never_user.passwd: all authentication tokens updated successfully.
[root@localhost home]# tail -1 /etc/shadow
Never_user:$6$vogq3txX$7pcR5l4sb6YMRbE9CK2gNg2ZR12tCeqdgMWb3vmhlZmcnw2hfgjozcSellI7w7QLTHoQpuik1EGFkAn.74py30:17357:0:99999:7::99999:
gpasswd
NAME:可以设置组密码
SYNOPSIS:gpasswd [option] group
常用选项:
-a USERNAME:向组中添加用户
-d USERNAME:从组中移除用户
比如我们将用户"Never_user"添加到组"cloud"中
[root@localhost home]# gpasswd -a Never_user cloud
Adding user Never_user to group cloud
[root@localhost home]# tail -3 /etc/group
my_group:x:1002:my_test
cloud:x:1003:Never_user
Never_user:x:1201:
[root@localhost home]#
newgrp
NAME:临时切换基本组
SYNOPSIS:newgrp [-] [group]
常用选项:
-:会模拟用户重新登录以实现初始化其工作环境,返回以前的状态,是用exit退出
#我们切换到Never_user下,Never_user基本组为Never_user和cloud
[Never_user@localhost ~]$ iduid=1201(Never_user) gid=1201(Never_user) groups=1201(Never_user),1003(cloud) context=unconfined_u:unconfined_r:unconfined_t:s0-s0:c0.c1023
[Never_user@localhost ~]$ touch test.txt
[Never_user@localhost ~]$ ll     #我们可以看见创建的文件的组为Never
total 0-rw-rw-r--. 1 Never_user Never_user 0 Jul 10 08:07 test.txt
[Never_user@localhost ~]$ newgrp - cloud   #切换为组cloud
[Never_user@localhost ~]$
[Never_user@localhost ~]$ touch test1.txt   #test1文件的用户组为cloud
[Never_user@localhost ~]$ ll
total 0-rw-r--r--. 1 Never_user cloud      0 Jul 10 08:07 test1.txt-rw-rw-r--. 1 Never_user Never_user 0 Jul 10 08:07 test.txt
chage
NAME:修改用户密码的过期信息
SYNOPSIS:chage [options] LOGIN
常用选项:
-d:修改最后一次修改密码时间
-E:修改用户失效时间
-I:修改密码过期怒限时间
-W:修改告警天数
-m:修改密码最小使用天数
-M:修改密码最长使用天数
举个例子:修改Never_user账户失效的时间为2017年07月30日
[root@localhost home]# chage  -E  2017-07-30 Never_user
[root@localhost home]# tail -1 /etc/shadow   #2017年07月30日,自动转换为了从1970年1月1日到2017年07月30日的天数
Never_user:$6$vogq3txX$7pcR5l4sb6YMRbE9CK2gNg2ZR12tCeqdgMWb3vmhlZmcnw2hfgjozcSellI7w7QLTHoQpuik1EGFkAn.74py30:17357:0:99999:7::17377:
id
NAME:显示真的和有效的用户和组ID
SYNOPSIS:id [OPTION]... [USER]
常用选项:
-u: 仅显示有效的UID
-g: 仅显示用户的基本组ID
-G:仅显示用户所属的所有组的ID
[root@localhost home]# id frank
uid=1000(frank) gid=1000(frank) groups=1000(frank)
[root@localhost home]# id -u frank1000[root@localhost home]# id -g frank1000[root@localhost home]# id -G frank1000
su
NAME:切换用户
SYNOPSIS:su [options...] [-] [user [args...]]
登录式时切换,会通过读取目标用户的配置文件来重新初始化
su - USERNAME
非登录式时切换,不会读取目的用户的配置文件进行初始化
su USERNAME
管理员可以无密码切换至其他任何用户
-c 'COMMADN':仅以指定用户的身份运行此处制定的命令
[root@localhost home]# su -c "whoami" Never_user
Never_user
权限的定义
我们先任意看一下目录下的文件:
[root@localhost ~]# ll /etc/default/total 12-rw-r--r--. 1 root root 254 Jun 30 10:19 grub-rw-r--r--. 1 root root 1756 Nov 4 2016 nss-rw-r--r--. 1 root root 124 Jul 10 07:20 useradd
每一行的最左位为文件的类型,-代表普通文件,那么接下来的9为又是什么呢?
左三位:定义了owner(属主)的权限,也就是user的
中三位:定义了group(属组)的权限
右三位:定义了others(其他人)的权限
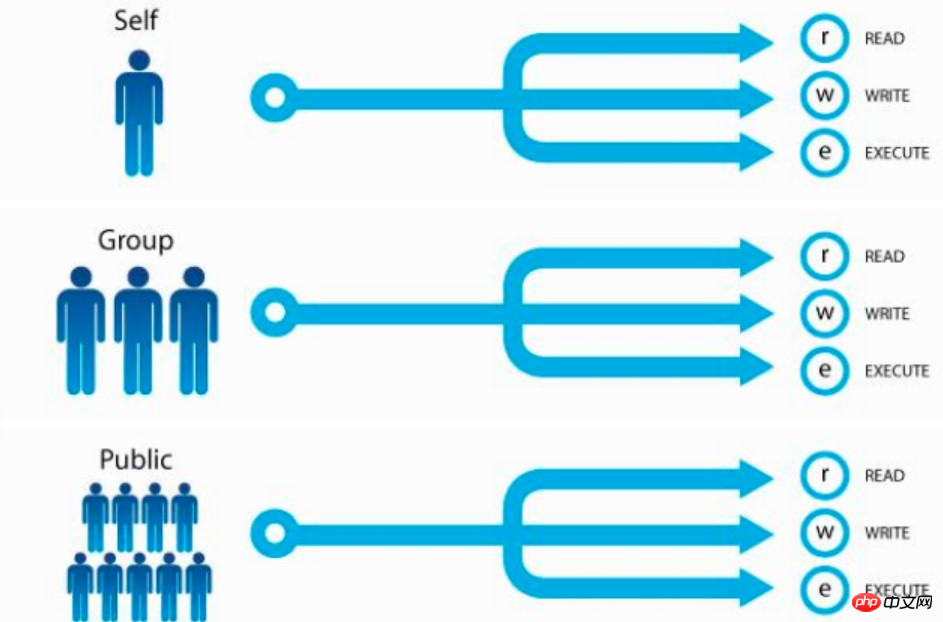
进程以其发起者的身份运行,进程对文件的访问权限,取决于发起此进程的用户的权限;当使用一个进程对一个文件进行操作的时候,会对比进行的发起者是不是和文件的属主一致,如果一致,则应用属主的权限,如果不一致,则对比进程的发起者是不是属于文件的属组,如果属于则执行属组的权限,如果都不是,则只能应用其他人的权限。用户也只能修改那些属主是自己的那些文件。
那么rwx分别代表什么呢?
r:readable,可读
w:writable,可写
x:excutable,可执行
rwx对文件和目录的操作是不同的:
对文件:
r:可获取该文件的数据
w:可修改文件的数据
x:该文件可以执行
对目录:
r:可以使用ls命令回去其下的所有文件的列表,如果只有r,则只能看到目录下的文件名列表
w:可修改此文件目录下的文件列表,就是可以删除和创建文件,前提必须有x的权限,如果只有w,不能干任何事
x:且可使用ls -l来获取所有文件的详细属性信息,前提必须是有r的权限,如果只有x,只能cd到目录下
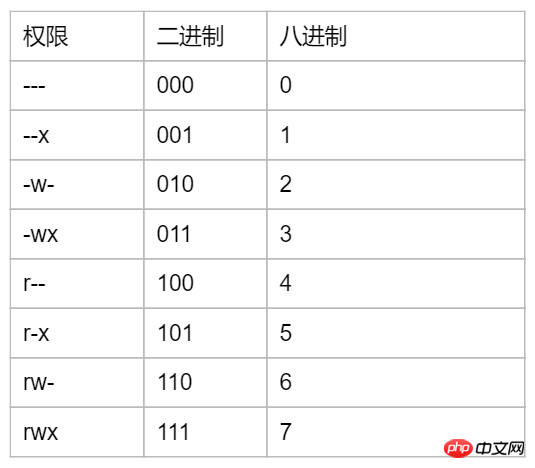
权限与二进制和八进制的对应关系表
权限的管理命令
chmod
NAME:change file mode bits,修改文件的权限
SYNOPSYS:
首先我们来了解一下,在命令中使用以下字母代表相应用户类型
u:属主
g:属组
o:其他人
a:所有
(1)可以直接将rwx直接赋值给相应的用户类型,比如:u=rwx,g=x,o= ,空代表该位没有权限
举个例子:
[root@localhost ~]# cd /tmp/read/[root@localhost read]# ll
total 4-rw-r--r--. 1 root root 4 Jul 10 09:49 read.txt
[root@localhost read]# chmod u=rwx,g=rw,o= /tmp/read/read.txt
[root@localhost read]# ll
total 4-rwxrw----. 1 root root 4 Jul 10 09:49 read.txt
(2)直接操作一类用户的一个权限位
[root@localhost read]# ll
total 4-rwxrw----. 1 root root 4 Jul 10 09:49 read.txt
[root@localhost read]# chmod u-x /tmp/read/read.txt
[root@localhost read]# ll
total 4-rw-rw----. 1 root root 4 Jul 10 09:49 read.txt
2.chmod [OPTION]... OCTAL-MODE FILE...
直接指定八进制
举个例子:
[root@localhost read]# chmod 777 /tmp/read/read.txt
[root@localhost read]# ll
total 4-rwxrwxrwx. 1 root root 4 Jul 10 09:49 read.txt
3.chmod [OPTION]... --reference=RFILE FILE...
参考其他文件的权限
[root@localhost read]# chmod --reference=/etc/passwd  /tmp/read/read.txt
[root@localhost read]# ll
total 4-rw-r--r--. 1 root root 4 Jul 10 09:49 read.txt
常用选项:
-R:--recursive:递归修改
chown
只有管理员可以修改文件的属主和属组
NAME:修改文件的属主和属组
SYNOPSIS:
举个例子:
[root@localhost read]# ll
total 4-rw-r--r--. 1 root root 4 Jul 10 09:49 read.txt
[root@localhost read]# chown frank:frank ./read.txt
[root@localhost read]# ll
total 4-rw-r--r--. 1 frank frank 4 Jul 10 09:49 read.txt
常用选项:
-R:如果修改目录,也想递归修改下面的文件,则是用该参数
chgrp
[root@localhost read]# umask0022
对于新建文件的权限为666-umask=644=rw-r--r--
[root@localhost read]# touch test.txt
[root@localhost read]# ll
total 4-rw-r--r--. 1 frank frank 4 Jul 10 09:49 read.txt
drwxr-xr-x. 2 root  root  6 Jul 10 10:36 test-rw-r--r--. 1 root  root  0 Jul 10 10:37 test.txt
对于新建目录的权限为777-umask=755=rwxr-xr-x
[root@localhost read]# mkdir ./test
[root@localhost read]# ll
total 4-rw-r--r--. 1 frank frank 4 Jul 10 09:49 read.txt
drwxr-xr-x. 2 root  root  6 Jul 10 10:36 test
可以使用umask MASK来设置umask,当然只对当前Shell进程有效
补充命令:
install
NAME:复制文件并设置属性,也可以创建目录,不能复制目录和递归复制
SYNOPSYS:
和cp的用法类似,这里不再敖述,新的用法是install -d 可以创建目录
常用选项:
-m:设置目标文件的属性,默认属性为755
-o:设置目标文件的属主
-g:设置目标文件的属组
[root@localhost read]# install -o frank -g frank /etc/fstab /tmp/[root@localhost read]# ll /tmp/total 48drwxr-xr-x. 2 root  root      6 Jul  7 02:44 07070244drwxr-xr-x. 2 root  root      6 Jul  7 02:45 07070245drwxr-xr-x. 2 root  root      6 Jul  7 02:53 07070253drwxr-xr-x. 2 root  root      6 Jul  7 01:18 a_c
drwxr-xr-x. 2 root  root      6 Jul  7 01:18 a_d
drwxr-xr-x. 2 root  root      6 Jul  7 01:18 b_c
drwxr-xr-x. 2 root  root      6 Jul  7 01:18 b_d
drwxr-xr-x. 2 root  root    279 Jul  9 00:57 conf.d-rwxr-xr-x. 1 frank frank     5 Jul 10 10:44 fstab-rw-r--r--. 1 root  root    126 Jul  9 01:22 fstab1.out
mktemp
NAME:创建临时的文件或者目录文件,会直接返回文件名称
SYNOPSIS: mktemp [OPTION]... [TEMPLATE]
TEMPLATE为:name.XXXX name可以自定义,XXXX必须为大写的X且最少三位
[root@localhost tmp]# mktemp case.XXXcase.rMB
[root@localhost tmp]# mktemp case.XXXXXcase.HeqBH
[root@localhost tmp]# mktemp case.XXXXXcase.MatKC
常用选项:
-d:创建临时目录
[root@localhost tmp]# mktemp -d case.XXXXXcase.TGRtu
那今天就写到这里了,如果有误之处,还望各位大佬多多指教。
The above is the detailed content of Linux user and permission management functions. For more information, please follow other related articles on the PHP Chinese website!

Hot AI Tools

Undresser.AI Undress
AI-powered app for creating realistic nude photos

AI Clothes Remover
Online AI tool for removing clothes from photos.

Undress AI Tool
Undress images for free

Clothoff.io
AI clothes remover

AI Hentai Generator
Generate AI Hentai for free.

Hot Article
Hot Tools

Notepad++7.3.1
Easy-to-use and free code editor

SublimeText3 Chinese version
Chinese version, very easy to use

Zend Studio 13.0.1
Powerful PHP integrated development environment

Dreamweaver CS6
Visual web development tools

SublimeText3 Mac version
God-level code editing software (SublimeText3)
Hot Topics
 1377
1377
 52
52

 Unable to log in to mysql as root
Apr 08, 2025 pm 04:54 PM
Unable to log in to mysql as root
Apr 08, 2025 pm 04:54 PM
The main reasons why you cannot log in to MySQL as root are permission problems, configuration file errors, password inconsistent, socket file problems, or firewall interception. The solution includes: check whether the bind-address parameter in the configuration file is configured correctly. Check whether the root user permissions have been modified or deleted and reset. Verify that the password is accurate, including case and special characters. Check socket file permission settings and paths. Check that the firewall blocks connections to the MySQL server.
 C language conditional compilation: a detailed guide for beginners to practical applications
Apr 04, 2025 am 10:48 AM
C language conditional compilation: a detailed guide for beginners to practical applications
Apr 04, 2025 am 10:48 AM
C language conditional compilation is a mechanism for selectively compiling code blocks based on compile-time conditions. The introductory methods include: using #if and #else directives to select code blocks based on conditions. Commonly used conditional expressions include STDC, _WIN32 and linux. Practical case: Print different messages according to the operating system. Use different data types according to the number of digits of the system. Different header files are supported according to the compiler. Conditional compilation enhances the portability and flexibility of the code, making it adaptable to compiler, operating system, and CPU architecture changes.
 What are the 5 basic components of Linux?
Apr 06, 2025 am 12:05 AM
What are the 5 basic components of Linux?
Apr 06, 2025 am 12:05 AM
The five basic components of Linux are: 1. The kernel, managing hardware resources; 2. The system library, providing functions and services; 3. Shell, the interface for users to interact with the system; 4. The file system, storing and organizing data; 5. Applications, using system resources to implement functions.
 How to solve mysql cannot be started
Apr 08, 2025 pm 02:21 PM
How to solve mysql cannot be started
Apr 08, 2025 pm 02:21 PM
There are many reasons why MySQL startup fails, and it can be diagnosed by checking the error log. Common causes include port conflicts (check port occupancy and modify configuration), permission issues (check service running user permissions), configuration file errors (check parameter settings), data directory corruption (restore data or rebuild table space), InnoDB table space issues (check ibdata1 files), plug-in loading failure (check error log). When solving problems, you should analyze them based on the error log, find the root cause of the problem, and develop the habit of backing up data regularly to prevent and solve problems.
 Can mysql run on android
Apr 08, 2025 pm 05:03 PM
Can mysql run on android
Apr 08, 2025 pm 05:03 PM
MySQL cannot run directly on Android, but it can be implemented indirectly by using the following methods: using the lightweight database SQLite, which is built on the Android system, does not require a separate server, and has a small resource usage, which is very suitable for mobile device applications. Remotely connect to the MySQL server and connect to the MySQL database on the remote server through the network for data reading and writing, but there are disadvantages such as strong network dependencies, security issues and server costs.
 Solutions to the errors reported by MySQL on a specific system version
Apr 08, 2025 am 11:54 AM
Solutions to the errors reported by MySQL on a specific system version
Apr 08, 2025 am 11:54 AM
The solution to MySQL installation error is: 1. Carefully check the system environment to ensure that the MySQL dependency library requirements are met. Different operating systems and version requirements are different; 2. Carefully read the error message and take corresponding measures according to prompts (such as missing library files or insufficient permissions), such as installing dependencies or using sudo commands; 3. If necessary, try to install the source code and carefully check the compilation log, but this requires a certain amount of Linux knowledge and experience. The key to ultimately solving the problem is to carefully check the system environment and error information, and refer to the official documents.
 MySQL can't be installed after downloading
Apr 08, 2025 am 11:24 AM
MySQL can't be installed after downloading
Apr 08, 2025 am 11:24 AM
The main reasons for MySQL installation failure are: 1. Permission issues, you need to run as an administrator or use the sudo command; 2. Dependencies are missing, and you need to install relevant development packages; 3. Port conflicts, you need to close the program that occupies port 3306 or modify the configuration file; 4. The installation package is corrupt, you need to download and verify the integrity; 5. The environment variable is incorrectly configured, and the environment variables must be correctly configured according to the operating system. Solve these problems and carefully check each step to successfully install MySQL.
 How to solve the problem of missing dependencies when installing MySQL
Apr 08, 2025 pm 12:00 PM
How to solve the problem of missing dependencies when installing MySQL
Apr 08, 2025 pm 12:00 PM
MySQL installation failure is usually caused by the lack of dependencies. Solution: 1. Use system package manager (such as Linux apt, yum or dnf, Windows VisualC Redistributable) to install the missing dependency libraries, such as sudoaptinstalllibmysqlclient-dev; 2. Carefully check the error information and solve complex dependencies one by one; 3. Ensure that the package manager source is configured correctly and can access the network; 4. For Windows, download and install the necessary runtime libraries. Developing the habit of reading official documents and making good use of search engines can effectively solve problems.
