This article mainly shares with you the method of configuring static IP in Linux bridge mode. I hope it can help you.
1: Bridge mode
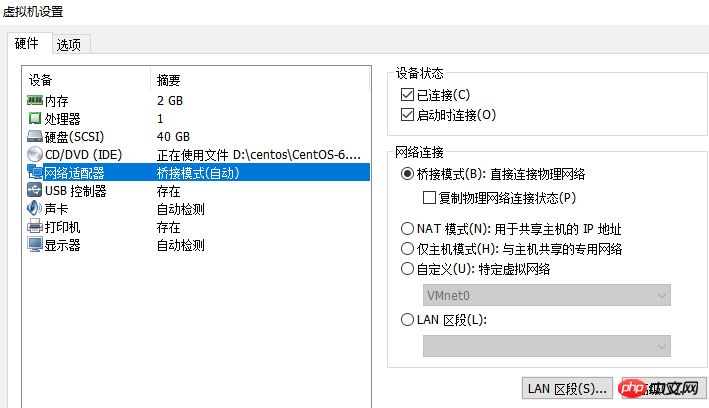
VMware bridge mode is to transfer the virtual network adapter of the virtual machine to the physical network adapter of the host. The virtual network in the virtual machine The adapter provides direct access to the external network through the physical network adapter in the host. In short, it is like adding a new, independent computer to the LAN. Therefore, the virtual machine will also occupy an IP address in the LAN and can communicate with other terminals. Bridged mode network connections support both wired and wireless host network adapters. If you want to treat the virtual machine as a completely independent computer and allow it to communicate with other terminals on the network, then bridge mode is usually the easiest way for the virtual machine to access the network.
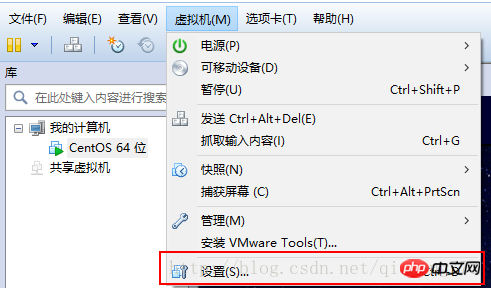
Two: Set up the network adapter


## Three: Modify the configuration file and set a static ip
1: Check the network card interface name ifconfig | more or ip addr | more[root@localhost ~]# ifconfig | more
eth0 Link encap:Ethernet HWaddr 00:0C:29:5A:71:6D
inet addr:192.168.1.123 Bcast:192.168.1.255 Mask:255.255.255.0
inet6 addr: fe80::20c:29ff:fe5a:716d/64 Scope:Link
UP BROADCAST RUNNING MULTICAST MTU:1500 Metric:1
RX packets:5631 errors:0 dropped:0 overruns:0 frame:0
TX packets:324 errors:0 dropped:0 overruns:0 carrier:0
collisions:0 txqueuelen:1000
RX bytes:398905 (389.5 KiB) TX bytes:27775 (27.1 KiB)
lo Link encap:Local Loopback
inet addr:127.0.0.1 Mask:255.0.0.0
inet6 addr: ::1/128 Scope:Host
UP LOOPBACK RUNNING MTU:16436 Metric:1
RX packets:230 errors:0 dropped:0 overruns:0 frame:0
TX packets:230 errors:0 dropped:0 overruns:0 carrier:0
collisions:0 txqueuelen:0
RX bytes:19722 (19.2 KiB) TX bytes:19722 (19.2 KiB)[root@localhost ~]# vi /etc/sysconfig/network-scripts/ifcfg-eth0 DEVICE=eth0 #网卡接口名称 BOOTPROTO=dhcp #系统启动地址协议 dhcp:DHCP动态地址协议 static:静态地址协议 HWADDR=00:0c:29:5a:71:6d IPV6INIT=yes NM_CONTROLLED=yes ONBOOT=yes #系统启动时是否激活网卡接口 TYPE=Ethernet UUID="793813e9-4cbd-4ae1-a1de-f9f38b8369ee" USERCTL=no PEERDNS=yes
BOOTPROTI=static
ONBOOT=yes
IPADDR=192.168.1.123  #静态ip,添加前先ping一下该ip,ping不通才能使用,确保唯一
NETMASK=255.255.255.0  #子网掩码
GATEWAY=192.168.1.1   #网关
[root@localhost ~]# vi /etc/sysconfig/network-scripts/ifcfg-eth0
DEVICE=eth0
BOOTPROTO=static
HWADDR=00:0c:29:5a:71:6d
IPV6INIT=yes
NM_CONTROLLED=yes
ONBOOT=yes
TYPE=Ethernet
UUID="793813e9-4cbd-4ae1-a1de-f9f38b8369ee"
USERCTL=no
PEERDNS=yes
IPADDR=192.168.1.123
NETMASK=255.255.255.0
GATEWAY=192.168.1.1
[root@localhost Desktop]# service network restart
Shutting down interface eth0:                              [  OK  ]
Shutting down loopback interface:                          [  OK  ]
Bringing up loopback interface:                            [  OK  ]
Bringing up interface eth0:  Active connection state: activating
Active connection path: /org/freedesktop/NetworkManager/ActiveConnection/9
state: activated
Connection activated
[ OK ]Four: This Open cmd on the machine to test ping 192.168.1.123
C:\Windows\System32>ping 192.168.1.123
正在 Ping 192.168.1.123 具有 32 字节的数据:
来自 192.168.1.123 的回复: 字节=32 时间=6ms TTL=64
来自 192.168.1.123 的回复: 字节=32 时间=30ms TTL=64
来自 192.168.1.123 的回复: 字节=32 时间=8ms TTL=64
来自 192.168.1.123 的回复: 字节=32 时间=8ms TTL=64
Detailed explanation of bridge mode of PHP design pattern
The above is the detailed content of How to configure static IP in linux bridge mode. For more information, please follow other related articles on the PHP Chinese website!


