

yum装配nginx+mysql+php

yum安装nginx+mysql+php 命令准备 创建目录 mkdir 目录名 chmod 777 目录名 变更权限 加入开机启动项服务 chkconfig --add php-fpm chkconfig nginx on 查找文件位置 经常用于查找yum安装后各种配置文件及启动程序所在位置 find|grep php-fpm 服务启动 servic
yum安装nginx+mysql+php命令准备
创建目录
mkdir 目录名
chmod 777 目录名 变更权限
加入开机启动项服务
chkconfig --add php-fpm
chkconfig nginx on
查找文件位置 经常用于查找yum安装后各种配置文件及启动程序所在位置
find|grep php-fpm
服务启动
service nginx
start|stop|restart|condrestart|try-restart|force-reload|upgrade|reload|status|help|configtest
service nginx start
service php-fpm start
查看进程
ps -ef | grep java
查看进程
kill -9 进程id
1.安装
添加nginx源http://nginx.org/packages/centos/6/noarch/RPMS/nginx-release-centos-6-0.el6.ngx.noarch.rpm
wget http://nginx.org/packages/centos/6/noarch/RPMS/nginx-release-centos-6-0.el6.ngx.noarch.rpm
rpm -ivh nginx-release-centos-6-0.el6.ngx.noarch.rpmrpm -qa | grep nginx 检查nginx 是否加入源路径
安装 php mysql nginx
yum install mysql mysql-server php php-mysql php-fpm nginx
php组件库 选择安装 如果找不到源地址,请查找小技巧里面的更新第三方源库
yum install php-cli php-gd php-imap php-ldap php-odbc php-pear php-xml php-xmlrpc php-mbstring php-mcrypt php-mssql php-snmp php-soap php-tidy php-common php-devel
2.配置
2.1nginx 配置
配置文件位置 如果找不到相关配件,查找文件位置 命令/etc/nginx/nginx.conf
/etc/nginx/conf.d/*.conf
多个站点放在conf.d目录,在nginx.conf用include语法包含
include /etc/nginx/conf.d/*.conf;
默认default.conf修改
server {
    listen       80;
    server_name  localhost;<span>#自定义域名配置</span>

    #charset koi8-r;
    #access_log  /var/log/nginx/log/host.access.log  main;

    location / {
        root   /home/www;<span>#自定义目录设置</span>
        index  index.html index.htm<span> index.php</span>;
    }

    #error_page  404              /404.html;

    # redirect server error pages to the static page /50x.html
    #<span>错误页处理</span>
    error_page   500 502 503 504  /50x.html;
    location = /50x.html {
        root   /home/www;
    }

    # proxy the PHP scripts to Apache listening on 127.0.0.1:80
    #
    #location ~ \.php$ {
    #    proxy_pass   http://127.0.0.1;
    #}

    # pass the PHP scripts to FastCGI server listening on 127.0.0.1:9000
    #
    location ~ \.php$ {
        #root           /home/www;
        #fastcgi_pass   127.0.0.1:9000;
	<span>fastcgi_pass  unix:/tmp/php-cgi.sock;#这种方式听说性能提升比较多</span>
        fastcgi_index  index.php;
        fastcgi_param  SCRIPT_FILENAME  /home/www$fastcgi_script_name;
        include        fastcgi_params;
    }

    # deny access to .htaccess files, if Apache's document root
    # concurs with nginx's one
    #
    #location ~ /\.ht {
    #    deny  all;
    #}
}
类似
其他*.conf 可自定义添加
server
	{
		listen       80;
		server_name wx.vtz.cc;
		index index.html index.htm index.php;
		root  /home/wwwroot/weixin;

		location ~ .*\.(php|php5)?$
			{
				try_files $uri =404;
				fastcgi_pass  unix:/tmp/php-cgi.sock;
				fastcgi_index index.php;
				include fcgi.conf;
			}

		location /status {
			stub_status on;
			access_log   off;
		}

		location ~ .*\.(gif|jpg|jpeg|png|bmp|swf)$
			{
				expires      30d;
			}

		location ~ .*\.(js|css)?$
			{
				expires      12h;
			}

		access_log  /home/wwwlogs/weixin_access.log  access;
}2.2 php-fpm.conf配置
include=/etc/php-fpm.d/*.conf //因为包含其他文件,/etc/php-fpm.d查找到www.conf 修改[www]
#设置监听 修改项
#listen = 127.0.0.1:9000
listen = /tmp/php-cgi.sock
3.添加服务自启动
nginx 服务chkconfig --add nginx chkconfig nginx on service nginx start
php-fpm
chkconfig --add php-fpm
chkconfig php-fpm on
service php-fpm start
mysql
chkconfig --add mysqld
chkconfig mysqld on
service mysqld start
默认root 密码空
小技能:
1.php开启错误提示
<span><strong>vim</strong></span> <span>/</span>etc<span>/</span>php5<span>/</span>fpm<span>/</span>php.ini Copy after login |
打开错误提示
display_errors = On Copy after login |
因为用到的四fpm与nginx配合,所以还需要修改php-fpm.conf文件
<span><strong>vim</strong></span> <span>/</span>etc<span>/</span>php5<span>/</span>fpm<span>/</span>php-fpm.conf Copy after login |
再最后添加 有可能在此配置文件里面 www.conf
php_flag<span><strong>[</strong></span>display_errors<span><strong>]</strong></span> = on Copy after login |
让后从新读取nginx配置
<span><strong>sudo</strong></span> service nginx reload Copy after login |
2.其他安装参考
- 配置CentOS 6.0 第三方yum源(CentOS默认的标准源里没有nginx软件包)
1yuminstallwget2wget http://www.atomicorp.com/installers/atomic3sh ./atomic4yum update - 安装开发包和库文件
1yum -yinstallntpmakeopenssl openssl-devel pcre pcre-devel libpng2libpng-devel libjpeg-6b libjpeg-devel-6b freetype freetype-devel gd gd-devel zlib zlib-devel3gcc gcc-c++ libXpm libXpm-devel ncurses ncurses-devel libmcrypt libmcrypt-devel libxml24libxml2-devel imake autoconf automakescreensysstat compat-libstdc++-33 curl curl-devel - 卸载已安装的apache、mysql、php
1yum remove httpd2yum remove mysql3yum remove php
- 安装nginx
1yuminstallnginx2service nginx start3chkconfig --levels 235 nginx on - 安装mysql
1yuminstallmysql mysql-server mysql-devel2service mysqld start3chkconfig --levels 235 mysqld on4mysqladmin -u root password"密码"<span></span>service mysqld restart - 安装php
1yuminstallphp lighttpd-fastcgi php-cli php-mysql php-gd php-imap php-ldap2php-odbc php-pear php-xml php-xmlrpc php-mbstring php-mcrypt php-mssql php-snmp php-soap3php-tidy php-common php-devel php-fpm45service php-fpm start67chkconfig --levels 235 php-fpm on - 配置nginx支持php
1mv/etc/nginx/nginx.conf /etc/nginx/nginx.confbak2cp/etc/nginx/nginx.conf.default /etc/nginx/nginx.conf
在文件中加入3vi/etc/nginx/nginx.conf
1location ~ \.php$ {2root /usr/share/nginx/html;3fastcgi_pass 127.0.0.1:9000;4fastcgi_index index.php;5fastcgi_param SCRIPT_FILENAME /usr/share/nginx/html$fastcgi_script_name;6include fastcgi_params;7} - 重启nginx php-fpm
view source print?1service nginx restart2service php-fpm restart
3.服务器状况php函数组件探针
下载地址4.mysql 新建用户外网访问
insert into mysql.user(Host,User,Password) values("%","admin",password("1234"));
update mysql.user set password=password('新密码') where User="phplamp" and Host="localhost";
grant all privileges on *.* to 'yourname'@'%' identified by 'youpasswd';   //密码为必填项
flush privileges;5.linux svn搭建 版本库
1、 # yum install subversion2、新建一个目录用于存储SVN所有文件
# mkdir /home/svn
3、在上面创建的文件夹中为项目 project_1 创建一个版本仓库
# svnadmin create /home/svn/project_1
执行完这一步,/home/svn 中将存在project_1文件夹,这个项目的配置都在 /home/svn/project_1/conf 中
4、为项目配置权限
(1)svnserve.conf 是主配置文件
# vi /home/svn/project_1/conf/svnserve.conf
anon-access=read #匿名可读
auth-access=write #验证用户可读写
password-db=passwd #指向验证用户名密码的数据文件 passwd ,请看下文配置
auth-db=authz #指向验证用户的权限配置文件 authz ,请看下文配置
注意:每一行前方不能有空格,否则会出现 Option expected 错误!
(2)passwd 用户名密码配置文件
# vi /home/svn/project_1/conf/passwd
[users]
manager1=123456 #每一行都要是“用户名=密码”的格式
manager2=123123
manager3=888888
(3)authz 用户权限配置文件
# vi /home/svn/project_1/conf/authz
[groups]
managers=manager1,manager2 #定义群组 managers 包含 manager1 和 manager2 两个用户
[/]
@managers=rw #定义群组 managers 有读写权限
manager3=r #定义 manager3 有读权限
*= #以上没有定义的用户都没有任何权限
4,启动和停止SVN服务
启动SVN服务:
[root@svn ~]# svnserve -d -r /data/svndata/
-d表示后台运行
-r 指定根目录是 /data/svndata/
停止SVN服务:
ps -aux |grep svn

Hot AI Tools

Undresser.AI Undress
AI-powered app for creating realistic nude photos

AI Clothes Remover
Online AI tool for removing clothes from photos.

Undress AI Tool
Undress images for free

Clothoff.io
AI clothes remover

Video Face Swap
Swap faces in any video effortlessly with our completely free AI face swap tool!

Hot Article
Hot Tools

Notepad++7.3.1
Easy-to-use and free code editor

SublimeText3 Chinese version
Chinese version, very easy to use

Zend Studio 13.0.1
Powerful PHP integrated development environment

Dreamweaver CS6
Visual web development tools

SublimeText3 Mac version
God-level code editing software (SublimeText3)
Hot Topics
 1664
1664
 14
1421
52
1315
25
1266
29
1239
24
14
1421
52
1315
25
1266
29
1239
24

 Solution to the problem that Win11 system cannot install Chinese language pack
Mar 09, 2024 am 09:48 AM
Solution to the problem that Win11 system cannot install Chinese language pack
Mar 09, 2024 am 09:48 AM
Solution to the problem that Win11 system cannot install Chinese language pack With the launch of Windows 11 system, many users began to upgrade their operating system to experience new functions and interfaces. However, some users found that they were unable to install the Chinese language pack after upgrading, which troubled their experience. In this article, we will discuss the reasons why Win11 system cannot install the Chinese language pack and provide some solutions to help users solve this problem. Cause Analysis First, let us analyze the inability of Win11 system to
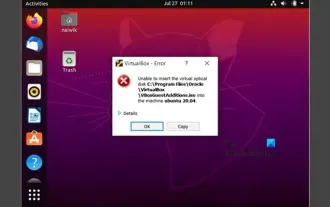 Unable to install guest additions in VirtualBox
Mar 10, 2024 am 09:34 AM
Unable to install guest additions in VirtualBox
Mar 10, 2024 am 09:34 AM
You may not be able to install guest additions to a virtual machine in OracleVirtualBox. When we click on Devices>InstallGuestAdditionsCDImage, it just throws an error as shown below: VirtualBox - Error: Unable to insert virtual disc C: Programming FilesOracleVirtualBoxVBoxGuestAdditions.iso into ubuntu machine In this post we will understand what happens when you What to do when you can't install guest additions in VirtualBox. Unable to install guest additions in VirtualBox If you can't install it in Virtua
 What should I do if Baidu Netdisk is downloaded successfully but cannot be installed?
Mar 13, 2024 pm 10:22 PM
What should I do if Baidu Netdisk is downloaded successfully but cannot be installed?
Mar 13, 2024 pm 10:22 PM
If you have successfully downloaded the installation file of Baidu Netdisk, but cannot install it normally, it may be that there is an error in the integrity of the software file or there is a problem with the residual files and registry entries. Let this site take care of it for users. Let’s introduce the analysis of the problem that Baidu Netdisk is successfully downloaded but cannot be installed. Analysis of the problem that Baidu Netdisk downloaded successfully but could not be installed 1. Check the integrity of the installation file: Make sure that the downloaded installation file is complete and not damaged. You can download it again, or try to download the installation file from another trusted source. 2. Turn off anti-virus software and firewall: Some anti-virus software or firewall programs may prevent the installation program from running properly. Try disabling or exiting the anti-virus software and firewall, then re-run the installation
 How to install Android apps on Linux?
Mar 19, 2024 am 11:15 AM
How to install Android apps on Linux?
Mar 19, 2024 am 11:15 AM
Installing Android applications on Linux has always been a concern for many users. Especially for Linux users who like to use Android applications, it is very important to master how to install Android applications on Linux systems. Although running Android applications directly on Linux is not as simple as on the Android platform, by using emulators or third-party tools, we can still happily enjoy Android applications on Linux. The following will introduce how to install Android applications on Linux systems.
 How to install Podman on Ubuntu 24.04
Mar 22, 2024 am 11:26 AM
How to install Podman on Ubuntu 24.04
Mar 22, 2024 am 11:26 AM
If you have used Docker, you must understand daemons, containers, and their functions. A daemon is a service that runs in the background when a container is already in use in any system. Podman is a free management tool for managing and creating containers without relying on any daemon such as Docker. Therefore, it has advantages in managing containers without the need for long-term backend services. Additionally, Podman does not require root-level permissions to be used. This guide discusses in detail how to install Podman on Ubuntu24. To update the system, we first need to update the system and open the Terminal shell of Ubuntu24. During both installation and upgrade processes, we need to use the command line. a simple
 How to install creo-creo installation tutorial
Mar 04, 2024 pm 10:30 PM
How to install creo-creo installation tutorial
Mar 04, 2024 pm 10:30 PM
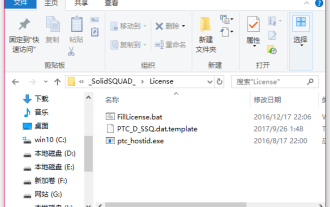
Many novice friends still don’t know how to install creo, so the editor below brings relevant tutorials on creo installation. Friends in need should take a look at it. I hope it can help you. 1. Open the downloaded installation package and find the License folder, as shown in the figure below: 2. Then copy it to the directory on the C drive, as shown in the figure below: 3. Double-click to enter and see if there is a license file, as shown below As shown in the picture: 4. Then copy the license file to this file, as shown in the following picture: 5. In the PROGRAMFILES file of the C drive, create a new PLC folder, as shown in the following picture: 6. Copy the license file as well Click in, as shown in the figure below: 7. Double-click the installation file of the main program. To install, check the box to install new software.
 How to Install and Run the Ubuntu Notes App on Ubuntu 24.04
Mar 22, 2024 pm 04:40 PM
How to Install and Run the Ubuntu Notes App on Ubuntu 24.04
Mar 22, 2024 pm 04:40 PM
While studying in high school, some students take very clear and accurate notes, taking more notes than others in the same class. For some, note-taking is a hobby, while for others, it is a necessity when they easily forget small information about anything important. Microsoft's NTFS application is particularly useful for students who wish to save important notes beyond regular lectures. In this article, we will describe the installation of Ubuntu applications on Ubuntu24. Updating the Ubuntu System Before installing the Ubuntu installer, on Ubuntu24 we need to ensure that the newly configured system has been updated. We can use the most famous "a" in Ubuntu system
 Detailed steps to install Go language on Win7 computer
Mar 27, 2024 pm 02:00 PM
Detailed steps to install Go language on Win7 computer
Mar 27, 2024 pm 02:00 PM
Detailed steps to install Go language on Win7 computer Go (also known as Golang) is an open source programming language developed by Google. It is simple, efficient and has excellent concurrency performance. It is suitable for the development of cloud services, network applications and back-end systems. . Installing the Go language on a Win7 computer allows you to quickly get started with the language and start writing Go programs. The following will introduce in detail the steps to install the Go language on a Win7 computer, and attach specific code examples. Step 1: Download the Go language installation package and visit the Go official website
